Beton-House.com
Website about concrete: construction, characteristics, design. We combine the experience of professionals and private craftsmen in one place
We are building a house
Fastening timber to concrete is a fairly common question that arises in the process of building a country house with your own hands.
The sequence of performing such work is not particularly difficult, but choosing the technologically correct fasteners for timber to concrete is a task that requires detailed consideration.
Fastening timber to concrete and brick walls
You should drill the brick carefully, strictly at a right angle, without “losing” the drill, so as not to split the brick. Splitting can cause the brick to fall off. if a brick gets into the cavity, you will have to use an anchor-type dowel, which, when screwed into the wall, forms a knot, or a spacer dowel. Tighten the dowel carefully. Mechanical anchors for fastening wooden beams to brick walls are much better than self-tapping screws and nails, both technologically and in terms of fastening strength.
For concrete, you need a drill with a hammer drill function and durable plastic dowels for self-tapping screws; sometimes, before driving a plastic dowel into the wall, it is additionally lubricated with glue.
Application
The design of the beam supports is simple: they combine the so-called “bed” and side petals.
The “bed” part secures the part to the horizontal beam. The internal dimensions must fully comply with the geometric dimensions of the timber. That is why labeling always focuses on such a moment. The connection is achieved using standard carpentry screws, and no specific structures are required for the job. Side-type petals ensure retention on the wall. The holes in the shelves are designed in such a way that it is possible to drive in not only ordinary self-tapping screws, but also “wood grouse” of increased power. A T-shaped joint is provided. The beam is attached with the end part to the crown, making sure that this is ensured on both sides of the joint line
Attention: an open support is obviously not suitable for a corner connection
Brackets:
- used even by individuals without special skills and training;
- make it possible to avoid inserting wooden blocks and using embedded parts;
- speed up the work many times over compared to the formation of a traditional log house;
- are divided into several universal sizes;
- allows you to do without drilling;
- absolutely resistant to corrosion processes;
- very reliable and stable under normal conditions.
Fastening to concrete
To attach joists to concrete, you will need to follow several mandatory steps. First, you need to mark and drill the fixation points; the diameter of the drill must exceed the size of the hardware head. During drilling, they are buried 5-10 cm, or reached to the middle of the beam. The nozzle is replaced with a drill, which is 1-2 mm smaller in size than the screw, and the joists are drilled through.
The next step is to place the tree in the right place, check the level, and correct it with a rubber layer. When using stacks of gaskets, the elements are fastened with glue and fasteners, placed again in the right place, and checked for level.
Alignment with pads
Now, you need to secure one side of the log and apply markings to the concrete through the drilled points. You can immediately insert the bolts into the holes, but do not tighten them yet.
The beam is moved aside and the concrete surface is drilled to the required depth. Drills are selected according to the type of fastening: for a dowel with a plug the diameter must be completely suitable, for studs and anchors - a couple of millimeters less.
All that remains is to put the block back in place and tighten it to the concrete using fasteners.
Sometimes, to create a level floor, it is necessary to lift the beams onto thick pads or sections of board. The first element is screwed with a dowel in the middle, several screws around the perimeter, the next layers are fixed on the previous ones.
Approximate depth of fasteners
They place a block and nail it. The position of the posts can be properly secured by installing metal plates that are screwed onto the sides of the elevations.
A clear example of how to attach a joist to a concrete wall can be seen in the following video:
The scope of application, if there is a need to secure a wooden beam to a brick wall, is quite extensive. Such a connection is necessary to achieve the following purposes:
Such actions are necessary when constructing an extension that will be connected to the house.
- installation of a wooden partition;
- installation in the entrance doorway;
- insulation of walls, when the sheathing made of timber serves as a frame;
- fastening together elements of furniture and interior decor;
- installation, when a rail with a canopy is installed above the front door;
- construction of any additional premises adjacent to the house.
Return to contents
Installing joists on a concrete base: to fasten or not
The logs are placed on a concrete base to lay plywood (other sheet material) or boards on top. Moreover, sometimes the timber must be rigidly attached to the concrete, and sometimes it is better to do without a rigid connection. It depends on what is under the concrete foundation.
If there are neighbors below, it is better to do without fasteners. Because the presence of a rigid connection will violate sound insulation. It’s not very good in multi-storey buildings anyway. Therefore, in high-rise buildings, vibration-damping rubber pads are placed under the joists. With their help, the logs are leveled and set to the required level. They are also laid between the ends of the beams and the walls. This way, your neighbors won't complain about you stomping too loudly.
Whether or not to attach the logs to the concrete floor of a high-rise building is up to everyone to decide for themselves.
If the joists are not secured, will the floor be reliable? Will. In the rooms, clamped with rubber gaskets, it is secured sufficiently. Any type of flooring—boards, plywood, OSB, or any other sheet material—will hold the entire structure together. Finally, he is loaded with furniture. This design has served for decades without any problems. There is just one point: the timber must be dry and chamber drying is better. That is, it will not lead during operation. When using damp wood, it is still better to secure it, since if the logs “lead”, the loose beam may rise.
To ensure that the timber does not move, you can make it composite. That is, take two or three boards, which in total give the required cross-section and connect them into a beam. They are connected with nails or self-tapping screws, which are driven in on both sides in a checkerboard pattern. When laying out the boards, you need to make sure that the annual rings of the wood are directed towards each other. A timber spliced in this way will definitely not move. This is also a real chance to save money, since three 50*25 mm boards will cost less than 50*75 mm timber. But it’s still better to buy a dry board.
In what cases are logs attached to a concrete base? Usually in private houses in which the floor is screeded. Most often, this is a rough screed on the ground, which is designed to cut off nearby groundwater. At a normal groundwater level, a screed on the ground as a basis for laying lags is simply unnecessary. In this case, it is much easier to simply lay down columns of stone or brick and support the logs on them.
Residents of the first floor can attach the logs to the concrete floor slab. Soundproofing in the basement is not necessary; no one will complain there. But this is absolutely not necessary. It is worth paying more attention to waterproofing and insulation.
Selecting mounting and fastening methods
The need to join the timber to the wall arises when installing ceiling slabs and beams, interior partitions and suspended ceilings, door and window frames. Wall-mounted furniture, bookshelves, cladding and design elements are attached to the bars. For large design loads, it is recommended to use a hard fastening method; to attach light structures, use a soft method.
The fastening method is chosen taking into account the load and material of the walls; the following types of timber fastening are distinguished:
- Sealing into grooves;
- Laying under support;
- Installation on brickwork;
- Dowel fastening;
- Use of metal supports.
Construction adhesive and polyurethane foam have become new fastening materials that have received high praise from professional builders.
Fastening a wooden beam to a brick wall
You can firmly fix the timber to the brickwork in the following ways:
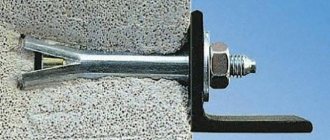
- Seal in the groove. This method is used to install load-bearing interfloor and ceiling joists. The ends of the beam are installed in special grooves up to 150 mm deep. Brick is a fragile material; it can crack when gouging out recesses; it is better to make the landing groove in advance when laying the walls. U-shaped frame anchors can be used to secure the joists. When installed on external walls, the ends of the beams are treated with sealant, and the free space is filled with insulation. The edges of the beams in the wall space are wrapped with roofing felt.
- Installation of supports. In this case, the timber serves as a support for laying the boards. The support is attached to screw anchors; the number of anchors depends on the diameter and design load. For example, for a beam with a cross-section of up to 50 mm, the distance between the anchors should be no more than 30-40 mm. The technology is used for laying floors and installing wooden ceilings in brick houses. The junction of the support with the external wall is laid with roofing felt.
- Installation on brickwork. In this way, the rafter mauerlat is fastened and the first - the tying crown of a two-story house, where the first floor is made of brick, and the second is planned to be made of timber. To securely install the mauerlat and the tying crown on the brickwork, embedded anchors are used.
Fastening timber to a concrete base
Concrete walls compare favorably with brickwork in their strength and resistance to cracking. To attach the timber to a concrete wall, use bracket supports, anchors or plastic dowel plugs. L-, Z- or U-shaped support brackets are easy to install and ensure reliable connection of the bars to the walls.
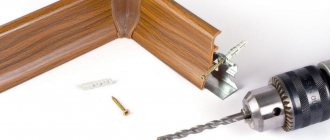
The basic rules for attaching timber to a wall with a dowel include:
- The anchoring depth should be 1.5 times greater than the part of the fastener that “sits” in the wood;
- A hole in concrete is made according to the diameter of a plastic dowel, a hole in solid wood is smaller than the diameter of a screw;
- The upper part of the screw should be without thread; such a “neck” allows you to pull the block to the base;
- The choice of fastener size depends on the design load, for example, an 8x150 dowel can withstand a shear load of up to 150 kg. If the design load is greater, install several dowels, dividing the design load by 150 kg to obtain the number of dowels.
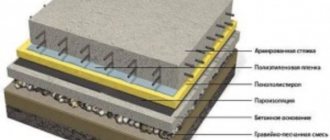
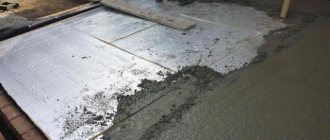
Foundation preparation
Before laying timber on the foundation, it is necessary to properly prepare the base surface
- Before laying timber on the foundation, it is necessary to properly prepare the surface of the base. Preparation includes, first of all, control over the horizontal plane and its alignment if necessary. Because if there are differences in height, the walls of the house will not be level. The plane of the foundation is monitored using a building level. If there are differences, it is necessary to mix the solution and apply it to the foundation until a perfectly flat plane is obtained. The solution is allowed to dry completely.
- If it is planned to install studs into the foundation at the stage of its construction, then after pouring the solution into the formwork, fasteners are embedded in the concrete in increments of 1.5-2 meters and to a depth equal to a third of the length of the hardware.
- The foundation for wooden walls must be carefully waterproofed. To do this, bitumen mastic is applied to the walls and the upper plane of the base, and then rolled roofing felt is laid. In this case, you should overlap the edges of the waterproofing material over each other and additionally coat the joints with mastic.
- Professional craftsmen also recommend using a backing board made of larch, which is laid under the lower crown of timber. Larch perfectly repels water and will serve as a reliable barrier against rot and mold for timber.
Important: the board must have perfectly smooth edges and thickness.
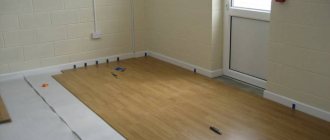
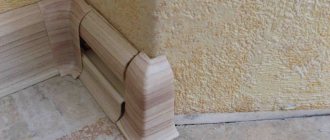
Fastening methods
The photo shows the installation of wooden slats for installing wall panels
Over the long history of construction work, a large number of methods for attaching wood to concrete have been tested. Among the current and widely used methods, we note the use of specialized assembly adhesives and the use of fastening hardware.
Let's look at the features of implementing these methods and find out which materials are optimal for carrying out such work.
Application of specialized adhesives
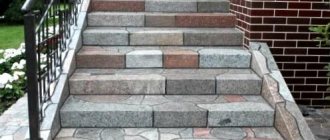
Installation of wood on concrete stairs
If reinforced concrete was cut with diamond wheels, and now you have to install wooden parts that are small in size and weight, you can use special assembly adhesives.
A properly selected adhesive composition allows you to reliably fix not only baguettes or baseboards, but also overlays on stair steps. However, you need to understand that the range of adhesive compositions is wide, and therefore you should count on the optimal result only if you select the right product.
If you need adhesive for concrete and wood, pay attention to the following compositions:
- Construction adhesive “Liquid Nails” is a relatively inexpensive and at the same time effective solution for working with materials of interest to us. “Liquid nails” are presented on the market in several modifications, namely, “Universal”, “Express”, “Super strong”, “Extra strong”, “For panels”, etc.
Assortment of glue “Liquid nails”
If the question is how to attach a wooden block to a concrete wall, the best choice would be a particularly vicious and universal modification.
The universal type of Liquid Nails adhesive is an excellent choice for interior use. For example, with this tool you can successfully glue wall panels made of lumber to pre-cleaned and dust-free concrete.
But if you are interested in how to glue wood to concrete at sub-zero temperatures, you will need “Liquid Nails,” which are especially strong with a gripping force of up to 70 kg per 1 m². This glue will hold the wood even on uneven concrete at temperatures down to -17°C.
- Moment glue is a wide range of different compositions with different technical and operational properties.
The photo shows the two-component composition “Epoxilin Duo”
Of particular interest is the “Epoxylin” modification, which is a two-component composition that works with a wide range of materials including concrete and wood.
After drying, the composition not only reliably holds the glued surfaces, but can also be sanded or subjected to other mechanical processing without compromising the adhesion strength.
Another modification of the Moment glue, through which concrete can be joined to wood, is the Joiner Moment. This product has found wide application in the process of laying floor coverings made using lumber.
Polyurethane foam is a good option for simple and effective gluing
The photo shows the use of polyurethane foam
If necessary, high-strength polyurethane foam can be used as glue. This is a good solution for laying wooden floors, installing window sills, wall panels, etc.
General principles
In general, they are not very difficult:
- When installing any wooden structures on a foundation, reliable waterproofing is required at the interface of two dissimilar materials. If the waterproofing of the foundation is damaged, concrete can provide capillary suction of groundwater; meanwhile, moisture is detrimental to wood;
Please note: different types of wood tolerate prolonged contact with moisture differently. That is why they try to make the lower trim of frame walls or the lower crowns of a log house from oak or larch - extremely resistant to rot and characterized by the highest mechanical strength.
- Where contact with water or moist air is expected, the wood is, if possible, protected from dampness by impregnation with drying oil or oil compounds;
- Antiseptic impregnation is mandatory for all wooden building structures. It will not only protect the wood from fungus, but will also repel woodworms and reduce the flammability of the timber.
Antiseptic for wood from the Neomid company.
The most reliable fastening is time-tested
When attaching a beam to a concrete wall, of course, the most reliable fastening will be fixation with an anchor.
Reliable fastening of wooden beams has been known since ancient times, when the concept of “quick installation” and “perforator” did not even exist, self-tapping screws and dowels had not yet been invented. A hole was made with a bolt in a wall made of bricks, blocks, or in a ceiling made of reinforced concrete. A large wooden rod was driven into the hole, lubricated with cement. A nail was driven into this rod through a wooden beam. Despite the fact that we now have a choice of various fasteners and elements, modern technology and equipment, this method of fastening, although rigid, is still widespread. It is appropriate to use this method for small loads on the beam.
A softer method is the use of U-shaped brackets for drywall profiles. The positive difference here is the short installation time. But the fastening does not have sufficient rigidity. If you hit a wooden beam with force, the bracket will bend and the surface of the structure will be damaged.
Installation of the crown on a pile foundation
If the base for the house is piled, then the fastening is done using U-shaped heads
If the base for the house is made of piles, then the fastening is carried out using U-shaped heads welded to the piles or screwed to the support pillars. The timber is laid on the mounted heads and secured through the sides of the plates with special bolts or studs with locknuts.
Important: The U-shaped plates must first be covered with waterproofing material. Otherwise, the wood will begin to deteriorate over time upon contact with metal.
Fastening Features
We will consider it as the house grows, starting with the foundation. After building the foundation, if you intend to build a log house, then you definitely need to think about fastening the casing and the first row of logs.
But the very first layer in this structure will always be a layer of waterproofing.
Why is waterproofing needed? The fact is that the foundation will come into contact with the ground and even possibly with groundwater. And water is the builder’s worst enemy. This so-called capillary moisture will be absorbed by the concrete and rise up to the walls of the building.
If you do not put a barrier in the form of two layers of roofing material, this will lead to very big problems. The wall will get wet and the humidity will destroy the material from which it is made, even brick or reinforced concrete.
Attaching the timber to the wall is done in different ways. In this case, the following parameters must be taken into account:
- wall material and decoration (aerated concrete, concrete, plastered, brick, plasterboard, etc.);
- beam section;
- the weight and scale of the structure that the beam must support.
These parameters determine which tools and fasteners need to be used to secure the beam to the wall. The following can be used as fastening elements:
- screws;
- nails;
- self-tapping screws;
- anchor bolts;
- metal and plastic dowels;
- U-shaped brackets;
- metal corner;
- wooden cotter pin.
Secure the timber to the concrete wall
Before attaching a beam to such a wall, it is worth assessing its dimensions, as well as the weight of the structure that it must support. If the beam is small and the structure is quite light, you can use technology using gypsum or alabaster mortar:
- a screw of the required diameter is tightly wrapped along its length with wire (it’s good if it’s copper);
- prepared holes in the wall must be filled with gypsum or alabaster mortar;
- quickly, without waiting for the solution to set, it is necessary to screw a screw wrapped in wire into the hole;
- after 10 minutes, when the solution has set but has not completely dried, carefully unscrew the screw;
- After the solution has dried, use this screw to secure the beam.
For more reliable fastening of powerful structures, this method is better suited:
- In the places of intended fastening it is necessary to drill holes (0.5-1 cm in diameter). To drill concrete walls, you need to use diamond-coated drills, carbide drills or pobedit drills.
Attention! To make quality holes, you need to cool the drill from time to time by immersing it in cold water for a few seconds.
- Pre-prepared wooden plugs of suitable diameter must be impregnated with glue. Do not use water-based glue, otherwise the cork will become deformed and swell.
- Drive the plugs into the drilled holes using a hammer.
- Wait until the glue is completely dry.
- The timber is attached to the wall using screws (they are screwed into the plugs).
To ensure that the fastening of the timber to the concrete wall is as strong and reliable as possible, it is better to use anchor bolts.
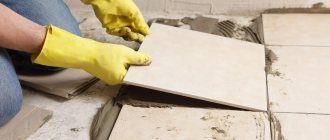
Fastening timber to a brick wall
Attaching timber to a brick wall has some peculiarities. Before attaching the timber, you need to make holes in the wall in the places where the fasteners should be located. Holes in a brick wall must be made with a drill or drill bit with a Pobedit, carbide or diamond-coated tip. In this case, it is not recommended to use a hammer drill, since brick is a rather fragile building material. It is important to take into account the unevenness of the brickwork, therefore, before attaching the timber to the brick wall, it is worth taking measurements and making preliminary markings.
Conclusion
As we found out, securing a wooden pole to a concrete base is really not difficult. The only thing is that it is necessary to strictly adhere to the above technology so that the support is not only securely fixed, but also protected from environmental influences. This will allow the structure to last for many years.
You can get additional useful information on this topic from the video in this article.
Fastening timber to concrete is a fairly common question that arises in the process of building a country house with your own hands.
The sequence of performing such work is not particularly difficult, but choosing the technologically correct fasteners for timber to concrete is a task that requires detailed consideration.
Description
They often try to use boards and beams based on timber in low-rise construction. In large houses, such elements are of an auxiliary, auxiliary nature. The main role of these products in private construction is the assembly of roof frames and rafter complexes. Often, completely wooden houses are also built, for which glued or profiled materials are used. In this case, the open beam support just helps to connect (attach) individual beam and rack parts to each other, increasing the strength of the building.
Structurally, this is a bracket with a profile or a paired corner. The minimum permissible thickness of the product is 0.2 cm. A complex system of holes is provided. Thanks to it, it is possible to fix on:
- bricks;
- concrete support;
- wooden beam crowns.
Related discussions
Advice and criticism of the project
Looking for a designer for a home in New Moscow
70455295). [Before and after: Transforming an old attic into a cozy relaxation area[(https://www.houzz.ru/statyi/do-i-posle-prevrashchenie-staroy-mansardy-v-uyutnuyu-zonu-otdyha-stsetivw-vs
72529559) All information and other examples of projects are on our website. You will find the site in the contacts of our profile. After communicating with you, we will create and send you a commercial offer. You can call us or write to us by mail. If our worldview is close to you and you liked our projects, we suggest organizing a meeting for a detailed discussion of the project, pricing and consultation on the object. A meeting is possible in our meeting room or in a place convenient for you. The meeting does not oblige you to anything and will be of an advisory nature. We are waiting for your request. Thank you for your attention. If you need it quickly, cheaply and how it works out, this is not for us. Our prices and terms are adequate to the result, the result is ideal for you.
Is it possible to turn a 42 m2 studio into a one-room apartment?