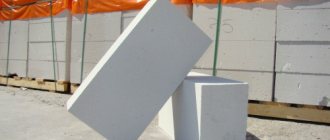
Paving “brick” panels are produced mainly by small concrete plants producing small-piece products or independently.
Since the competition in the market for manufacturers of paving slabs and paving stones is quite serious, in order for the products to be in demand, they must be of high quality. To do this, you must comply with all GOST requirements. Some manufacturers, trying to reduce the cost of products, violate rules and regulations, which is unacceptable.
The buyer, in order not to be deceived and not to get into an awkward situation, should at least superficially study GOST for the production of concrete tiles and know its main characteristics.
Everything you need to know about brick paving slabs
- Advantages and disadvantages
- Dimensions and weight
- Laying options
- Plain
- 2 or more colors
- Radius patterns
- Installation nuances
Brick paving slabs are very often used to decorate different areas. Thanks to its versatility, it can be installed in parking lots, courtyards, and parks.
Dimensions and installation details
Despite the name of the figured paving element and the external similarity with ordinary brick, the dimensions of paving slabs differ from it:
- standard dimensions – 20 x 10 cm, thickness 5 – 8 cm;
- non-standard size – height 7 cm, 18 x 8.8 cm, 21 x 7 cm or 24 x 16 cm.
Dimensions FEM Brick.
An additional element used in some Brick paving schemes is a Cube measuring 10 x 10 cm for standard FEM or 8.8 x 8.8 cm for non-standard products. On the long sides of the paving slabs there are 2 or 3 shaped protrusions to provide a seam; at the ends of the FEM there is only one protrusion.
Paving slabs Brick is one of the few shaped paving elements that allows it to be laid on winding and radial sections while maintaining longitudinal seams and patterns. It is enough just to change the shape of the seam from rectangular to wedge-shaped, but the layout diagram must first be drawn by hand or in a graphic editor.
There are options for laying Brick paving slabs of high originality, which can significantly improve the quality of exteriors and landscape design of the site.
Variety of paving schemes.
Popular layout schemes
Due to the standard length/width ratio of FEM, paving slab laying patterns are varied. Even when using a single-color Brick, paving elements can be placed along the path, diagonally to its longitudinal axis, or in the form of a decorative pattern in any individual area.
Plain
The most popular layout schemes for figured paving elements are the following types of brick:
- “Linear” - all the bricks are oriented with the long side in one direction (usually along the path), the seams coincide;
Brickwork styling.
Herringbone paving pattern.
Important! The general orientation of blocks, herringbone, brickwork and linear layout can be directed in any direction convenient for the master.
If you add Cube paving elements to FEM Brick, you can improve the quality of the exterior of the paving area, even when using tiles of the same color, as in the photo below.
Two or more colors
The “Checkerboard” layout scheme is the simplest option for increasing the originality of the paving surface if the landscaping budget allows you to buy tiles of several colors/textures. This is a standard block diagram with Bricks oriented in pairs, as in the bottom photo.
The main nuances of paving with multi-colored FEM elements are:
- in small areas - a small repeating pattern, ornament, pattern is usually used;
Important! Flat areas without elevation changes, path intersections and junction points are a rarity in suburban areas. Therefore, in order to qualitatively complete the drawing of the paving area, it is better to draw a sketch to scale or make a full-fledged project with the Brick order.
Combined scheme for a difficult area.
Radius patterns
By analogy with paving stones made of natural stone, Brick paving elements make it possible to cover radial and winding areas with high quality and with minimal labor costs using the following technology:
- sketch – created by hand (to scale) or in a program;
- contact layer - granite screening, sand or sealing compound (cement/sand in a ratio of 1:6) is applied and leveled over the entire area of the paving area;
- laying - from a smaller to a larger radius when placing concrete products with the long side along the path route, as in the bottom figure;
- compaction - after filling the seams with quartz or washed quarry sand, the tiles are compacted with an area vibrator.
If the bricks are oriented across the path, first the entire row of small radius is laid with displacement of the longitudinal joints in the form of a wedge, the size of which is selected experimentally locally.
Paving a radius section.
By analogy with the above technology, it is possible to lay Brick in a radius pattern on straight sections if they are large enough (Patio, Roman courtyard, intersection of several paths). Here it will not be possible to do without trimming concrete products, but the decorative value of the paving area will sharply increase, despite the presence of small-sized pieces.
Plot
Clinker brick was known in Russia more than a hundred years ago. Then it was borrowed from German builders and widely used for improving roads and decorating mansions. Then clinker was forgotten for a long time, and only recently regained its former popularity. Now it is used for paving a wide variety of road surfaces: garden paths, park alleys, sidewalks, parking lots, shopping areas, etc. – nothing better simply exists, as professionals say. This article will talk about laying paving bricks.
Content:
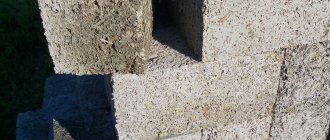
What is paving brick
Clinker bricks or paving stones are shaped products for paving paths, made on the basis of refractory clay and water. A special firing method gives such bricks very high performance characteristics, and in addition, a unique appearance. Thanks to various chemical compounds, it is possible to obtain unique, variegated colors of bricks in the same batch, which allows you to create exclusive, very beautiful landscape designs, no matter what area they will be used for - in the country house, in the garden, on the summer terrace of a restaurant or in a parking area near office building.
Paving brick photo
The main advantages of paving clinker bricks for road surfaces:
- wear resistance – this material is resistant to abrasion, damage, and heavy loads;
- frost resistance - does not crack or deform even at low temperatures and snowfalls;
- durability - if the laying technology is followed, paths and areas with such a coating will not change their original appearance even after ten years;
- resistance to chemicals;
- non-toxic.
Another big advantage is that paving bricks can be reused without losing their properties and qualities. It is easy to dismantle if the need arises, for example, to replace water or sewer pipes. And then lay it down again.
Clinker bricks may vary:
- by size - depending on the intended purpose;
- in shape - from classic rectangular to figured and even lattice;
- by color - from standard brick red to blue, yellow, purple, white, etc.;
- according to the texture of the top layer - smooth, matte, rough, like natural stone.
You can combine several different sizes, colors and textures on one area to create a unique ornament or design. Whatever brick you choose, you will always receive guaranteed quality, durability and impeccable appearance - provided that all recommendations for laying clinker are followed.
Laying paving bricks
To facilitate and speed up the paving process, it is strongly recommended that you first draw up a sketch taking into account all dimensions and patterns. Based on this, the amount of brick that will need to be purchased and related materials is calculated.
If paving work is carried out independently, you will also need the following tools:
- stone saw;
- level or rule;
- roulette;
- rubber hammer;
- construction cord;
- rake and shovel;
- wooden pegs for marking;
- work gloves and safety glasses.
Marking
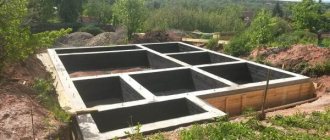
- Before starting work, you need to mark the area where the paving will be carried out. To do this, you should thoroughly clear the soil of grass, turf, fallen leaves, etc. Then, using a tape measure, wooden pegs and thread, mark it in accordance with the drawing. If installation is carried out only on paths, then it is convenient to use metal slats as side limiters.
- After this, you need to dig ditches or a hole for the foundation. You should focus on the level; if the depth of the foundation pit is the same everywhere, you can significantly save time and materials. The minimum depth of the hole for the foundation is 20-25 centimeters.
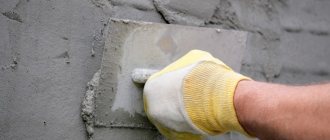
Preparing the base of the road surface
- This is one of the most important stages of masonry. If you prepare the “foundation” for paving bricks incorrectly or carelessly, the coating will not last long, especially if we are talking about places with high traffic and loads. Therefore, it is recommended not to save money and use only professional mixtures, the composition of which is adapted specifically for laying paving bricks. Additionally, special drainage solutions are used that effectively remove water and prevent moisture accumulation, which also affects the strength and durability of the brick road surface.
- There is another way to prepare the base for clinker bricks. You can build a “pillow” of gravel, crushed stone and sand. First, crushed stone is poured, leveled and compacted. Fine gravel is laid on top of it in the same way. At the end, a layer of sand is poured in and all three layers are filled with water. What does this give? When wet, sand and fine gravel will sink where there are gaps and uneven areas. After complete shrinkage occurs, all gaps and depressions will be visible. To level them, another layer of sand is poured, compacted and filled with water again. The process must be repeated until holes no longer form. This means that all cracks and voids are filled completely and with the required density. Such a base guarantees high-quality and durable support for clinker bricks.
Tip: For small areas, using a hand tamping machine is suitable. But if the site is impressive, it makes sense to work with an electric tool. If this is not available, you can rent it for a while at a hardware store.
- The thickness of the foundation for paving bricks depends on the degree of traffic in the area where it will be laid. The greater the load, the thicker the base should be. Then the coating will last for several decades without losing its excellent characteristics. The soil also has an effect. On sandy soil, a foundation should be laid with a thickness of at least 20 cm; for clay soil it can reach 40 cm. If the loads on the paved surface are large, you can compact the foundation using reinforcement, boards or pipes. They need to be laid between layers of gravel.
An important point: the thickness of the base should be constantly monitored; it should be equal in all areas. This is done using a rule and a cord plumb line. If the installation is designed for narrow paths, then instead of the rule, you can focus on the side rack stops.
Drainage system
- If a drainage solution was not used when laying the base under the paving clinker bricks, you will need to build a drainage system. This is done so that during rain water does not accumulate under the brick and destroy the coating. The height and angle of the gutters are calculated, as well as the direction in which the water will flow. Under no circumstances should water flow towards the building. In this case, the soil is subject to leaching, which leads to a gradual but irreversible subsidence of the foundation.
Preparation of clinker bricks
- If bricks of the same color, texture and size are used for paving, then no special preparation is required in this case. If you plan to create a variegated coating, then you need to mix 5-6 pallets of bricks of different shades in a tray or box, and then lay them out randomly.
- When laying out a thoughtful ornament or pattern, it is recommended to place bricks of different colors and shapes in different trays for ease of work.
- It should be remembered that even if intricate ornaments are not laid out, you still cannot do without trimming the bricks. This is done using a special stone-cutting saw. The bricks are pre-moistened. It is recommended to use gloves and a mask when working.
Features of laying paving bricks
- Clinker bricks are usually laid in two ways: end-to-end, with a gap of no more than 5 mm.
- The “butt joint” method is not very recommended, since it is difficult to avoid moisture getting between the bricks and to keep them immobile during the operation of the coating. In addition, if it becomes necessary to replace one, it will be difficult to remove it without damaging the adjacent ones.
- Laying should begin from the middle of the site towards the edge fences. This makes it much easier to follow all the markings and monitor the symmetry of the drawing. And in case of an error, it is much easier to correct it in a timely manner. During the process, it is very important to ensure that the bricks are laid at the same level. Since the installation of clinker brick covering of sidewalks and paths is carried out by pressing the bricks into the base, it will not be difficult to adjust the level.
Methods for laying paving bricks
- There are many ways to decoratively lay clinker bricks. The most common: herringbone dressing, parquet dressing, half-brick dressing, decorative dressing.
- You need to choose the type of dressing not only based on your own preferences and the possibility of implementing a particular pattern. It is also important to take into account the cross-country ability and load on the road surface. For example, herringbone is a universal dressing, but not every pattern can be designed this way. But the “parquet” dressing is not suitable for roadways and highways, only for sidewalks and alleys.
Filling the seams of paving slabs
- If installation is carried out with gaps, then at the end of the work all seams are covered with sand or rubbed with a special compound. First, the brick must be thoroughly cleaned, and only after that begin filling the seams. The sand is rubbed and compacted, after which the seams are filled again until a dense coating is obtained. It is not recommended to use cement for these purposes, as it affects the characteristics of clinker bricks.
- How well the seams are closed also affects the shrinkage of the coating, the passage of rain and melt water, and its durability. Therefore, there is no need to be lazy when performing the final work; the seams must be grouted immediately; this cannot be put off, as the strength of the coating will be impaired. For high-quality, dense compaction of seams, a special vibrator is used. It compacts sand well, but does not mechanically damage the surface of the brick.
- Upon completion of all work, the paved area should be given several days to settle. You cannot step on it at this time.
Mold for paving slabs brick
- If you really want to get stone paths in your dacha or around your own house, but you don’t have the time or money to buy paving bricks and lay them, there is a good alternative. Now special plastic molds are produced that allow you to make tiles for garden paths, terraces, verandas, alleys and other coverings with your own hands.
- All you need is to mix cement, sand, water and plasticizer in the proportions specified by the manufacturer. The solution is poured into a mold greased with emulsion (ordinary diesel fuel is excellent for plastic, cheap and cheerful) and leveled. You should wait until it dries completely. After this, you get relief patterned elements imitating natural stone or brick, which can be fashionably used for paving garden paths, gazebos, etc.
- What is the advantage of such forms for brick paving slabs: the finished product, at cost, is several times cheaper than an analogue manufactured using a production method. Thus, the price of paving bricks from European manufacturers varies from 800 rubles. up to 1500 rub./m2. You will have to pay for the matrix form once, but you can use it many times. If all specified proportions for preparing the solution are strictly observed, home-made paving slabs will not differ in quality from factory ones and will last up to ten years.
- By the way, with the help of this innovation in the field of construction, many have already opened their own small businesses and are successfully developing it. It doesn’t matter which option is chosen - high-quality clinker bricks from a well-known European manufacturer, or self-made paving slabs using a plastic stencil. It is always more important to comply with all technologies and competent application, otherwise even the most beautiful area will be damaged, and the coating will last a maximum of two years.
What's the best way to lay it down?
Modern manufacturers offer a range of paving slabs that gives scope for creative imagination. To solve various design problems, all possible installation schemes are used. Some patterns can be used either on their own or, if space allows, easily incorporated into another pattern. Even the most daring ideas can now be brought to life, which makes it possible to lay tiles in any garden area.
There are more than 40 types of tiles with this geometry. A variety of colors, textures, shapes and installation combinations allows you to create coatings with a 3-D effect (3D).
Once you become familiar with the principles of laying diamond-shaped elements, you can come up with your own paving options.
- Hexagons . To form patterns, use tiles of one or more colors. The visual effect is achieved through rhythmic repetitions of the selected pattern report and selection of tile colors. The laying pattern can be diagonal or straight. You may also be interested in the features of rubber coatings for paths in the garden.
- Flower (snowflake, star). Usually take three contrasting colors. The pattern can be laid out vertically and horizontally. Before installation, you need to mark the center of symmetry. This is especially true for paths up to 1.50 meters wide.
- Hex star . The pattern is repeated vertically, ideal for paths. You can use two or three colors of tiles. The pattern may consist of a central star with repeating elements or rhythmically repeating star modules.
"Wave"
Rectangles with wavy edges look good laid out in the form:
- horizontal or vertical “chess”;
- diagonals;
- brickwork.
These are universal tiles that can make any area attractive. It has an increased contact area on the sides. This helps create a uniform load over the entire surface.
Find out how to lay paving slabs on a concrete base here.
"Clover"
The unusual shape of this Clover tile allows you to create interesting coating options. It can be smooth or rough. Combinations of different colors, textures and sizes of tiles allow you to create aesthetically pleasing coatings.
Even a simple “chess” pattern with such tiles looks impressive. This type of tile is universal in its application.
Rectangular
The shape is used to create classic parquet and herringbone patterns. Square tiles are more suitable for checkerboard paving.
Read about how to make a birdhouse with your own hands here.
Brick (brick) or square shapes
Elements of the Brick shape have rounded edges and have proven themselves in such patterns as:
- linear laying without shift or with shift;
- spiral laying;
- modular installation.
How to lay Aurika tiles
The tile follows the texture of crushed stone, has a wide color palette and is available in three different sizes. Aurika slabs are quite large and allow you to quickly create paved areas.
A pattern of large and small squares can enliven even the most boring landscape. For installation, schemes such as:
- "chess";
- "random mixture";
- "Old city".
The technology for laying paving stones is described in detail in this material.
Preparatory work
The stage of preparing the soil surface with your own hands is important for the long-term operation of the sidewalk and access roads to the building.
A plot of land is marked out using pegs and a cord, then the soil is removed in a layer of up to 25 cm. It is necessary to clear the area in the space behind the cords by 2-3 cm (for installing borders).
The pit needs to be cleared of weeds and pebbles. If there is loose soil on the site, it is necessary to remove the fertile layer of soil, because This soil cannot be compacted.
The bottom of the area is leveled using a rake. Then you need to moisten the surface with water from a watering can or hose with a nozzle to prevent soil subsidence. On the leveled earthen base, work begins on creating a concrete screed.
In some cases, experts recommend waterproofing the area under the sidewalk (laying out several layers of roofing felt). The placed layer of geotextile prevents the growth of weeds and allows the coating to maintain its integrity for a long time.
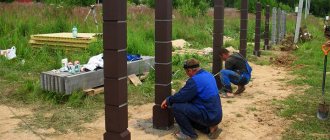
Paving nuances
Laying paving stones in the form of bricks has its own subtleties. Installation should begin from the lowest point of the site. The coverage area must be limited to storm drainage gutters or a curb, so these elements are installed first and securely fixed with cement mortar. Without these limiters, the integrity of the masonry may be compromised during operation.
If the coating will be subjected to heavy loads in the future, it is recommended to use geotextiles or dornite for the base. To reduce labor costs, you should lay the paving stones in front of you, while moving along the already formed surface.
When arranging a parking lot or parking lot, it is better to use tiles with a thickness of at least 6-8 cm, while for sidewalks products with a thickness of 4-5 cm are suitable. To increase the resistance of the tile to environmental factors, after the formation of the coating, it is recommended that it be treated with special hydrophobic compounds.
Other parameters:
• abrasion of the top layer – no more than 0.7–0.9 g/cm2, depending on the expected load;
• grade of concrete for compression – from B25 to B40:
• frost resistance – according to the project, but not lower than F200;
• water absorption – 5% for tiles made from heavy concrete mortar, and 6% for two-layer slabs made from fine-grained concrete. It depends on the weight of the product;
• reliability of concrete in compression – 32 MPa.
The most common colors are close to natural: red, brown, gray, yellow and grey.
Types and sizes of tiles
Paving slabs are distinguished by their decorative properties and high all-weather performance characteristics. Therefore, for paving paths and parking areas, the brick form is most often used.
Typically, the size of such a brick is approximately 20 cm by 10 cm with a width of about 7 cm. But different manufacturers may have an excellent pattern for pouring mortar, and accordingly, the size of the bricks in this case will vary by several centimeters in length, width or height.
In addition to rectangular bricks, the manufacturer may also have squarer insert tiles that are used to adjust the width of the path without additional tools.
Also, in construction stores you can purchase a ready-made pattern for making tiles in the form of bricks or other slab formats yourself. They also sell specialized coloring additives for the solution to make multi-colored inserts or lay out a pattern on the track.
Not all types of tiles can be used for winding areas or smooth turns. The shorter the length and the squarer the brick, the more convenient it will be for laying the path around sharp turns.
Preparatory work
Before you begin, you need to prepare your tools. To work with paving brick tiles, we will need:
- Rule (ruler for checking the correctness of masonry, plaster).
- Roulette.
- Building level.
- Rubber hammer.
- A grinder with a set of discs for working on stone (if you have to cut bricks to size).
- Crushed stone.
- Gardening tools: shovel, rake, etc.
- Pegs.
- Cord.
- Sand.
- Cement.
Don’t forget about safety precautions, especially when working with an angle grinder. So be sure to take gloves, safety glasses, and a dust mask when cutting tiles.
First, the area for the paths should be cleared of plants and other debris (leaves, branches), using gardening tools. Next, a plan is drawn and the work area is marked out.
Site preparation
The boundaries within which the coating will be installed are first marked using pegs with string stretched between them. You can also use slats to indicate the direction of the pattern or use ropes for this.
Next, a trench with a depth of at least 25 cm is formed. This is necessary to create a substrate for future paving. Don't forget to use a building level to make the trench more level, as this will make it easier to later form a base of crushed stone and sand. Also, this approach reduces both the consumption of materials and, accordingly, costs.
A curb stone is installed along the edges of the site or path, secured with cement mortar and then a cushion is made. The lining-pillow under the track is formed in layers:
- First, a layer of sand about 5-7 cm is poured.
- Then crushed stone, about 10 cm.
- And the next layer again consists of sand about 8 cm high.
Each layer is carefully compacted during installation. In the future, you should spill the substrate with water so that it shrinks slightly. After waiting for complete drying, pour out the last layer of a 3 cm mixture of cement and sand. Everything is compacted and leveled according to the rule. Next, you can begin laying out the pre-selected pattern.
Laying schemes
First of all, it should be noted that with proper preliminary work, laying the tiles will be easier and faster. Even a non-professional worker can cope with this.
Paving bricks, options for laying paving slabs and bricks should be considered from the simplest schemes, which are designed for a single-color material. Basically, all diagrams are drawn up and worked out by professionals, so finding schematic graphic drawings is not difficult.
However, if you want to make an individual pattern, you can always create an independent diagram using a pencil, or using special programs for this.
Types of installation
Conventionally, all existing installation options can be divided into three categories:
- Plain. This includes an option such as “Linear”. This is the easiest installation method. In this case, the long side of the bricks is oriented along the direction of the path and the seams coincide with the previous line. This method requires careful attention to the initial stage. That is, it will be necessary to install the curbs correctly and firmly in order to maintain the integrity of the masonry during further use. Another method is “Brickwork”. It is usually created with a line offset by half a brick. With proper calculation and installation, there is no excess material left when cutting the slabs. This also includes “Christmas tree pattern”. Quite a simple and beautiful way of installation. In this case, each tile is laid at right angles to the previous one. This type of installation can be oriented in any direction.
- Two colors or more. The types of paving with a single-color version are also applicable with multi-colored tiles. For example, “Chess drawing”. This option should be laid out in two tiles of the same color. The first two are laid vertically, then, perpendicular to them (at right angles), two tiles of a different color are laid horizontally. The pattern involves laying two tiles of the same color vertically. Next, one tile is laid side by side perpendicularly and horizontally of a different color, and two tiles of the first color are again installed vertically on top. Thus, a row of offset tiles is formed. You can change the direction of the drawing.
- Radial pattern layouts are the most labor-intensive, and the consumption of materials also increases. Before laying out round, semicircular and winding patterns, it is imperative to make a plan and drawing of the future path, as well as calculate the amount of material required, allowing for an increase in the purchasing base if necessary.
Nuances
Paving bricks and options for laying paving slabs and bricks when paving have their own subtleties that must be taken into account. You should start from one edge of the path, moving to its other end along the already laid tiles.
Pay special attention to curb stones or storm drains, which will further keep the stones from spreading. For greater reliability and better operation, the laid out coating should be treated with hydrophobic specialized products.
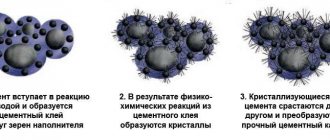
Preparation method
Paving slabs are a practical finishing material. Figured paving elements (FEM) are produced at enterprises using vibration casting or pressing. Manufacturing technology using vibration casting ensures high quality products and a smooth surface.
This method allows the use of special additives that improve the quality of the finished product. The use of mineral powder pigments provides a variety of color solutions.
The technology for manufacturing paving slabs involves preparing the concrete mixture and compacting it in molds on a vibrating table.
To do this, the forms need to be laid out on the work surface as closely as possible to each other. Colored concrete is laid out at the bottom in a layer of 1-2 cm (if dye is used). After this, the vibrator is turned on for 5-10 seconds to ensure even distribution.
The vibration amplitude of the tabletop should be moderate so that the concrete compacts under its own weight. When making paving bricks without using pigment, the mold is filled to the brim and compacted on a vibrating table. Excess concrete is cut off with a metal corner.
If the filling is insufficient, you need to add concrete mixture. The filled forms are placed on pallets and covered with film to prevent intense evaporation of water. Before removing the finished product, the mold is heated in a water bath, and the tiles are dried for 48 hours. After use, the molds are washed in an aqueous solution of hydrochloric acid with a concentration of 5-7%.
Varieties and advantages
Paving stones or paving slabs “Brick” have high frost resistance and are designed for 200 cycles. The surface laid with FEM of this type is easy to maintain and resistant to stress. High-quality paving elements are suitable for arranging paths, entrances, alleys and other areas. Paving slabs have an affordable price. The main advantages include:
- possibility of laying various compositions;
- wide color spectrum;
- Possibility of installation on any base;
- resistance to ultraviolet rays;
- ease of cleaning.
Methods for grouting paving slabs
When carrying out routine repairs, it is enough to replace the damaged fragment on the surface of the canvas. Figured paving elements of this type are presented in various varieties. The distinctive features are the color scheme and external parameters. The common size of rectangular products is 20x10 cm.
The construction market is represented by products with dimensions of 7x21 cm, 16x24 cm. Due to the fact that the aspect ratio of 1:2 allows you to lay out Greek ornaments, patterns, products with other parameters are rarely used.
Tile sizes
brick dimensions geometric brick dimensions
Paving stones are made in sizes 200x100 mm and heights of 40, 60, 80 mm. The load on the product depends on the thickness. For example, tiles with a thickness of 4 cm are designed for laying on pedestrian paths, and with a height of 6 cm, paving is possible in an area intended for parking a car. The 8 cm thick brick has high strength and can withstand the mechanical impact of freight transport. Paving slabs, which in appearance resemble clinker bricks, are distinguished by high mechanical properties and a wear-resistant surface.
The rectangular shape emphasizes the restraint of the design of the surrounding area. FEM "Brick" is often used for paving the roadway.
Laying methods
geometric pattern brick laying
laying bricks figured pattern gray-red color combination of bricks tiled path brick laying bricks tri-color pattern
Tiles of this type allow you to refine the exterior and get rid of dirt during rainy periods or melting snow. FEM “Brick” is distinguished by a variety of colors, which allows you to lay out patterns, mosaics, ornaments, and geometric designs on the paving surface. The herringbone layout is especially popular. This scheme is achieved by placing elements at right angles or 45°. When laying products, you can combine fragments of different colors, creating chaotic patterns. Rectangular tiles can be laid out in the form of weaving, which consists of alternating longitudinal and transverse arrangement of fragments. This type of tile is used to lay out ornaments.
“Brick” products can be arranged in pairs in a checkerboard pattern, using fragments of 2 colors. Restrictive structures are laid with paving stones. To do this, the elements are placed on edge.
Stone-like paving slabs
Paving nuances
It is recommended to start paving products with preparing the base. To do this, it is necessary to compact the subgrade to a state of stability, paying special attention to the organization of the drainage system. In case of high groundwater levels, the use of geosynthetic materials is required.
A load-bearing layer is not laid on sandy soil. The transverse slope of the base must correspond to the location of the outer covering. Sand and fine crushed stone are used as underlying material.
In areas designed for high loads, cement or lime is used as a binder layer to give strength to the base.
When laying “Brick” tiles under canopies or surfaces protected from precipitation, a dry mixture is used. The joints between the tiles are filled with sand. All elements must be laid exactly in height, taking into account the angle of inclination and direction of the route.
To ensure that the seams are evenly positioned, the cord is pulled in the longitudinal direction. When laying on a large area, 2 control lines are placed and right angles are measured every 1-3 meters.
A curb stone is used as a boundary fence, which preserves the integrity of the canvas. Established standards allow an unevenness of 1 cm within 4 m of masonry. To ensure high-quality installation, the use of special equipment is required. FEM compaction is carried out using a vibration device.
After laying, the working surface is sprinkled with sand and left until the joints are filled. When paving pavements along which traffic moves with “Brick” paving stones, the seams must have a stable filling. The use of a durable material is necessary to evenly distribute the shear forces created by the wheel load.
Self-paving paving requires the preparation of tools, materials and equipment. When choosing a location for installation, you need to decide on water flow.
On the marked area, the turf layer is removed and a cushion of crushed stone and sand is installed. FEMs are laid away from themselves in a diagonal direction.
Unevenness of the base is adjusted with sand, which, if necessary, is removed or poured under the masonry elements.
How to lay geotextiles under paving slabs? Manufacturing method and types of brick paving slabs Link to main publication
Layout schemes
To ensure highly original paths, the home craftsman will not have to contact a designer. Schemes for laying out paving stones already have sufficient operating experience and are used in different climatic zones. For example, for the classic “brick” in the bottom photo there are 8 patterns, 6 ways to design a sidewalk edge and one diagram of a radius section.
Options for brick tiles.
Important! Unusual patterns and original paving methods dramatically increase the waste of tile cutting and, accordingly, the budget for finishing work.
This condition is especially relevant for winding paths, which can easily hide defects in the geometry and topography of the courtyard area. Therefore, you have to sacrifice either money and get a high-quality design, or the aesthetics of the perception of pedestrian and parking areas, but save the developer’s money when purchasing paving stones.
With minimal skills and the presence of a graphic editor on a computer, you can make a scale design of a paving area in the program and “lay out” virtually paving stones of the desired format on it to reduce cutting waste.
Layout of tiles in a graphic editor.
Using colorful tiles
The easiest way to ensure the originality of the sidewalk is with paving stones of different colors, laying them in geometric shapes, stripes of the same or different widths.
Clover stripes of different widths.
Some tile modifications allow the use of 3 or more colors, for example, “Old Town” and “rhombus”.
Multi-color tiles of one format.
Combined options
If you combine several patterns, patterns and patterns of paving stones, the aesthetics of perception increases many times over. The main nuances of combined technologies are:
- if the tile has a curved shape, it is possible to shift the seams and experiment with colors;
With clover you can “draw” stripes in any direction.
- for paving stones of the correct geometric dimensions, any options are possible;
- paving stones of the same format can change direction at curbs, on winding sections, and at intersections;
Paving stones instead of curbs.
- the wider the path (larger the size of the recreation area, parking), the more appropriate large drawings are on it;
- Do not forget about the storm drainage elements integrated inside the bridge (troughs and storm water inlets), since at the nodes adjacent to them the ornament/pattern will inevitably be crumpled and interrupted, which will reduce its artistic value;
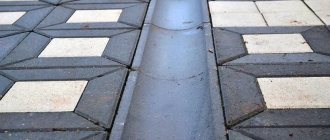
- but if you start paving from the storm drain, you can separate this element into a separate design solution, as in the photo;
Decorating a rainwater inlet with paving slabs.
Thus, combined technologies outperform previous schemes and paving options in terms of aesthetics.
We recommend: Laying paving slabs without a curb.