Today, various technologies can be used to install support structures for flooring. There is a wide range of fasteners for this purpose. Let's consider what kind of fastening of the joists to the concrete floor should be chosen, taking into account the operating conditions. Let's get acquainted with the recommendations of craftsmen on the choice of lumber, possible problems and how they can be prevented during the construction stage.
Example of adjustable floor fasteners Source saucyintruder.org
Briefly about lags
Logs are transverse or longitudinal beams laid on concrete. Floorboards are attached to them, resulting in a floor that is level on a horizontal plane, which can differ only in the way the beams are fixed.
Laying joists on a concrete floor allows you to:
- create a flat surface for a wooden floor.
- transfer the load evenly to the load-bearing elements of the building (walls or foundation).
- leave a void between the base and the floor covering. Thanks to this, it is possible to well insulate the floor, protect the room from noise and lay various communications in the floor.
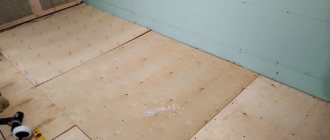
Installation on plywood base
Laying a wooden floor on a concrete screed can be done using moisture-resistant plywood, the thickness of which ranges from 12 to 18 mm. How it's done?
- Plywood is cut into squares 40x40 or 80x80 cm.
- Plywood sheets undergo rough sanding.
- The sheets are spread at intervals of 4 mm diagonally towards the future wooden floor. First, the plywood is fixed with glue, and then with dowels. It is necessary to retreat 10 mm from the wall. Laying plywood sheets is similar to laying bricks. The screw heads are recessed by 3-4 mm.
- The surface is cleaned of dust and dirt.
- The floorboards are attached with self-tapping screws to the plywood.
Laying wooden floors on a concrete screed is not difficult. If the installation technology is followed, such floors will last for many years and will provide warmth and a comfortable microclimate in the house.
Dear reader, leave your opinion on the article in the comments and share your secrets of installing wooden floors.
What material is used for joists?
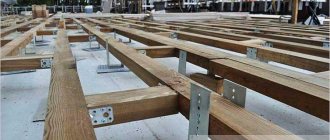
Logs are made from a variety of materials (reinforced concrete, iron, plastic), but the most popular of them for many centuries has been wood. Iron channels and reinforced concrete elements are rarely used. High-strength logs can significantly increase the load-bearing capacity of the floor. More often, such elements are installed in industrial buildings. Wooden logs are the most common, so you need to disassemble them in detail.
They come in the form:
- square or rectangular beams;
- stacked and tied boards;
- adjustable lags.
What should the cross section of the log be?
The strength of this part of the floor depends on the material of manufacture and the accuracy of load calculations. When choosing the size of the timber, the maximum permissible load on the floor is taken as a basis. For living rooms, this figure is 300 kg per 1 m2. For non-residential premises it is individual in each specific case, so before purchasing the material you need to calculate this indicator.
Basically, timber with a profile aspect ratio of 1.5 x 2 is laid under the floorboard.
The height of the beams must also be selected taking into account the thickness of the insulation. If iron and concrete elements are installed, their cross-section may be smaller. This is due to the fact that these materials are able to withstand high loads for a long time.
Floor subfloor options
These types of floors can be installed on a wooden or concrete base or on the ground. Each option has its own technological features, which must be kept in mind during work. As for the specific purpose of the premises, taking this parameter into account, the base of the floor and its operational characteristics are selected. The technology of the device itself remains almost unchanged. There are, of course, options for warm and cold floors, but these features also have a common construction algorithm.
Step width between joists
The pitch between the joists is selected taking into account the thickness of the floorboard. The thicker it is, the larger the step between the bars is allowed. In addition, a thick board sag less under loads.
The table below allows you to quickly select the distances between the bars.
You can also resort to the following rule: when the width of the logs increases by 5 mm, their pitch increases by 10 cm.
When installing plywood, the cross-section of the joist is calculated differently. This is due to the fact that it has great bending strength. With a thickness of sheet material of 1.5-1.8 cm, it is fashionable to place logs against each other at a distance of up to 40 cm. It is necessary to install the beams so that the sheets are fixed at the edges and in the middle. Moreover, the edges of the sheets should fit half the width of the beam.
Professional advice on choosing lags
Coniferous wood should be used for logs.
Larch logs
If possible, materials should be impregnated with antiseptics. These are very effective means for protecting wood not only from fungi, but also from many pests.
wood antiseptic
Antiseptic for wood
Antiseptic
Always select joists with a safety margin, especially in cases where the installation method involves bending loads. It must be remembered that correcting mistakes made during the construction of flooring always costs much more than carrying out the work with high-quality materials and in compliance with recommended technologies.
Logs from boards
Choose your joist boards carefully. They must be absolutely healthy without signs of rot. The presence of through cracks and rotten knots is completely prohibited. If there are large healthy through knots, then you need to install the joists in such a way that there is a stop under them.
When attaching the logs, do not allow the possibility of wobbling.
Fix the joists firmly
Most loose joists cause very unpleasant squeaks in the flooring while walking. To eliminate such phenomena, you will have to remove floor coverings; this is time-consuming and expensive; it is not always possible to keep the dismantled materials in a condition suitable for reuse.
Tools
To install the beams, the following tools are required:
- electric drill or hammer drill;
- screwdrivers or screwdriver;
- electric circular saw or simple hacksaw for wood;
- plane;
- hammer;
- tape measure and level;
- fasteners.
Other tools may be required.
Base made of concrete and reinforced concrete (laying on an uneven base)
Before installing the logs, the uneven concrete floor is leveled with a cement screed. This technology allows you to make a smooth and reliable base for parquet, laminate or floor tiles, as well as well insulate the floor and protect the room from external noise.
For most floor coverings, a spacing between joists of 60 cm is suitable, but floor tiles require cells measuring 30x30 cm because they are very fragile.
Reinforcing mesh in the screed and spacers between the beams increase the rigidity of the floor. Thermal insulation material can be placed in the resulting cells.
Sequence of work
The first step is to assess the condition of the screed, if there is one, and prepare the base. If the screed is in normal condition, you can leave it, but if it is cracked or detached from the base, it is better to remove it.
The floor slab should be thoroughly swept or vacuumed with an industrial vacuum cleaner.
Some craftsmen level the base with a self-leveling floor mortar to make it easier to level the joists in the future. In this case, you must wait until the mortar mixture dries completely, otherwise the logs may begin to rot. The drying time is usually indicated on the packaging.
Next, the base is treated with a deep penetration primer, which will prevent the appearance of dust in the future. Waterproofing is performed to protect against moisture penetration into the insulation. For waterproofing, you can use thick polyethylene film, a special moisture-proof membrane or waterproofing mastic.
Fixation methods
Basically, four fastening methods are used to fix joists on a concrete floor. Therefore, if you do not know how to attach joists to a concrete floor, then after studying all these methods you will understand this issue.
Fixation with self-tapping screws
This method is considered simple, but it is not suitable for all cases.
- First you need to prepare the concrete surface. To do this, it is cleared of debris (it is allowed to use a vacuum cleaner). Then they repair cracks, chips and other defects with cement mortar or polyurethane foam.
- Next, in the logs (treated with antiseptics) you need to drill holes with a drill to install plastic dowels. Then you need to drill counter holes in the concrete using a hammer drill.
- Then the dowels are driven into the concrete with hammer blows, and then self-tapping screws are screwed into them with a screwdriver. Moreover, the head of the screw is driven into the hole 2-3 cm.
Fixation with anchors
Anchors securely fix the beams to the concrete, so this method is the most reliable. In addition, such fasteners help to restrain the deformation of wooden logs if they are not dried well. But the boards laid on them can sag, so it is necessary to install spacers more often.
- First, you also need to prepare the concrete floor (remove debris from it and repair all defects with mortar).
- After which it is necessary to make through holes in the timber (treated with antiseptics) with an electric drill.
- Next, you need to drill holes in the concrete opposite each hole with a hammer drill.
- Then the anchors are mounted on a concrete base and tightened with keys. The main thing here is not to overtighten the bolt, because this will cause the beam to bend. This is especially true for those places where there is a gap.
Before installing the anchors, trenches (small recesses) are made in the joists to hide the bolt heads.
Anchors need to be installed every 600-1000 mm. This distance is selected taking into account the partial immersion of the anchors in concrete (approximately 60 mm). Many people fix the beams to the concrete with 4-5 anchors ⌀ 10 mm.
Attaching joists to the floor: pros and cons
According to opponents of fastening, these actions can destroy the screed, and where the beams and the base are connected, sound insulation is broken and sound bridges are formed, which the neighbors below will not be happy about. And those who believe that fixation is necessary share their experience: all the work done to repair the floor was in vain due to deformation of the joists.
Is everything really as they say? Regarding the destruction of the screed, if the screed is quite strong, then you will not be able to break it with a drill when drilling a hole. And floor repairs can only be done if there is a solid foundation. If the old screed begins to collapse, then it must be removed.
The problem of violation of sound insulation remains controversial. Rigid structures can actually transmit sound. However, insulating material is placed in the space between the joists, which has soundproofing characteristics. A gasket with shock-absorbing properties is placed under the joists, which also prevents the spread of sound.
The sound bridge, which is formed at the attachment point, transmits vibrations to concrete, which is a fairly dense material and, unlike wood, does not conduct sound well. Consequently, neighbors below will not notice changes in noise levels before and after repairs.
The floor on the joists is constructed from beams, fasteners, and rough flooring. When all components are displaced relative to each other, a creak occurs, which is unlikely to please the neighbors. You can prevent the appearance of unpleasant sound by firmly securing the joists to the floor.
Another argument in favor of fastening is the fixation of the lag. When it comes to the degree of drying of the wood, buyers are forced to trust the seller’s words, since it is impossible to find out by simple inspection. Over time, poorly dried beams may warp, eventually the coating will move, and the entire complex structure of the floor will be warped.
For those who are wary of attaching logs to a concrete base, you can organize a floating floor. In this case, the flooring is not attached to the supporting structures. This will provide excellent sound insulation, but it is necessary to use well-dried joists. They won't warp over time.
The beams are fastened to each other in such a way as to form a lattice. This design will make the floating floor more stable. Insulation is laid in the gap between the beams, and a subfloor is built on top. As a result, the entire structure is pressed to the floor under its own weight. Over time, such a floor will not change its shape and will serve for a long time.
In most cases, the installation of logs on a concrete base is carried out with their fastening to the floor, since there are many more arguments in favor of this than the possible disadvantages.
Fixation with iron corners
It is difficult to work with high logs (100 mm and above), so they are fixed to the concrete with iron corners. One shelf is attached to the beams with self-tapping screws, and the other is fixed to the concrete with dowels and nails. The main thing is that the entire load goes to the spacers, and not to the corners, since their main function is to fix the position of the beam.
- First, screw the corner to the joists with self-tapping screws, which need to be deepened into the wood by 3 cm.
- Next, it should be fixed in concrete with dowels.
Adjustable joists
This fastening of the joists to the concrete floor involves the installation of rectangular supports under the beams, which are secured to the base with the help of four dowels. In the center of this fastener there is a pin that secures the joist to the concrete. The nuts placed under the beams allow you to accurately set the height of the logs, and the nuts located on top allow you to reliably fix their position. The pitch of supports installed under the beams depends on the size of the profile of the beams, but experts advise not to make it longer than 1 m. This type of floor sheathing fastening is not in demand due to its high cost.
Fixation to concrete pillars
This method involves fixing beams to concrete pillars, using similar fasteners, but designed specifically for pillars.
- The pillars must be covered in advance with a waterproofing layer (bitumen or mastic is used). Their upper part can be protected from moisture with roofing felt. You need to pre-drill holes in the posts and beams.
- Next, you need to drive dowels or anchor spacers into them.
- Then the beam is attached to the post with self-tapping screws 2-3 times longer than the width of the spacer.
- The timber is attached to the posts using iron plates with screws. They are fixed to the posts with dowels-nails, and to the beams with screws.
Thanks to the study of all these fastening methods, the question of how to install joists on a concrete floor disappears by itself.
Self-tapping screws
Fastening with self-tapping screws is the most economical method. Self-tapping screws should be galvanized, with a diameter of at least 4.2 mm, and a length equal to the thickness of the logs plus 50-60 mm.
Through holes are drilled into the logs with a certain pitch, usually 500-600 mm, countersunk to hide the heads of the screws, the logs are laid out around the room, holes in the ceiling are drilled through the holes with a hammer drill to a depth of 60-80 mm, dowels are inserted into the holes and through the logs screws are tightened.
If necessary, spacers are placed under the beams for leveling. It is important to place the pads in the fastening areas.
Installation process and features
Properly selected building materials are the key to successful floor installation. Logs are mainly made from wood of various species, with a moisture content of no more than 18%. After purchasing the bars, you need to let them acclimatize to room temperature for several days. The logs bent during this time are rejected. Before laying, they are treated with an antiseptic composition to prevent mold and pests from appearing on them.
- Preparing the concrete base. It is cleared of debris, cracks are sealed and irregularities are removed.
- The tree must be protected from moisture. Therefore, the beams are covered with rolled waterproofing materials, mastics and treated with impregnating compounds.
- It is necessary to prepare all the fasteners and substrates required for installation of the joists on the concrete floor. They must have high rigidity so that they do not sag under loads and gaps do not appear between the joists and the base. Thin boards, plywood and plastic substrates, which are sold in specialized stores, are suitable for this. They are slipped under the joists and securely fixed.
- The logs must be placed across the light coming from the windows. Wood often becomes deformed due to temperature changes, but thanks to this installation it heats up evenly. In rooms without windows, the bars must be placed across the direction of movement.
- The pitch of the beams is selected based on the thickness of the floorboard. In this case, the rule is used: the thicker the board, the larger the step between the lags can be chosen. On average, it varies in the range of 40-50 cm. The logs located near the walls are installed 20-30 mm from the wall, and the rest, taking into account the dimensions of the room.
- After assembling the grating under the floor, it must be accurately installed horizontally. The support for the floor must be perfectly level, so many experts level the floor with a screed if the height of the room is sufficient for this. The underlay for the joists also allows you to level the floor.
- For good shock absorption and increased protection from moisture, logs are placed on roofing felt and other similar materials. These materials should not be soft, because they will sag under the influence of loads, which will lead to the formation of gaps. As a result, the floor will creak while walking.
Laying logs on the ground
The method is used for outbuildings, bathhouses, gazebos, verandas, etc. The wood must be treated with antiseptics. It is better to have a columnar foundation; if you want to make a more durable strip foundation, then it is necessary to provide vents for natural ventilation in advance.
Floor on joists on the ground
How is this floor made?
Step 1. Remove the topsoil. You can use it to fill the beds or level the area in front of the house.
Removing a layer of soil
Step 2 . Mark the columns. The distance between them is selected taking into account the load and size of the logs. The posts can be made of concrete, block or prefabricated. The dimensions of the supports are approximately 40x40 cm, the burial depth is within 30 cm. A layer of sand ≈ 10 cm thick should be poured onto the bottom and compacted.
Step 3. Fill the supports with concrete. To prepare concrete, you should use two parts crushed stone and three parts sand for one part of cement. Water is added as needed. There is no need to make formwork in the ground; formwork from boards or OSB scraps is installed above the ground level. During the manufacture of formwork, you need to use a level; all edges must be strictly vertical.
Wooden floor base
Ready-made concrete pillars
Practical advice. It is much easier to make columns from ready-made blocks. Horizontal alignment must be done along the rope. After the outer ones are aligned with the hydraulic level, a rope is pulled between them. Deviations should not exceed ± 1 cm. This variation is eliminated during installation of the log.
Installation of blocks under logs
Laying columns under plank floor joists, diagram
Step 4. Start fixing the lags; you should also start work from the outermost ones. For precise horizontal alignment, you can use shims. It is not advisable to take wedges made of wood; over time, they will dry out and wobble will appear: the floor will begin to creak unpleasantly when walking. Between wooden structures and concrete surfaces, it is imperative to place two layers of roofing material for reliable waterproofing.
Joists laid on supports
Step 5. After the outermost logs are laid, a rope is stretched between them and all the remaining ones are laid under it. The logs are fixed with metal squares on dowels and screws. To increase stability, it is recommended to install them on both sides. Floor boards can be laid directly on the joists or a subfloor can be laid first. The final choice depends on the characteristics of the operation and purpose of the room.
Wooden floor on joists
Joists laid on blocks and waterproofing
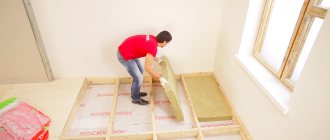
Insulation and sound insulation
Soundproofing and insulating floors on beams is quite simple. For example, you can cut TECHNONICOL into strips and lay it between the beams. In this case, the self-adhesive side section that overlaps the beam must be rolled with a roller. For additional insulation of the floor, you can place mineral wool on top of the TECHNONICOL. This sound insulation allows you to protect your living space from noisy neighbors downstairs.
The height should not exceed the bars. In those places where it is higher than the log, its thickness must be reduced. To do this, the cotton wool needs to be cut lengthwise with a knife. If the result is rags, this will not affect the properties of the material.
Further floor arrangement
Further installation of the floor along the joists involves two more stages of work.
The first stage is laying the finished floor
After installing the logs, thermal insulation, waterproofing and sound insulation, the finished floor is laid. They begin to lay it from the corner of the room. The first row of boards is placed tongue-and-groove against the wall, with a gap of 10 mm between the wall and the boards. This will compensate for the deformation of wood that appears from temperature changes and changes in humidity levels.
The next row is placed offset to the previous one by approximately 2 lags. To lay the boards tightly, apply a piece of wood to the ends of the board being attached and hit it with a hammer.
The boards are fastened to the joists with screws, the heads of which are driven into the boards.
After laying the boards, the expansion joints are covered with plinths.
Expert advice:
- lay the floor on a concrete base after leveling all the joists along the horizontal plane;
- boards must be attached to all beams;
- their size is chosen so that the joints between them are in the middle of the lag.
- To prevent them from cracking, it is necessary to make small-diameter holes in them for self-tapping screws. For the screw head it is necessary to make a countersunk hole, for drilling which you need to use a drill of a larger diameter.
- Instead of a plinth, you can install profiled strips - fillets.
- holes for pipes need to be made 8-10 mm larger.
To increase the accuracy of installation, experts advise that before fastening the boards, tighten them together with the staples of a construction stapler.
The second stage is the final finishing of the floor
This is the most critical stage of work on arranging a floor on a concrete base on joists. The appearance of the floor and room depends on the choice of finishing material. Listed below are the main types of final floor finishing.
Parquet
Parquet consists of solid wooden planks from which the floor covering is laid. It makes the floor very attractive. This flooring has a long service life - more than 30 years. In addition, part of the parquet can be replaced at any time.
Laying parquet requires a lot of experience, so it is difficult for an ordinary person to lay it falsely, since the technology for laying parquet is complex and labor-intensive. In addition, this coating is expensive. During operation, parquet requires careful handling, as it is scratched and afraid of moisture. To keep this floor always beautiful, it must be regularly polished and varnished.
Linoleum
This floor finish is very popular today. This is due to the low cost, practicality and ease of installation of this flooring material. You can lay linoleum indoors yourself, because this does not require special knowledge and skills. A floor covered with linoleum is resistant to moisture and aggressive liquids, while it looks beautiful.
Linoleum is easy to clean and sweep. Thanks to the wide variety of textures and colors, it can be matched to almost any color of furniture and wallpaper.
Linoleum can be laid on top of boards, plywood or concrete. Thick linoleum with a base of more than 3 mm can hide small unevenness in the floor and seams of sheet materials.
The disadvantage of linoleum is its low maintainability. If a hole appears on it, then it will not be possible to seal it and make this place invisible.
Laminate
This flooring is quite expensive. In appearance and performance characteristics, this material is similar to parquet. It is easy to install and does not require special care. The choice of laminate on the finishing materials market is quite extensive, so everyone can choose the option that suits them.
Laminate is very susceptible to moisture. In terms of price, it is comparable to the cost of high-quality linoleum, but it can be 3 to 7 times more expensive. Laminate floors look elegant.
Fiberboard
Fiberboard is rarely used today for finishing floors. This material is mainly used to level the floor for the installation of other floor coverings. The sheets are secured to the floor with small nails or self-tapping screws. After fixing, the fiberboard is painted in 2–3 layers. This material is also afraid of moisture, because it swells under its influence.
Carpet
This floor covering looks beautiful and additionally insulates the floor. At the same time, carpet quickly loses its attractiveness (the pile wears out and gets worn out), which is why it is used only in bedrooms and children's rooms, where people rarely walk.
It is difficult to clean and quickly absorbs moisture. Drying the carpet without dismantling it is extremely difficult. In terms of installation, the material is convenient; it is simply rolled out on the floor and trimmed where needed.
Which tree to choose?
Types of materials
An important point in installing wooden floors is the choice of wood. For these works, the building materials market offers the following types of building materials for the consumer to choose from:
Six-meter boards can be used as covering material.
- Six meter boards. The thickness of the products ranges from 20 to 60 mm. Using grooves and tongues at the edges, the wood is joined.
- Two-meter parquet. These products are not only shorter in length, but also thinner. It is 18-25 mm. The joining principle is similar to the previous type.
- Engineering. They are products glued together from three layers of wood. Pine is used for the lower part, and the upper parts are made of valuable wood.
Criterias of choice
Wooden boards are used for both rough and finishing installation. If the wood flooring is planned to be covered with laminate or linoleum, then the quality of the material can be chosen even unplaned. If the wooden covering on the concrete base is the finishing one, then the boards chosen are tongue-and-groove with a planed surface. When choosing wood, the following criteria are adhered to:
To perform such work, the material must be carefully sanded.
- The wood must be dried, but not overdried, since excessive dryness leads to deformation of the boards under the influence of moisture and temperature changes.
- The material is purchased with a margin of 15%.
- The boards must be smooth, sanded and free from defects.
- Wood from different batches may differ in shade and texture, so experienced experts recommend buying boards of the same type.
- Regardless of the quality of the wood, the boards must be at least 2 m long.
- When installing flooring on a concrete base, raw materials made from softwood are most often chosen, as they are resistant to abrasion. Material made from oak and beech is more durable and expensive.