Wooden logs are essential to ensure natural ventilation of the underground space and better heat retention in the premises. Thanks to the use of logs, the floor covering can last much longer. However, among people who do not have much experience in construction, you can often hear the question: is it necessary to attach joists to a concrete floor? Experienced craftsmen know that for a truly durable flooring that does not change its geometry under load, and for its long service life, it is imperative to correctly fix the logs on any supporting structure, including on a concrete screed.
Now that it is clear whether it is necessary to attach the joists to the concrete floor, it is worth noting that this task is not difficult, does not require special skills and knowledge, and, therefore, can be done by any home craftsman.
Laying joists on a concrete surface - how to do it correctly
Logs are wooden beams that have a rectangular shape.
Conditions for quality work:
- Unplaned boards of the second grade of coniferous species are selected. Chamber-dried spruce or pine are best suited. If installation is to be done in a bathhouse, choose larch.
- The wood should not have protruding knots, chips, cracks, pores or mold stains. Humidity - 12-18% (measured with a moisture meter). The cross-section depends on the thickness of the flooring and the mechanical load.
- Before installation, the timber is kept indoors for two weeks for acclimatization. Then the curved one is discarded. The rest is treated with antibacterial and fire retardant impregnation.
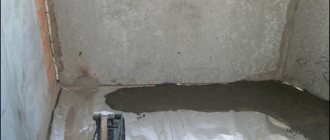
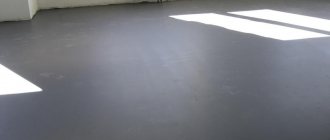
- The concrete base is cleared of debris. Sagging and defects are cleaned out.
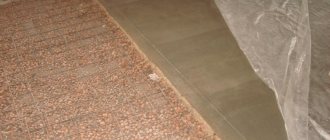
- To prevent moisture condensation, waterproofing impregnation is applied to the concrete or the base is lined with plastic film.
- For shock absorption, linoleum or roofing felt is laid.
- In apartments, the installation of logs is carried out perpendicular to the sun's rays, which ensures uniform heating of the material. In offices, due to increased traffic, they are laid across the movement of people.
- The beam is attached to a flat base. The distance from it to the wall is 2-3 cm. The floor level is leveled with fasteners.
Additional Information! A balcony or loggia can be converted into a place to relax. The leading role in insulation is played by the wooden floor.
Do the lags need to be fixed somehow?
In multi-storey buildings, if there are neighbors below (second floor and above), they often do without fasteners. Rubber pads are placed under the bars.
Professional builders still recommend attaching the joists to the concrete floor.
When installing using fasteners, the issue of sound insulation is solved by a shock-absorbing substrate, which is installed on a concrete base, or the space under the subfloor is filled with materials with sound-proofing properties. The entire structure is fixed as rigidly as possible. If this is not done, the flooring elements move relative to each other and creak.
Local alignment
Slope the floor towards the middle. As a rule, such a defect occurs in places that are intensively used.
Volume cavities can be filled with durable material. Craftsmen offer budget compositions: plasters, putties, cements, adhesives mixed with sawdust. Everyone has the right to experiment. But the floor should last for decades. There are no guarantees that these compounds will not turn into crumbs.
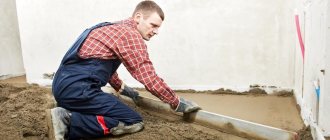
Therefore - no matter how trite it sounds - trust the professionals. The best choice is self-leveling solutions. This way you can level a wooden floor under a laminate. Cement base, reinforcing fibers, polymer modifiers. Ceresit, Kerstonit, Vetonit, Knauf, Staratel are the most famous brands. But even these compounds are not directly intended for use on wooden floors.
Before purchasing, you should study the instructions: the amount of shrinkage, the amount of fiber or fibers (the more, the better). If they are not there, you will have to fill it over a reinforcing mesh nailed with brackets to the boards. It's better to avoid this. You should not use finishing mixtures if the required layer height is more than 5 mm.
Self-leveling compound is sold pre-mixed, in large buckets, or as dry mixes. In the latter case, the proportion of water and mixture must be observed with pharmaceutical precision.
Excess water will lead to delamination of the composition and reduce strength. Particular attention is paid to the hardening time: the mixture must be used in time during this period.
The areas of the old wood floor that need to be filled are identified. They must be absolutely rigid. On them, acrylic putty is used to seal all the places where the self-leveling device can drain. The junctions between the floor and the walls are covered with damper tape. Then the entire floor area is cleaned and dusted.
A moisture-proof primer is applied to the area where the self-leveling material will be used. If the primer is absorbed very quickly, 3–4 layers are required.
Pour a large amount of well-mixed leveler onto the lowest point of the base. Spread it over the floor with a notched trowel, squeegee or needle roller (the height of the needles is 2 mm above the fill layer) so that it completely covers the lowered area.
The mixture will find its own level, hide unevenness, but must initially be distributed over the entire area.
Allow the material to dry according to the manufacturer's directions. Fragmentary leveling of the wooden floor with a self-leveling mixture ends with cutting the damper tape.
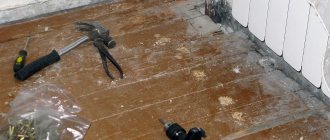
What tools and materials will be required for the work?
To quickly attach the joists to the floor, no special equipment is required.
Tools required for work:
- perforator;
- drill;
- screwdriver;
- Bulgarian;
- hacksaw;
- jigsaw
To measure: tape measure or centimeter, square, pencil.
Supporting materials:
- fasteners;
- building level;
- hammer;
- plane;
- knife, brush;
- rubber gaskets.
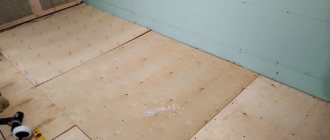
For flooring, sheets of plywood, OSB and chipboard, and tongue and groove boards are used.
Note! Plywood sheets are stronger than OSB and chipboard. The board is laid perpendicular to the joists.
Plywood joists. Material selection
Floor installation begins with the correct choice of materials. It is necessary to pay attention to the type of plywood, its composition, water resistance, but the main thing is the thickness of the sheets. The appearance of the material is not particularly important, since there will be a finishing coating on top (for example, laminate).
It is recommended to use plywood marked FK (moisture-resistant plywood based on urea resin) or FSF (plywood in which veneer layers are joined with phenol-formaldehyde glue). However, in the production of FSF, stronger and, therefore, more toxic adhesive compositions are used. Therefore, such plywood is considered less environmentally friendly, and it is better to use it outdoors.
Basic methods of attaching joists to a concrete floor
Several methods of fixing the floor structure are used. There are mainly 3 mounting options used.
Fasteners for floor joists are selected based on the following factors:
- unevenness of the base;
- load level;
- floor height;
- moisture content of concrete.
Note! Poor quality materials and incorrectly selected fasteners will lead to swelling or sagging of the floor. When drilling wood, a drill bit smaller than the diameter of the screw is used.
Self-tapping screws
The simplest and most economical way. Not suitable for every occasion.
Stages of work:
- Holes are made in concrete and wooden beams in increments of 0.4-0.8 m.
- The dowel is driven in with a hammer, then a self-tapping screw is screwed into it.
A small gap is needed between the floor and the beams. This will ensure reliable installation.
Important! For better fastening to the base, self-tapping screws are used, in which the thread does not reach the head slightly.
Fastening with anchors
This method ensures reliability and durability of installation. The anchor attracts the tree to the concrete base and restrains deformation. It is advisable to use it for beams with a large cross-section, which increase the load on the fasteners.
Execution sequence:
- Wooden elements are drilled through in increments of 0.8-1.0 m.
- Holes are made in the concrete floor opposite.
- The anchor is tightened with a key.
Bolt length 45-200, diameter 10 mm. When installed, they must go right through the tree and go 6 cm into the base.
Note! To avoid subsidence of the floor covering during installation using anchors, spacers should be installed as often as possible.
Fastening the log to a metal corner
In the case when the height of the beams is more than 10 cm, perforated corners are used, one side of which is fixed to the concrete floor with dowel nails, the other - with self-tapping screws to the wood. This type of fastening fixes the position of the log, distributing the load on the gaskets.
For flooring, a tongue and groove board is used, which is connected with self-tapping screws.
Note! The self-tapping screw is screwed into wooden elements at a slight angle. This ensures the strength of the connection.
Reviews
Alexey Belyaev, 52 years old, Kemerovo
My son and I decided to make a wooden floor in my one-room apartment. We bought studs as fasteners. It seemed not so simple, but we faced a big problem. The pins inside the drilled holes moved under slight loads. We decided to pour additional cement mortar inside and then insert the fasteners. The next day, some of the fasteners still did not inspire confidence. I had to abandon them and buy other more expensive ones, the design of which has metal platforms in the form of a base. But there were no more problems with them. So if someone decides to build a floor using joists, I recommend not saving.
Sergey Utkin, 39 years old, Moscow
At the dacha I decided to replace the old plank floor. When opening the flooring, it turned out that the joists were rotten. Therefore, without hesitation, I dismantled everything, backfilled it, laid a thick screed, and leveled the floor to the level of the foundation. But then I decided to install joists under the boards. I attached it to the corners, it turned out to be a convenient thing. The main thing here is to accurately position the fasteners on the floor, taking into account the thickness of the joists. Therefore, I first attached the corners on one side of the logs to the floor, then installed the beams themselves, and finally installed the fastenings on the other side.
Irina, 28 years old, Astrakhan
In our apartment, craftsmen installed a wooden floor on joists. Metal corners were used as fasteners. Now the neighbors downstairs say that when walking around our apartment, the audibility of footsteps has become strong. There was some kind of grinding noise. It turned out that the craftsmen did not lay a special material between the metal and concrete, which acts as sound insulation. Why open everything again now?
Step-by-step instructions for attaching joists to a concrete base with your own hands.
A simple way is to install the structure using dowels.
Operating procedure:
- The floor is leveled with a water level.
- The gaskets are cut from fiberboard.
- The concrete surface is primed.
- Waterproofing impregnation is applied.
- Along the level line, you need to secure the outer beams that are located along the walls.
- The remaining wooden elements are laid out in parallel. Spacers are used for alignment.
- Holes are drilled in wood and concrete. Dowel nails are installed.
- After installation, thermal insulation is laid.
Note! The logs are laid parallel to each other.
Types of bases
If you plan to make a floor on the ground, then it is necessary to make foundations for columns made of brick. Logs will be laid on them, but first, roofing material will be placed between them and the brick columns as waterproofing.
Next, you need to fill all the gaps between the joists and near the walls with insulation to insulate the floor. The height of the resulting underground should be approximately 20 centimeters. It is recommended to choose the lag laying step depending on their thickness. It ranges from 90 to 120 centimeters.
If you plan to lay the floor on a reinforced concrete surface, then first lay gaskets or add a mixture of sand and slag. And only after that the logs are laid.
The laying step is usually 60 centimeters. The lags are fastened using anchor bolts, checking with a building level that the installation is correct.
Wooden beams
Typically, wooden floors are made from rectangular beams, so floors can be laid on top of them. However, if the distance between the beams is more than 80 centimeters, then the installation of logs is necessary. In this case, the elements are placed on top of the beams, and only then the floor coverings are laid.
Application of glue
There are also non-standard ways to level a concrete floor with plywood. One of them is the use of a mixture of glue and sawdust. This is a kind of screed, on top of which plywood sheets with a thickness of 5-8 mm are subsequently laid. If this concerns a wooden floor, then cost savings occur. However, this requires more time for installation. This becomes especially noticeable when there are significant differences in the heights of the floor base.
The algorithm includes stages that should begin, as elsewhere, with preparing the surface for work. Also here you should put beacon slats on the base, which are set according to the level. The entire space between them should be filled with the prepared mixture. Usually several layers of this “screed” are made, but no more than two. The evenness of the adhesive should be checked each time it is applied using a level.
After everything has dried, you can begin laying the plywood sheets. This will allow you to learn how to level the floor in an apartment with plywood.
Preparatory activities
When laying plywood on a concrete floor, maximum measures should be taken to bring the base to the required level. Concrete may have high moisture levels. And this immediately negatively affects the condition of the plywood sheets after installation. Therefore, humidity level studies should be carried out before work begins. If this indicator corresponds to the norm, then you can proceed to the next stages of repairing the floor surface.
Checking humidity can be done using improvised means. To do this, a polyethylene film is laid on the surface, the edges of which are carefully pressed to the base. If after three days there is condensation formed on the inside, then it is best to postpone the work for a while. During this time, measures can be taken to reduce the humidity using various means.
The concept of plywood grade
There should be no question as to whether the floor can be leveled with plywood. This material is perfect for these purposes. But before starting work, they should be coated with an antiseptic, which will protect the sheets from high humidity and low temperatures during operation. In addition, you can forget about the formation of mold on the surface or fungi.
The most affordable plywood sheets are category 4. This variety has visible defects, but is perfect for creating a smooth surface. Rough leveling will be carried out according to all requirements. If a final coating is required, then the best quality variety is selected.
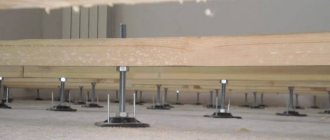
Video about the design of adjustable systems
The videos will demonstrate in great detail how to create a perfectly smooth surface using factory adjustable systems. The video is aimed at owners of city apartments with concrete floors.
Fundamentally, the method of installing adjustable joists with plywood or plywood sheets with anchor posts on a wooden base does not differ from the scheme for installing them over cement slabs.
If the owner of a country bathhouse has a surplus of funds, he may well use ready-made adjustable kits. Leveling in the recreation room, billiard room or dressing room will be carried out quickly and without much effort. However, we certainly won’t classify adjustable plywood and joists as cheap methods. Let's better explore budget options.