The modern construction industry is developing rapidly, offering consumers a variety of materials with unique properties. One of the building materials that can significantly reduce the cost of production and save time allocated for construction is penoplex or EPS. Such products are designed to insulate a building and improve the performance characteristics of concrete structures. However, to obtain maximum results, you should approach the installation process with special care.
Advantages and disadvantages of penoplex
Porous synthetic penoplex does not absorb moisture and insulates the room from sounds.
Choosing to lay penoplex on the floor under a screed has a number of significant advantages that have not gone unnoticed by professionals and private developers.
- Low thermal conductivity. This figure is several times higher than that of analogues, which makes it possible to lay slabs of minimal thickness on the floor and install a warm water or electric floor on them.
- Long service life. Various manufacturers provide a warranty of 40-60 years.
- Reasonable price. Petrochemical industry by-products are used as raw materials.
- Sufficient strength. The coating can withstand strong mechanical loads. You can lay laminate or parquet boards directly on it.
- Waterproof. The slabs do not absorb or allow moisture to pass through, creating a high-quality water barrier.
- Resistance to fungus and mold. Insects and rodents are not interested in the polymer.
- Environmental Safety. The insulation does not contain formaldehyde or other substances harmful to health.
- Excellent sound insulation properties. A layer of material of only 5 cm completely cuts off all noise produced at the lower level of the building.
- Low specific gravity. There is no additional pressure on the foundation, and installation of penoplex on the floor can be done without much effort alone.
Preparing the surface for installation
Penoplex panels are attached only to treated and smooth surfaces.
The preparatory stage includes the following operations:
- The surface is carefully inspected, after which all dirt, remnants of the old destroyed coating, and peelings that will not withstand the load of the insulation are removed.
Cleaning the walls with a wire brush
- Particular attention is paid to surface damage by mold and mildew. The damaged area is cleaned with a stiff brush and then treated with a special composition, which is made at home using copper sulfate or purchased in a retail chain.
Ready-made compositions against fungus and mold
- To eliminate irregularities, a map of problem areas is drawn up. After this, alignment is performed using any of the following methods:
- plastering is a simple and reliable method. The solution is selected individually for the surface material. The insulation can be attached when the plaster has dried;
- Laying slabs of different thicknesses is a labor-intensive method that requires precise identification of irregularities. The brand of penoplex depends on its thickness. When purchasing, slabs of different thicknesses, but of the same brand, are selected;
- using shims is a method used only by experienced installers. Pieces of penoplex or plastic are used as linings.
- Metal parts that are planned to be covered with slabs are treated with anti-corrosion compounds.
Anti-corrosion composition WEICON Zinc Spray
- Brackets are mounted for equipment that will be hung in the future, for example, an air conditioner.
What is the best way to cut penoplex?
During various procedures, the insulating product must be divided into certain parts that have certain dimensions. If the material simply breaks, you will get uneven edges, and it is not possible to achieve the exact size.
Based on the above, we can conclude that the best solution is cutting. You can use various tools:
Using a utility knife. The advantages of using this tool: accessibility, no noise, speed of the process. The sharper the tool, the higher the cutting quality.
Stationery knife
Using an electric jigsaw. The downside is getting edges that are uneven. But the speed of performing this work is the maximum possible. An electric jigsaw can handle slabs of varying thicknesses.
Electric jigsaw
- A kitchen knife can be used. Be sure to sharpen the kitchen knife thoroughly before starting the cutting procedure. Next, the selected tool should be heated. A hot knife does a much better job of cutting. Pros of using a kitchen knife: no debris and smooth edges.
- Nichrome wire. It is used for figure cutting. It is necessary to connect the wires to a 24V transformer. When electric current is applied, the tool heats up.
One of the distinctive features of thermal insulation products is ease of installation. To do this, you do not need to have any specific knowledge or extensive experience as an installer.
How to properly attach penoplex to a concrete wall
The modern construction industry is annually enriched with a mass of new materials with unique properties that make it possible to build stronger, more durable and cheaper structures.
One such material is penoplex or EPS, used mainly as thermal insulation.
At the same time, to ensure high reliability and long service life, it is important to correctly perform the installation procedure
In the photo - gluing EPS to a concrete foundation
Installation methods and materials used
Installation of polystyrene foam slabs can be done without the use of any additional fasteners, however, the concrete surface should be carefully prepared:
Advice: if the protrusions interfere with your preparation, use cutting reinforced concrete with diamond wheels to dismantle them.
In the photo - foam boards
Before gluing penoplex to concrete, you need to prepare the following materials:
- cement mortar;
- primers;
- adhesives for polystyrene foam;
- drills for mixing glue components;
- containers in which the components will be mixed;
- serrated spatulas.
If installation is planned to be carried out using additional fasteners, the set of materials will be even smaller:
- insulation;
- glue;
- seam sealant;
- dowels
- The method of attaching insulation using liquid nails is widely popular. Its advantage is that this substance does not need to be applied to the entire surface of the sheet - it is enough to apply it pointwise.
Application of liquid nails
Advice: keep in mind that its use is not possible with every type of insulation, moreover, it contains toxic substances.
To carry out work using this method, in addition to polystyrene foam and liquid nails, you will also need protective gloves.
- Another option that answers the question of how to glue penoplex to concrete is the use of special foam. However, it is advisable to resort to this method only when working with floors, since the foam has rather low adhesive properties. There are several types of foam: for fastening foam block structures;
- for foam sheets;
- for polystyrene foam boards.
Below we will talk in detail about how to glue penoplex to concrete and the characteristics of these materials.
Properties of various types of glue and options for its use
Its key advantages include:
- pronounced waterproofing properties;
- resistance to low temperatures.
It does not require any special preliminary preparation, however, if work is carried out at an air temperature below + 5 ˚С, it is recommended to warm the glue to + 18-20 ˚С.
How to glue foam to concrete?
Polystyrene foam is used as insulation, since its thermal insulation properties are higher than those of natural materials, and the cold buildings in which it is used are mainly made of concrete. Often polystyrene foam needs to be attached to surfaces where it is impractical to assemble rigid sheathing (walls, ceilings, facades). In such situations, sheets of material are attached using a variety of methods and adhesives. The right technological solutions make the work easier. So, how to glue foam to concrete?
Mounting methods
Specialists use different methods to attach polystyrene foam.
- Glue method.
This is a quick and convenient way to attach. It is enough to choose the right adhesive composition and then apply it to the insulation. Based on their initial state, adhesive compositions are divided into types:
dry mixes are bulk materials packaged in bags. They contain cement with binding additives. To prepare the glue, just dilute the solution according to the instructions;
- liquid formulations are always ready for use. These include the adhesive composition “liquid nails” and cheap PVA glue. If PVA glues foam plastic well to metal surfaces, then “liquid nails” glue different materials, however, the glue is very expensive, so it is used on small surfaces;
- foam - this type includes special adhesive compositions developed for foam plastic. First of all, these include:
- Polyurethane adhesive that has good adhesion to foam. It is packaged in cans, so it is used with a special pistol.
- Adhesive - foam provides reliable adhesion to various materials. A special gun makes it easier to use glue.
- Fastening method.
Dowels with a wide head are intended to strengthen the fastening of slabs. They are used for external wall insulation, as well as when there is an increased load on the heat insulator.
There are several types of dowels, but they all necessarily have a sleeve, a core and a wide head. If the dowel is hollow, then a nail or screw is used in the spacer zone. The plate is fastened in the corners and in the center. Compared to gluing insulation, this method is more labor-intensive.
- Combined method.
The simultaneous use of two methods of fastening the insulation allows you to achieve high quality installation. The adhesive composition isolates the surface from external influences, and the dowels increase the reliability of fastening.
Video instruction:
Technology
How to insulate the foundation itself with Penoplex? You need to start with the situation in which the installation is being carried out:
- If you are just building a house, most likely its foundation is free of soil and you don’t need to do anything beforehand;
- If we are talking about an already constructed foundation, you must first clear it of soil. Clean the surface and only then carry out insulation.
Also, it is worth noting that when insulating the foundation of a house, three components are insulated from the outside:
- Blind area;
- Horizontal insulation on the cushion of the future foundation (carried out only during construction);
- Vertical installation of slabs on a plinth.
We talked separately about how to make an insulated blind area, so here we will describe in more detail only the last of these three points.
Preparing the workplace
If you need to insulate the foundation outside of an already built house, you will have to dig it out. To do this using:
- Your own shovel
- Special equipment,
A trench is being dug around the entire perimeter of the building. The depth of the trench should be equal to the depth of the foundation. The width should be such that you can work safely. Please note that when you attach the penoplex to the foundation, the width of the trench will narrow, in our example by as much as 120 mm.
After this, you need to let the foundation dry, then the insulation will be effective. A minimum of 2 weeks is allotted for this. By the way, this nuance imposes some restrictions on the time of year in which work can be carried out. In the fall, the dug trench may fill with sedimentary water. Inspect the foundation and assess its condition. Plaster large uneven areas, if any.
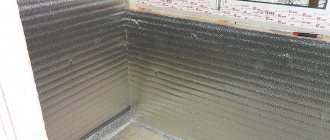
Waterproofing
We talked about this important step for the foundation separately, but here it is only worth repeating that waterproofing is mandatory for the foundation of a house with a basement. If there is no basement, perhaps Penoplex itself can handle it, because it repels moisture
If you use waterproofing, choose a composition that does not contain alcohol so that it does not corrode the insulation.
Installation of slabs
Although you can find examples of penoplex being attached to dowels, this approach is considered unacceptable. Nails damage the waterproofing layer and the insulation itself, which, unlike a “wet” façade, will not be particularly protected. The material must be secured with foam adhesive or other adhesive for fastening.
Fastening the slabs begins from the bottom row. Using a level, you need to mark a strip of the upper edge of the slab. The lower part of the slabs is trimmed so that the upper edge is always level.
If, as in our example, installation on the outside with penoplex takes place in 2 layers, the second layer needs to be attached only after the first has been completely fixed (hardened), usually no less than 2 hours later. That is, first the entire foundation strip is covered with the first layer, then with the second. The sheets are laid in a checkerboard pattern, without joining the seams.
Afterwards, the insulation is covered with a membrane for additional protection from moisture and mechanical damage.
By the way, external insulation is considered the most effective.
Finally, video: how to insulate the foundation of a house with Penoplex.
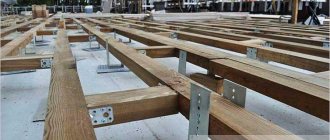
Rules and recommendations for installing penoplex
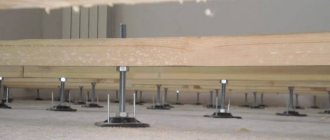
Effective thermal insulation with penoplex is only possible if the technology for its installation is followed. The sheets are installed on a flat surface. The first to be fixed is the starting bar, made of wooden beams or perforated metal. The width of the strip must correspond to the width of the insulation. Ready-made kits are available for sale, consisting of strips, external and internal corners for installation at joints.
Installation of the starting strip is carried out in the following order:
- A horizontal guide is marked along the perimeter of the building using a level or chokeline.
- First, the required level is set, then the beacons are installed with a thread.
- The plank is mounted on the dowels along the intended guide.
The starting strip will ensure the correct fastening of the penoplex in compliance with the installation geometry.
A staggered arrangement of sheets from the starting strip upward is the best way to install insulation. The adhesive composition is applied to the inside of the insulation, and to fill the resulting voids, polyurethane foam is used, which does not contain hazardous components.
After the installation of penoplex is completed, decorative finishing of the surface is performed.
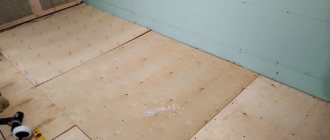
Required tools and materials
To install under the screed, it is necessary to lay a reinforcing mesh.
To insulate the floor in a dacha with penoplex and then pour the screed, you will need the following set of tools:
- level, tape measure, square;
- perforator;
- hacksaw;
- rule;
- spatulas;
- stationery knife;
- needle roller;
- hammer, mallet;
- construction mixer or drill with an attachment;
- container for mixing the solution.
Penoplex can be attached to mounting foam or tile adhesive
Materials:
- synthetic glue to attach penoplex to the floor in front of the screed;
- aluminum tape;
- dowels and screws;
- steel mesh or grate;
- mixture for screed based on gypsum or cement;
- beacons for leveling the screed.
You should think about the convenience and safety of work. It is recommended to prepare rubber boots, safety glasses and gloves.
Gluing instructions
First of all, an adhesive solution is selected. It is determined depending on what the penoplex is glued to; the work is carried out outside or inside the room. The gluing process is as follows:
- The working surface on which the stove will be attached is cleaned of dirt.
- Surfaces are treated with a primer.
- Prepare the adhesive solution and use it according to the instructions. It may be necessary to apply glue to the insulated surface and the penoplex itself.
- The slabs are applied to the surface from bottom to top on the walls or from left to right on the ceiling/floor. The plate must be held until it no longer lags behind the surface.
When the slab is well glued, then you can begin installing the next one.
Ventilation in the waiting room
Ventilation in the lobby is similar to ventilation in any other room and is designed to provide fresh, oxygen-rich air and remove stale air.
In this case, the circulation of air flows must be designed in such a way that not only the room, but also decorative and furniture elements are well ventilated and dry.
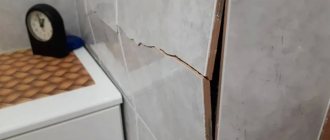
The most important “disease” of the front bench is condensation that forms on the walls and ceiling of the room. This leads to terrible consequences, namely the formation of various fungi and molds, which lead to premature decay of the wood.
Sometimes an oven is installed in the antechamber, and then the issue of air exchange disappears on its own when air flows in and out through it.
After bathing, the front room is usually ventilated and all windows and doors are opened. Despite these measures, experts still recommend installing at least a basic ventilation system on the front bench.
Video description
Features of fastening foam boards indoors can be seen in the video
Depending on the nature of the work, the glue is applied in three ways:
- continuous layer - over the entire area, evenly, with a distance of 3 cm from the edge;
- stripes - “L”-shaped four stripes in the corners and two long ones in the center;
- point – dense drops are made at a distance of 30 cm from each other.
Having figured out how to glue penoplex to concrete or other surfaces, you need to remember several important nuances of the work. It is better to do all work with an assistant. Be sure to read the glue consumption level and the manufacturer's instructions. Spray adhesives are easiest to work with, but they are not suitable for all surfaces.
Be sure to treat all surfaces with a primer to improve the quality of bonding and protect against fungus. The adhesive solution is applied evenly, in a layer of several millimeters. Immediately after touching, it is imperative to level each slab. Do not forget about safety measures and manufacturers' recommendations.
Each adhesive option is applied differently, this is important to consider during installation of slabs Source obustroeno.com
Preparing the concrete base
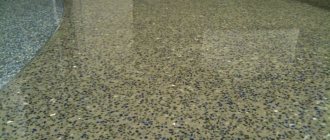
The concrete floor must be leveled and cracks repaired.
Before attaching penoplex to the concrete on the floor, a number of measures should be taken to prepare the base. Ignoring this stage is fraught with rather unpleasant consequences.
- Dismantling the old coating. Cleaning the surface from debris and dust.
- Removing nails, screws, protruding reinforcement and other foreign objects.
- Carrying out measurements and inspection of the activity area. Determining the level of the subfloor, the presence of open seams, cracks and holes.
- Leveling the slab, sealing all openings with cement mortar or sealant.
- Sanding the floor. Removing all protrusions and uneven surfaces. The height difference should not be more than 1% per linear meter.
- Concrete primer. This procedure must be carried out at least twice to ensure deep penetration of the liquid.
Finally, a damper tape is installed around the perimeter of the room. It will provide space for thermal expansion of the insulation when heated. If there is no door, a board, plywood or steel profile is inserted into the opening, the height is designed to raise the floor level after laying the penoplex and pouring the screed.
The best manufacturers
How to glue penoplex to concrete and other surfaces, which manufacturer of the composition to choose? Many experts prefer well-established and well-known companies. Among such manufacturers are Teploskrep, Kleiberit, Penoplex, Technonikol and some other companies. The products of these manufacturers were developed specifically for foam boards. It can be liquid, foamed or dry. The market offers products from domestic and foreign manufacturers in different price categories.
Video description
Step-by-step technology for facade insulation with penoplex in the video:
The compositions are designed for external and internal use. Adhesives are resistant to temperature changes, high humidity, and sunlight. When developing the formulations, high-quality materials are used; they are as safe as possible for people and the environment. However, in any case, before starting work, you must carefully study the recommendations and requirements of manufacturers and consult with specialists. Choose an adhesive that will be best suited for a particular surface. Manufacturers also offer special universal adhesives. Some compositions are additional insulation for the basement, roof or foundation.
Compositions for penoplex are developed specifically for slabs and withstand the negative influence of the environment; universal options can be used with different materials. Source stroymat77.ru
Briefly about the main thing
There is no clear answer to the question of how to glue penoplex to each other or to different surfaces. Manufacturers offer specialized adhesive compositions that have the following characteristics:
- high quality adhesives are not afraid of moisture, temperature changes, sun rays and wind;
- the compositions are developed for different surfaces and are applied using several techniques;
- glue is applied in several ways depending on its type and characteristics;
- There are several types of adhesive solutions;
- some compositions are strictly prohibited for use for interior work;
Which one to choose depends on the task at hand and the operating conditions of the insulated object.
Insulation methods
Solving the issue of insulating a wooden house is possible without inviting specialists; basic skills in working with building materials are sufficient.
It is important that thermal insulation using penoplex is possible both inside and outside the building
But practice shows that external, or external, insulation of a house is preferable for a number of reasons:
- Insulation on external walls will last longer, as it will be better ventilated.
- The external structure will not only serve as insulation, but also protect the walls from negative natural factors.
- External insulation will not reduce the internal living space.
- Work can be carried out in an occupied house without disturbing the internal structure.
Tape-type structure insulation technology
How is the foundation insulated with polystyrene foam? Preparing the load-bearing foundation of a house, as mentioned above, is the most labor-intensive and physically difficult process. First you need to dig out the foundation with your own hands.
To do this, a trench is dug outside, along the perimeter of the construction site. Its width must be at least one meter.
The depth will depend on the place to which the soil freezes when the temperature drops. Usually, it is with this calculation in mind that the strip foundation is initially laid.
Despite the fact that the technology of insulation with extruded polystyrene foam from the outside becomes a barrier to moisture, in case of heavy floods it is recommended to install drainage.
Having retreated about 60 cm from the strip foundation of the house, they dig another shallow trench for laying drainage pipes.
Having properly equipped the drainage system, they begin to prepare the excavated base for insulation with their own hands.
The walls are cleaned of adhered pieces of soil and broken parts of concrete. Then, using a cement-sand mortar in a ratio of 1:4, the strip foundation slabs are plastered.
Having thus leveled the surface, you don’t have to worry that the slabs will damage the waterproofing material, and this problem will subsequently affect the life of the house.
At the next stage, the leveled slabs are thermally insulated. Do-it-yourself application of several layers of waterproofing onto completely dry plaster.
As the first layer, bitumen mastic is used, and as the second layer, sheets of TechnoNIKOL are used.
Next comes the insulation of the foundation with penoplex, which is fixed on the walls in a vertical position, from bottom to top.
Penoplex is attached using any glue made on the basis of inorganic components.
The space at the joints and seams is sealed with polyurethane foam. If the thickness of the insulation seems insufficient, then a second layer is placed on top of the first layer of polystyrene foam boards in the same way so that the thickness increases slightly.
This layer is attached with an offset, which will further insulate the joints.
At the final stage, insulating the foundation with penoplex requires plastering the surface. To do this, reinforcing material is overlapped over the insulating layer.
Then a plaster cement-sand mortar is applied. After the plaster layer has completely dried, the trench is buried, but not completely, since it will still be necessary to leave room for a warm blind area.
Additionally, we suggest watching video material on this topic (including about the installation of a blind area).
Video:
Features of penoplex
Penoplex has certain distinctive features:
- environmentally friendly and durable;
- resistant to evaporation and moisture;
- minimum chemical activity;
- easy to install and handle;
- good resistance to deformation;
- favorable price, low thermal conductivity.
Special glue is used to attach the plates
When choosing it, it is very important to consider several important factors. The quality of the glue directly affects the service life of the insulation
The composition of the glue can have a negative effect on human health. When purchasing glue, choose solutions that have high adhesion and are safe for the environment and human health.
The material has good characteristics, thermal insulation properties, is not afraid of moisture, a favorable price, can be glued to different surfaces, ceilings, floors and walls. Source pro-uteplenie.ru
Tips for use
To make the process of thermal insulation of your home effective, comfortable and economical, you should take into account some professional advice:
- For beginning craftsmen, use the mixture in aerosol cans and avoid using quick-drying compounds, since mistakes made are difficult to correct.
- Make calculations on the amount of glue required, taking into account the information indicated on the packaging. Purchase material with a reserve, since more mixture is wasted on surfaces with defects.
- Follow the manufacturer's recommendations for diluting dry mixtures and their use.
- Apply the composition no more than 2-3 mm. The increased amount of material will not make the fastening stronger, but will lead to costs.
- Level the penoplex immediately after contact with the surface, without waiting for the glue to set.
- Take precautions when working with hazardous compounds.
Taking into account the recommendations of professionals and purchasing high-quality materials, even an inexperienced builder will be able to carry out insulation quickly, reliably and efficiently.
Today there is no consensus on which adhesive mixture is best suited for installing penoplex. It is necessary to make a choice based on the characteristics of each specific situation. By taking care of thermal insulation at the time of building a house, it will be possible to reduce the consumption of building materials and make the process less labor-intensive.
Penoplex: wall mounting technology
It is not so important where the insulation is carried out - on the outside of the house, or in the interior. In any case, the insulated surface must be flat
Its quality is checked by level and plumb line; if necessary, the surface is plastered.
When finishing a newly constructed building from the outside, it is necessary to prime the walls with a primer containing quartz sand. This treatment will significantly improve the ability of the glue to connect the insulation to the base.
For the same purpose, old walls should be thoroughly cleaned of dirt and traces of the old coating. Before installation, it is necessary to treat the surfaces with antifungal agents.
What to glue
How to glue penoplex to a concrete wall? In this case, it is better to choose cement-based or mineral adhesive solutions. With their help, you can achieve the maximum effect of bonding two surfaces. Such compositions have an affordable price and high adhesion rates when using penoplex for outdoor use. The composition is excellent for installing slabs to concrete, aerated concrete and sandstone. Such compositions are sold in the form of bulk mixtures and packaged in paper packaging. Before use, the mixture is mixed with water; instructions are on the package.
Mineral and cement adhesives are sold in the form of a dry mixture, which is diluted with water in accordance with the manufacturer's instructions. Source blog-potolok.ru
If you are choosing how to glue penoplex to a brick, then you need to look towards polyurethane glue. This is an ideal option for attaching penoplex to wood and brick. Such a solution can be used to insulate concrete surfaces, but in this case the cost of the result increases significantly. Polyurethane compositions are sold ready-to-use, they are sticky, and are sold in 750 ml aerosol cans.
It is very important to remember that this type of glue has one characteristic feature - it dries very quickly. Therefore, immediately after applying the adhesive, the slab must be immediately attached to the surface.
Polymer adhesives are universal and can be used on different surfaces. Provides quick fixation. Can be used to attach slabs to the ceiling. Bituminous waterproofing compounds are designed specifically for rooms with high and constant humidity.
Polymer compounds are a universal type of glue; they can be used for different surfaces and quickly glue slabs to different surfacesSource ad-cd.net
All types of adhesive compositions have their own characteristics, pros and cons. When removing glue, it is necessary to take into account working conditions, external or internal work, room humidity, and so on.
How to attach to concrete
What should I use to glue penoplex to concrete? There are several ways to attach slabs to concrete surfaces - using special adhesives, foam and liquid nails. It is necessary to select a suitable material taking into account the characteristics of the work. Experts prefer dry mineral and cement mortars developed specifically for these purposes. They have high adhesion and give a high result of bonding two surfaces. Liquid nails can only be used if penoplex will be installed on the floor. Foam is best used only to fill joints.
Special dry adhesive mixtures are designed for installing foam boards to concrete surfacesSource www.cemtorg.com
How to attach to metal
How to glue penoplex to metal? When working with metal surfaces, you can use regular polyurethane foam. The composition is applied to the sheet at five points and then pressed tightly against the metal. Many experts use PVA glue. This is a cost-effective option, but you will need to purchase additional burlap.
The gluing process occurs in two stages. First, glue is applied to the burlap and it is glued to the metal. At the second stage, a foam board is glued to the burlap, but only after the previous layer on the metal has dried well. Cladding is allowed only after the glue has completely dried. For cladding, any materials that are light in weight can be used.
To glue penoplex to metal, you can use mounting foams or PVA glue. Source imhodom.ru
Gluing the boards together
Sometimes the question arises: how to glue penoplex together? In this case, it is strictly forbidden to use any solutions that contain kerosene, alcohol or acetone. This is due to the fact that organic solvents can completely destroy the structure of the insulation. To fasten foam boards together, it is allowed to use only adhesive compositions designed for working with polymer materials.
Any dry mortars based on cement are used in this case. The best option is polymer adhesives. After application, it forms a homogeneous mass that reliably holds the sheets together. Polyurethane compounds that provide quick bonding also give quite good results.
Plates can only be glued together to increase thermal insulation properties and noise protection using polymer adhesives; it is strictly forbidden to use compositions with organic solvents Source i1.photo.2gis.com
Protective covering
Scheme for attaching penoplex to a brick or concrete wall
In order for the surface of the insulation to look beautiful and be durable, it must be protected. The simplest and cheapest way to protect insulation is plastering, which is carried out in stages.
- Selection of plaster mortar.
- Selection of reinforcing mesh for plaster mortar.
- Fastening the reinforcing mesh using a certain technology.
- Laying the mortar, leveling the surface, grouting with a plastic float.
- Primer the surface for the finishing coat.
- Finish plaster. After drying, painting is done or a transparent protective layer is applied.
Video instruction:
In general, attaching penoplex to concrete and brick walls, as well as insulating the foundation of a building, is not difficult. It is enough to follow the installation technology and carry out the work carefully to ensure that the insulation is attractive and durable.
Subscribe
Penoplex installation
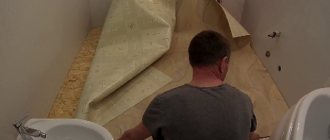
You will have to choose from two options: install from the attic side, or make thermal insulation from the inside of the room.
Installation from the attic is carried out as follows:
The attic floor is thoroughly and carefully cleaned of dirt and debris and, if necessary, leveled. Dry glue is applied to the foam boards, after which they are laid on the attic floor in dense rows to each other. After the glue has dried and the slabs are attached to the attic floor, the gaps between the laid material are sealed with polyurethane foam
It takes a day for the resulting structure to dry thoroughly. Excess foam is carefully cut off. A floor made of boards is laid on top of the foam boards.
Installation from the side of the room (loggia, balcony) is done as follows:
The ceiling, cleared of dirt and debris (leveled, with cracks and potholes sealed), is treated with a primer. Dry glue is applied to the foam boards, then they are attached to the ceiling. Use a hammer drill (very carefully!) to drill holes for the fungi. Fungi are driven into the holes made by the puncher. They are necessary to ensure that the structure rests securely on the ceiling. At the joints and in the gaps, foam boards are filled with polyurethane foam
When it dries, the excess is carefully trimmed off. Now the reinforcing mesh is attached. For this, a rough adhesive mixture is used. The surface of the ceiling is cleaned and treated with a primer. A fine finish is applied. The final touch is a decorative coating or paint.
Ceiling insulation is complete.
Take note: if you have an attic, it is better to insulate it from its side. The second method of thermal insulation with penoplex - from the side of the room - is suitable if neighbors live above and there is no access to the attic.
Advantages of thermal insulation from the attic:
- the usable area of the room is preserved;
- ceilings will not become lower after installing penoplex;
- additional work in the attic is carried out, as when laying a floor.
How to insulate the foundation of a wooden house
Many owners of wooden houses believe that to ensure favorable living conditions it is enough to insulate the walls and floors. However, this is not true, because serious heat loss can occur through a wooden floor - up to 20%. Therefore, thermal insulation of the foundation is mandatory, especially if the house is located in an area with harsh weather conditions.
Insulating the foundation of a wooden house from the outside will not only create favorable conditions indoors, but also prevent adverse effects on it. For this purpose, polystyrene foam and its varieties, as well as expanded clay, are usually used.
Stone finishing
Insulation of the foundation of PPS or EPS
Expanded polystyrene has excellent consumer properties, such as low thermal conductivity and moisture absorption, resistance to negative weather conditions, affordable cost, ease of installation, etc.
These and other characteristics have made this material one of the most relevant and in high demand among many consumers.
To insulate only the above-ground part of the foundation or plinth, a fairly simple installation is required. PPS sheets are simply attached to the surface using glue or special fasteners.
After this, cladding or plastering is performed. However, you should know that installing insulation does not mean complete waterproofing, so it should be carried out separately to avoid groundwater from penetrating under the floor.
At the summer cottage
In this case, it is necessary to completely waterproof the walls. For this purpose, a trench is dug around the wooden house, then the foundation is cleared of soil and debris. Next, EPS panels are attached to the surface, after which the whole thing is backfilled and compacted.
The insulated base can additionally be finished with brick or other types of cladding that can withstand adverse weather conditions.
Foundation insulation with expanded clay
Often a wooden house is insulated from the outside with expanded clay. However, it has increased moisture absorption.
To avoid the negative effects of this phenomenon, a trench is dug around the house and formwork with waterproofing is installed, after which the expanded clay itself is filled.
Blind area
This method is no less effective, but requires special attention and the need to adhere to all installation rules.
Advantages and disadvantages of using penoplex
This material has optimal properties for use as insulation:
- extremely low thermal conductivity of 0.03 W*m*C, wet material also perfectly insulates;
- absolute moisture resistance is due to the foamed structure of polystyrene. Closed foam microcells do not allow water to pass through, which makes it possible to use penoplex for insulation on the roof and foundation, in conditions of increased dampness;
- compressive strength 0.2–0.5 MPa, flexibility, does not change its shape and properties under mechanical loads;
- does not rot, does not contribute to the growth of mold and mildew;
- wide operating temperature range is from -50 to +70Сº;
- the effective service life declared by the manufacturers is at least 50 years;
- does not contain phenols and other toxic substances;
- does not burn, self-extinguishes, some models contain fire retardants;
- low weight makes storage and transportation, installation easier, does not load the walls;
- low price will allow you to inexpensively insulate a house and save on utility costs, produced by Russian companies.
Disadvantages of the material:
- when exposed to fire, it melts and emits caustic toxic smoke;
- vapor permeability is low, the walls do not breathe;
- requires finishing on top, with constant ultraviolet irradiation it is destroyed over time;
- weak adhesion to adhesives, fixed to the wall using fasteners.
Insulation of the foundation with penoplex: we understand the thickness of the insulation in different regions
The basis of any home is a reliable foundation. The integrity, safety, durability of the building, and, to a certain extent, even the indoor microclimate directly depend on its condition. That is why it is necessary to use the most reliable and high-quality structures and materials to build a foundation. However, it is not enough to simply build this part of the house - it needs special protection from external influences.
Insulation of the foundation with penoplex
One of the publications on our portal describes in detail the issues of foundation waterproofing . Usually, in combination with these measures, with the right approach, its insulation is immediately provided. For this, various construction technologies can be used, but the most common, simple, and easy to do independently is insulating the foundation with penoplex.
This article will discuss the reasons for the need for thermal insulation of the foundation, the properties of the insulating material - penoplex, and outline the sequence of the process of carrying out such work and the technological methods used.
Why is the foundation insulated?
It would seem - why insulate the foundation? It may seem that it is enough to isolate it from moisture penetration, and this will completely ensure its safety. All living spaces are located above, do not directly interact with the basement part and have their own thermal insulation. This opinion is quite widespread, and therefore many homeowners simply discount the need for such work, without even including it in the construction plan. Meanwhile, foundation insulation is necessary for several reasons:
- The massive structure of the foundation and plinth becomes the “main route” for the penetration of cold. A significant part of the heat loss of a house is always associated with the poorly insulated floor of the first floor. But even with seemingly reliable thermal insulation, a cold bridge operates from the foundation through the walls. This leads to significant losses in terms of energy costs and an uncomfortable indoor environment. And properly carried out insulation provides up to 30% of total heat savings.
- The base of the foundation is usually located below the freezing level of the soil, and its temperature is fairly constant due to the constant influence of geothermal heat. The upper part is subject to significant temperature changes. Such unevenness causes internal stresses of the reinforced concrete structure associated with the difference in the linear expansion of the material, which leads to its rapid “aging”. In order for the entire foundation mass to have approximately the same heating, regardless of the time of year, reliable thermal insulation will be required.
- A layer of insulation on the foundation walls shifts the dew point outward, and concrete structures will not become damp from the formation of condensation caused by the difference in external and internal temperatures.
- Although any reinforced concrete structure has a certain reserve of frost resistance, expressed in the number of cycles of complete freezing and thawing, it is better not to waste this “internal reserve” by minimizing or completely eliminating the effects of negative temperatures.
- Along with insulating the foundation walls, it is advisable to also carry out thermal insulation of the adjacent layers of soil backfill by placing a horizontal thermal insulating belt at the level of the base (for shallow foundations) or under the concrete blind area. This can reduce the risk of soil heaving during freezing, which is dangerous due to the appearance of deformations and violation of the integrity of the foundation.
- The insulation layer becomes another fairly reliable barrier to soil moisture. In addition, it well covers the applied waterproofing layer, which is vulnerable to mechanical stress.
Expert opinion: Afanasyev E.V.
Chief editor of the Stroyday.ru project. Engineer.
Insulation of the foundation should be carried out along its outer wall. Thermal insulation material placed inside the basement (basement) room will only slightly improve the microclimate there, but will not solve the main problems.
Penoplex is the optimal material for foundation insulation
Of all the existing thermal insulation materials, penoplex is probably the most optimal for insulating the foundation and basement. Of course, other technologies are also used, for example, spraying polyurethane foam, but still, for carrying out such work independently, it is still difficult to find better than penoplex both in terms of physical and operational qualities, and in price.
Penoplex is perhaps the best modern material for foundation insulation
Penoplex is a slab of extruded polystyrene foam. Extrusion technology, that is, melting a mixture of polystyrene granules, foaming it with special agents and then pressing it through a molding nozzle (extrusion head), makes it possible to obtain a high-density material while maintaining excellent thermal insulation qualities.
- The density of penoplex varies, depending on the brand, from 30 to 45 kg/m³. This allows the materials to withstand significant mechanical loads. Thus, the limit of compression force with volumetric deformation of up to 10%, even for the “lightest” penoplex, is at least 20 t/m², and for the densest it reaches 50 t/m². These indicators are quite sufficient not only for insulating the foundation walls, but also for laying a thermal insulator under its soles or installing it as a basis for pouring a slab foundation.
Video: testing extruded polystyrene foam for strength
- Due to its saturation with air, penoplex has excellent thermal resistance. Thus, the thermal conductivity coefficient is only 0.030 W/m×Cº - one of the lowest among all modern thermal insulation materials.
- At the same time, the closed cellular structure of the material resists moisture penetration well. Water absorption on the first day does not exceed 0.2% of the total volume, during the month - no more than 0.4 - 0.5%, and subsequently this value does not change throughout the entire service life.
- The temperature range at which penoplex does not change its physical properties is from -50 to + 75 ºС.
- The material is absolutely harmless from an environmental point of view, does not decompose over time, does not emit harmful substances, and its service life is estimated at no less than 30 - 40 years.
Penoplex is produced in the form of rectangular slabs, usually orange, 600 × 1200 mm in size, with a thickness of 20 to 60 mm (in 10 mm increments), 80 or 100 mm. The slabs have a locking tongue-and-groove part, which makes installation extremely simple and minimizes “cold bridges” at the joints of the panels.
Several types of penoplex are produced, which are divided into classes, from “Penoplex 31C” to “Penoplex 75”. The main difference is the level of density of the material, which is quite clearly expressed by a digital indicator. In addition, the composition of Penoplex 31 and 35 additionally contains fire retardants, which significantly increase their fire resistance. However, for external insulation of the foundation this indicator is not decisive. For such work, they usually purchase material of class “35C”, “45C”, and for installation under a sole or under a slab foundation - “45”.
Prices for thermal insulation materials
Thermal insulation materials
Schemes and calculation of foundation insulation parameters
So, in order to achieve effective thermal insulation of the foundation and the thickness of the adjacent soil, the insulation system must include two sections:
Approximate layout of insulation and possible errors
- Vertical - a layer of insulation is installed directly on the foundation walls from the outside, from the very bottom to the top edge of the base. This solves the problem of eliminating “cold bridges” through the walls and basement of the building.
- Horizontal - laid out in a continuous layer around the perimeter of the building and prevents freezing of the soil around the foundation walls, thereby completely eliminating or reducing heaving processes to the maximum extent. Depending on the depth of freezing in a particular area, on the type of foundation and its depth, this layer can be located at the level of the base, or higher, at a depth above the freezing point. In practice, very often a horizontal layer of insulation is placed directly under the concrete blind area.
Scheme of thermal insulation of a foundation with an insulated blind area.
At the same time, experts recommend that the horizontal insulation belt be thickened at the corners of the building, at a certain distance along the walls - this will be discussed below.
What should be the thickness of penoplex for the insulation to be effective and fully justify its purpose? There are special calculation methods used by specialists. With some simplification, you can make a similar calculation yourself.
The thickness of the penoplex for the vertical section can be determined based on the following formula:
R = h 1/ λ 1 + h 2/ λ 2
R is the value of heat transfer resistance, a constant established for specific regions taking into account their climatic characteristics;
h 1 – thickness of the foundation walls;
λ 1 – thermal conductivity coefficient of the material from which the foundation is made;
h 2 and λ 2 – respectively, the required thickness of the penoplex layer and its thermal conductivity coefficient.
The value of R is easy to clarify in any local construction organization - it is established by SNiP 23-02-2003. For example, the table below shows this minimum value for some regions of Russia:
| City (region) | R - required heat transfer resistance m2×°K/W |
| Moscow | 3.28 |
| Krasnodar | 2.44 |
| Sochi | 1.79 |
| Rostov-on-Don | 2.75 |
| Saint Petersburg | 3.23 |
| Krasnoyarsk | 4.84 |
| Voronezh | 3.12 |
| Yakutsk | 5.28 |
| Irkutsk | 4.05 |
| Volgograd | 2.91 |
| Astrakhan | 2.76 |
| Ekaterinburg | 3.65 |
| Nizhny Novgorod | 3.36 |
| Vladivostok | 3.25 |
| Magadan | 4.33 |
| Chelyabinsk | 3.64 |
| Tver | 3.31 |
| Novosibirsk | 3.93 |
| Samara | 3.33 |
| Permian | 3.64 |
| Ufa | 3.48 |
| Kazan | 3.45 |
| Omsk | 3.82 |
For example, you can calculate how thick a vertical layer of penoplex should be on a concrete foundation 500 mm thick in the Moscow region:
R = 3,28
h 1 = 0.5 m
λ 1 for concrete - W/m×°K
λ 2 for penoplex – 0.032 W/m×°K
3,28 = 0,5 / 1,69 + h2/0,032
Simple arithmetic calculations give 0.0955 m. We should, of course, round up, and as a result we get a 100 mm layer of penoplex.
Calculator for calculating the thickness of foundation insulation
To make the work easier for site readers, we present a special built-in calculator that allows you to quickly and accurately calculate the thickness of thermal insulation for different materials and sizes of the foundation, and for various types of insulation materials appropriate in this case.
Go to calculations
You can use another calculation method. In a certain sense, it is even more convenient, since it will show not only the thickness of the vertical insulation, but also the parameters of the horizontal foam belt - its thickness and the necessary reinforcement in the corners of the building.
There is such a thing as the “frost index” ( IM ). This given indicator expresses the number of days with negative air temperatures and the magnitude of these temperatures characteristic of a particular region. It is expressed in degree hours. of IM with isotherm lines .
Scheme of the approximate distribution of the frost index (MI) in the European part of Russia
Having found out the IM for your area, it is easy to design vertical and horizontal insulation of the foundation, based on the data in the table:
| THEM | thickness of the vertical insulation layer (mm) | width of horizontal insulation belt (m) | thickness of the horizontal insulation belt (mm) | length of thickened sections from the corners of the building (m) | Thickness of the thickened section (mm) |
| up to 35000 | 84 | — | — | — | — |
| 35000 | 91 | 0.3 | 18 | 1.2 | 25 |
| 40000 | 98 | 0.6 | 32 | 1.2 | 44 |
| 50000 | 112 | 0.9 | 49 | 1.5 | 69 |
| 60000 | 126 | 1.2 | 63 | 2 | 95 |
| 70000 | 140 | 1.5 | 81 | 2.5 | 121 |
| 80000 | 154 | 1.8 | 102 | 3 | 152 |
| 90000 | 168 | 1.8 | 133 | 3.5 | 200 |
The values obtained from the table are rounded up. Then they must be brought to the existing standard foam thicknesses. When insulating the vertical part, it is recommended to provide two layers of slabs - this way all joints will be reliably covered and there will be no “cold bridges” left. Thus, if, for example, with a “frost index” of 50,000 degree-hours, a foam thickness of 112 mm is required, then it would be advisable to use two layers of insulation of 60 mm each.
Knowing the height of the foundation and its basement part, having determined the insulation parameters, it will not be difficult to calculate the required amount of material, based on the fact that the area of one panel is 0.72 m².
Video: tips for insulating the foundation with penoplex
How to insulate the foundation with penoplex
Vertical insulation of foundation walls
The table below shows an approximate sequence of work on vertical thermal insulation of the underground part of the foundation. It is clear that this work is closely related to the waterproofing of the concrete base, so this topic will also be briefly touched upon - as one of the stages of the insulation process.
| Illustration | Brief description of the operation performed |
| To ensure high-quality insulation of the foundation throughout its entire height, right down to its base, at the point of hardening and full strength gain, the formwork is removed, the soil is removed to its full depth, along the entire perimeter of the building - so that there is freedom of movement for workers. | |
| To ensure high adhesion of concrete to the waterproofing layer, good adhesion of rolled materials and insulation blocks, its surface should be thoroughly cleaned of dirt, dust, adhering debris, small irregularities (saggings) formed during pouring of the tape and identified after stripping. | |
| This cleaning is carried out using a grinder, equipped with a special grinding wheel for concrete. The operation is very dusty and labor-intensive, so many people often neglect it. However, to ensure a truly high level of waterproofing and insulation, skipping this step is not recommended. | |
| A primer is applied to the cleaned surface - a special bitumen waterproofing mastic. There are many of their brands on sale - Russian builders often choose domestic products, in particular, as shown in the illustration, “Primer No. 01,” which is excellent for pre-priming concrete bases. | |
| The primer is applied to the surface in a thick layer, so that all remaining unevenness in the concrete is completely covered. Particular attention is paid to small depressions, which often remain “dry”. The primer can be applied over large areas using a medium-pile roller, but in corners, in the area of transition fillets and in other difficult areas, a brush must be used. The surface of the foundation is completely covered from the outside with primer, from the base to the top edge, and in addition to this, the horizontal surface of the tape from which the construction of the base or wall of the building will begin is immediately primed. | |
| Next, the stage of basic waterproofing of the foundation surface begins. In the example under consideration, the craftsmen use the weldable roll material TechnoNIKOL Linokrom OM. To operate, you will need a gas burner and a propane tank. | |
| Fusing of rolled waterproofing is carried out by two people. One worker heats up a section of roofing material with a gas burner until the protective film melts. The second one rolls out the roll and presses the heated area to the wall surface. It is important that the roll must be correctly oriented - there are markings on its surface indicating the side to be melted (in the “standard” winding of the roll it is located on top). Work begins from the base of the foundation. Cover the outer side of the sole, transition fillets, with a layer of waterproofing, and go onto the vertical wall of the tape. | |
| After the outer layer has melted, the roll rolls upward, and the roofing material adheres perfectly to the primed surface. | |
| After gluing the entire measured piece of roofing felt to the top, you need to go back down - there the “starting” strip remains unglued. It is also carefully melted from below with a burner flame, then pressed and finally fixed on the wall surface. | |
| The work is usually carried out “tier by layer”, that is, first the lower part of the foundation tape with the sole is completely glued along the entire perimeter. This creates a kind of “reinforcement belt” in this complexly configured area of the foundation. Adjacent strips of roofing material must overlap each other by at least 100 mm. | |
| Particular attention is paid to the external and internal corners of the foundation. The strip of material must extend at least 150 mm onto the adjacent wall. If necessary, appropriate incisions are made. | |
| Then this entire “knot” will be covered with another sheet, heated on the adjacent wall. The same principle applies to internal corners. | |
| After the lower waterproofing belt is installed along the entire perimeter, moving higher - to the vertical part of the foundation strip. Strips are cut from the rolls in such a way that they overlap at the bottom with the already glued fragments by 100 mm... | |
| ...and in the upper part they completely covered the horizontal surface of the foundation strip. | |
| The work is carried out in the same order. The measured and cut roll of material is first, gradually rolled out, fused from bottom to top on the vertical surface of the tape. | |
| Then the horizontal surface of the foundation is glued. | |
| And, as before, the installation of the cut roll of roofing material is completed - fusing the bottom strip from which the work began. This continues until the entire foundation is covered with a primary layer of waterproofing. | |
| For reliability, it is recommended to cover this first layer of built-up waterproofing with a second, continuous layer, from the base to the upper edge of the foundation strip. | |
| The second layer will completely hide the “reinforcement belt”, and such waterproofing will no longer be afraid of any pressure of groundwater, rain or flood water. The waterproofing process is not shown in sufficient detail because on our portal a separate publication is devoted to this issue - “Do-it-yourself foundation waterproofing” , which discusses various methods, including the use of self-adhesive roll materials. | |
| After the waterproofing is completely ready, you can proceed to the installation of Penoplex insulation panels. To do this, one of several methods is used. Firstly, insulation blocks are often mounted with a special glue designed specifically for thermal insulation work. It can be sold in the form of a dry construction mixture, and then it will need to be diluted and kneaded to the required consistency in accordance with the attached instructions. An example of such glue is shown in the illustration. | |
| The adhesive composition may also be sold in ready-to-use form, in a paste state. It goes on sale packaged in jars or buckets. | |
| To install penoplex, you can also use bitumen mastic, the same one that was used to waterproof the foundation walls. The only condition is that the mastic must be water-soluble, since organic solvents (acetone, benzene, alcohols and other similar compounds) have a destructive effect on extruded polystyrene foam. However, a special bitumen mastic is produced, designed specifically for the installation of polystyrene foam insulation boards - this will be the optimal solution. | |
| They begin gluing the Penoplex boards from the bottom. If the foundation has a complex shape, for example, a pronounced stepped sole, then the insulation layer installed on it must exactly repeat it. In this case, you should strive to leave minimal gaps on the internal and external corners, carefully adjusting the cut pieces of penoplex. | |
| The glue is applied to the panels pointwise (in slides), but in such a way that after pressing them to the surface, the contact area is at least 40% of the total area. If the surface of the wall after waterproofing is highly even, then you can use a notched trowel with a ridge height of 12–15 mm to apply the adhesive. In any case, no matter how the glue is applied, it must be done in such a way that when the slab is pressed to the surface, it does not protrude at the seams and does not interfere with the joining of subsequent insulation slabs. | |
| When installing penoplex, be sure to combine the tongue-and-groove connection, achieving the tightest possible fit of the panels to each other. | |
| The entire underground part of the insulation is mounted exclusively on an adhesive composition. The use of any “mushroom” type anchors is strictly prohibited. Photos or videos circulating on the Internet with a similar method of attaching penoplex to the underground part of the foundation only indicate that the “masters” publishing this do not understand this technology well enough. Firstly, drilling holes for “fungi” will inevitably break the tightness of the created waterproofing layer, and all the work done in this regard will go down the drain. And secondly, there is no need for additional mechanical fastening - the soil backfill will reliably fix the Penoplex on the vertical surface of the foundation strip. | |
| The area located in the basement, ABOVE GROUND LEVEL , is additionally fixed to the surface using plastic dowels - “fungi”. A hole of the required diameter is drilled directly through the insulating panel, with a depth of 35 - 50 mm into the concrete (brick) layer, the “fungus” is inserted until it stops, after which the fixing core is driven in (screwed in, depending on the model). Subsequently, the cap of the “fungus” will be hidden by the finishing of the base. | |
| If the technology of fusing rolled material was used to waterproof the foundation walls, then another method of subsequent fastening of thermal insulation slabs is also practiced. Using a gas burner, surface melting of the glued roofing material is carried out, of course, very carefully to prevent through burning. | |
| For a whole panel of Penoplex, two or three such molten “spots” are enough. | |
| After pressing the panel, it is held for 10–15 seconds - the bitumen filling hardens, and the insulation is sufficiently securely fixed to the wall. | |
| After the entire surface is covered with penoplex, it is necessary to carefully seal the seams between the panels. In case of large gaps, they can be closed with scraps of material; for small ones, it makes sense to use polyurethane foam. However, if foam is used, then after it has hardened and cut off, it will be necessary to coat the seams with excess bitumen mastic to prevent moisture from getting on it - this can cause the polyurethane foam to begin to decompose over time. For Penoplex, it is best to use branded adhesive foam, which, by the way, is also well suited for gluing insulating boards to the surface of the foundation. | |
| If it is decided to place thermal insulation panels in two layers, then the second layer is laid offset, so that neither the vertical nor the horizontal seams coincide. This will practically reduce the likelihood of the formation of “cold bridges” to zero. | |
| After sealing the seams, it is recommended to protect the installed insulation from direct chemical exposure of the soil. Here you can do different things: | |
| The first option is to lay a reinforcing serpyanka mesh on the surface of the insulation and apply a thin layer of plaster, using the same adhesive composition or a special mixture for coating waterproofing work as a solution. | |
| The second option is to cover the Penoplex with a layer of inexpensive roofing felt or glassine, laid on bitumen mastic with an overlap of adjacent sheets of 100 mm. This, in addition to protection, will create another waterproofing barrier. But the best option is to use a special profiled membrane of the “PLANTER – standard” type. This modern coating becomes an impenetrable barrier to moisture, and the raised protrusions will serve as a kind of “damper pads” that prevent damage to the insulating layer when backfilling the foundation with soil. | |
| Waterproofing and insulation of the underground part of the foundation has been completed. Everything is ready to start backfilling. | |
| For large volumes of work, it is advisable to use special equipment. Please note that for additional insurance, the craftsmen installed temporary wooden supports. As the foundation is filled with soil, it is easy to remove them, and after filling the pit, thermal and waterproofing of the foundation, nothing can damage it. It should be noted that when backfilling soil, it is recommended to place a layer of sand (sand-gravel mixture) near the walls - this will help reduce the load on the foundation walls. Sometimes expanded clay is also used for these purposes, which will make the insulation even more effective. | |
| The backfilling has been completed - it will only need to be tidied up manually. This will be done at the stage of creating insulated blind areas. | |
| And the foundation strip itself became the basis for further work - laying out a plinth made of clinker bricks. |
Video: sequence of waterproofing and insulation work on the foundation
Horizontal soil insulation belt around the foundation
Approximate diagram of an insulated blind area
- When filling the soil, it is compacted sequentially. When about 300 mm remains to the surface level, the soil is compacted as much as possible and wooden formwork is installed so that it rises above the ground by 100 - 150 mm. The width of the insulation belt is indicated in the table above. As a rule, even if its table value is less than a meter, it is still recommended to maintain a minimum of 0.7 - 1 meter.
- A sand cushion with a thickness of at least 100 mm is laid and carefully compacted. Then a layer of rolled waterproofing material - roofing material - is laid, with the overlaps between the sheets glued with bitumen mastic.
The panels of the horizontal insulation belt should be as close as possible to the vertical ones.
- Penoplex slabs are laid on top of the roofing felt. It is necessary to achieve their maximum fit to the vertical panels so as not to leave a path for the cold. The joints between the plates are filled with adhesive or polyurethane foam.
- The foam boards are covered with a thick polyethylene film on top, leaving a small overlap on the base part. To strengthen the structure of the blind area, you can lay a reinforcing metal mesh or several parallel reinforcement bars on top of the film.
Reinforcing the blind area before pouring concrete
- The blind area is being filled. Concrete of a standard composition is poured into the formwork - 3 parts sand to 1 part cement. The solution must be thick enough to slope from the walls of the building to the edge of the blind area.
The finished blind area can later be tiled
- After the initial setting of the poured concrete, it can be hardened using ironing technology. Another, more optimal option is to cover the blind area with paving slabs.
Video: well-executed insulated blind area
The insulated basement part is also subject to mandatory finishing with plaster or facing with tiles, artificial stone or special panels. More information about plinth cladding technologies can be found in the corresponding portal publication.
Features of insulation of slab foundations
If any structure requires a slab foundation, then the main feature is that it is insulated with penoplex foam immediately during the pouring process.
Approximate layout of layers of insulated slab foundation
- Excavation work is carried out on the marked site - soil is selected to the depth specified by the project. The bottom of the resulting pit is leveled as much as possible by hand.
- A sand cushion with a thickness of at least 100 mm is poured. One must be thoroughly compacted. It is advisable to lay a layer of geotextile - dornite - over the sand cushion.
- The next layer is the so-called concrete preparation - the surface is filled with a thin layer of concrete filled with crushed stone. In this case, no reinforcement is provided.
- After the concrete substrate has hardened, it must be covered with a waterproofing roll material - roofing felt. One layer laid on mastic with careful gluing of the overlaps of adjacent sheets is enough.
- The formwork is installed around the perimeter to the required height of pouring the foundation.
- Penoplex slabs are laid out over the entire area with careful adjustment of the tongue-and-groove joints. For such work, it is better to use high-density polystyrene foam - brand "Penoplex 45" with a thickness of 50 to 100 mm. All joints, if necessary, are carefully sealed with polyurethane foam.
Before pouring the foundation, the laid foam slabs are covered with thick polyethylene film
- A polyethylene film with a thickness of at least 200 mm is laid on top of the laid slabs. The overlap of adjacent canvases is at least 150 mm, with the obligatory gluing of these places with construction waterproof tape.
- Next, the necessary reinforcement and pouring of the foundation are performed in accordance with the building design.
- After the foundation has finally gained the required strength, the formwork is removed and the vertical walls of the resulting slab must be insulated with penoplex. The installation of an insulated blind area is also carried out - it will not differ in any way from the process described above.
So, the process of insulating the foundation with penoplex is quite voluminous and labor-intensive. However, ignoring the importance of such work would be an unforgivable mistake. A foundation that has received reliable protection from both moisture and temperature changes will reliably serve without repair for decades, thereby maintaining the integrity of the entire structure of the house.
How to attach the insulation
To understand how to glue penoplex to the wall, check out all the possible options for the products. There are several ways to attach insulation. For example, using:
- polyurethane foam;
- cement mixture;
- disc dowels;
- polymer-bitumen mastic;
- "liquid nails"
Let's look at each method of installing penoplex in more detail and find out how to glue penoplex to a concrete wall, wooden surface or other materials.
Mastic
Bitumen-polymer mastic is recognized as one of the most practical and cheapest materials. Most often it is used to insulate the basements of buildings with constant high humidity.
Also, bitumen-polymer mastic is suitable for rooms with reagents that corrode other mixtures. Penoplex will be securely attached even when exposed to adverse factors.
The adhesive mixture is supplied in the form of tubes and is inserted into a special sealant gun. You can buy one at a building materials store. After installing the tube, you must apply the composition to the center and along the perimeter of the penoplex, as well as into the grooves. It remains to press the insulation sheet for a short time. Complete drying occurs in one hour.
Dry mixes
Reliable and simple option. The use of a dry mixture allows you to quickly and without hassle fix the insulation on a wall made of brick or concrete. To prepare the solution for use, dilute the powder in water according to the instructions. Now mix the mixture using a mixer attachment for a regular construction drill. Set the minimum speed.
Apply the solution using a notched trowel. Don't forget to fill the grooves; you can also do this with a spatula. Press the penoplex lubricated with the mixture onto the surface for one minute.
Adhesive foam
The ideal solution specifically for smooth stone surfaces. Since the adhesive mixture has high adhesion, even smooth insulation will be perfectly fixed to concrete surfaces and will not move over time. The foam is applied strictly along the perimeter of the slab; to enhance adhesion, it can also be applied to the center. It is enough to press Penoplex tightly for thirty seconds, with an average setting time of about twenty minutes.
You will be able to carry out further work with the insulation (for example, grouting) in two hours.
Disc dowels
The use of dowels is relevant for rooms with an uneven facade or large areas. To secure the insulation to the dowels, you will need a drill, a hammer drill and a hammer. So, how to properly attach penoplex using dowels?
Using a hammer drill, you must drill holes; each ready-made one has a recess in the base of about fifty millimeters.
Fill these holes with regular mounting foam, then place and hammer a disc dowel into them. Fungi should not protrude above the stove. One slab of penoplex will require about five pieces. One dowel can be used to fasten adjacent sheets of insulation.
Liquid Nails
The most expensive fasteners for penoplex. If the wall is already well primed and leveled, you can try attaching the insulation to so-called “liquid nails”. The glue is applied using sealant (or a glue gun) in the center and along the perimeter of the foam sheet. Now press the insulation against the wall for a few seconds.
But such an adhesive composition has a fairly high cost. Therefore, the method is suitable only for small insulation areas.
Polyurethane foam
An equally popular option for attaching foam sheets. Apply the foam using a gun, then hold the sheet until it fully adheres to the surface. But do not forget that the composition expands and breaks down over time, so this method is not recommended when installing insulation outside the house.
Features of fixing thermal insulation to the wall using dowels
The technology for fastening materials such as penoplex, polystyrene foam, and polystyrene foam is the same. First, the thermal insulation material is prepared, then the sheets are fixed to the walls using an adhesive composition. When the solution dries, they begin to fix the penoplex with dowels; before this, all seams must be processed so that cold bridges are not created through them. After this, the thermal insulation material is finished with a finishing coating, this can be various panels or plaster.
Before fixing the insulation material, the old plaster is removed from the surface of the walls, and all defects in the form of differences are eliminated using a solution. After this, the surface is degreased, this will help create high-quality adhesion of the adhesive composition to the wall.
The adhesive mixture for fixing the insulation material should not contain toluene, acetone or other organic solvents. To prevent the thermal insulation sheets from moving downward due to their natural weight, before laying the first row, I install a metal profile. After the solution has dried, fastening is performed using fungi. To do this, use a drill whose diameter is equal to the circumference of the dowel rod to make special holes. The length of the recess is made greater than the length of the dowel itself by one centimeter, thanks to this, the fixation of the fasteners will be reliable.