Beton-House.com
Website about concrete: construction, characteristics, design. We combine the experience of professionals and private craftsmen in one place
Floor beams on aerated concrete walls
Recently, a lot of houses are being built from aerated concrete. This lightweight and energy-efficient wall material has an affordable price, which is what made it so popular. But it is not very strong, so you have to carefully select materials for other load-bearing structures.
That is why wooden floors in aerated concrete houses are used much more often than monolithic or panel ones.
- Interfloor
Pros and cons of wooden floors in aerated concrete houses
Owners of private houses choose wooden floors because they:
- durable - high-quality processed and correctly installed beams last 100 years or more;
- accessible - the cost of wood is quite low, and an attractive price generates demand;
- easy to install - beams, unlike slabs, can be installed by two people or even one. At the same time, builders do without specialized equipment and without wet, labor-intensive technological processes. If necessary, do this work alone.
Wood is more convenient to use:
- ceilings and floors are much warmer than concrete; the structure does not need to be additionally insulated.
- the rough floor, which is obtained after the initial lining of the beams, is practically suitable for use. To give it an aesthetic appearance, you can get by with carpet, laminate or any other decorative and finishing material.
Unlike wooden ceilings, concrete ceilings need to be improved after the slabs are installed. Additionally you need to do:
- backfill with expanded clay,
- reinforce the surface and lay the screed,
- level it out;
- and only then – a month after it has dried – decorate the floor.
Regarding the disadvantages of wooden floors, it can be noted that they are rather theoretical in nature. Critics of this technology usually name two disasters that could happen:
- fire;
- biological pests.
In response, it should be recalled that 200 years ago builders were able to effectively prevent such troubles: houses built during that period are still in use in all major cities of the country.
Expert opinion Vitaly Kudryashov builder, aspiring author
Ask a Question
It can be added that even an untreated pine beam does not collapse in the 15th minute of a fire, like, say, a steel beam, but resists the flame for at least 40 minutes. And biological treatment today is much more effective than half a century ago.
Origins of combined buildings
The first in Rus' to combine houses were merchants, who borrowed this style from the Europeans. They allocated the colder, but stronger first floor made of brick or stone for a trading shop or craft workshop, and on top they built an apartment made of warm, fragrant wood, in which the family lived.
This type of buildings began to be used more widely after the fires that practically destroyed the capital, to combat which Peter I issued the highest decree. The main goal is to allocate floors with non-combustible walls for fire hazardous premises. The tradition of building houses according to this principle has been preserved today, and given the cost of brick, stone, and even more so high-quality wood, it is possible to make housing not only safe, but also cheaper.
Types of wooden beams
For the installation of floors, beams of three types are used:
- solid;
- glued;
- I-beam
Solid timber beams
Beams cut from one trunk have the disadvantage of warping. The fiber structure of wood is heterogeneous. When moistened and then dried, the board moves: it can bend like a propeller, or it can turn into a gutter.
For this reason, GOST limited the length of beams made of homogeneous solids. The norm is no more than 4.6 meters. In most cottages, the width of the rooms does not exceed 3 meters, so this wood is quite suitable for constructing floors.
Beams made of laminated veneer lumber
Glued laminated timber is considered more rigid. And all thanks to a special technology for connecting individual parts. The wood is unraveled along the grain, and then one half is turned 180° and glued together. The result is a composite of two layers, in each of which the fibers are directed in different directions. Deformation forces acting in opposite directions balance each other.
Glued beams are more technologically advanced: their length can reach 12 meters. This material is more durable. It is believed that the fire retardant characteristics of prefabricated modules are much higher than those of ordinary wood.
Prefabricated floors are made from glued beams. If the load on the main beam is too great, it is reduced by additionally installing spacer bars or installing intermediate columns.
Wooden I-beams
I-beams are a three-layer structure. It is interesting because the outer elements are wider than the middle lintel. This prefabricated beam has very high rigidity, strength and uniformity.
Working with I-beams is a pleasure. And these floors are convenient to use: they do not bend, do not creak, or crack.
The only disadvantage of such beams is the high price. But, as they say, the game is worth the trouble.
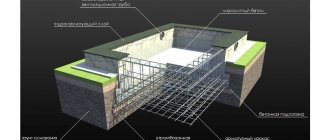
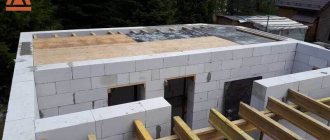
Construction of walls
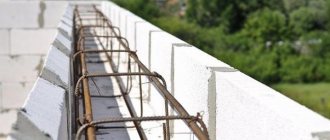
The lower floor is being built using conventional aerated concrete masonry technology. A special adhesive composition is used (the usual solution is used only for laying the first row of gas blocks). Then, after laying 3 or 4 rows (1 m in height), reinforcement is performed - placing 2 reinforcing bars in the grooves along the entire perimeter of the box. The top, final row of masonry is the armored belt. This is a row made of U-shaped blocks, into which a reinforcement cage is installed (a spatial lattice of 4 working rods) and concrete is poured. Threaded rods are immediately installed into the fill to secure the timber frame. It plays the role of the lower crown of the second floor made of logs or timber.
The second floor is built in the usual way - timber is installed with dowels. Insulating tape is placed between the rows for compaction. When the specified height of the second floor is reached, the floor is built and the rafter system is assembled.
The roofing is laid immediately. If the exterior finishing is carried out only after the completion of the shrinkage of the building, then the roof must be done as quickly as possible and in full to prevent rainwater from entering the house under construction. In addition, it is necessary to immediately organize the drainage of wastewater into a storm sewer (or to a discharge point) so as not to create a threat of flooding of the foundation.
What are the sizes of beams?
Beams can theoretically be made to any length, as long as the production line allows. However, standards in different countries set strict limits on the length of structures. This is due to the fact that the beam during operation should not bend by more than 1/350 of its length.
Expert opinion Vitaly Kudryashov builder, aspiring author
Ask a Question
The degree of deflection of the beam depends on the magnitude of the load per unit area of the floor. Therefore, the main parameter is the dependence of the interval between beams (step) on its length, width and height.
Relationship between cross-section, installation interval and span length:
| Design span length, m | Installation interval, mm | |
| 600 | 1000 | |
| Width x height of beam, mm | ||
| 7,0 | 150 x 300 | 200 x 275 |
| 6,5 | 150 x 250 | 200 x 250 |
| 6,0 | 150 x 225 | 175 x 250 |
| 5,5 | 150 x 200 | 150 x 250 |
| 5,0 | 125 x 200 | 150 x 225 |
| 4,5 | 100 x 200 | 150 x 200 |
| 4,0 | 100 x 200 | 125 x 200 |
| 3,0 | 75 x 200 | 100 x 175 |
| 2,5 | 75 x 150 | 100 x 150 |
| 2,0 | 75 x1 00 | 75 x 150 |
Disadvantages of foam concrete blocks
Along with a huge number of advantages, like all building materials, foam concrete blocks also have a number of disadvantages.
Existing types and sizes of foam concrete blocks
These are:
- Fragility. This can be especially true during transportation. The material may crack. Cracks may also appear during the laying of foam concrete blocks. However, these misunderstandings can be avoided if you handle the material carefully during delivery to a private site, as well as during the work process.
The process of storing foam concrete blocks - The porosity of the structure is not only an advantage. Due to porosity, the material is also susceptible to high levels of moisture absorption. However, this misunderstanding can also be avoided if you cover the finished structure with a special substance that does not allow moisture to penetrate into the material.
As you can see, there are significantly fewer disadvantages than advantages, and besides, you can handle the material in such a way that you don’t even have to remember the disadvantages.
An example of a house built entirely from foam concrete
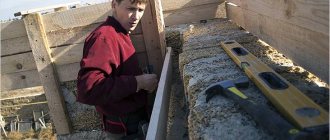
How to properly support wooden beams on aerated concrete
There are two documents approved by Gosstandart that regulate the depth of support of beams.
- One GOST establishes requirements for the use of wood, in particular beams. It defines the minimum support heel - 15 cm (when laying beams on wooden walls - 7 cm).
- The second GOST regulates the amount of support for floors on walls made of aerated concrete. It sets the size to 200mm.
In our opinion, when building a house from aerated blocks, there is a reason to be guided by the norm approved by the second standard.
There are technological subtleties when working with wood:
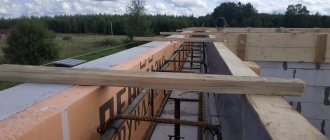
- a waterproofing, vapor-proof material should be placed under the beams to prevent dampness and damage to the wood;
- the ends of the beams are cut obliquely - at an angle of 70° to ensure ventilation of the internal fibers.
The cavities formed between wood and aerated concrete are filled with insulating material.
Installation instructions
Beginning craftsmen are offered the following step-by-step instructions, according to which you can independently, quickly and inexpensively cover the first floor of a new building:
- Carry out markings in accordance with the previously drawn up diagram, cut out beams of the intended length. It must be taken into account that the depth of their support must be at least 15 cm. Accordingly, the beam must be 30 cm longer than the distance between the walls.
- Treat the wood with an antiseptic, fire retardant and hydrophobic agent.
- Make waterproofing. Rolled, coating materials or a combination of both are selected. The most popular products are roofing felt, roofing felt, linochrome, bitumen, waterproofing. The disadvantage of coating is that it can be pressed through and lose its solidity.
Finally, communications are laid, the subfloor and ceiling are installed, insulation is installed, and finishing coatings are installed.
Methods for laying beams
In aerated concrete houses, beams are laid using one of two technologies:
- Beam
- Beam-distributed.
- The beam design is traditional and intuitive: the ends of solid or glued beams rest on walls facing each other.
- With beam-distributed technology, longitudinal elements are fastened together by short runs. This method allows you to reduce the number of beams, since the force experienced by the lattice at each point is lower than the load on the beams.
There are other installation methods, but they are rarely used, so we will leave their description for another article.
What is a combined house
A two-story house, the walls of which are built of stone and wood, is called combined. The walls of the first tier of the Alpine chalet, which became a role model, were made of rubble. The upper floor, where sleeping quarters were traditionally located, was built from debarked logs.
They still do this today if they build a house in the appropriate style - however, over time, the list of materials used has expanded significantly. Instead of natural stone, brick or concrete blocks are now used, and planed or glued timber, calibrated logs are often used on the second tier, and frame-cladding technology is also used.
How to install floor beams between floors in a house made of aerated concrete with your own hands
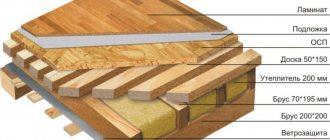
The general layout of the interfloor overlap looks like this:
- Basic structure. These are single beams - matitsa, or a lattice with short purlins - exchangers, as the builders say.
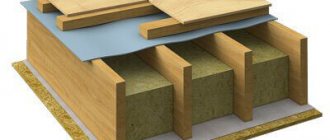
- The bevel between the beams is transverse boards laid on the cranial bars.
- Skull bars are longitudinal slats screwed along the lower border of the beams.
- Vapor barrier and insulation - rolled or panel materials laid on the roll.
- Joists are cross beams, the basis for floor boards.
- Finish floor - boards on joists.
- Finish ceiling - panels, hemmed from below to the runway.
In special cases, some elements may not be in the overlap. For example:
- When installing from below, rolling is not necessary. It is more advisable to install only logs and lay insulation between them.
- If the ceiling is mounted on top, then there is a reason to fix the roll, but you can refuse the lags.
Expert opinion Vitaly Kudryashov builder, aspiring author
Ask a Question
Important: a vapor barrier must be added to sandwich structures. This is an air-impermeable film that is fixed to the outer surface - on the side that is in contact with the colder environment.
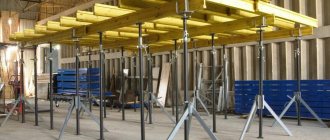
Technology of work execution
- Any practical work begins with calculations and planning.
We choose the most reliable floor scheme - the beams are located parallel to the short wall. Beams should be selected such that each square meter of floors can withstand a load of 400 kg.We select the cross-section and installation interval of the beams in accordance with the data in Table 1.
A rule of thumb: it is better to install fewer beams of larger cross-section than many small-gauge boards.
The optimal section is considered when the height is related to the width by a factor of 1.5.
Based on this data, we calculate each type of material.
- Preparing beams and wall surfaces for installation.
- We coat the ends of the beams with antiseptic and fire-retardant materials.
- Walls: first you should carry out leveling - checking the levels of marks. The support platforms for all beams must be in the same plane.
- The next task is to thoroughly clean the seats in the wall and install waterproofing gaskets.
- Installation of the first pair of beams.
This is a lighthouse couple. Beams are installed first at the extreme points - at opposite walls. Installation should be performed so that there is a ventilation gap of 3–5 cm between the ends of the beams and the wall.The beams are secured with dry gravel backfill; their edges are trimmed as indicated above.
- Installation of all floor beams.
- The intermediate beams are placed at the same level as the lighthouse beams. The gap between the wall and the end is a rule mandatory for all beams.
- The ends of the beams are filed at an angle, the edges are wrapped with roofing felt.
- The ends are secured. The gaps are sealed with a heat insulator, and CBR is poured into the free cavities.
- Further operations depend on the selected technology.
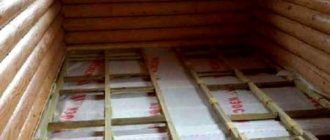
- You can install logs on the top. Insulation and vapor barrier are placed in the resulting grooves. Then the finished floors are laid.
- The second option is to attach longitudinal bars to the beams - cranial ones, the builders say. These slats run on each side at the very edge of the bottom rib. The slats are covered with bevels - transverse boards. Insulation and vapor barrier are laid on the ramp. Then the floors are installed on the upper surface of the beams, and the finishing ceiling is installed on the lower surface.
Preparation of materials and tools
Materials and tools are purchased after calculations have been made. The logistics technology is as follows:
- Based on the drawn laying diagram, a list and quantities of required materials are formed.
- Based on the analysis of the technical process, a list of tools and equipment is drawn up.
It is obvious that in addition to the basic materials - timber, boards, plywood, waterproofing, etc., you will need:
- auxiliary – primers, impregnations, paints (for metal and wood), crushed stone, etc.;
- hardware – screws, screws, hooks, various brackets, chucks, etc.
Tools and equipment: drills, angle grinders, winches, mixers for preparing CPR, clamps, saws, pliers, hammers, axes, grinding wheels.
Installation work
The main stage is, of course, the installation of beams. It implies competent preparation at the stage of construction of the first floor.
First, the wood should be pre-treated with a fire-retardant compound, as well as an anti-rotting liquid (this must be done with the entire crossbar). This must be done immediately after purchase. If the material will lie for some time before laying, it needs to be rearranged: a row of beams, then 3-4 bars across, then the next row. This will allow the board to ventilate and dry out. This will prevent mold from appearing.
The part of the beam embedded in the wall should also be coated:
- Bitumen or primer.
- Ruberoid, roofing felt or glassine.
- Liquid waterproofing agent consisting of bitumen.
- Linocrom.
This is done due to the fact that wood, when in contact with concrete and blocks, can absorb moisture and begin to rot over time .
Reference
For aerated concrete, an operating humidity content of 3-5% is considered normal. No matter how dry the blocks may seem, direct contact of wood with this material is unacceptable.
The beam must be embedded into the load-bearing wall at least 12 cm. The ends are cut at an angle of 70 degrees in order to ensure the removal of moisture.
Attention!
There is no need to cut off the end of the beam with waterproofing material. Otherwise, access to moisture evaporation will be blocked. It is required to leave a small air gap between the end of the beam and the wall.
Beams are laid on a reinforced surface (to enhance the strength of the structure). Instead of an armored belt, some manufacturers in small houses allow a 6x60 mm metal strip to be supported on aerated concrete with a lining.
The beams are fastened to the reinforced belt in houses made of gas silicate using anchor bolts.
To insulate the street side, insulation can be placed in front of the beam. As a rule, the outer ends of the beams are insulated from the outside with expanded polystyrene.
Filling the voids between the laid beams is done with gas blocks. Gaps of 2–3 cm are left between the gas silicate and the timber. They are tightly packed with mineral wool, thus preventing the formation of condensation and dampening of the beams.
Do not forget to think about the placement of the stairs to the second floor , since the opening must be provided immediately:
Well, that's all, the floors are ready. Now you can begin the subsequent finishing.
Using slabs
The flooring of a house made of reinforced concrete slabs or foam concrete has a fundamental difference related to mass. Their use significantly reduces construction time. The need for slabs is determined depending on the size of the object. The span between the supporting walls should be 30 cm less than the length of the product. This will allow them to install a supporting surface of 15 cm on each main wall. The location of reinforced concrete slabs, depending on the building design, can be longitudinal or transverse.
When using a concrete floor, it is necessary to use a reinforced ring belt
The weight of finished reinforced concrete products is 0.9-5 tons, which allows the use of truck-mounted cranes with a lifting capacity of up to 5 tons. Depending on the area of use of reinforced concrete products, they differ in the perceived load, which is 600-800 kg/m2 for residential premises, and 2000 kg/m2 for industrial facilities and public buildings.
The length of hollow slabs is standardized and is:
- 6 meters – for products with a smooth surface
- 9 meters – for products with a ribbed base.
The basis for installing reinforced concrete slabs is the main walls of the building. Before installation, the top row of foam blocks is equipped with a power belt, then the slabs are lifted using a crane.
The main advantages of reinforced concrete products:
- Limited installation time.
- Increased load-bearing capacity.
- Increased reliability of the base.
- Long service life.
- High noise insulation and heat protection characteristics.
- Acceptable prices.
- Fire resistance.
- The plates are manufactured in industrial conditions that guarantee the quality of the products.
Prefabricated types of floors are made using slabs that are attached to load-bearing walls
Negative sides:
- impossibility of installation without the use of special lifting equipment;
- limited selection of slab sizes;
- the need for special access roads for transporting slabs to the site;
- difficult installation when the main walls are curved;
- Highly qualified installation specialists are required.
The slabs are installed on a cement-sand mortar. The cavities are filled with mineral wool, which increases the thermal insulation of a building made of foam blocks.
Floor slabs made of gas-filled and foamed concrete are recommended for buildings built from foam blocks.
Announcements on NN.RU - Construction
We offer new rolled metal, used circle, sheet, pipe 1. circle f170 st. 20 - 10 tons - 33,000 cash. new length from 1850 to 2600.
Log house 6*9 five-walled, 2.8 m high, planed logs. Price: 360,000 rub.
Orchid set author new free delivery within the city of Nizhny Novgorod Dzerzhinsk. The Dastorg factory offers - kitchen corners with. Price: 8,000 rub.
Milan kitchen table new with free delivery to your doorstep in the city of Nizhny Novgorod Dzerzhinsk. Size: 1154*752*756 mm frame: legs. Price: 4,500 rub.
Did you like the article? Follow our channel for new ideas of useful car tips. Subscribe to us in Yandex.Zen. Subscribe.
When installing a rough floor in a house, we need to proceed from several foundation parameters.
It is depending on the type of base that we install the floor.
Tape base
A foam block structure does not always require a strong foundation, so a strip foundation is ideal for construction technology.
Let's take a step-by-step look at how to make a floor in a house from foam blocks, taking into account the strip base:
- We remove all the vegetation that we have between the concrete walls.
- Add a layer of sand or expanded clay and compact everything well. This will be a kind of pillow for us.
- We lay waterproofing on the cushion layer.
- We install beams.
Let's make a small digression here.
To attach beams to concrete walls, we need:
- Make the markings, using a hydraulic level and accurately.
- You can waterproof the concrete surface with your own hands using mastic.
- Place the beam on the anchor, in increments of 50-60 cm.
Now that we have attached the perimeter beams, we can begin the sheathing.
Advice! Depending on the future floor covering, we determine the level of the first floor covering, that is, if we still have insulation and laminitis, we must reach the zero level at which the door will open normally.
Next, we begin to install the beam on the shelves, and we try to ensure that it lies perpendicular to the short side of the room, if we have a rectangular room. That is, we place them by width, not length. (see also the article Is it necessary to insulate a house made of foam blocks: expert advice)
Ground floor floor: requirements
In order to properly arrange the ceiling on the ground floor, you need to know about the requirements that it must meet:
- The material must be strong, reliable and durable.
- The ceiling must adequately withstand climatic, technological and temperature influences.
- The structure must withstand permanent and temporary loads from load-bearing walls and foundation.
- The base must be quite rigid, with regard to the permissible performance of the structure for deflection.
- The design should not create bridges of sound and cold;
- The material must have thermal insulation properties.
1st floor floor structure