Concrete is one of the most ancient building materials. Due to its versatility, it is used both for load-bearing structures and for finishing. If it is better to entrust the construction of walls to professionals, then creating a beautiful facade or sidewalk can be done by any craftsman. The most accessible way is to add texture using a stencil.
There are several types of stencils:
- roll;
- stamp;
- roller
Everything can be purchased in the store, but to create an exclusive work, it is better to make them yourself.
The essence and possibilities of using this technology
Stamped concrete is ordinary concrete, onto the surface of which decorative embossing is applied using special stamps. The relief pattern can imitate any material: brick, paving stones, boards, animal skins, weathered stone, cracked earth. You can choose stamps with leaf patterns, dinosaur footprints, and animal figures.
Stamped concrete is especially popular when decorating terraces, patios, areas near swimming pools, garden paths, sidewalks, gazebos, floors in restaurants and exhibition halls. This technology becomes indispensable for complex restoration work. For example, when it is necessary to recreate a destroyed part of an ancient pavement. It is often not possible to find exactly the same materials that have aged naturally. And with the help of stamped concrete technology, exact copies of existing old brick or half-erased stone can be easily created.
How to arrange paths in the garden
A summer cottage is a place where you want to switch away from the bustle of the city and take a break from the gray, faceless landscapes. Therefore, it’s nice when grass not only grows in the garden, but you can walk along beautiful paths. In addition, equipped paths provide an opportunity for safe walking in the garden at any time. After all, you can slip on the grass after rain. Different materials are used to make tracks :
- natural stones (limestone, sandstone, marble, basalt, granite);
- wood (boards, tiles, saw cuts);
- paving stones;
- paving slabs;
- bricks;
- gravel;
- plastic;
- tennis player (covering the same as on the courts);
- concrete.
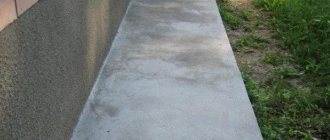
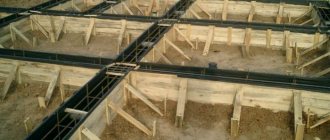
Each of them has its own advantages and disadvantages, but this article will only talk about concrete paths. To make them, you need to buy formwork for the paths. It will become the basis for pouring the concrete mixture.
Formwork for paths Source fermerslife.ru
Variety of stamps for printed concrete
The first stamps for stamped concrete were made of cast aluminum and were massive molds equipped with handles. Such matrices are well suited for simulating ordinary brick or stone patterns. But they are unable to copy complex textures. Modern polyurethane stamps are a completely different matter. They are cast on real materials, the texture of which must be copied. As a result, incredibly authentic textural effects can be achieved using polyurethane molds.
Ready-made stamps can be purchased at many construction stores or centers. When choosing, you should pay attention to the degree of rigidity of the shape. The denser the stamp, the easier it is to create a clearly visible design. Forms that are too soft and pliable are more difficult to work with and require more effort during the printing process.
Work technology
Even beginners can work with a relief roller; only minimal plasterer skills are enough. The main requirements are accuracy and precision.
Before using the roller, the plaster must be dried for 20 minutes. If you do not do this, the liquid solution will flow and deform, so the relief will be blurred.
The roller is rolled along the wall, and each strip should lie end to end with the previous one, without any gaps. It is also impossible to work with an overlap, since the pattern will be distorted.
If the pattern formed by the roller is too harsh, it can be softened with a wet brush
If the design concept requires a textured surface without a high complex relief, you can dilute the plaster thinner and apply it directly to the wall with a roller. In any case, after treating the wall with a roller, you need to leave it untouched until the solution has completely hardened. The room temperature should not be lower than +5ºС. Drafts and high humidity are extremely undesirable - they are fraught with uneven shrinkage of the solution. And this, in turn, leads to drips and cracks.
Self-production technology
The technology of stamped concrete is quite simple, but you should only take it on if you already have some skills in working with concrete. Otherwise, the result may not be what you expected. Problems may arise for the following reasons:
- concrete hardens quickly, after which the use of stamps does not produce clear embossing on the surface;
- To perform embossing using stamps, you need to apply physical force;
- errors in embossing a concrete surface are difficult to correct;
- stamped concrete technology requires the worker to be able to use special tools to form and smooth the surface.
Once you are confident that you can handle the potential problems, you can begin creating the concrete pad and performing the stamping work.
Step 1. Preparing the concrete site
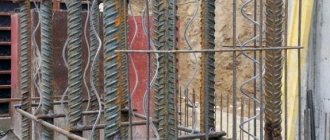
The basis for stamping is a regular concrete platform with reinforcement, made of concrete grade M350 and higher.
Technology for creating such a platform:
- using pegs and a cord, mark the boundaries of the area where stamping will be carried out;
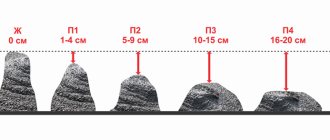
- remove the top layer of soil (depth 15-20 cm), compact the soil bottom;
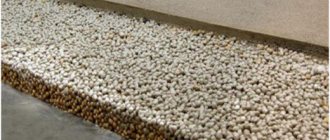
- pour a crushed stone cushion (10-15 cm thick) onto the bottom of the excavation and tamp it down;
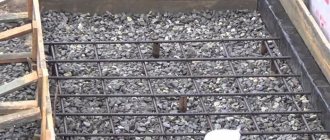
- formwork made of boards is installed along the border of the site;
- lay a reinforcing mesh in the formwork, raising it above the ground level by at least 3-5 cm (by placing stones and bricks under the mesh);
- concrete is mixed manually, using a concrete mixer, or ordered ready-made;
- concrete is poured into the formwork, a metal rule is used to obtain the required level of the site;
- compact the concrete with a vibrating screed;
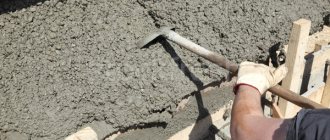
- The top layer of concrete is smoothed with a trowel, achieving a smooth and uniform surface.
Step #2. Application of color hardener
A colored hardener is applied to still fresh concrete, which simultaneously colors the surface and increases its strength. A colored hardener is a powder that contains coloring pigments, a binder filler and ground particles of granite and quartz sand. Due to the dispersion of the mixture, its particles penetrate into the pores of concrete and fill them. The concrete surface becomes more dense and durable. At the same time, the particles give the concrete a lasting color (about 30 tones to choose from).
Work on applying a colored hardener begins after the initial setting of the concrete surface. You can focus on the moment when all the water that appears from the surface has evaporated.
Colored hardener powder is scattered over the concrete surface manually, from the center of the site to the edges. At the same time, they perform movements similar to throwing a bowling ball. Scoop up a portion of the powder, move your hand back and with a sharp movement throw the mixture forward from waist level. This principle of applying powder minimizes the number of particles flying through the air.
The first layer of hardener should be absorbed into the concrete, which takes 5-10 minutes. During this time, the surface of the concrete is smoothed by rubbing the dye into it using a magnesium smoother. Corners are also processed using corner smoothers to make them curved and neat.
Then a second layer of colored hardener is applied. It is necessary to paint the surface more evenly and compact it. The powder is applied in exactly the same way as in the first case. After application, the surface is leveled with a steel trowel.
Step #3. Application of the release agent
The release ink prevents the concrete from sticking to the dies during the printing process. In addition, it additionally colors the surface of the concrete, giving it subtle shades of color. The release agent is available in the form of a dry powder or liquid. Most often, powder is used, applying it to the surface of the concrete with a wide brush (brush).
The brush is immersed in a bucket with a separating component so that the bristles are evenly covered with powder. Then, holding the brush at waist level, throw your hand forward and “spray” the powder over the surface of the concrete.
After painting, the corners of the area are treated with textured sandpaper.
Step #4. Surface stamping
Before you start stamping, you need to make sure that the concrete has acquired the required degree of plasticity and has become similar in consistency to plasticine. If you start stamping too early, the concrete surface will not be able to support the weight of the workers and maintain the print lines. If you are late, you will have to put more effort into the stamps to print clearly. In addition, the texture of the stamps may not be imprinted at all on concrete that is too dense, especially at the end of the job.
To determine the degree of density, just press your finger on the concrete surface at several points on the site. If there are prints left with a depth of 4-6 mm, then stamping can begin. You can also check it another way: place a stamp on a concrete surface (at the edge of the site) and step on it. The stamp must support the weight of the worker, not sink into the concrete, and not slide across the surface.
If all tests pass successfully, you can begin stamping. The stamps are laid out on the concrete surface, one after another. Manufacturers often number the stamps (1, 2, 3... or A, B, C...) to indicate the desired sequence of their placement in the printed design.
To imprint the texture of the stamps into the concrete, you can often simply step on them. Sometimes light hand tampers are used for this.
After the prints are made, the concrete surface is left to cure for 12-24 hours.
Step #5. Elimination of defects
On the concrete surface, where the dies meet, a slight displacement of the cement mortar often occurs. Sometimes, due to insufficient compaction, the seams of the printed pattern may appear blurry and indistinct. To correct surface defects, a hand roller is used along the seams and joints, and uneven surfaces are smoothed out with textured sandpaper.
Step #6. Cutting shrink joints
Several cut seams in the slab provide stress relief and prevent cracks. Such joints can be made in still fresh concrete using a special cutter. Or cut the seams with a grinder after the concrete has dried.
Step #7. Surface washing
The next day, wash the surface. Use a hose to wash off excess release agent. Afterwards, an acid wash (with hydrochloric acid) is performed to obtain the desired effect of a combination of two colors on the surface. During this process, the pores of the concrete also open, which promotes better interaction of its surface with the sealant.
Step #8. Applying sealant
The next day, a sealant varnish is applied to the concrete. It performs a number of functions:
- protects the surface from abrasion and wear, as well as from the penetration of oils and chemicals;
- gives the surface a shine of varying saturation (from barely noticeable satin to rich varnish);
- enhances the color saturation of concrete;
- simplifies the care of the treated surface.
The sealant is applied with a roller, rolling it over the surface. But, if the stamped texture has deep imprints, when applying sealant it is advisable to combine rolling with a roller with additional processing with a brush. Typically 2-3 coats of sealant are required.
After the sealant has dried, the stamped surface will be completely ready for use.