Beton-House.com
Website about concrete: construction, characteristics, design. We combine the experience of professionals and private craftsmen in one place
Ideally durable and beautiful floors
So, you own a garage with a rough concrete floor. This type of floor most often has flaws. These could be chips, incorrect slope, or delamination of the upper part of the concrete pour.
How to level a concrete floor in a garage, make it more practical and durable? In this article we will tell you about the stages of pouring the finishing screed in the garage, what measures should be taken, and what material to choose.
- Types of self-leveling floors
- An example of pouring an ideal floor
Causes of irregularities and types of damage
When driving and parking a car in a garage, the floor covering has to withstand static and dynamic loads, the influence of aggressive substances, and in an unheated room is subject to temperature changes. This reduces the strength of concrete and promotes the appearance of cracks. After initial violations of the integrity of the coating, the destruction process begins to proceed faster and potholes gradually appear in places of cracking. To prevent them from harming the car, bumps often have to be repaired.
In addition, the reasons for the appearance of floor defects in a garage may include:
- discrepancy between the load of the material and the strength of the coating, which may arise due to a change of car or incorrect calculations during construction;
- low quality concrete, which is the result of improper preparation of the solution;
- poorly prepared base for screed or slabs, formation of voids under the concrete surface.
Due to various reasons, numerous types of damage occur, which can be divided into:
- mechanical (cracks, chips, potholes);
- installation problems caused by improper installation of the screed, despite the high strength of the material (“washboard”, small bulges and holes);
- internal, which appeared due to poor quality of the solution (air cavities, cavities inside and under the concrete layer).
Minor defects are eliminated using local or partial repairs. But in case of large-scale damage or a discrepancy between the thickness and strength of the coating and the loads it experiences, the screed must be completely replaced.
Materials for backfilling.
The next step is to select materials for the cushion under the base. This is no less an important stage, because the more firmly everything is done, the better quality and more durable it will be. Therefore, if you are going to do it, do it well. For a good coating, it is better to use crushed stone; gravel is not suitable for such work, as it will be difficult to compact. Therefore, we buy and fill it with medium and fine crushed stone. The average should be somewhere around 60-70%; the rest is fine crushed stone.
It is important that the sand is free of clay impurities, otherwise you will violate the technological instructions and this may subsequently lead to the appearance of cracks and potholes. And of course, sift the sand before you fall asleep.
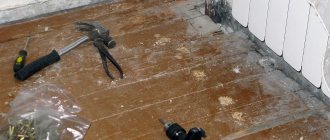
Repairing cracks
Cracks can appear for various reasons, including simple wear, errors made during installation, and the influence of external factors. Removing cracks begins with expanding the defect to allow the solution to penetrate inside without hindrance. When expanded, it is also possible to detect hidden damage that is difficult to determine visually. Under the crack you can sometimes find the reason for its appearance: a void in the foundation laid under the screed.
Expansion is carried out using a chisel, inserting it into the slot and hitting the tool with a hammer. Before repairing deep and long splits in concrete, it is advisable to lay reinforcement. To do this, narrow grooves about 1 cm deep are cut across the recess. Short sections of rod are placed in them so that they extend onto the intact monolith by at least 7-10 cm on each side.
Broken parts, dust, and pieces of filler must be removed from the excavation before repairing it. Rinse the cracks with water under pressure, removing any remaining dust. Dry the excavation prepared for repair and prime its surface with a concrete primer. This measure will increase the adhesion of the newly laid mortar to the old coating.
The prepared crack is repaired using the following steps:
- Mix M400 cement and water to obtain a semi-liquid dough. Add PVA glue (1:1) as a plasticizer and mix the solution with a mixer until completely homogeneous.
- Pour the repair compound into the recess; you can push it deeper with a spatula. Fill the grooves with reinforcement with the solution. When filled correctly, the solution protrudes slightly above the floor level.
- After 24 hours, you need to level the surface, removing excess mortar that remains outside. To do this, use a grinder, and if the amount of work is small, use a large piece of sandpaper stretched over a block.
Video description
The video shows the technology for assembling a plank floor:
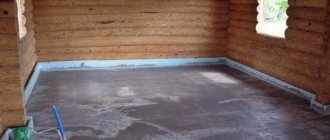
Wooden floors on the ground
This means that there is no solid foundation inside the garage. The structure was simply built on a strip foundation, between the elements of which there was earth from dug trenches.
First, the soil is leveled. Then the entire plane is covered with a 5 cm layer of sand, which is leveled and compacted. After that, a crushed stone layer 10 cm thick is poured, which is also leveled and compacted.
In principle, this is not necessary, since the screed will not be poured over the prepared sand-crushed stone bed. This is simply how a filter layer is formed that will quickly absorb liquids spilled on the floors and passing through it.
Brick stands for logs built on the ground Source santorpack.ru
An easier way to do this is:
- Bricks or concrete blocks are laid
every meter on the leveled ground . You can make small recesses under them, into which it is recommended to lay waterproofing material, for example, roofing felt folded in half. - Stands for logs
are placed in one horizontal plane. In principle, the leveling technology is exactly the same as in the case of lags. - That is, on the opposite wall from the entrance,
the two outer stands aligned horizontally - Next, they do the same with the bricks
(blocks) near the entrance. - Then all four stands are placed
in the same horizontal plane. - After that, stands are placed
both in transverse rows and in longitudinal ones. That is, it turns out that all the blocks form one plane with their upper ends.
Stands can be formed from different materials. For example, it could be timber, paving slabs, stone tiles, paving stones and other durable materials. Often, linings are made of reinforced monolithic concrete. That is, waterproofing material is placed in the dug hole, then a metal mesh, and then concrete is poured.
When the stands for the joists are ready, they begin to assemble the joist structure. Everything here is the same as when forming a wooden floor over concrete. And exactly the same technology for assembling floorboards.
Elimination of bumps and holes
Bulges can form from sag of the solution when it is inaccurately stretched during the manufacture of the screed. They need to be removed to avoid injury when moving around a garage with an uneven floor. The removal of the bumps is carried out with a chisel or perforator with an appropriate attachment. If the protrusion is formed by the edge of the reinforcement, it will have to be cut off with a grinder.
When trying to smooth out numerous small irregularities, it is better to use a milling cutter. The tool makes it possible to obtain a smooth concrete screed coating without additional work to level it.
Potholes in concrete also require local repairs without replacing the screed throughout the entire garage area. The surface of the pit must be cleaned from broken fragments to a durable monolith. Remove the resulting debris with a construction vacuum cleaner, pour crushed stone (fraction up to 2 cm) into the recess. The backfill level should be 2-5 mm below the edges of the pit. The prepared recess is filled with epoxy concrete, prepared according to the instructions for the kit, including powder (component A) and a mixture hardener (component B).
Stop work until the mixture dries. You can continue in 30-50 minutes. After this, the pit is filled with cement-sand putty, leveling it with the floor surface. Dry the putty layer for 12-24 hours and sand with coarse sandpaper.
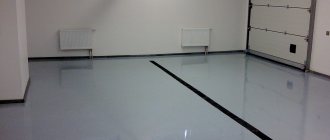
Self-leveling floor
Self-leveling flooring is expensive, but the benefits of such a coating well justify the cost. The service life of a self-leveling floor is at least 40 years, it has very high strength, is easy to clean, does not burn, and has a perfectly flat surface. Epoxy and polyurethane industrial mixtures are best suited for garages. You can carry out the installation yourself, because the filling technology is very simple.
Self-leveling floor
pros
- wear resistance, which remains at the initial level over time;
- good thermal insulation properties (even for coatings with minimal thickness);
- impact resistance, ensuring the ability of the surface to withstand heavy weight and mechanical impacts of various kinds;
- moisture resistance;
- frost resistance;
- excellent spreadability of the mixture, ensuring even pouring;
- solidity of the surface, which implies the absence of any seams on the finished floor.
Minuses
The disadvantages of self-leveling floors include the relative high cost. This is due to the high cost of the components that make up the mixture. However, when the task is to choose a material to create a high-quality and durable coating, it is better not to skimp on raw materials.
What is self-leveling floor
Stage No. 1. Preparatory work
The rough base is cleaned of dust and all cracks are sealed. Recesses more than 3 cm deep are also filled with solution and dried. After this, the floor is treated with a primer twice.
Prices for self-leveling floors "Starateli"
self-leveling floors prospectors
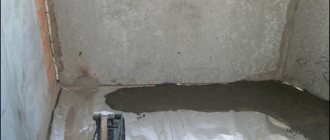
Stage No. 2. Pouring the mixture
The floor solution is prepared exactly according to the instructions, otherwise the quality of the coating will decrease. During operation, the temperature in the garage should not be less than 10 and above 25 degrees. If the room is large, pouring is done in stages, dividing the area into several sections. Level the mixture with a needle roller, carefully removing air bubbles. It will take about 20 days to dry, after which the coating is ready for use.
Self-leveling floor device
Leveling the squeegee mixture
Leveling with cement-sand mortar
If there are too many potholes and cracks, the only way to repair the floor is by completely replacing the screed and pouring concrete over the entire surface of the floor. If there is no suspicion of the presence of voids under the coating, then a new layer can be laid without dismantling the old one. But if there are internal defects in the old covering, if there are differences in heights of more than 5 cm, or if there is severe wear, it is best to remove the old floor and make a new screed. At the same time, you can insulate and waterproof the coating.
Dismantle the concrete using a hammer drill, completely removing the screed over the entire area of the room. For repairs you will need:
- construction benchmarks (beacons);
- cement, sand and crushed stone;
- reinforcement mesh with mesh 15x15 cm;
- roofing felt;
- thermal insulating material (EPS with a thickness of at least 5 cm);
- boards for formwork near the inspection hole.
Level the garage floor horizontally and cover it with plastic film or roofing felt, overlapping adjacent strips and gluing the joints. Eps boards are placed on top of the waterproofing, and a reinforcing mesh is laid out on them. Then formwork is installed around the inspection pit and against the walls.
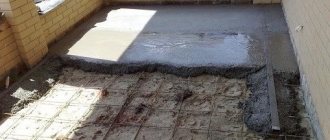
Main works
Determine the highest point of the floor. Level the rest of the surface along it, installing rows of screed beacons. They use a special thin metal profile, fixing it on racks made of alabaster mortar. The height of the beacon above the level of the floor insulation is at least 6 cm, and if the garage is intended for a heavy car, then at least 10 cm. Using a level, check the horizontality of each beacon and 2-3 adjacent rows. The distance between the beacons is 30-40 cm.
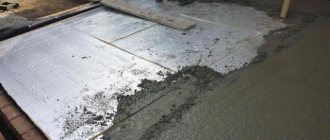
Mix a solution of 1 part cement, 3 parts sand and 4 parts crushed stone with a fraction of 1-2 cm. Its consistency should be semi-liquid. Installation of the screed begins from the far corners of the garage:
- pile 2-3 buckets of solution between the beacons;
- put a long wooden rule on the profiles, fill the corner;
- stretch the heaped concrete towards the exit, without tearing the rule away from the beacons.
To facilitate stretching, perform oscillatory movements, usually to the sides. When all the concrete is leveled along the beacons, you need to lay out the next portion and repeat the process. Concrete will reach full strength in approximately 21 days. Before this, the coating cannot be used.
Final works
To prevent the surface from cracking during the drying process, the screed is watered daily. Finishing with self-leveling mixtures will help make it smoother. They are applied in a thin layer over the screed approximately 1 week after its installation. As a finishing layer, a liquid cement-sand mixture is used, pouring it onto the screed in a layer of 1-2 cm.
If you choose ready-made mixtures with appropriate properties as a leveling agent, the floor will become additional resistant to oil, gasoline and other aggressive liquids. When choosing what to level the floor with, they often focus on the final cost of the work.
The formwork around the inspection pit must be removed the day after pouring. Until the concrete gains strength, after removing the formwork, the edges must be treated with abrasive tools, removing its unevenness and sharp edges.
Ceramic tile covering
This option is quite expensive, since high-quality floor tiles are expensive. But this floor looks great, is easy to clean, and produces very little dust. Tiles must be purchased with a wear resistance class of at least 5, and if there is no heating in the garage, then frost-resistant. It is recommended that installation be carried out no earlier than 2 years after the construction of the garage, otherwise the coating will deform during shrinkage.
Ceramic tiles in the garage
pros
- aesthetics;
- ease of installation and further maintenance;
- practicality and reliability;
- high performance;
- acceptable cost.
Minuses
When water or other liquid substances come into contact with the surface, the surface becomes slippery. For this reason, it is better to choose a product that contains special substances that provide an anti-slip effect. Also, the material is not very impact-resistant, which creates inconvenience, especially when you have to work with various tools that sometimes fall on the floor.
Ceramic tiles for garage
To work you will need:
- primer;
- tile adhesive;
- ceramic tile;
- notched spatula;
- level;
- plastic crosses for seams;
- grout.
Prices for grout for Ceresit tiles
ceresit tile grout
Stage No. 1. Preparing the base
The tiles are laid on a concrete base. If the rough screed has been damaged during use, you need to repair all the irregularities with cement mortar, clean it of dust and cover it with two layers of primer. It is enough to simply prime a high-quality screed.
Primer screed - photo
Stage No. 2. Floor covering
The adhesive composition is diluted according to the instructions and allowed to brew for 10 minutes. Apply part of the adhesive to the back side of the tile, and apply the rest to the floor with a notched trowel. Place the tiles on the floor, level them and press them gently. Plastic spacers are inserted between adjacent fragments to ensure uniform seams. After leveling, the tiles are checked with a level to ensure the floor is perfectly level. Glue should not get on the front side of the ceramic; all accidental splashes and smears should be wiped off immediately with a rag.
Start laying tiles on the floor
Trimmed tiles near the garage wall
Stage No. 3. Grouting joints
After installation, you need to wait 3 days and rub the seams. For this, a special cement-based composition is used. The seams are moistened, and then the working mixture is applied with a narrow rubber spatula. After filling the seam, remove the excess with a gentle, sharp movement. When the process is completed, allow the grout to set for half an hour, after which the seams are washed with a damp sponge. You can drive your car into the garage after 2 weeks, when the glue has completely dried and the floor has acquired the required strength.
Grouting joints
Leveling with ready-made self-leveling mortar
Leveling a concrete floor in a garage can be done using levelers - polymer-based mixtures. These are expensive compounds, so they are used as a material for finishing a new screed or repairing an old one, if it is not dismantled.
The work is carried out in 3 stages:
- Applying primer to concrete. It must be selected taking into account the composition of the leveler.
- Elimination of major defects (if the screed has not been changed).
- Applying a leveling layer. The composition must be stirred and poured onto the garage floor. Roll the liquid mixture with a needle roller.
Primary waterproofing
The optimal scheme for the primary waterproofing layer is as follows:
- along the perimeter of the installation there is a rubber bitumen tape on a self-adhesive base;
- the surface is coated with bitumen class mastics with an approach to the walls of about 200 mm;
- Rolled waterproofing materials are laid. It is optimal to choose materials of the bitumen class (glassine, roofing felt, fiberglass or fiberglass insulators).
Strips of rolled material are spread with an overlap of 10-15 cm and overlapping the walls by 10-15 cm. The overlapping areas of the strips are melted with a blowtorch or a hair dryer. Floating materials can be selected as a waterproofing material. However, their use is somewhat irrational. With a noticeably higher price and complexity of application, they do not show a noticeable increase in the results of use.
Tools
To make a screed without extra effort, you need to use tools, and sometimes you need the help of practitioners. If the work of a concrete mixer, milling cutter, laser level is required only for repairs, expensive equipment can be rented.
In addition to them, you will need simpler tools that can be bought and left for use in other areas of the economy:
- building level to determine horizontal and vertical;
- a needle roller to expel air bubbles from the leveler;
- rule for distributing the mortar (also useful when plastering walls);
- shovel, trowel and other small construction tools;
- A hammer drill with a chisel attachment will help you easily remove the old coating.