Before making a mortar for floor screed, you should prepare all the basic materials that are needed first: cement, water and sand. The ductility and strength of the screed can be improved by using special additives in the solution - plasticizers. Depending on the degree of influence on the concrete mixture, additives in the form of plasticizers are divided into 4 groups:
- highly plasticizing;
- superplasticizers;
- medium-plasticizing;
- weakly plasticizing.
Floor screed diagram.
For concrete solutions, a filler is also provided, which is marble chips, crushed stone or expanded clay. Concrete mortars are practically not used for residential premises, but only sand-cement mortars. Thanks to cement, the floor gains strength, so when choosing this type of material, it is very important to pay attention to what brand it is. To designate the grade of cement, the letter M and numbers are used, indicating the degree of load that this material can withstand.
For example, if cement is grade M50, this means that it can withstand a load of no more than 50 kg per unit volume or area. As a result, before choosing the components of the solution, it is important to decide what load will be placed on the floor. At the same time, it is important to know how to calculate the floor screed solution correctly.
Features of concrete floor
A concrete floor is the most reliable option for a garage, but, of course, it cannot be left in its original form.
A concrete floor is a traditional covering for a garage. In its pure form it is not very attractive and has some difficulties in operation. To eliminate them, several options for dust removal and concrete coating have been developed:
- ironing;
- porcelain stoneware finishing;
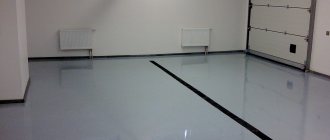
- installation of a self-leveling floor on a mineral, polymer or epoxy basis;
- coloring.
The strength characteristics of the coating largely depend on the grade of concrete and compliance with the technology for pouring it. It is equally important what the base is, the “pie” on top of which the screed is poured.
When installing a concrete floor in unheated garages, you need to be prepared for the fact that with the onset of spring, the frozen concrete will begin to thaw and the air humidity in the room will increase. As a result, moisture will condense on the cold metal. High-quality garage ventilation and the correct installation of the top moisture-proof layer of the screed will help eliminate this deficiency.
Requirements and recommendations for floor screed
If the proportion of DSP components is incorrectly selected:
- adhesion of the solution to the base decreases;
- the wear resistance of the screed decreases;
- the strength of the concrete layer deteriorates;
- the risk of cracking of the rough coating increases.
If the plastic pipe for water in the bathroom is incorrectly selected, this can lead to leaks immediately when the tap on the riser is opened. And if you mix the cement mixture for floor screed incorrectly, problems may appear several months after pouring. In this case, both detachment of the screed from the base and its banal destruction are possible.
In order not to make a mistake with the proportions, it is recommended to take ready-made mixtures with cement as the main binding component. The content of all components in them complies with the requirements of building codes. It is enough to add water and the concrete composition is completely ready for pouring.
Proportions for preparing the mixture for screed
Advantages and disadvantages
Concrete is highly durable and fire resistant
The main advantages of concrete are strength and durability . These are undeniable advantages that have ensured the widespread use of this building material. In a garage, such a floor is convenient due to its resistance to various types of oils, solvents and flammable liquids. Other benefits include:
- fire safety;
- easy to clean surface;
- ability to withstand significant, including uneven, weight loads.
The disadvantages of concrete pavement include:
- damage from blows from sharp, heavy objects;
- long period of gaining brand strength (at least 28 days);
- difficulty of dismantling.
Types of self-leveling floor for garage
First, let's understand a little terminology. Manufacturers of mixtures offer special compositions for construction work - the so-called self-leveling self-leveling floors. These are compositions of binders (cement or gypsum), special additives, polymer additives and fillers. When mixed with water, highly mobile solutions are formed, which are used for leveling all types of bases (mineral, wooden, soil), as well as for repairing defective areas.
This type of material has more than enough advantages:
- It can be applied in a layer from 1 mm to 10 cm. Working with it is much more convenient and practical than with a traditional cement-sand mixture.
- They are used indoors and outdoors, that is, they are universal, frost-resistant and can withstand significant temperature changes.
- They are produced in a huge range, for different purposes. For example, to smooth a concrete slab, you should choose an inexpensive thin-layer gypsum-based leveler, which will not shrink and harden in a few days. And to form a full-fledged screed, it is better to purchase cement-gypsum mixtures that are ready for laying the floor covering within 7-10 days.
- Sold at very affordable prices. The cost of bags starts from 200 rubles.
There is another class of self-leveling floors - decorative finishing. In fact, this is a one- or two-component paint on a polymer base, which is applied to concrete in a layer of 1-4 mm and creates a high-strength coating that is resistant to abrasion, mechanical and impact loads, as well as chemically aggressive substances. Elastomers such as polyurethane or epoxy are used as a base.
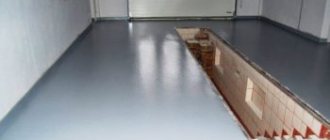
Polymer self-leveling floor in the garage.
Polymer self-leveling flooring for garages is produced by domestic (Novbytkhim, KrasKo) and foreign (Enecon, RustOleum) enterprises in several colors, sold in cans, often in combination with a hardener. Additionally, it comes with chips for decorating the coating.
The most important condition for application is a perfectly flat surface, polished with industrial grinders. The slightest bump or hole - and the self-leveling floor for the garage is instantly erased or chipped. But if you follow the instructions, the coating actually forms a highly durable film, inert to chemical compounds and water, which can withstand at least 5-7 years of active use.
In the last couple of years, on the Internet you can find mention of such a new product as a self-leveling rubber floor for the garage. Although the term elastic coating is better suited for this product.
Almost all well-known manufacturers of paints and varnishes produce this material under the name rubber paint. Purpose: roofs, swimming pools and other unloaded surfaces. It withstands water, direct sunlight and temperature changes from -50 to +60 ºС. The instructions state in black and white the limitation - not suitable for painting floors.
The Russian company Moskraska claims that their technologists have created a rubber product intended for use in garages, parking lots, warehouses, car service centers, car washes, etc. Moreover, the basis is not traditional solvents, but an aqueous dispersion of acrylate copolymers. The extent to which the advertising information corresponds to reality is unknown, since there are practically no reviews in the public domain, and the product is not available as a class in the assortment of large dealers and retailers.
Rubber coating Moskraska.
Instead of unknown rubber paint, it is better to use a proven product - mats and modular slabs made of pressed rubber crumbs (Unidor, etc.). As a rule, they are used when arranging outdoor sports and children's playgrounds, in gyms, on terraces, and parking lots. They are water and frost resistant and can easily withstand significant weight and abrasive loads. A very convenient, albeit expensive alternative to standard garage coverings.
Modular tiles for garages, parking lots, sports grounds.
Rice. 5 Modular tiles for garages, parking lots, sports grounds
Which option to choose depends on your capabilities, including financial ones. And in the category of self-leveling floors for garages, it is more correct to include self-leveling mixtures of thick-layer application.
Device requirements
To get a smooth surface, you need to sand the floor
In order to get an idea of the relationship between the strength of concrete and the thickness of its layer, it is recommended to pay attention to the requirements for constructing a concrete floor in hangars for Euro trucks. The standard foundation “pie” in these rooms is as follows:
- sand – 10 cm;
- crushed stone – 10 cm;
- reinforced screed – 10 cm.
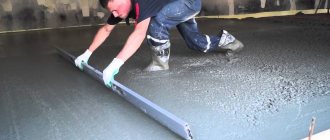
It should be noted that to obtain a smooth floor surface, it is not enough to level the concrete along the beacons during its pouring. A smooth surface is obtained by grinding using special machines or a self-leveling floor device. Also for this purpose, porcelain stoneware is laid on the screed.
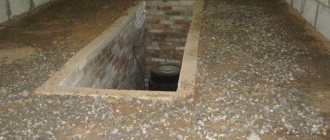
Attention! Before pouring the floor, you need to make sure there is an inspection hole, if provided for by the garage design.
The requirements for the installation of a concrete screed are recorded in SP 29-13330-2011 “SNiP 2.03.13-88 Floors”:
- The minimum thickness of the concrete layer is 20 mm.
- If installation of sound or heat insulating materials is provided, the minimum thickness of the screed is 40 mm.
- When installing communications along the plane of the lower floor, the recommended thickness of the concrete layer is 10-15 mm greater than the cross-section of the pipes.
- The end surfaces must be covered with a moisture-proof coating (moisture-resistant primer or paint).
- After leveling the work joints along the beacons, they are filled with cement-sand mortar and smoothed.
- To install the screed, sifted sand, gravel or crushed stone with a fraction of 5-15 mm is used, cement M150 for industrial premises and M300-M400 for residential premises.
- To reinforce the screed, metal mesh with a mesh size of 100x100 mm or 150x15 mm is required.
- Reinforcement is carried out with a concrete layer thickness of 40 cm.
Preparing the base for the floor
It is very important to properly prepare the base for the self-leveling floor in the garage. Usually the base is concrete. The screed must be durable and strong, smooth. If the concrete base turns out to be of poor quality, the self-leveling floor may begin to crack. You can prime old concrete.
The optimal solution is to make a completely new concrete screed for subsequent installation of the self-leveling floor. But sometimes just cleaning the base is enough.
Another option is to further strengthen the concrete coating using special building compounds. Do everything carefully, since the durability of the self-leveling coating directly depends on this.
Which brand of concrete is better to choose?
Before choosing concrete, read the SNiP requirements
To install the floor in the garage, you can order factory-made concrete or prepare it yourself using a concrete mixer. When choosing a concrete grade, they are guided by the requirements of SNiP:
| Coverage type | Minimum thickness (mm) | Concrete grade | Hardening time (grade strength gain, days) |
| Screed with reinforcement | 50-70 | M200-M350 | 28 |
| With voluminous topping | Not less than 40 mm | M600-M700 | 7-8 |
| Reinforced concrete floors | Not less than 40 mm | M500-M550 | 7-8 |
| Reinforced sand concrete floors | Not less than 40 mm | M400-M500 | 7-8 |
| Fiber concrete | Not less than 40 mm | M200-M350 | 28 |
According to reviews from garage owners, for passenger cars it is enough to pour a reinforced concrete floor 70 mm thick (excluding the shock-absorbing “cushion”) . Then apply 2 layers of primer and renew the coating every six months. The optimal grade of concrete is M300.
How to choose the right type of self-leveling floor for a garage
The garage floor material must meet the following criteria:
- Exceptional compressive and abrasion strength . The average passenger car weighs 1 ton or more. In this case, the weight is actually distributed over four small areas - at the points of contact between the wheels and the base. In addition, when driving, tires act as a rough abrasive that destroys the base.
- Resistance to various loads . A garage is not only a covered parking place for a car, but also often a repair shop, a kind of storage room for storing various things and equipment, and often a meeting place for neighbors and acquaintances. Accordingly, the floor must withstand frequent washing and mechanical or impact loads, and not react with chemically aggressive compounds (solvent, gasoline, oil, antifreeze), etc.
- Weather and frost resistance . Temperature differences in garages are significant. It is enough to open the gate for half an hour in winter for frost to form on the surfaces. If there is no desire to constantly repair cracked floor coverings, the compositions must contain frost-resistant additives and be classified as a material for external use.
- Easy to use . Experienced buyers know that concrete or wood is incredibly difficult, and sometimes impossible, to clean from spilled gasoline, oil stains or tire marks. Therefore, this criterion is no less important than all the others.
Let's summarize: the floor must be highly durable, weather- and water-resistant, washable and chemically inert. These parameters correspond to a complex of two products:
1st layer - Self-leveling self-leveling mixtures for external use.
These are high-strength compositions exclusively based on cement. Chemical industry giants such as Ceresit, Bergauf and others produce materials recommended for use specifically in garages, basements, warehouses, workshops, terraces, etc. These are Ceresit CN76, Bergauf Boden Street and others. This layer will allow you to level the cement screed, thereby preparing the floor for the next layer. These compositions can also be used as an independent coating, without further finishing, but for better results a 2nd layer is necessary.
2nd layer – Finish epoxy coatings for garages, parking lots, parking lots.
This is a specialized series, which is produced only by some factories. The coating is so durable that it can withstand even heavy pedestrian and vehicular traffic. Among the well-known: Epoxy Shield, Eneklad SFS, epoxy paint for garage Novbytkhim, SdelaiPOL, etc.
We won’t say which one is better or worse; when choosing, you should pay attention to the basic parameters. For example, Boden Street forms a coating with a strength corresponding to the M300 cement grade and can withstand up to 50 freeze-thaw cycles. That is, this mixture is great for owners of passenger cars and heated, insulated garages. But Ceresit 76 has a grade strength of M350 and frost resistance of up to 100 cycles. That is, it is better to use it for cold rooms under heavy, oversized cars.
Calculations
You can calculate the floor using special calculators
To install a floor in a garage, it is necessary to perform a series of calculations of the required amount of concrete and the optimal thickness of its layer. To perform these tasks, special calculators have been developed that take into account:
- expected weight load;
- the need to concreting the inspection pit and platform before entering;
- brand of concrete;
- weight characteristics of the solution components;
- 10% supply of materials.
To independently prepare M300 concrete, mix a composition of the following components:
- cement M400 – 1 part;
- sifted sand - 1.9 parts;
- gravel or crushed stone - 3.7 parts.
Optimal screed parameters:
- for garages with one car, the floor thickness is 50-70 mm;
- for garages with two parking spaces - 80-100 mm;
- reinforcement is performed with road mesh BP1 with a wire cross-section of 8 mm and a cell size of 150-150 mm;
- sand layer thickness – 50-70 mm;
- the thickness of the gravel or crushed stone “pillow” is 120-150 mm.
Attention! Chain-link mesh is unsuitable for screed reinforcement, since it can only withstand tensile load in the horizontal direction.
Criteria for choosing a coating for a garage
When choosing the type of self-leveling floor composition for a garage, you should consider the following factors:
- The quality of the base and the conditions under which the coating will be installed. Among such factors are the level of humidity (both screed and air in the garage), air temperature, optimal timing for starting to use the finished coating, environmental requirements).
- Loads to which the self-leveling coating will be subjected. In addition to the fact that there will be people in the garage, you should evaluate the weight of the car, which will not only drive into the garage, but also stand in it, putting pressure on the floor.
- Possible temperature loads on the floor . Since garages often use special equipment for repairs, possible thermal effects on the coating should be taken into account.
- Chemical influences . The use of special chemical agents is also inevitable. Oil and gasoline will primarily expose the flooring to aggressive reactions.
Return to content
Required materials and tools
The tools for pouring a concrete floor in a garage are very extensive.
In order to fill the floor in the garage, you will need to perform a large amount of excavation work and, if necessary, make your own mesh for reinforcement. To complete all tasks you will need the following tools:
- concrete mixer;
- stretcher or garden wheelbarrow with pneumatic wheels;
- bayonet and shovel shovels;
- roulette;
- laser level;
- bucket with a strong handle;
- rags;
- a brush with stiff bristles;
- lighthouses;
- rule (can be replaced with a flat board).
It is necessary to prepare materials:
- cement M400;
- sand;
- clay;
- crushed stone or fine gravel;
- plasticizer for cement (sold in cans);
- reinforcement with a cross section of 8 mm or ready-made mesh for screed reinforcement;
- waterproofing materials: bitumen-rubber mastic, roofing felt, special membranes.
Screed installation
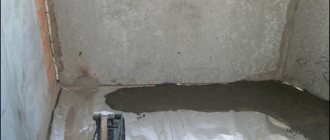
The first step is to level and compact the bottom of the hole . Then its surface is generously lubricated with a waterproofing agent, which in this case will be liquid clay . On the garage “box” it is necessary to mark the floor covering and draw an index cord.
After this, gravel is poured in a layer of up to 80 cm (its exact height will depend on the characteristics of the soil, but, as a rule, it is 30 - 45 cm). Along the walls of the pit, pillars are installed in the ground at intervals of 100 cm, the task of which is to indicate the thickness of the “powder”. The quality of the work at this stage determines what the entire base will be like, and, accordingly, the final polymer self-leveling floor for the garage.
Installation of a concrete covering in a garage is accompanied by careful compaction of all components of the “flooring”. Crushed stone must be pressed, while it is advisable to exclude large fractions and elongated stones. When the layer of sand (height 10 cm) is filled in, it should also be compacted. According to SNiP standards, the filtration “cushion” must have a flat surface. The maximum deviation from the horizontal level is ± 2 cm.
Return to content
Preparatory work
If you cheat at the preparatory stage, further work may go down the drain
Every step of installing a concrete garage floor is important. There are no trifles in this matter. The quality of further work largely depends on how correctly the preparatory work is completed.
Step 1. Calculation of the pit depth. On average, to fill a floor with a thickness of 10 mm, you will need to go 20-30 cm deep into the ground.
Step 2. Marking the floor level. Using a level, find a point 10 cm above the level of the existing floor in the garage. Focusing on it, horizontal lines are drawn along the walls (or marks are made) with chalk or a marker.
Step 3. Preparing the pit. Includes a set of works for excavating soil to the calculated depth.
Step 4. Level the bottom using shovels.
Step 5. Compact the soil using a vibrating plate or heavy objects. If necessary, dig a pit for an inspection hole. Its parameters:
- width 75-80 cm + thickness of waterproofing layer 30 cm;
- depth - they are guided by the height of the person who will be repairing the car + 30-40 cm;
- length is equal to the length of the car + 120-150 cm.
Damper gap
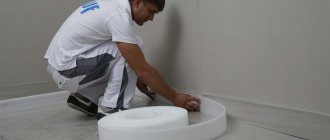
To fill the space between the wall and the screed, a damper tape is installed around the entire perimeter of the room. This edging tape is sold in rolls of various thicknesses. A 10 cm tape is considered the most optimal for floor screeding.
The damper tape not only fills the space between the screed and the wall, it creates additional heat and sound insulation. The edge tape can be stapled or glued using special tape; some builders simply fix it to the wall with mortar. After pouring the screed, the remainder of the edge tape that remains on top is cut off with a knife to the floor level.
Step-by-step instructions for pouring a concrete garage floor
After pouring the concrete floor, it will not be possible to walk on it for about a week.
Step 1. Place a layer of clay 3-4 cm thick at the bottom of the pit and compact it thoroughly. It will act as a waterproofing agent.
Step 2. Pour sand and level it to form a layer 8-10 cm thick. Water it with water from a hose, level it again and compact it.
Step 3. Pour a layer of crushed stone and repeat the leveling and compaction processes.
Step 4. Fill the sand-crushed stone “cushion” with lean concrete, which is prepared in the following proportion: for 1 bag of M400 cement (25 kg) – 344 kg of sand and 11 liters of water. The resulting layer is leveled and left to dry for 2-3 days.
Step 5. Waterproofing is done using the chosen method: sheets of roofing material or special membranes are laid with an overlap, and a layer of coating mastic is applied. The waterproofing should extend 10-15 cm onto the garage walls.
Step 6. Lay the reinforcing mesh.
Step 7. Install beacons. They are guided by the previously completed markings of the garage walls. The beacons are pre-lubricated with machine oil and installed on a cement-sand mortar. All planks must be in the same horizontal plane. The correct installation is checked with a level or the threads are pulled from one wall to another.
Step 8. Prepare M300 concrete or use a ready-made factory mixture.
Step 9. Concrete is poured in layers, compacting it with a reinforcement bar. This will allow air to escape from the solution and prevent voids from forming. Level the concrete along the beacons.
Step 9. After 24-36 hours, carefully remove the beacons.
Step 10. The resulting depressions are filled with cement-sand mortar and leveled.
Step 11. During the first three days, moisten the floor. To protect it from drying out, you can sprinkle it with wet sawdust or cover it with plastic wrap.
After 4 weeks the surface will be ready for use. But you can walk on it after 5-7 days.
We provide waterproofing
The prepared pillow needs waterproofing. The optimal solution is to use polyethylene film with a thickness of 300 microns as the material. The canvases are laid overlapping each other to ensure the tightness of the coating. The edges are glued together with a special polyvinyl chloride film. The film should protrude from the edges.
You also need to reinforce with metal mesh over the entire area of the garage. When concreting is carried out, you should focus on the beacons, achieving a perfectly even surface, without depressions or slopes. At the final stage, it may be necessary to compact the mixture. The surface is carefully leveled as a rule.
Methods of hardening and dust removal
A practical garage owner will take care not only of the durability of the floor, but also of its smoothness. One of the most important tasks is to create a smooth, non-hygroscopic surface. This effect is achieved in several ways.
Ironing
For the ironing process, you will need to equip yourself with a metal float or similar tool.
The easiest way to strengthen the top layer of screed is ironing . This is a time-tested technology that guarantees dust removal and compaction of concrete. The procedure is performed on the 3-4th day after pouring the floor. The essence of the process is to rub dry cement into the surface of the concrete, or use various additives:
- washed and sifted quartz sand with a fraction of no more than 0.2 m;
- steel fiber: metal filings with a cross-section of no more than 1 mm;
- slaked lime and cement mixed in a ratio of 1:10.
To complete the work, you will need a metal grater or any convenient metal object. Rubbing the prepared composition is carried out until the shine characteristic of a polished surface appears.
Important! Before use, the cement is sifted through a fine sieve.
Coloring
There are several ways to strengthen the concrete surface using enamels:
- When pouring the top layer of the floor, moisture-resistant and quick-drying paint is added to the cement-sand mortar. Take into account that the color of the surface will change, but will not reach the same brightness as when applying paint with a brush.
- Use paint intended for road markings. Cover the floor with 2 layers. On average, painting an area of 100 m2 will require 90-100 liters of paint. This is a quick-drying compound that hardens within 10 minutes.
- Painting with a paint brush with wear-resistant, quick-drying paints.
Padding
Floor priming is used to remove dust from concrete. Any composition that ensures moisture resistance of the treated surface is suitable for this purpose. The primer is poured onto the floor and spread with a brush or roller with a long handle. As a rule, one layer is not enough to achieve the desired result. Therefore, the concrete floor in the garage is primed twice, observing the break required by the instructions.
Bedding
Adding granite or marble chips significantly increases the strength of a concrete floor . You need to understand that it is not enough to add stones when pouring the top layer. Not all the crumbs will be tightly covered by the cement-sand mortar and will soon begin to peel off. The correct bedding technology is as follows:
- the floor is coated with a layer of two-component primer ENECLAD CFS (“Eneclad SFS”);
- pour a layer of granite or marble chips, level and compact it;
- After the primer has hardened, a new layer of ENECLAD CFS is poured over the crumbs.
Topping
Topping is the process of compacting concrete using special additives. Depending on the ingredients used, there are several types of topping:
- volumetric - with the addition of plasticizers;
- liquid - using polymerizing soluble mixtures on a polyurethane, epoxy, acrylic basis;
- dry – with the addition of the additives “Terrazzo”, “Maser Top 100”, “Master Top 450”.
Any of the listed technologies strengthens only the top layer of concrete screed. The coating needs to be updated every 3-5 years.
Washed (washed) concrete
Washed concrete combines strength and decorativeness
Washed concrete is a rocky surface, each element of which is securely held in place by a cement-sand mortar. The durability of this coating is high, so it is recommended for arranging warehouses, parking lots and garages. Due to its decorative effect, it is widely used in landscape design, when decorating entrance groups and steps.
To obtain washed concrete you will need the following materials:
- aggregate fraction 5-10 mm (granite or marble chips, crushed stone, dolomite, gravel);
- sifted quarry sand;
- Portland cement M400;
- hardening retarder gel for the finishing layer of concrete (can be replaced with sugar syrup or Progress detergent);
- plastic molds for paving slabs or self-prepared wooden boxes.
Tools:
- hydrodynamic washer of the Karcher type (instead, you can use a hand pump for whitewashing with a pressure of 0.5 MPa);
- concrete mixer;
- running water;
- brush with synthetic stiff bristles.
Stages of work:
- The concrete mixer is filled with 1 part cement, 3 parts sand and 4 parts aggregate. The solution is prepared within a few minutes.
- The resulting mass is placed in molds, the bottom of which is coated with a layer of gel in advance.
- Wait until the mixture hardens.
- The finished products are taken out.
- Rinse under the pressure of a stream of water, scrubbing the gel with a brush.
Important! Surface treatment with water is carried out immediately after formwork. Otherwise, the gel will be more difficult to wash off.
Laying porcelain tiles
Porcelain tiles are a reliable and aesthetic option for covering a concrete floor
To lay a concrete floor in a garage, you will need ceramic tiles with a wear resistance class of at least 5. When choosing, pay attention to the front surface of the porcelain tile: it is important that it is not smooth. The optimal solution is to buy tiles with a rough or textured surface. This coating is non-slip and at the same time easy to clean.
Porcelain tiles are laid on tile adhesive or cement-sand mortar. Concrete is pre-primed 1-2 times. Laying begins from one of the far corners; the correctness of the work is regularly checked using a bubble level. The seams are filled with moisture-resistant grout.
A guide on how to make a self-leveling floor for a garage
It is currently very difficult to make a choice among the variety of building materials.
For example, today they produce flooring that is not spread, but poured. That's what it's called, a self-leveling floor. What this type of flooring is, and whether it can be used in a garage, will be described below. An overview of types of rubber floors for garages is here: https://kakgarazh.ru/pol/obzor-vidov-rezinovogo-pola-dlya-garazha.html. The photo shows a self-leveling floor for a garage
Can it be used in a garage?
Self-leveling flooring is also called liquid linoleum; its surface is smooth, without seams or gaps, and feels smooth to the touch like a monolithic tile. This material is presented in 12 color shades, plus additional colored chips are offered, which are sprinkled on the newly poured floor, creating an original decorative effect. Chemists call this floor a special seamless polymer coating.
This type of flooring is used in rooms where special requirements are imposed on the flooring: high strength, abrasion resistance and sanitary and hygienic requirements. Most often, production areas, including garages, fall under these requirements. Read the guide to choosing the type of cellar for your garage.
Self-leveling floor in the garage - pros and cons. If we compare the self-leveling floor with other floor coverings, only with linoleum, laminate and ceramic tiles. When we consider organizing a good, durable garage floor, linoleum and laminate are not even considered. What remains is tile, which has the main disadvantage in comparison with self-leveling flooring; it is a large number of seams.
You can also consider the positive and negative characteristics of this flooring. Advantages:
- External – a variety of colors, solidity, good appearance, gloss;
- Service life can reach 40 years;
- Resistant to moisture and chemicals;
- It is easy to care for; it is enough to wash it with plain water without special products;
- Hygienic;
- Features good adhesion to any surface;
- No seams;
- Simplicity and ease of installation, which you can do yourself without any help in 12 hours.
Colored self-leveling floor in the parking lot
- No variety in design compared to other surfaces;
- Very long service life, mentally annoying, although you can renew the coating or use a different shade;
- There are types of self-leveling floors that can turn yellow when exposed to ultraviolet radiation. Not very pleasant given the high cost of the material;
- Before applying the self-leveling floor, the surface should be thoroughly prepared, leveled and puttied; this takes a lot of time and effort;
- If it is necessary to remove this coating, difficulties will arise; it is difficult to remove;
- The material is completely artificial;
- High price.
There are several types of self-leveling floors for garages on the domestic market:
- Methyl methacrylate (from methyl methacrylic resins) is used quite rarely, since drying such a floor requires a chemical reaction where the solvent evaporates, releasing a pungent odor;
- Epoxy (from epoxy resins) – have high chemical resistance;
- Cement-acrylic (prepared on the basis of a dry construction mixture and an additional liquid component) is the most affordable option, which helps to even out all the unevenness errors of the original floor.
- Polyurethane - used mainly in residential buildings.
If the floors were previously covered with paint, it must also be removed by sanding. The self-leveling floor will fit well only on a similar coating previously. At the very end, the floor is tested with a hydrochloric acid solution to determine if there are any other stains or coatings that need to be removed. Afterwards you can apply the coating. Read the instructions on how to decorate the walls in the garage.
The use of polymer self-leveling floors in garages has long proven itself. The polyurethane base of such floors belongs to the elastic group and can withstand heavy loads and the negative impact of external factors. This type of material is applied in several layers, which makes it possible to level out concrete defects, such as large porosity.
A self-leveling self-leveling floor in a garage is a cement or gypsum screed that contains a large amount of polymers. This material spreads well on its own and is distributed over the entire surface of the main floor and creates a perfectly flat and highly durable surface. In addition, the self-leveling self-leveling floor is absolutely safe for human health and fire-resistant.
Self-leveling rubber flooring for garages is made from crumb rubber obtained from used car tires. After several stages of rubber processing, the necessary mixture is obtained, which is diluted with water. As a result, the self-leveling rubber coating in the garage is soft and elastic, and at the same time quite durable. The floor surface has a perfectly smooth coating that does not slip. Read the instructions on how to cover the walls in the garage on this page.
A cement-based self-leveling floor is the most affordable way to make self-leveling floors in a garage. This material is applied to a flat and clean surface; it will take about 20 days for the coating to dry completely. Such floors are susceptible to mechanical stress and also do not like water. These factors quickly render the self-leveling cement floor unusable.
Special colored chips will allow you to diversify the monochromatic floor surface, giving it originality, resulting in an imitation of natural materials.
The photo shows an epoxy self-leveling floor in a garage with chips
Any self-leveling floor requires preparation of the floor surface. One of the main requirements for a concrete base is an almost perfectly flat surface.
The picture shows an example of an excellent concrete screed for self-leveling flooring
Despite the fact that polymer-based self-leveling floors are recommended for use in residential buildings, they are also successfully used in garages and parking lots.
Polymer self-leveling floors are often used to organize covered parking lots, as in the photo
The installation of self-leveling floors in a garage requires the presence of a smooth concrete screed. It must be cleaned before direct installation of the self-leveling floor, and also primed. The surface may need to be sanded, depending on the quality of the primer. The self-leveling floor solution is poured in parts onto the floor and leveled using a toothed roller. Depending on the type of self-leveling floor, the floor will dry in a period of 2 hours to a month. You can find a guide on how to make a vegetable pit in your garage here.
Cost of self-leveling floor in garage
The cost of a self-leveling floor is influenced by the manufacturer and the country where it is manufactured. Thus, imported self-leveling flooring costs from 2,000 rubles per sq. m. m, and Russian-made self-leveling floors cost from 500 to 800 rubles per sq. m. m.
Where to buy a self-leveling floor for a garage?
Where to buy in Moscow:
- Teohim company, st. Suvorovskaya, house 10, office 15, Contact phone;
- TemaPol Company, Moscow Region, Mytishchi, Olimpiysky Prospekt, no. 38, Contact phone number;
- Company Self-leveling floors Polyushko, st. Privolnaya, house 70, Contact phone.
Where to buy in St. Petersburg:
Of course, the cost of a self-leveling floor will cost a pretty penny, but it’s worth it. High-strength, reliable and perfectly smooth floors will last for decades.
Care and operation
The main condition for maintaining the load-bearing capacity of a concrete floor is the absence of moisture that destroys it . It is necessary to provide high-quality natural or forced ventilation in the garage to ensure good air exchange. If you plan to wash your car indoors, provide ditches for water drainage.
Another important condition for the safety of the coating is not to hit it with heavy objects. It is necessary to organize the garage space so that all large and heavy products are located on the lower shelves of the racks.
The range of concrete floor care procedures includes:
- timely removal of stains from oils, paints and solvents;
- traces of tire rubber are washed off with special detergents;
- Wet cleaning is carried out regularly.
Curing
For high-quality hardening of the subfloor, you need to create the right conditions in the room.
Try to rid the room as much as possible:
- from drafts;
- from direct sunlight;
- from sudden temperature changes.
To prevent moisture from evaporating quickly, the concrete screed is watered with water for the first week. The concrete is then covered with plastic film to allow the surface to dry gradually and evenly.
The stove must be watered daily during the week.
Possible problems
After some time of use, cracks may appear in the concrete floor.
During the operation of a concrete floor, surface defects such as cracks and cavities may form. They are eliminated by filling with cement-sand mortar. Pre-embroider, removing all loose particles, remove dust and apply 1-2 layers of primer.
One of the troubles when using concrete surfaces is the formation of specific fine dust. It can be removed by priming, ironing or finishing with facing materials.
The hygroscopicity of concrete is reduced using special means - water repellents. One of them is Penetron. The solution is prepared in accordance with the manufacturer's instructions and applied to the floor surface with a paint brush or roller. For these purposes, you can use other compositions:
- "AQUATRON";
- "HYDROHIT";
- "KALMATRON";
- "HYDROTEX";
- "WASCON"
They all work on the same principle: they fill the smallest pores of concrete, crystallize and form a moisture-proof layer.
The final stage of screed preparation
The finished coating is covered with a metal mesh . After this, special beacons should be installed (strictly according to the level) up to 8 cm in size. The concrete base is leveled with a rule , moving it along the “rails” and wiping off the excess mass of the solution. In order to smooth the surface evenly, you can take a steel trowel . This way the entire surface is covered with the screed. This operation is similar to creating a “rough” coating; in addition, self-leveling garage floors are laid according to the same principle, after the batches have been poured.
In the absence of a thermal insulator, cement laitance is used. Its composition includes, in addition to water and cement, a special plasticizer. The resulting mixture will act as a kind of connecting link between the “rough” base and the final coating. The density of this component should correspond to the consistency of sour cream. The entire working area of the garage should be treated with milk.
As a result, the thickness of the base in the garage should be from 13 to 15 cm (10 cm for the base, 3 – 5 for the final coating of the screed). It is also necessary to remember about the slope for the screed, which should be directed towards the exit.
Return to content
Approximate calculation of the amount of required materials
When calculating, we will proceed from the following parameters:
- room area – 40 sq. m;
- The thickness of the screed can be either 2 cm or 5. Let’s take 5 cm;
- The solution is standard, that is, one part of cement to 3 parts of sand.
First of all, let's calculate the cubic capacity of the future screed. For this purpose 40 sq. m multiplied by 0.05 m. We get 2 cubic meters. meter of solution. Let's calculate how much cement we need. It makes up one part in the solution, that is, half a cubic meter. meters. One cubic meter contains 1300 kilograms of cement. From here we get that we need 650 kilograms. You can also calculate how much sand and water you will need.
Solution proportions
The most optimal ratio, which has been verified over the years, is considered to be one share of cement to three shares of sand. In this case, water is consumed in the ratio: two parts water to one part cement.
Proportions of mortar for screed
There may be other options. For example, 1 share of cement to 1 share of sand or 1 to 2. But, although such proportions can improve the strength of the floor, quality is lost. The solution sets quickly and is difficult to level. It must be remembered that an increase in the content of sand in the solution or water, or both together, leads to a decrease in quality and strength.
To make screed mortar, cement of at least M300 is usually used.
Technical characteristics of cement M500
Characteristics of sand concrete M300
You can prepare the solution yourself or buy a ready-made dry mixture in the store. In this case, it is recommended to purchase a mixture of a brand no lower than M200. But keep in mind that the dry mixture does not indicate the strength of the cement, but rather the strength of the mortar itself.
Damper
The concrete floor is made in such a way that it is not “tightly” tied to the walls of the garage. Therefore, if the walls or floor move up and down, this does not affect the integrity of the structure. To prevent concrete from sticking to the walls, a buffer is laid along them. It can be damper tape from the store or polystyrene foam cut into centimeter-thick strips, which are easy to make yourself. During pouring, they should protrude above the floor, and subsequently level with the floor. Seams are made during pouring of concrete and after hardening. The joints between the floor and the wall are smoothed with a trowel. The sealant will protect against contamination.