The ceiling of the cellar and basement is carried out to protect such premises for utility use from atmospheric influences.
They have one common feature - their location below ground level. Unlike a basement, a cellar can be located outside the building, completely independently on a local area. To do this, its design must provide for the installation of a separate entrance.
Such premises are equipped with an autonomous ventilation system, and there is only artificial lighting. But the basement can be located not only under the main residential building, but also under auxiliary ones. It is very convenient and economical when it is done in the garage.
What does the concept mean?
The ceiling of a cellar or basement is a horizontal load-bearing building structure of a building being built , designed to ensure the tightness and strength of a special room for storing food or equipment located below ground level.
For such structures, it is possible to use various floor structures (from monolithic to wooden), it all depends on what load these floors will bear.
So, for example, for a separately located cellar, it will be insignificant, while basements in the basement or garage can bear significant loads.
At the same time, these floor slabs differ from other types of floors installed in residential buildings, since they work in particularly humid conditions and must ensure not only the strength and durability of the structure, but also a stable temperature throughout the year and standard humidity.
These characteristics will depend on how correctly the walls of the basement and cellar are erected, as well as on the professional thermal insulation of the ceiling and effective ventilation. Only in this case will the most comfortable conditions for storing vegetables and winter preparations be created inside them.
Preparatory activities
To ensure that the room fully performs its assigned functions, before you start building a cellar with your own hands, pay attention to the following points:
- Excavation work is preceded by the development of a room layout, which should be thought through to the smallest detail. This will help avoid unforeseen situations in the future.
- Assess the groundwater level at the construction site. Ideal if they are located low. When the storage floor is located below a water-saturated layer, take care that water does not penetrate the floor and walls.
Only after reliable protection from moisture can you install a ceiling for the cellar. The task of waterproofing a building is one of the main ones, as it determines the comfortable conditions of the room. How to do it correctly?
Types of basement floors
Such floors are classified according to a number of criteria:
- by location in the building and garage or separately on a personal plot;
- according to the structural scheme - beam and non-beam;
- according to the material of supporting structures - reinforced concrete, wood and steel beams;
- according to the construction method, monolithic, prefabricated, and can also be combined prefabricated-monolithic.
Since the intended purpose of the cellar and basement is located below the ground level, the floor structure must meet the following regulatory requirements:
- Strength, the structure must support not only its own weight, but also the load of all structures above it.
- Stability in lateral stiffness, determined by the original building materials.
- Water resistance, including against flood and groundwater.
- Fire resistance, the ability to hold fire for a long period of time.
- Thermal protection is a necessary characteristic to ensure the desired temperature conditions indoors.
- Seismic resistance.
Type
Types of floors can be basement, basement and ceilings for a separate cellar. In the first two cases, they are the basis for the floor and therefore are presented to them as for standard basement floors of a house, and in the latter, soil is usually placed on the floor, along which the movement of people and cars is not provided.
By design
Depending on the type of structure, there are beam structures that perform a load-bearing function .
They are equipped with beads, slabs, floorings and fillers, heat and moisture-proof materials that impart the required characteristics to such structures. The beams should be spaced at regular intervals and can be made of wood, iron or reinforced concrete.
Most often, in individual housing construction, wooden beams are installed, used for one-story stone, as well as frame housing construction. They are limited in span length to no more than 5 m; iron and reinforced concrete beams have no restrictions.
Beamless structures are formed from load-bearing slabs , which rest on the vertical load-bearing supports of a house or garage or on purlins and crossbars. Slabs are also used that are connected to a vertical support by a load-bearing capital. Beamless structures include monolithic slabs that are both load-bearing and enclosing.
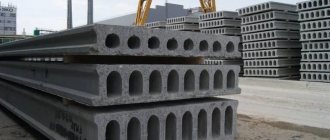
Most often, reinforced concrete floor slabs are used as basement floors - solid ones made of lightweight concrete and multi-hollow ones, in which round holes act as “stiffeners”.
By construction method
Based on the method of construction, floors are divided into prefabricated, monolithic and precast-monolithic. Prefabricated floors are made mainly in the basements of stone houses from factory-made hollow-core slabs.
Dimensions of such slabs: length from 2.4 to 6.8 m, width from 1.2 to 1.5 m, weight from 0.9-2.5 tons. These floors are the most popular, especially for large basements.
Monolithic reinforced concrete structures are made in the form of solid 80-200 mm slabs filled with M 200 concrete. They must rest on load-bearing walls. They are quite heavy; the mass of 1 m2 of monolith, 200 mm thick, weighs approximately 500 kg.
Prefabricated monolithic is the most modern option for installing floors in basements. The 600 mm space between the beams is filled with hollow block structures, after which the structure is filled with M200 concrete.
The weight of a block of expanded clay concrete is 14 kg, polystyrene concrete is 5.5 kg. This allows installation to be carried out without the use of expensive lifting equipment. The weight of 1 m2 of finished prefabricated monolithic floor reaches 380 kg, for expanded clay concrete 320 kg.
Based on materials
Ceilings for basements and cellars are also classified according to source materials :
- asbestos-cement,
- wooden,
- slabs and monolith.
The choice of a specific type of building materials will depend on the location of the structure, load-bearing load and dimensions of the objects.
On asbestos-cement pipes
Not many developers know that instead of basement floor slabs located in low-rise buildings and cellars, asbestos-cement pipes can be installed. This option is resorted to when it is impossible to use lifting equipment to install heavy reinforced concrete slabs.
The advantages of this technology for installing ceilings for basements:
- no lifting equipment is required for installation;
- pipes are well suited for non-standard cellar sizes with a width from 0.5 to 6.5 m and any length;
- can be used for any shape of spans, with the exception of rounded ones;
- simple and quick installation;
- further technological filling of such pipes is intended for the simultaneous formation of a floor if a technical or residential premises is located above the basement.
The disadvantages of using asbestos-cement pipes for basement floors are the high cost of work, approximately 15% compared to traditional reinforced concrete slabs, high labor costs and long periods of construction and installation work.
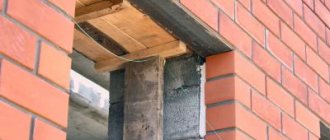
On wooden beams
Such floors are the most popular, both for wooden residential buildings and for separately located cellars. Floors on wooden beams are not suitable for block and brick walls of multi-story buildings , since they are not able to withstand the high load of wall building materials.
For these houses, in order to strengthen the floors, it is allowed to use steel beams and even used rails. To install them correctly, specific beds are made that reliably fix the steel structures. In this embodiment, the walls become the foundation relative to the beams.
Before laying such floors, all wooden parts must be treated with antiseptic impregnations and fire-resistant solutions, and metal beams must be treated with anti-corrosion compounds.
The main advantages of wooden multilayer floors for basements and cellars:
- high level of thermal insulation;
- high level of sound insulation;
- lightweight design, does not create a significant weight load on the walls and foundation;
- simple installation technology and high maintainability.
The disadvantages include low strength, which, however, does not prevent them from being installed as floors for oversized basements and cellars, as well as increased flammability.
Plates
In order to install the slabs as basement floors, you will need an installation crane. The structures are installed on 250 mm brick walls. For reinforcement, they can be installed on iron beams. After this, the slabs are waterproofed, the tile joints are sealed, and a heat-protective layer of foam is installed. A hole into the basement is made in the ceiling, with a size of approximately 800 x 800 mm.
The advantages of such an overlap:
- high strength;
- quick installation;
- fire resistance;
- heat resistance and water protection.
Disadvantages include the need to use lifting equipment, as well as the standard sizes of finished slabs, which may not coincide with the contour of the cellar or basement.
Monolithic
Such structures do not have inter-tile connections and do not require lifting mechanisms for installation, in contrast to reinforced concrete slabs. A monolithic structure is made in the form of a solid reinforced concrete slab , which is supported by load-bearing walls; if the basement area is large, they are installed on additional support columns.
All parameters of a monolithic slab must be pre-calculated by specialists, and for a basement located in a residential building, this work must be carried out during the house-building design process. An important parameter of such a structure is its thickness, which should not be less than 15 cm and is determined by the largest span from a ratio of 1:30.
For a six-meter span, the minimum thickness is 20 cm; if you need to fill the slab over spans of more than 6 m, you will need to reinforce the structure with stiffeners.
Specifics of installation of prefabricated monolithic slabs
The ceiling in the cellar can be formed using prefabricated monolithic slabs. To carry out construction activities, order special lifting equipment, which will significantly speed up the work.
Precast slabs are blocks that are laid between steel beams and then filled with a small layer of concrete
A number of difficulties arise associated with increased tolerances for the length and width of the slabs. They may simply not correspond to the actual storage dimensions. Considering that the length of the slabs ranges from 9 to 12 meters, before installation you should compare them with the dimensions of the building. If you plan to use monolithic prefabricated slabs, it is advisable to take this into account at the design stage. The width of the basement room must correspond to the parameters of the installed slab.
If the size of the slabs matches the basement, installation is carried out using a crane. Perform the activities in the following sequence:
- connect structural elements using steel profiles;
- fill the cavities in the joints with heat-insulating composition;
- fill the joint planes with concrete mortar;
- lay the roofing material on the surface using bitumen mastic.
Requirements for parameters and characteristics
Floors are subject to a variety of force loads, primarily from the weight of their own, upper structures, walls, utility networks and equipment.
Under their weight, high stresses appear in them, which lead to deformations and deflections of the beams. The maximum amount of deflection in basements and cellars that is allowed according to the requirements of SNIP: 1/200-1/400 of the span length , more specifically they are established by calculations for the design and selection of building materials.
Developers should strive to minimize the deflection of the floors, although at the same time, such a requirement invariably leads to an increase in the thickness of the slab.
For basements located in residential buildings, it should be the minimum acceptable, as a rule, in the region of 200-300 mm, for the reason that an increase in this indicator leads to an increase in the total construction volume, and therefore the weight of the building, the load on the foundation and the cost of the project.
Basic requirements for the parameters and characteristics of basement floors:
Durability, for built-in basements must correspond to the design life of the main building, for separately located cellars at least 50 years.- Protection from flood and groundwater, high waterproofing characteristics.
- Fire protection, they must correspond to the 1st degree of fire resistance with a fire resistance of at least 1 hour.
- Ease of use, creation of conditions for normal presence of people and storage of products.
- High heat-shielding characteristics to create optimal food storage temperatures.
- The economic component of construction should not lead to a high final cost of the project.
Insulation of ceilings, walls and blocks
Cellar floor insulation scheme. The ceiling of the cellar can be insulated in several ways. One of them is that pipes with a diameter of 25 mm are installed horizontally 15 cm from the ceiling with a fastening pitch of about 60 cm. These pipes can be attached to the walls or the ceiling. Reinforcing bars made of wire with a diameter of 8-10 mm are attached perpendicular to the pipes. They are secured with soft wire. It is better to paint the entire structure with chromium oxide, red lead or other waterproof paint. Polyethylene bags are placed in the space between the ceiling and the resulting structure. First, forest moss or chopped straw is placed in the bags and sealed with an iron. The bags are placed without a gap on top of each other and tightly together. Galvanized iron sheets, waterproof plywood or plastic film are laid on top. They are used as an umbrella, from which condensate should flow through pre-arranged grooves into a bucket or some other container. You can use a mortar with the addition of cement and sawdust to insulate the ceiling. The layer of such a solution can reach 20 cm. After complete drying, a plaster solution is applied in a few days. The same method can be used to insulate basement walls. The floor is insulated using glass wool or other insulation placed between the joists under the finishing coating. If the groundwater level is high, then a drainage system should be installed around the garage. The bottom of the cellar is deepened 30 cm from the expected floor level. A layer of crushed stone of about 10 cm is poured onto the leveled soil. Sand is poured onto the crushed stone in a layer of 5 cm. All layers are compacted. The cover of the entrance to the basement is made with a lattice or mesh so that ventilation is better and small animals cannot enter. For the winter, the lid is closed with insulation.
Cellar insulation scheme. The best insulation for the floor, walls and ceiling is polyurethane foam. It is applied by spraying directly onto the insulation surface. The entire inner surface of the basement is blown with foam. The insulation fills all the cracks, penetrating into inaccessible places. During rapid hardening, a smooth surface without seams or voids is formed. Polyurethane foam has very low thermal conductivity. It is practically weightless, so it will not additionally load the supporting structures. Using this method, the basement is insulated very quickly, and the only drawback is the high price of the material.
To make a high-quality ceiling for your cellar, you can use load-bearing beams. Metal beams are best for this.
Layer diagram and cake
The design of the basement floor depends on what material it is made of, the installation location indoors or its independent location and the characteristics that need to be endowed with such a structure.
For built-in basements, it is better to form a protective floor pie during the construction of the building . In the case when the building has already been constructed, the finishing work has been completed, including the final finishing of the floors, and these floors do not have protective layers for heat and moisture protection, then the protection will need to be installed under the floor slab.
The work is carried out provided that the basement has a sufficient distance to carry out protective work and locate repair and maintenance personnel, that is, at least 2 m.
In built-in basements, the main protection should be organized against moisture penetration and heat loss.
It is formed mainly by the walls and floor of the room and must be completed during the construction of the main building. Standard insulation pie on top of a floor slab for a separate cellar:
- flooring made of cast-in-place concrete, slabs, prefabricated structures or flooring;
- vapor barrier membrane film;
- insulation layer;
- waterproof film;
- roofing;
- bulk soil.
A modern solution for installing a separately located ceiling to create an inversion roof:
This is a relatively modernized type of construction, the pie of which is designed taking into account the disadvantages of traditional options, which suffer from moisture seeping through the heat insulator into the ceiling and destroying it. This design has increased moisture protection, since a reliable waterproof single- or multi-layer carpet is installed between the inner layer of the ceiling and the insulation.
The composition of the inversion roof pie is determined as follows:
- overlap;
- a layer for organizing moisture protection, usually a building primer;
- waterproof carpet;
- laying geotextiles;
- thermal protection, installation of hard plates, for example, extruded polystyrene foam is allowed;
- top layer of geotextile;
- loose gravel ballast layer;
- rigid covering for traffic safety and uniform distribution of ballast.
Technology for building a cellar from asbestos-cement sheets
Such a cellar can only be built in dry soils. It is made not only quadrangular, but six-, octagonal and decagonal.
Construction takes only a few days.
Asbestos cement sheets or slabs have standard dimensions: 1200 X 900 X 10 mm, so the area of the cellar can be calculated based on the number of its sides. The hexagonal cellar will have an area of 4.3 square meters. m, octagonal - 5.7 sq. m, decagonal -7.8 sq. m.
Asbestos-cement sheets can be connected to each other using metal corners measuring 40 X 40 mm (50 X 50 mm) or strip iron.
Fastening is carried out using bolts. The sheets are cut with a hacksaw.
The construction of the cellar begins, as usual, with a foundation pit. After the excavation is ready, the lower row of asbestos-cement slabs is installed. They are connected to each other using angles on bolts and nuts. The result is a closed structure that has the shape of a polygon in plan.
Cellar made of asbestos-cement sheets: 1. - asbestos-cement sheet; 2. - corner; 3. - bolt; 4. - shelf; 5. - cross member; 6. - hatch.
The base is made of concrete. While the concrete has not yet hardened, the assembled asbestos-cement walls are carefully and evenly pressed into the concrete base of the floor to a depth of about 10 cm. Then they are left for 5-7 days so that the concrete hardens and the lower tier of the walls is firmly fixed, after which the next slabs are attached to it tiers. The number and height of the slabs depend on the selected cellar depth. The seams between the slabs are rubbed with cement mortar.
If the floor of the cellar is earthen, then a foundation is made around the perimeter of the cellar under the lower tier of asbestos-cement slabs. The depth of the foundation is 30 cm, width - 40 cm. The outside walls are covered with a layer of hot bitumen in two stages. The surfaces are pre-cleaned and primed.
The ceiling is also made of asbestos-cement sheets: two channels are laid parallel to each other and the cellar axis passing through the middles of these opposite sheets on the ends of the corners of two opposite slabs. Floor sheets are attached to the channels. They should also be primed and covered with two layers of hot bitumen.
For better waterproofing, it is recommended to make a clay castle from crumpled clay 15-25 cm thick. This must be done carefully so as not to damage the bitumen insulation.
The entrance hole in the form of a hatch is located in the ceiling of the cellar between two channels. It is made double from sheet steel 1.5-2 mm thick, and the strapping is made from angle steel. Some known heat-insulating material is placed between the hatch covers. The hatch does not have to be made by welding; it can be assembled using bolts and nuts. The dimensions of the hatch are 60 X 60 or 75 x 75 cm. A metal or wooden ladder is attached to the hatch.
Ventilation is provided by two pipes. One is brought higher out, the second is installed so that it is located 5-10 cm above the ceiling. The diameter of the pipes is about 10 cm. The lower pipe is sealed with a metal mesh with small cells to protect against rodents entering the cellar. The inside of the walls is covered with water-based paint or lime mortar. Along the inner perimeter of the cellar, you can make shelves on brackets from metal corners. They are cut and bent to obtain the desired shape. The cellar can be divided into cells; the same asbestos-cement sheets will serve as partitions.
If the cellar is not located under the house, but stands separately on the site, a canopy is placed over it to protect it from precipitation, and around the perimeter there is a blind area made of clay or concrete. The blind area has a slope in the direction opposite to the cellar at an angle of 2-5°.
How to calculate?
In fact, the calculation of the basement floor is based on the use of simple formulas for establishing the bending moment M and the moment of resistance W , and their ratio must satisfy the condition: M/W<=Rd, where Rd is the permissible resistance of the structure in MPa, at a load q that can withstand the beam and its length l. M=(ql2)/8.
According to GOST 26519, published in 1985, a safety factor of 1.3 must be taken into account for beam floors. For basements built into residential buildings with a permissible load of 151.0 kg/m2 with a margin, this value is equal to: 151 x 1.30=197 kg/m2.
Intervals made of light blocks with a layer thickness of 180 mm and D 500 create a load: 500x0.18 = 90 kg/m2 . A reinforced screed with a layer of 55 mm and a density of 2000.0 kg/m3 creates a load: – 2000*0.055=110 kg/m2.
The total floor load will be: 197 +110+90=396.0 kg/m2. The deflection is calculated based on the total load for an I-beam Ry=2000 kg/cm2, span length l=4.5 m
Find Mmax Qmax . Based on the results obtained and Wtr and Itr and rental tables, select the I-beam number:
In this case, I-beam No. 14 is quite sufficient.
Stone cellar construction technology
A stone cellar is the most reliable and durable storage for various types of agricultural products. Previously, such cellars were built in every peasant yard, which is why they are sometimes called peasant cellars. There are known cases of such cellars being used for more than a hundred years without any major repairs. This is the extent to which the art of the masters was developed! Let's try to build a stone cellar, which will also serve our grandchildren.
The best material for construction is flagstone - a limestone common in the central black earth regions, where it is cheap and available. It is laid on a clay mortar, to which no sand is added, but chaff and a small amount of lime are added. The solution is so strong that not every nail can be driven into it.
The durability of the building will be guaranteed if it is installed in a dry place where groundwater does not reach the floor level by at least 70 cm.
There is one important condition that must be met to obtain the desired result - construction can only be done in the dry season, so that the open pit does not get wet or be washed away by rain. A clay castle is installed on all sides of the walls and foundation for waterproofing. The thickness of the clay castle is 20-25 cm. The floor in the stone cellar is made of adobe with compacted crushed stone or pieces and fragments of quarry stone ranging in size from 2 to 8 cm.
The ceiling is made in the form of a vault. To lay the vault, you need a special wooden formwork with circles. This formwork has an arched shape convex upward and rests on circles - specially cut boards the length of a span.
The arch is laid out simultaneously on both sides from the edges to the center. The masonry must contain an odd number of stones (bricks). In the center, the masonry is completed by the so-called keystone, which wedges the vault, which provides the entire structure with strength and reliability. The main thing in this matter is the ability to calculate the design of the vault and lay the keystone with a steady hand. If you want to tilt the bricks, you need to place small flat stones under them.
From the outside, the vaulted ceiling is filled with thick lime mortar, a layer of clay grease 8 cm thick is placed on top, then wood ash along with coals 10 cm thick for thermal insulation, and on top of everything - clay or dry earth. To go down to the cellar you need a staircase with stone steps, but, in extreme cases, made of durable lumber. In addition to the usual cellar with earth embankment, you can make a cellar above the stone cellar, which will provide additional convenience for use. The cellar is laid out from the same flagstone on a clay mortar. Thus, it will reliably protect the cellar and become an additional storage room for food and equipment. On all sides of the cellars, shallow drainage grooves are installed to protect against the accumulation and penetration of melt and rainwater, as well as a wide sandy or clay-crushed stone blind area. Modern stone cellars are built according to the same model, only the material is red burnt brick. The ceiling is made of slabs; thermal insulation is provided by clay grease and layers of earth on top.
Brick cellar: a - section; b - cellar plan; 1 - wall; 2 - concrete; 3 - soil compacted with crushed stone; 4 - waterproofing layer.
Ground cellars are constructed if groundwater lies at a depth of less than 0.5 m from the surface of the earth.
What tools and supplies will be needed?
Since floors are made from a variety of materials: reinforced concrete, rolled steel and wood, various tools and materials will be required accordingly.
To install the most common types of wooden floors on metal load-bearing beams, the developer must prepare the following materials and tools:
- I-beam floor beams by number depending on the permissible deflection, the number is calculated depending on the span length and the interbeam distance of at least 600 mm;
- thermal insulation material, mainly mineral wool and Penoplex;
- steam and waterproof membranes and tape for sealing seams;
- lumber for flooring and sheathing, in case of installation of a ventilation gap for mineral wool;
- antiseptic and fire-resistant impregnation for wooden products;
- measuring instruments: angle, ruler, tape measure, level and plumb line;
- jigsaw and regular hacksaw;
- electric drill with drills;
- Bulgarian:
- hammer and set of carpentry tools;
- welding to connect steel load-bearing beams.
For monolithic reinforced concrete floors you will need:
- concrete,
- fittings,
- boards for formwork,
- concrete pump and hoses for pouring mortar.
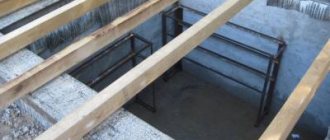
Option on load-bearing beams
To make a high-quality ceiling for your cellar, you can use load-bearing beams. Metal beams are best for this. If possible, you can even use ordinary rails, which can often be purchased at construction warehouses or scrap metal collection sites. Often the beams from which the ceiling of the structure is supposed to be made are ordered individually at factories.
Even ordinary rails are suitable as load-bearing beams.
When choosing this method of creating a cellar ceiling, at the stage of its construction it is necessary to provide for the presence of special holes in the walls that are required for attaching load-bearing beams. The ceiling of your cellar will experience significant stress. That is why the walls must also be as strong as possible, capable of supporting the weight of the beams and soil poured on top. By and large, the walls will be the “foundation” for the ceiling.
Special holes are provided in the walls for laying beams.
The order of work is as follows:
- Load-bearing beams are laid in pre-prepared holes in the wall. By and large, this work can be done independently, but with several assistants, because even the rails have significant weight.
- In the space that will be formed after laying the load-bearing beams, it is necessary to mount reinforcing bars and then secure them with special wire. Next, the reliability of the connection and the durability of the beams are checked. If all is well, then wooden formwork is made and a waterproofing layer is applied to it.
- After installing the formwork, it is necessary to install supports that will be designed to take the load of the cement mortar.
- You can mix the cement mortar yourself or order it ready-made from any construction company. The solution must be poured as evenly as possible and without long breaks into the metal frame. All compartments of the frame must be filled with concrete; nothing should be left out. Upon completion of pouring, distribute the solution throughout the entire thickness of the structure.
- The ceiling that is obtained after using this method requires high-quality thermal insulation. In principle, any thermal insulation material is suitable for this.
As a result, you get a reliable floor slab that can withstand serious loads. In this case, the ceiling of the cellar will be perfectly strengthened, insulated and will not cause problems during operation. After all insulation work, the resulting floor must be covered with soil, making a small mound. In some cases, a gable roof is additionally installed, which will protect the cellar from precipitation.
Description of device technology features
There are certain features of installing a basement floor, which depend on the source material, type of structure and location of such an object, built-in or separately located.
For built-in basements in a wooden house, the basement is covered with wooden load-bearing beams. This wooden structure serves as the base for the floor of the first floor, so it should be carried out as part of the overall project for the house.
Before its installation, the entire design complex of works for the construction of the zero cycle is carried out, especially the part of the construction of the foundation and waterproofing of the walls.
The basic procedure for installing a ceiling on a basement in a wooden house:
install floor beams, at this stage it is important to observe the design size of the beams in cross-section, the distance between the beams, the depth of embedding in the wall material, as well as perform antiseptic and fire-resistant treatment of the wood;- perform a roll-up device;
- install a vapor barrier membrane secured with a stapler and with an overlap of 100 mm, the seams are taped with special tape;
- install thermal protection from fire-resistant mineral wool insulation materials;
- install the sheathing
- install waterproofing with an overlap of 100 mm and gluing the seams with tape;
- install a ventilation sheathing;
- install a subfloor layer;
- install a finishing layer of the floor;
- perform a finishing layer of ceiling cladding from the basement side.
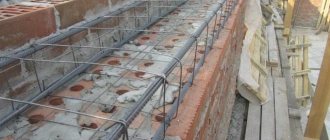
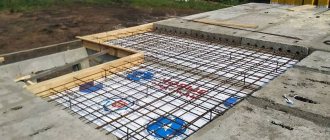
In order to construct a monolithic ceiling over a separately located cellar, which was not included in the building design, you will need to first perform drawings and calculations for the strength and permissible deflection of the supporting structure. Before installation of the slabs begins, all work on the construction of walls, their waterproofing and thermal protection must be completed.
When assembling formwork for pouring concrete, it is necessary that the slab extends onto the basement walls by at least 10 cm. Only in this case will the strength and durability of the structure be guaranteed.
To perform this work, the developer should first do:
- Steel racks are installed under the beams, mounted at a distance of no more than 1 m from each other.
- Formwork is installed; moisture-resistant plywood laid on durable boards is suitable for this purpose.
- A reinforced frame is made from 10-12mm reinforcement, with a gap between the rods of 15 cm, the mesh is made in 2 layers. The mesh is installed on special spacers so that they do not lie on the bottom layer of concrete; the area covered with concrete of the reinforced structure must be at least 3 cm.
- The formwork must be poured at once and from one batch of M 250, it is better if the concrete is made at the factory, the layer thickness is 20 cm.
- The layer is laid evenly, since it will serve as the ceiling of the basement.
- The poured concrete is vibrocompacted with special equipment or manually by piercing the concrete mass with a reinforcing bar; in this case, air pockets will come out and the slab will be strong, monolithic without voids.
- After 28 days, the formwork is removed; throughout this period, the surface of the concrete must be moistened and covered with film until it gains strength.
- Further work is carried out depending on the chosen insulation pie or inversion roofing.
Pouring a monolithic concrete ceiling
Upon completion of the work related to the construction of walls and waterproofing of the room, the moment comes when it is necessary to resolve the issue of covering the cellar. In some cases, a conventional monolithic concrete slab, which is made of concrete and a reinforcement frame, is used for this.
All the work can be done with your own hands. It is very important to construct timber formwork before pouring concrete.
- The size of the ceiling must exceed the dimensions of the room, because the walls of the cellar will serve as its supports.
- Before pouring the floor, special supports should be installed, which should hold the wooden formwork structure while it is filled with concrete and when it dries. In this case, the formwork must be pre-sealed so that the solution does not leak during the pouring process.
- The next step after creating the formwork is knitting the frame of the concrete slab. The frame, as already noted, is made of reinforcement. The distance between the individual rods should be approximately 20–25 cm. If your cellar is small in size, then one reinforcement frame will be enough, but when the dimensions of the storage are significant, for greater reliability it is better to use paired reinforcement of the slab. The reinforcement network should extend beyond the cellar walls by several centimeters from different sides.
As soon as the work on creating the formwork and reinforcing mesh is completed, you can begin the process of pouring the concrete solution, which will form the future slab. As a rule, the height of the slab does not exceed 30 cm. This is a reliable, monolithic and high-quality ceiling that will serve you for decades.
Concrete should be poured as evenly as possible, without interruptions, until the entire slab is formed. To prevent cavities from forming inside the structure, the solution must be subjected to vibration before pouring, which is done using a regular board or special devices.
After pouring the concrete slab, you need to wait some time (about 3-4 weeks) for it to completely harden and take on its final form. According to experts, such an overlap is the most durable and effective. In addition, if desired, it can even be used as the foundation of a small outbuilding above an earthen cellar.
Possible difficulties and errors during the installation process
The biggest mistakes made by developers are when they start building a basement or cellar without a design and without calculating the strength of the load-bearing structures.
If the basement is built into the building, then its arrangement is carried out according to the construction project, and if this was not provided for at the time, then you will have to order a project for the reconstruction of the house so that the newly constructed basement does not weaken the walls and does not lead to the destruction of the house.
A free-standing cellar also needs design documentation, although of a smaller volume. It is important to provide not only the reliability of the load-bearing elements, but also a reliable ventilation system so that visitors to the cellar are not poisoned by radon or other aggressive gases that can accumulate in underground structures.
The main mistakes that developers make during the installation of basement floors:
poor waterproofing of load-bearing wooden beams when laid on walls, no roofing material at the ends of the logs;- low support of beams on wall structures;
- unacceptable deflection of beams due to their small cross-section;
- the heat-steam and water-protective layer is not completed;
- violation of the technology of pouring and compacting the monolith;
- weak reinforcing frame;
- small thickness of the concrete slab.
How to fill a cellar with concrete?
A cellar is a mandatory economic structure that should be in the courtyard of every private house and every dacha. At the same time, the most optimal option for constructing a capital cellar is to fill the cellar with concrete, its walls and the ceiling of the structure.
- Technology for pouring concrete into a cellar
- Required materials and designs
- Required Tools
- Stages of work
Cost of work
The final cost of installation of floors over basements and cellars depends on the construction area, the chosen design, the composition and number of layers of the “pie”, the area where the construction site is located, as well as the availability of good access roads.
The average cost of materials and work for installing floors above the basement per 1 m2 is summarized in the table:
| Floor type | Monolithic | Reinforced concrete slabs | Beams made of LVL timber | Regular beams |
| Load-bearing beams | 500 | 190 | ||
| Vapor barrier membrane | 65 | 65 | 65 | 65 |
| Wood flooring | 320 | 320 | ||
| sheathing | 62 | 62 | ||
| Concrete solution with transport costs | 625 | 125 | ||
| Armature | 430 | 63 | ||
| Reinforced concrete slabs | 935 | |||
| Heat protection material | 250 | 250 | 250 | 250 |
| Concrete mortar | 125 | |||
| Loading and unloading operations | 62 | 125 | 62 | 62 |
| Installation | 875 | 300 | 400 | 400 |
| Material processing | 215 | 215 | ||
| Formwork work | 270 | 70 | ||
| Transport cost | 250 | 375 | 170 | 170 |
| Total costs per 1 m2 of slab installation | 2827 | 2433 | 2044 | 1734 |
Use of wood
Are you planning to build a cellar with your own hands? Use wooden beams - a proven, easy-to-work material.
If you are building a house made of wood, you can cover the basement with wooden beams
Perform the activities in the following order:
- Treat all parts of the wood structure with an antiseptic.
- Wrap two layers of roofing felt around the supporting surfaces of the beams.
- Install wooden beams on the top surface of the cellar walls.
- Secure the end part of the beams with small strips, providing a base for the knurling boards.
- Lay the plank and secure it using self-tapping screws.
- Form a heat-insulating contour, coat with mastic, cover with roofing felt or roofing felt.
- Fill the structure with soil if no structure is planned to be built above the structure.
Pay attention to the presence of grooves in the basement walls necessary for installing load-bearing beams.
Drainage in the cellar on the site
The installation of a drainage system is mandatory in the refrigerator cellar. To drain melt water, a drainage channel is organized. You can build it in two ways. The choice depends on the type of soil on the site.
First way. Construction of a drainage pit (or well). Suitable for areas with dense, clay soils. A well equipped with a ladder with a hydraulic shutter is installed at the base of the ice storage facility. We connect the well to the pipe. Through it, water is diverted to low areas or a drainage well.
On sandy soils it is easier to organize drainage. In addition, this method is more hygienic. Arrange vertical drainage. The drainage pit is deepened into the ground, creating a well where the water goes.
Temperature and humidity control
The condition of the air in the cellar requires constant monitoring. One of the most important characteristics is relative air humidity. It is known that for storing potatoes the characteristics of the air condition are as follows: temperature + 2 -5 ° C, relative humidity 85-95%. If the humidity is below the specified level, the potatoes dry out and wrinkle. With higher humidity, condensation may form, which promotes the germination of tubers and the development of rotting processes, especially when the temperature rises. To control the air temperature, it is advisable to hang a thermometer in the cellar.
In addition to the temperature, for normal operating conditions of the cellar it is necessary to maintain a certain humidity.
An increase in humidity can be noticed by a musty smell, dampening of the walls and ceiling, and fogging of food.
To detect the transition to negative temperatures, you can use the old fashioned method - place a saucer of water in the cellar. When the temperature drops below 0° C, the water in the saucer will freeze.
Cellar gas pollution
Gas contamination in a cellar is a serious problem that its owner occasionally has to deal with. Most often, gas pollution is caused by the concentration of carbon dioxide (CO), which has toxic properties, causing suffocation. A concentration of carbon dioxide in the air of more than 10% is dangerous for the human body. You can judge with confidence the presence of carbon dioxide if a match does not light up in the cellar or a candle goes out.
Even more dangerous is the accumulation of swamp gas in the cellar. A swamp gas breakthrough can occur if the cellar is built in a low-lying swampy area. Swamp gas, consisting mainly of methane, forms an explosive mixture with air. At high concentrations, it has a nerve-paralytic effect on the human body. If gas contamination is detected, it is urgent to ventilate the cellar as thoroughly as possible. If ventilation is not working well and there is no air circulation, you need to create it artificially. To do this, you can lower a sheaf of straw or a blanket into the cellar on a rope and create air movement by quickly raising and lowering it.
Stairs and entrance
Usually a vertical ladder - metal or plastic - is installed in a plastic cellar. It is far from convenient to use. It’s still okay for young people, but it’s very difficult for older people. In addition, imagine how you will lower/raise bags of potatoes, carrots, and beets. It's no better with banks. How to raise or lower them without breaking them. Okay, we can come up with something for cargo. For example, make the simplest lift: block, rope, basket. Load supplies into baskets and lower them in this way. The problem has been partially solved, but going up and down steep stairs is an unsolvable problem.
Plastic caisson for a cellar with an inclined entrance
It is much more convenient if the ladder is placed at an angle, but in this case you need a neck for almost the entire length of the body. In most cases, the caisson for a plastic case is made to order. When placing your order, you can ask if they can make a larger neck. This should not affect the strength in any way. The only possible consequence: the mass that presses the caisson from above will decrease, saving it from being pushed out. The solution is to make the slab on top a little thicker.
There is another option. Some manufacturers (Titan) have developed models of plastic cellars with an inclined entrance. They are, of course, much more convenient to use, but more difficult to install. And the price is even higher.
Cellar-storage construction technology
This, one might say, is a classic of the genre, conjuring up pictures of merchant Moscow. A vegetable storehouse is an indispensable thing in conditions of high groundwater levels and in low-lying, waterlogged areas. The design of the storage shed is simple and accessible, proven by many years of experience. It can be successfully used not only by gardeners, but also by small vegetable farms, since the size of the storage shed can vary quite widely.
On personal plots, the land space is usually small, so the recommended dimensions of the storage shed are 3-4 m in length and 3.3-3.8 m in width.
In collective farms, large storage sheds can be made for storing vegetables, measuring 20-24 m in length and 7-8 m in width. It is not recommended to make warehouses with a larger area, because it becomes difficult to maintain the required temperature and humidity conditions in them and this is inconvenient to use.
The height of the storage shed should not exceed 2 m in its highest part, because otherwise the vegetables will freeze. The storage shed looks like a squat structure like a hut. In Fig. depicts a vegetable storehouse and some elements of its design.
For ease of use, passages are arranged inside the warehouse: in large warehouses there are two, in small warehouses there is one. It is enough to make passages 60-70 cm wide. The storehouse has a frame structure. The frame is made of logs with a diameter of 13-18 and 18-22 cm. The log-pillars must be sanded. They are dug into the ground to a depth of about 1 m, and the upper ends are tied together with long longitudinal poles or logs. To make such a strapping, the tops of the log pillars are hacked into a tenon, and then strapping logs (poles) are placed on them.
Vegetable storage: 1. - bin; 2. - soil embankment; 3. - roofing material; 4. - sheathing; 5. - hatch.
Those parts of the logs that come into contact with the ground must be coated with hot bitumen or burned. This applies to the lower ends of the frame logs and the lower trim logs. Such measures will extend their service life by several years.
The storage shed design does not include a ceiling, and this circumstance significantly reduces the material and time costs of its construction.
If you have minimal construction skills, a storage shed can be erected in 7-10 days.
The roof of the storehouse is constructed from boards, on which a continuous lathing is made from hewn slabs. For waterproofing, roofing felt sheets are placed on top in two layers. The roof is covered with earth or peat with a layer 30-40 cm thick. The ground is sown with grass or covered with turf. The roof is made with wide overhangs and is lowered almost to the ground so that in winter snow remains on it, providing additional thermal insulation. The end sides of the structure are sheathed with boards in two rows. A layer of roofing felt is laid between the boards to prevent drafts in the room. On one of the end sides there is a small door with a vestibule. The manhole door is also insulated.
Ventilation in the storehouse is carried out through an exhaust device: a wooden box with a valve-regulator located near the roof ridge. In the case where the storage shed is too elongated, two ventilation pipes are made: supply and exhaust. To protect the structure from melt and rainwater, a shallow drainage ditch is made around it.
If all of the above recommendations are followed during construction, then a constant temperature of 2-3°C will be maintained in the storage shed. Under such storage conditions, the loss of potatoes is only 3-4%, of fresh cabbage - no more than 10%.
Side ceilings of the cellar on the site
Burial walls are erected from brick, concrete, and lumber. They differ in thickness and properties to retain moisture and heat.
The thickness of the brick walls is 25-30 cm. They are laid flat. For the binder we use a solution of clay-lime mixture.
Wooden walls are made of thin logs with a diameter of 12-18 cm. The lumber is first subjected to antiseptic treatment. The gaps between the crowns are caulked with moss. This is a pure natural material with unique properties. It is not subject to rotting and absorbs unpleasant odors, which is especially important for a cellar with food supplies. It is recommended to make wooden floors dismountable in order to dry them outside during the warm season. Instead of logs, you can use sanded croaker. We will get walls 6-8 cm thick.
Slag concrete. Inexpensive building material made from crushed metallurgical or fuel slag.
It is undesirable to use in lowlands with high humidity levels and large amounts of precipitation. To increase the moisture-resistant qualities of the material, cinder concrete walls are plastered on both sides with cement mortar.
The thickest concrete walls are 20-30 cm.
Concrete walls are used in the design of a refrigerator cellar due to its unique qualities of accumulating cold and slowly warming up. Reinforcing bars or wire are used to strengthen the structure. The hardened concrete is covered with cement-sand plaster 1-2 cm thick. Then it is rubbed with a steel trowel.
The gaps formed between the mainland soil and the side ceilings are closed with side clay locks 20-30 cm thick. For hydro- and vapor barrier, the ground part of the walls is sheathed with traditional roofing felt. You can also use thick pressed cardboard (hardboard), construction cardboard made from sulfate cellulose (kraft paper), roofing cardboard with bitumen impregnation (glassine).
If an underground storage facility with a cellar is being built, it is not recommended to make single walls. This design freezes easily and is prone to flooding.
A cellar is a separate structure covering the entrance to the cellar and the space around it. Any available materials are suitable for building walls: stones, bricks, thick sanded slabs, shell rock, etc.
The walls of the cellar are deepened 50-70 cm into the ground. To protect against ground water, a clay-crushed stone blind area 100-120 cm wide is constructed around the perimeter of the building. A slope of 10% is required for water drainage.