A smooth, level base for the finishing coating is a prerequisite for installing floors. This is the only way to ensure its reliability and durability. In the minds of many apartment owners, construction work of this type is necessarily accompanied by destruction, dust, dirt and other consequences of work associated with pouring cement-sand screed. If we add a long wait of three to four weeks, the picture emerges not at all rosy. Is there a way out?
It may be a revelation for some, but quite often such a picture can be avoided. The solution to all these problems is dry floor screed. What is it, how to do it, what are its pros and cons - this is an approximate range of issues that we have to deal with.
Dry or wet floor screed
Several methods can be used to form a smooth surface. Classic pouring of concrete mixture is labor-intensive and takes a long time for final drying. An alternative is dry floor screed. What it is and what features the coating has should be analyzed before choosing a construction method.
The peculiarity of this method is the formation of a flat base surface using several types of materials. For this purpose, a special bedding is used, which must have certain properties. First of all, these are good thermal insulation performance. It is also not allowed to change qualities under the influence of external factors. For these purposes, you can use expanded clay, or ready-made compositions from manufacturers. After final leveling of the surface, gypsum fiber sheets with locking fasteners are installed.
Before making a dry floor screed, you should consider the relevance of its use. In this case, certain restrictions should be taken into account:
- Operational qualities of the premises. The formed leveling layer should not be exposed to moisture. When it gets into the building mixture, a change in properties occurs. Therefore, it is necessary to additionally install a waterproofing layer. Materials for dry screed are not designed for use in “wet” rooms - bathrooms, kitchens.
- Square. If the size of the room is large enough (50 m² or more), installation of the screed will be difficult due to the mandatory division of the area into sectors.
- Degree of load. Despite the fact that the floor screed mixture will not experience mechanical stress, it will affect the gypsum fiber slabs.
- Compatible with heated floors. The backfill itself has good thermal insulation properties. Therefore, heating elements cannot be installed in it. Dry floor screed for heated floors can only be compatible with film heating.
These are not the only conditions for using this surface leveling method.
You must first read the recommendations from the manufacturer and determine the optimal operating rules. Advice
The use of technology for rooms with a slope is unacceptable. This will lead to the formation of voids and a decrease in the thermal insulation value in a certain part of the room.
The main difference between the dry method and the use of cement-sand or dry construction mixtures for floor screed is the use of liquids. True, dry-type materials do not provide particularly high density, but these indicators are sufficient for their installation in any living space.
Proportions and calculations
For a regular screed, it is enough to take cement grade 400 and add 3 parts of sand to one part of it. Water must be added until the solution reaches a creamy state. Moreover, it is positioned as thick and tough. Excess water will lead to deterioration in quality.
Proportions of materials for screed Source oboiman.ru
Advantages and disadvantages
Arrangement of the method described above should begin with an analysis of its pros and cons. They depend on the type of materials used and the characteristics of the room. In this case, the required performance qualities of the coating are taken into account.
One of the disadvantages is the relatively low mechanical strength of the formed layers. Their structure is similar to wooden models, with the exception of the space filler between the joists.
What else makes this technology different?
- Low material consumption. It differs significantly from the concrete pouring method.
- Low weight reduces the load on interfloor floors. All dry construction mixtures for this work have a low specific gravity. Therefore, a layer thickness of 20-30 cm will not affect the overall characteristics of the building.
- With some skills, a dry screed can be laid in just a couple of days. After the final installation of the sheets, the floor may be subject to stress. When pouring a concrete surface, this will require waiting from 7 to 20 days.
- There are no wet processes, so dirt does not spread throughout the living spaces. It's not just dirt. There is also no cement dust, a rather strong allergen.
- Labor intensity, including work such as loading and unloading, lifting materials and equipment to the floor , is several times less.
- The technology of dry floor screed does not involve the use of concrete mixers, special containers or other special equipment. The exception is premises with a large area, where speed of work is important. In this case, you need equipment with which you can quickly form an even leveling layer.
- Internal communications can be laid through the bulk layer of the system.
- One of the priorities is for heated floors. Due to its high thermal insulation characteristics, it significantly increases the energy efficiency of the system. The ideal option is an IR film, which is placed directly under the final coating; the presence of a layer of thermally reflective material is mandatory.
- It simultaneously performs the function of additional thermal and sound insulation.
- Installation is quite simple. Also suitable for a wooden base, if it is, of course, durable.
- Provides layer stability to distributed and point loads - up to 1 t/m2 and 360 kg, respectively.
- The finishing coating can be installed as soon as the screed is completed. Almost any material is chosen for it.
The advantages of this technology also include:
- possibility of carrying out work at any time of the year;
- use in old buildings, since the loads are minimal;
- If necessary, work can be performed alone without assistants;
- more economical method: the cost of installation work and the price of equipment is lower.
It also has disadvantages, although they are few. The main thing, perhaps, is increased sensitivity to moisture, which is why it is completely unsuitable for installation in rooms with a high percentage of moisture, for example, a bathroom, and where water leakage is theoretically possible. It is also not recommended to carry out installation work in wet weather.
Advice
If you nevertheless decide to use this option in the bathroom, then pay special attention to the waterproofing device. It is necessary to lay a waterproofing tape along the joints of the walls and the base and take care of a special waterproofing layer covering the floor surface.
Now you know the difference between dry floor screed. The pros and cons of the technology make it relevant for furnishing residential premises. This applies most of all to places where there is a need to reduce the load on the floor as much as possible.
SNiP cement-sand screed
As for the most common capital method of organizing a coating, the characteristics here are virtually the same as those made using the semi-dry method. And the point, of course, is that the same cement and sand are used here and the addition of the same impurities is allowed. So:
- the thickness of the cement-sand floor screed should not be less than 2-2.5 centimeters (the larger limit can vary to significant values from 100 mm or more if reinforcement or plasticizers are used);
- the weight of cement-sand screed per 1 m2 with a minimum layer is 40-50 kg (higher ones can be lightened with various additives, for example, polystyrene foam granules);
- the strength of the cement-sand floor screed is enviable, like that of any other capital structure (the tabular indicators of a conventional mortar after hardening are from M150 to M180 - this is quite enough even for moving heavy equipment);
- the density of the cement-sand screed (thermal conductivity) is on average 2000 kg/m3 (if everything is done in compliance with the necessary details).
All of the above indicators are completely optional for people whose professional activities are far from construction. Contact us and entrust all calculations to our specialists. You can be sure that they will offer the most profitable and technologically advanced solutions in any specific case. Everyone who contacts us will always have the opportunity to take advantage of:
- attractive prices;
- prompt execution of work;
- many years of experience of employees;
- professional consultations;
- official quality guarantee.
Prefabricated dry screed made of OSB boards
First you need to define the terminology. The term OSB gets its name from the abbreviation – oriented strand board. This means that large-sized chips are used for production, arranged in a special pattern relative to each other.
During the manufacturing process, large chips are placed along the edges of the structure, and smaller components are placed inside. To increase mechanical strength, the outer layers have a longitudinal orientation of wood fibers, and the inner layers have a transverse orientation. Subsequently, slabs with a dense and uniform structure are formed by hot pressing.
Technical characteristics: thickness, weight
Before choosing a flooring material made from OSB boards, you should familiarize yourself with the technical characteristics. They directly depend on the specific model and its performance characteristics. In most cases, the manufacturer indicates these parameters on the packaging. However, difficulties may arise during individual purchases.
The most important parameter is the water resistance indicator. It determines the possibility of installing the coating in a specific room - bedroom, kitchen or bathroom. Depending on the degree of processing, this value can range from 12% to 25%. For flooring, it is recommended to use slabs whose thickness swelling parameter does not exceed 15%.
When creating a rough surface on which mechanical forces will not be applied, you can use a material with an elastic modulus of 1100 N/mm². If you plan to install slabs as the main covering, it is recommended to choose a value of this indicator from 1600 N/mm² and higher.
Due to its design, this material has the highest specific gravity. But to analyze the total mass of the future coating, it is necessary to know the optimal thickness of the OSB board for the floor. For a rough surface it can be equal to 6-9 mm. When arranging the main covering, models with a thickness of 16 to 25 mm should be installed, depending on the load on the floor.
| Thickness, mm | 6 | 8 | 9 | 10 | 12 | 15 | 18 | 22 |
| Average weight, kg | 12,9 | 16,5 | 18,6 | 20,2 | 23,8 | 30 | 34,6 | 42,9 |
To optimize cutting, manufacturers have provided several standard sheet sizes: 1220×2440, 1220×3660, 1250×6000, 1250×2500, 1250×3700. Since polyurethane resins are used for gluing the layers, they have increased fire safety and do not emit harmful components when the temperature rises. The last fact is very important for use in residential premises.
QSB boards have similar qualities. The difference lies in the manufacturing technology - waste from furniture production is used for this. The chips are smaller in size and therefore have better performance characteristics.
Laying technology
One of the key advantages of OSB is its relatively simple installation. To fulfill it, there are requirements for the quality of the rough surface. An important point is the correct choice of a specific model of flooring material.
Before leveling the floor with OSB slabs, it is necessary to draw up the actual characteristics of the room. The following factors will influence the installation technology:
- The starting material for making floors is wood or concrete screed;
- Temperature and humidity parameters in the room;
- Total coverage area;
- Maximum surface load value.
A laying scheme is drawn up in advance. One of the determining conditions is to minimize the number of joints. That is why large sheets are most often used. In general, the installation technology allows you to complete all the work without the involvement of specialists. But before that, you should familiarize yourself with the general installation recommendations.
Installation on concrete floor
Before installation, it is necessary to treat the cement surface. After a long period of use, cracks and chips will inevitably form on it. They must be thoroughly puttied. If the level difference exceeds 7 mm per 1 m.p. – install adjusting logs.
In practice, this is only required as a last resort. Most often, installation is carried out on a prepared base. To reduce the influence of moisture, install a layer of waterproofing. This can be film material or mastic.
Then you need to follow these steps:
- Cutting according to the previously drawn up diagram.
- Cleaning the floor from dust and dirt.
- Installation of material, adjustment of its joints.
- You can use glue for fastening. It is important that it does not negatively affect wood and concrete.
- The joints must be tightly fitted to each other. It is recommended to use models with side mounting elements.
- To compensate for thermal expansion, it is necessary to leave a gap of 5-7 mm between the base and the wall.
It is important to make sure the deck is facing the right way during installation. Most slabs have a front and back side that are designed for specific operating conditions.
On a note
For better fastening, you can fix the canvas with dowels. If you plan to install decorative material on top of OSB, the fastening heads must be recessed into the subfloor.
On a wooden floor
Before laying OSB boards on a wooden floor, you should check the condition of the joists. They must not be damaged, the surface and structure cannot contain fungus and mold.
Often, for the arrangement it is necessary to first install a layer of insulation. Cheap OSB with a thickness of no more than 8 mm can be used as a rough base. It must be remembered that during operation it may be exposed to moisture. Therefore, it is necessary to choose moisture-resistant models.
After this, a layer of waterproofing is installed. It should cover the entire surface of the floor and pass under the joists. If it is impossible to dismantle the logs, treatment can be carried out with liquid mastics. After this, you can install a layer of thermal insulation.
Rules for arranging a wooden floor.
- To increase mechanical strength, it is recommended to install two layers of OSB. The first is located across the joists, and the second along them.
- The plates are fastened using side screws. It is important that the joints are not at the same level.
- After installing OSB boards on the floor, the level is checked. If necessary, you can perform partial dismantling and install adjusting pads on top of the joists.
- A thermal gap is required.
To form the top layer, it is necessary to use models with a thickness of 16 mm or more. If you plan to install one layer, the distance between the logs should be no more than 30 cm. Otherwise, there is a high probability of damage to the material.
When laying ceramic tiles on top of OSB, you should use a special adhesive that will not damage the wooden base. It must be remembered that a high-quality OSB floor board should not have unevenness or obvious defects.
Main components for the solution
Main components for the solution
Classic concrete mortar contains cement, sand and water, taken in certain proportions. If the thickness of the screed is more than 4 cm, crushed stone is additionally used. To reduce the weight of the screed, special fillers with a porous structure are added to the solution - vermiculite, perlite and expanded clay. These components have high water absorption, and therefore when mixing the solution, water is added in a minimal amount - only to make the mixture plastic and convenient for application. In order for the screed to be of high quality and withstand the expected loads, the ratio of sand, cement and porous fillers must be observed very accurately.
Approximate ratio for ordinary concrete
The strength of a concrete base depends not only on the brand of cement, but also on its mass fraction in the solution. A simple table will help you choose the right ratio of components for the screed.
| Brand of Portland cement | Design grade of concrete | Mass composition of dry concrete mixture, Cement / Sand / Crushed stone | Average volumetric composition of dry concrete mixture, Cement / Sand / Crushed stone | Volume of concrete produced from 10 liters of cement |
| 400 | 100 | 1/4, 6/7, 0 | 10/41/61 | 78 |
| 500 | 100 | 1/5, 8/8, 1 | 10/53/71 | 90 |
| 400 | 150 | 1/3, 5/5, 7 | 10/32/50 | 64 |
| 500 | 150 | 1/4, 5/6, 6 | 10/40/58 | 73 |
| 400 | 200 | 1/2, 8/4, 8 | 10/25/42 | 54 |
| 500 | 200 | 1/3, 5/5, 6 | 10/32/49 | 62 |
| 400 | 250 | 1/2, 1/3, 9 | 10/19/34 | 43 |
| 500 | 250 | 1/2, 6/4, 5 | 10/24/39 | 50 |
| 400 | 300 | 1/1, 9/3, 7 | 10/17/32 | 41 |
| 500 | 300 | 1/2, 4/4, 3 | 10/22/37 | 47 |
| 400 | 400 | 1/1, 2/2, 7 | 10/11/24 | 31 |
| 500 | 400 | 1/1, 6/3, 2 | 10/14/28 | 36 |
You cannot use old-caked cement to prepare the solution: even if the proportions are observed, such a screed will very soon crack or begin to crumble. When preparing for repairs, buy cement last, making sure to check its expiration date. The sand is pre-sifted, because excess impurities and debris also reduce the density of concrete. For the same reason, water for the mixture is taken not from a reservoir, but from tap water or spring water.
DIY concrete
Properties and characteristics of GVL
First you need to consider the properties of this material, its structure and composition. Externally, it is similar to standard plasterboard boards. But that's where the identity ends.
For production, a mixture is used, which includes gypsum and cellulose fibers. Their ratio is usually 80/20. Fibers are needed to improve mechanical strength, a similar example is acrylic.
As a result of pressing and adding special fastening compounds, gypsum fiber sheets for flooring are obtained with the following properties:
- Density indicator – 1200 kg/m³. This makes it possible to use fastening materials (screws and nails) without damaging the surface;
- High degree of sound insulation. The thicker the Knauf GVL sheets, the higher this figure. For some models it is 35-40 dB;
- Fire safety. The material can be used in rooms with increased fire safety requirements;
- Low thermal conductivity. It is an additional property that does not negate the use of insulation;
- Flexibility. Usually it is 5.5 MPa, which is one of the best indicators for such materials.
For installation on a rough surface, it is recommended to use moisture-resistant models. They are less susceptible to moisture that can accumulate in the cellulose fibers. Therefore, if the question is, gypsum fiber board or plywood for the floor, it is better to do everything by laying the first one.
To obtain a high-quality floor surface, it is necessary to purchase models from well-known manufacturers. One of them is the Knauff company.
On a note
Despite the fact that the price per meter of GVL is relatively high, it will recoup its cost due to its quality and long service life.
How to calculate the required concrete consumption
Knowing the proportions of cement and sand for floor screed, as well as other components, it is necessary to correctly calculate the consumption. For example, it is necessary to cover a floor of 100 sq.m. with concrete screed. Based on the following parameters: layer thickness 5 mm, ratio of sand to cement solution 4 to 1. Now you need to find out the volume of the composition. It is necessary to multiply the area of the room by the thickness of the cement screed. It turns out 5 cubic meters. To prepare the mixture, you need to add water. It will account for about half of the composition. Therefore, we subtract this amount, leaving 2.5 cubic meters.
Now you need to find out how much cement you need to take. When choosing a proportion of 1 to 4, you need to add two shares, the result is the number 5. Divide the remaining 2.5 by 5, resulting in 0.5. This means that for 0.5 cubic meters you will need one share of cement. And in order to find out how much sand you need, you need to subtract 0.5 from 2.5. The result is this: for 100 square meters you need to take 0.5 cubic meters of cement and 2 cubic meters of sand. But if you buy material on the market, you need to know that it is sold in packages. They offer to buy cement in packages of 25 kg and 50 kg. That is, it is better to make calculations in kilograms. 1300 kg weighs approximately one cubic meter of cement. As a result, 0.5 needs to be multiplied by 1300 and we get 650 kg. You will need 13 packages of cement, 50 kg each.
Recommendations for selection
Despite all its positive qualities, in practice you may encounter some difficulties when choosing the optimal coating model. To avoid possible complications during the installation process, you must familiarize yourself with the recommendations of specialists.
Since the GVL slab will be attached to the floor, heat loss through the joints should be avoided. To do this, choose a model with a mounting groove. With its help, you can avoid laying two layers of material, as is necessary when installing plywood or OSB.
Another important indicator is the flooring material. To ensure sufficient rigidity, the base must be uniform. In this case, the load will be evenly distributed. Therefore, you can choose models up to 0.5 cm thick. But it all depends on the degree of maximum mechanical pressure on the material.
When choosing, you need to pay attention to the following nuances:
- The condition of the edges is smooth, without defects;
- Package. If the sheets are stored indoors, they may not be packaged. But during long-term storage, condensation may accumulate inside;
- Cost and sizes.
The last factor directly affects the cost. Currently, manufacturers make products with a width of 500, 1000 and 1200 mm. The thickness can be 10, 12.5, 15, 18 and 20 mm. The length varies from 500 to 3000 mm. Standard gypsum fiber sheets have an affordable price, which is determined by their dimensions.
On a note
The average price for a sheet of size 1200*2500*10 from the manufacturer Knauff is 1625 rubles.
Minimum and maximum screed thickness
SP 29.13330.2011 gives clear instructions on the minimum thickness of the screed layer to ensure the required floor slope: when laying on floor slabs, at least 20 mm, when laying on a waterproofing layer, on a heat and sound insulating layer - at least 40 mm. When covering pipelines (including in a heated floor system), the thickness of the screed must be at least 45 mm greater than the diameter of the pipelines. A smaller layer thickness can lead to cracking and destruction of the screed.
The minimum thickness of the screed layer recommended by experts is 30 mm. The optimal value of the screed is 40-50 mm; an increase in thickness entails excessive consumption of material, is limited by the permissible load-bearing capacity of the base even if light screeds are used, and requires additional reinforcement of the layer with reinforcement.
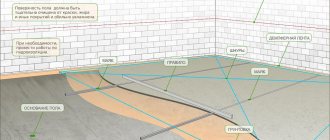
Prefabricated system in section
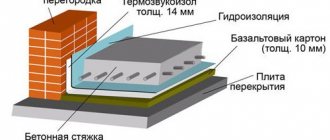
Essentially, this is a system of materials that are laid out on a leveled base in a specific sequence in the form of a “pie”:
- a layer of waterproofing (film or membrane) laid on the floor slabs or surface to be repaired;
- damper tape, which is used to create the required compensation gap;
- a leveling layer, usually made of expanded clay, slag or other backfill material;
Advice
If the base is sufficiently flat, at this stage thermal insulating boards made of EPP (extruded polystyrene foam) or high-density mineral wool are laid. Thus, on the one hand, the level is finally leveled horizontally, and on the other, the necessary sound and thermal insulation is ensured.
- sheet material as a base for the finishing floor covering, which absorbs the load and distributes it to the backfill layer located underneath. This can be moisture-resistant plywood, OSB, chipboard, etc. Recently, ready-to-install elements made of moisture-resistant gypsum fiber (GVLV) have been predominantly used.
On a note
The optimal thickness of the pie is considered to be 35–45 mm, with 20 of them being the sheet layer.
With a smaller system height, it is impossible to provide the required degree of strength and stability; with a higher height, the installation technology has certain nuances.
Step-by-step execution
The whole process can be divided into stages:
- The base is cleaned and primed. The insulation is distributed. A waterproofing membrane is laid on top of it. The pieces are overlapped, and all seams are taped to ensure a tight seal.
- The plastic film should extend onto the walls by ten centimeters. It is attached to them with polystyrene foam tape, 1 to 2 cm thick. You can use foam inserts.
- The general level of the entire screed is set. The easiest way is to use a laser level. If it is not there, then marks on the walls are made using a water level.
- Beacons are installed based on the marks made. A strong material (pipe, corner or profile) is selected for them. Place them on piles of mortar and level them at the same level in a horizontal plane.
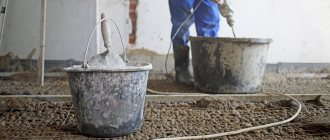
- Pouring the cement-sand mixture begins from the far corner. Leveling the solution between the beacons as a rule, they gradually move towards the door. The mixture is added in the right places.
Distribution of the finished mortar over the area Source stroikairemont.com
Repair of floors based on Knauf dry screed
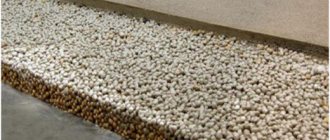
Knauf dry floor screed is essentially special sheet panels laid on bulk material laid out in a thin layer. The soft, fine backfill, pressed by these sheets, is transformed into a hard and durable base that is able to withstand fairly large loads.
Expanded clay sand used in Knauf technology is fine-grained. According to the standard, the size of its granules should not exceed four millimeters. The backfill is leveled “along the beacons” using the rule.
On a note
The backfill over large areas is leveled using a special machine.
Knauf gypsum fiber sheets (GVL) are made of gypsum and cellulose, the fibers of which perform a reinforcing function. They are characterized by high strength and fire resistance. The sheets are environmentally friendly and chemically passive. Unlike drywall, they do not have a paper backing.
The structural elements of the Knauf superfloor are panels that are glued together from two gypsum fiber sheets. They are slightly offset from one another, due to which folds of approximately 5 cm are formed along the perimeter of the element. It is due to them that the elements are held together during installation. Standard panel sizes in mm are 1200 by 600 by 10.
Semi-dry screed
With a semi-dry screed, instead of expanded clay or other dry filler, a cement-sand mixture with plasticizers, fiber and similar additives is used. Expanded clay or perlite may also be present in the mixture or replace part of the sand. The main difference between a semi-dry screed and a dry one is the use of liquid when preparing the backfill and the absence of a rough layer. The finishing coating is laid directly on the hardened screed in accordance with the technology of the selected type of floor.
Semi-dry differs from ordinary cement screed in the minimal amount of liquid used - it is enough to start the hydration process, but the batch turns out to be almost dry and is laid out on the base rather than poured. The molding process produces a smooth, streak-free floor that does not require finishing. Among our forum members, many use semi-dry screed as something between dry and regular. It can withstand dynamic and vibration loads, which are contraindicated in the dry method, but it is done faster and with less labor than pouring with a liquid solution.
TurbosolFORUMHOUSE Member
I myself am engaged in the construction of such couplers; in Moscow we were one of the first to offer this technology, although we were looked at wildly because of the cost at that time. As practice shows, the semi-dry method quickly replaces the classic liquid styling method. Semi-dry screed usually does not require additional leveling with self-leveling floors or levelers, and they cost quite a lot of money, although a lot depends on the master layers.
CupcakeFORUMHOUSE Member
I think that at the moment this is the optimal screed option: no dirt, no need to worry about flooding someone, no problems with delivery, no problems with lifting the mixture to a height, no need to worry about where to get a concrete mixer, you can start the next day for further finishing work. The screed is made on the basis of sand and cement, even if there are water leaks somewhere in the future, it will survive it without problems, and the price, in my opinion, is reasonable.
Unlike dry screed, semi-dry screed needs to be moistened during the hardening process.
Turbosol
Moisturize, at least once, but it is necessary! In order for cement to fully gain strength, it requires moisture; the reaction occurs only in the presence of liquid (hydration). The first time moistening is carried out five days to a week after installation; before this period, the screed contains its own moisture, and it gains a primary compressive strength of up to 15 MPa. This, in principle, is enough for a household floor, but it is advisable to increase it to 20 MPa by humidifying it.
A semi-dry screed is often made to float due to the high thermal conductivity of concrete - a layer of insulation can significantly improve the heat-saving parameters of a room if there is an insulating layer under the screed. In addition, a floating semi-dry screed is less susceptible to deformation, cracking and shrinkage. And due to the absence of direct contact between the ceiling, the wall and the screed, sound insulation is also effective.
Instructions for the device
- The surface on which the system will be laid is thoroughly cleaned of debris. It is also necessary to remove the protruding ends of all metal elements, say, wire, reinforcement, etc. Do the same with those on the surface of the concrete. If the metal is cut off, then the concrete is knocked down with a chisel.
- A vapor barrier film is spread on the cleaned base with a minimum overlap of 20 cm. Along the edges it is placed on the walls so that the edge passes above the line of the future floor.
- Next, a damper tape is laid vertically along the perimeter of the room, which will subsequently compensate for the thermal deformation of the Knauf panels. Due to the presence of a compensation gap, it is possible to prevent swelling of the floor surface during temperature fluctuations.
- Metal profiles are used as beacons. So, along the line of their intended location, a little expanded clay is poured in a slide and the beacons are laid, pressing them in and adjusting them to the set level. If repairs are carried out in one room, then the level of the future finishing coating is set in accordance with the floor level in other rooms.
- An expanded clay layer is poured into the space formed between them and leveled with the rule.
On a note
The undoubted advantage of the Knauf technology is that it allows you to fill in expanded clay sand and lay the panels in parts, and not all over the room at once.
- Next, the beacons are removed and expanded clay is poured into the remaining cavities. It is recommended to lay a few more free ones at the corner where the gypsum fiber sheets will begin to be laid. It will be possible to move freely along this improvised path, keeping the rest of the backfill intact.
- On panels that are adjacent to walls or other vertical surfaces, folds are cut off. The initial row is laid out along the wall located opposite the front door and gradually moved towards it. The folds of each previous row are lubricated with adhesive or mastic.
- Each subsequent row is laid with an offset of up to 25 cm in relation to the previous one, and the possibility of the formation of cross-shaped joints must be completely eliminated. The glued joints are additionally secured with screws. They are fastened in increments of no more than 30 cm.
- Complete the laying of the screed by filling the joints with gypsum putty from the same manufacturer.
- Before laying the finishing coat, Knauf superfloor is coated with a deep penetration primer.
Advice
The strength of the coating can be significantly increased if the second layer of Knauf panels is laid in a direction perpendicular to the panels of the first layer.