Monolithic ceiling on I-beams
Every person wants everything in his home to be done conscientiously, but not everyone knows how to achieve this.
Thus, many materials are used to create partitions, but only one of them has an increased strength coefficient - this is the overlap of metal beams.
Metal beams are more reliable and durable, have no restrictions and allow you to cover large spans (4-6 m or more) than wooden beams. This design is not subject to fire. However, when using metal beams, significant financial costs arise.
Most people believe that an ordinary monolithic floor can provide unsurpassed strength that will not lose its qualities over the years. But at the same time, they do not even try to calculate how much money and time it takes to create it, whereas it is quite possible to organize an alternative option that will be cheaper, it will require less material, and its properties will not be worse. These are floors on reinforced concrete beams, which are practically the same monolith, only much thinner and stronger.
In order for the monolith to be strong, it is necessary to clearly and clearly define the area of work, but taking into account this correction for the beams, this will be much easier than usual. First, you will need to collect a number of tools, which are found in almost every home, and only then you can begin to carry out each step step by step. Here you shouldn’t even be afraid of covering large spans, because... the structure is much more durable.
After the calculation is completed, it is necessary to take into account the weather forecast data, because... There should be no precipitation in the next 1-2 weeks under any circumstances. All wooden structures will immediately lose their properties for a fairly long period. The beam system will sag, the plywood formwork will get wet, and pouring concrete in a damp place will simply be useless.
Preparation for monolithic interfloor construction
Scheme of flooring on metal beams.
- sheet A3;
- pencil with eraser;
- roulette;
- level;
- welding machine;
- beams;
- perforator;
- laminated plywood from 20 mm and thicker;
- hammer with nails;
- supporting system (beam supports 100 * 100 and more, or metal struts with a steel thickness of 2 mm - you should not rely on one system, it is better to alternate);
- roofing felt or another waterproofing agent.
Here you will need to create an accurate drawing of the surface, which will provide a detailed idea of the future work that remains to be done. It is worth taking the outer side of the wall as the perimeter in the drawing, because It is she who will be the support.
Beams (I-beams) are being installed - this should be done at a level so that there are no problems with the formwork. Here it should be taken into account that at times it is necessary to splice them together using a welding machine. If the ceiling is installed above a separate room, which is part of the whole, then the beams should be joined to the finished wall using a hammer drill and the same welder. The step size between the I-beams is from 1 to 2.5 m, depending on the project budget, because the more beams and the closer they are, the more reliable the floors on reinforced concrete beams will be.
Scheme of strengthening metal beams A, B - with overlays. B - concrete coating. G - sprengel. D, E - sealing on supports. F, Z - pairing of beams on supports.
Plywood is mounted parallel to the top line of the I-beam, which will serve as formwork. The fastening should be as strong as possible. However, it should not stop being removable. When installing the formwork, it is important not to forget that in this case it is not a standard 0.3 m monolith, but a reinforced one, which can be reduced by 2 times without any losses, so the sides can be made only 0.15-0.2 m.
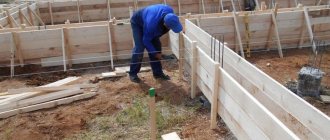
Next, the support system is installed. There are 2 options here - wooden beams and metal spacers. Beams are placed in the ratio of 1 pc. per 1 m², while spacers are 1 pc. per 2 m². After installation, each one should be checked individually for stability, because the calculation for falling cement is on average 500 kg, and it is necessary to withstand it so that the beam does not even move. For beam supports, calculations are done much more often, because the metal may undergo deformation, but the wood will stand until the last.
Once the beam systems have been checked, you can climb onto the formwork and walk on it. While walking, you should walk as hard as possible and try to catch the slightest vibration under you. Next, you can lay roofing felt, the calculation should be done for the entire perimeter, and if possible, in reserve.
Structural options for flooring on metal beams
Based on a steel profile, you can make a durable floor using various options:
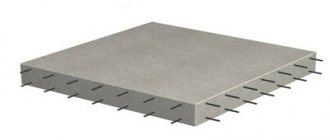
- The ceiling is monolithic on metal beams. It is formed by pouring concrete into the formwork, and is additionally reinforced with reinforcing mesh. This is a practice-tested option with a range of advantages. The main advantages that attract developers are the increased strength of the seamless surface and the absence of irregularities;
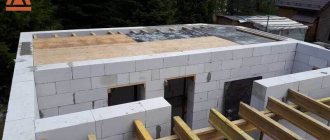
- monolithic prefabricated structure. For its arrangement, blocks of cellular concrete manufactured at industrial enterprises are used. They are laid with their edges on the surface of the steel profile. Thermally insulated formwork is constructed, reinforcement is made and the joint areas are filled with concrete mortar;
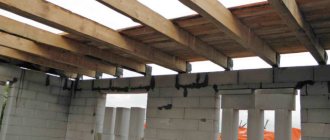
- composite structure made of various materials. Standard panels, wooden boards, and slabs can be used. The base elements are installed on load-bearing steel beams. To ensure comfortable operating conditions, it is important to insulate and soundproof the formed surface, as well as seal the gaps between the elements.
Depending on financial capabilities and availability of materials, developers equally use these options.
Particularly stringent requirements are imposed on the quality and strength of floors in a building of any design.
Ceilings between the floor and the basement or attic
Scheme of ceiling with metal beams between the floor and the basement.
- beams (I-beams);
- laminated plywood 20 mm or thicker;
- support system;
- hammer with nails;
- concrete mixer;
- mortar (1 cement, 3 sand, as much water as required);
- roofing felt;
- reinforcing rod (can be thinner than average);
- welding machine with electrodes;
- clay solution (Clay and horse manure 2 to 1, water);
- shovel;
- putty knife;
- Master OK.
Such monolithic floors on metal beams are made in a similar way and from the same materials as the calculation. It is created using almost the same formulas, but the manufacturing technology itself differs significantly:
- The formwork is mounted not under the top line of the beam, but under the bottom line, so that the filling is carried out exactly in the space between them.
- The reinforcement is attached to the beams using a welding machine or placed manually during pouring.
- There is no need to order an automixer, because... for such volumes (each space between the beams is poured separately, but the installation of the reinforcement with a welder should be done in advance) you can make the solution yourself in a concrete mixer.
- In this way, monolithic fixed panels are obtained that will have considerable strength indicators and at the same time not lose their thermal insulation properties (it is still better to lay a screed on the floor or raise the floor level above the beams themselves, since the metal will still be cool). Some attic floors and basement ceilings are coated with a clay mortar, better than which no modern material can retain heat.
How floors are poured
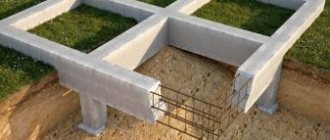
In a simplified form, the process of arranging the floor can be represented as follows. Metal beams are laid on a pre-made reinforced concrete lintel (reinforced belt). The reinforced concrete base can be equipped as:
- monolithic slab. Metal beams act as supports, formwork is erected on them, exactly repeating the desired geometric shape of the floor, and reinforcement work is carried out. After pouring the concrete solution, a single reinforced concrete structure is obtained. In this way, thin floors are poured without loss of load-bearing capacity;
- monolithic prefabricated floor. In this case, blocks of cellular concrete or reinforced concrete panels are laid on load-bearing metal profiles. Reinforcement is performed, then the joint areas are filled with concrete mixture.
Requirements for concrete
Table of concrete grades.
The brand and class of concrete that will be used to pour the floor are selected at the project creation stage. The most commonly used brands are B15, B20, B25. The class of concrete used depends on the distance between the beams inside the floor. The larger the step, the higher the concrete class should be. The quality of concrete also depends on moisture permeability and frost resistance. In a private house, concrete with frost resistance class F50 is used for flooring. In places of high humidity (on open terraces, balconies), frost resistance grade F75 and moisture permeability grade W2 are used.
The cross-sectional profile of the metal rods and the grade of steel used are calculated at the design stage. Since concrete reinforcement protects large spans from stretching, the diameter of the bottom layer of reinforcement is larger than the top layer. Additional reinforcement is required at the junctions of the slabs with the supports.
Reconstruction of old housing stock
Wooden floors deteriorate over time: they become damp from high humidity and are susceptible to fungi, insects and microorganisms. Wooden beams in an old house are replaced with monolithic floors of large spans. This allows you to extend the service life of the housing stock. Reconstruction and complete replacement of the interfloor ceiling requires preparation. It is necessary to clear the adjacent floors of the house from furniture and residents. On the lower floor, racks and beams are installed under the ceiling. Only after appropriate strengthening can dismantling work begin: the floor covering is removed, wooden logs, insulating backfill, and rough ceiling boards are removed, electrical wiring is dismantled, window frames and heating systems are protected from accidental damage, and then the old wooden floors are dismantled.
After completing the preparatory stage, bare wooden beams remain on the installed supports. Then they begin to cut out and remove pieces of the old frame. The part of the wall in contact with the frame being removed is pierced with a jackhammer, and the beams are removed. New beams for the reinforced concrete monolith are laid in the vacant space. After installing the metal structure, all wall voids are sealed with a cement-sand mixture.
Advantages and disadvantages of technology
As a support-bearing structure of a reinforced concrete monolith, we use metal beams in the form of:
- paired channels;
- I-beams;
- square and rectangular profile pipes;
- bent metal.
The main advantages of monolithic floors on steel beams include the low cost of construction and quick installation. This is achieved due to the frequent arrangement of beams, single-layer reinforcement and a small thickness of the concrete layer. The ceiling is relatively light and quite durable for use in public, administrative and commercial buildings.
Among the disadvantages, experts note the need to use special additives to increase the heat resistance of concrete, complex technology for protecting reinforcement from corrosion, and the mandatory installation of suspended ceilings during finishing.
Price for work
The price for installation of a monolithic concrete floor on corrugated sheets ranges from 600 rubles to 3,500 rubles per 1 sq. m. m. The cost depends on the status of the contractor and the list of operations that are included.
The maximum price consists of the cost:
- profiled sheet (1 sq. m);
- fittings (l.m/sq.m);
- concrete;
- metal support beams.
Also, the price depends on the category of equipment used during installation.
Concreting
Next, heavy concrete with a compressive strength class of at least B20 is poured. Pouring is carried out with a concrete pump. The concrete is compacted and leveled using a vibrating screed - electric or petrol. Some builders use deep concrete vibrators. However, experts do not recommend doing this, since there is a danger that under the pressure created by the vibrator, the aerated concrete will be “squeezed out” beyond the reinforced belt along the perimeter of the ceiling.
Concrete acquires brand strength 28 days after pouring. However, the supports can be dismantled and construction of the building can continue once the concrete reaches 70% strength. In summer this happens every other week. But you need to be sure that this happened. Therefore, the strength is measured with a special device, and only on the basis of its readings do they begin further work. Well, or wait 28 days.
On the lower floor side, the ceiling can be easily finished with one material or another. For example, plaster with a thick layer over a fiberglass mesh.
Formwork for prefabricated monolithic floors
A monolithic belt is installed around the entire perimeter of the building being constructed. Its function is to uniformly distribute the loads acting on the load-bearing structures of the building, preventing the appearance of cracks in the walls and ceilings.
Before you start pouring the monolithic belt, you need to assemble the formwork. For this purpose, aerated concrete blocks are used as permanent formwork, the thickness of which varies between 100 - 150 mm, and EPS insulation is also installed to prevent the formation of cold bridges.
Other materials can be used as formwork - boards, plywood, metal sheets, flat slate, etc.
Which profiled sheet to take for permanent formwork
To make permanent formwork, use only load-bearing corrugated sheets with a wave height of at least 60 mm and additional stiffening ribs. If you take a less embossed corrugated sheet, it will bend under the weight of the concrete pour and the ceiling will turn out to be uneven.
For permanent formwork, choose the following types of corrugated sheets (all these options are available in “Metal Profile”):
- N-60;
- N-75;
- N-114.
The number in the name of the profiled sheet brand means the wave height: 60, 75 or 114 mm. The letter “N” indicates that the corrugated sheet is load-bearing, i.e. it can withstand a lot of weight.
These grades of corrugated sheets are made from steel of increased thickness - from 0.5 to 1 mm. For formwork, choose a material with a thickness of 0.6 mm.
What kind of corrugated sheet is needed for the job?
When choosing a profiled sheet for a monolithic concrete floor, you need to pay attention to the material parameters :
- Load-bearing properties that are included in the marking. Profiled sheets H57, H60, H75 and H114 will allow you to withstand the weight of the poured concrete solution.
- The presence of additional stiffeners. This will allow you to use a thinner sheet.
- Sheet thickness. The load-bearing capacity of corrugated board directly depends on its thickness. However, increasing the thickness correspondingly increases the weight of the product. Therefore, it is recommended to take material with an average value of 0.8 mm or 0.9 mm.
- Wave height is optimally 60 mm.
- Structure of the protective coating. For the construction of floors, you should take sheets coated with polyester, PFDF, pural, plastisol.
Requirements for a professional sheet:
- smooth surface without damage;
- edges without burrs;
- uniformity of color;
- ability to bend without breaking;
- return to original shape after extension.
All these problems are solved by the use of load-bearing corrugated sheets of the following brand :
- N;
- NS.
Sheets of special relief shape with high corrugation:
- NS35;
- H60;
- H75;
- H114.
Full information about corrugated flooring is here.
How is installation done?
Poured concrete structures are created in several stages: preparing walls, laying load-bearing parts of the frame, installing formwork or laying corrugated sheets that perform this role, and the last stage will be pouring concrete. After pouring, it takes three to six weeks for the poured base to dry.
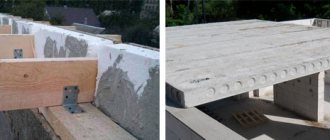
A prefabricated reinforced concrete base is most often mounted on I-beams and consists of the installation of load-bearing elements, with the previous preparation of walls and laying of slabs. Concrete panels are installed in such a way that their lower plane rests on the wide part of the load-bearing parts of the frame. This design will require additional sound and thermal insulation.
If reinforcement of floors is carried out, it is necessary to calculate the dimensions, as well as the load-bearing capacity of the mounted elements and support platforms - they will have to withstand the increased load, since such work is carried out in cases where it is necessary to strengthen existing floors due to increased load or weakening of existing load-bearing elements .
All of the above methods of arranging and strengthening floors are very difficult to implement. If you do not have special experience and construction skills, you should not take on such work - it is better to entrust all operations to a trained construction team. In addition, it will still be impossible to do without the involvement of assistants - even in the case of structures assembled from beams and wood, the weight of the individual elements will not allow them to be installed independently.
vote
Article rating
Main part of the work
Scheme of a monolithic floor.
- reinforcing rod A500C;
- wire;
- mortar 400-500 grade (1 cement, 3 sand, water as needed);
- bayonet shovel;
- shovel;
- polyethylene film;
- water;
- scrap.
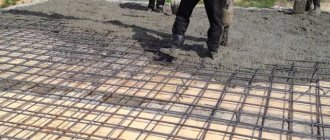
Creation of a reinforcing part. In this kind of floors, the use of double lathing is no longer required, but a single one is sufficient. The lathing is done in increments of 0.5 m and is fixed at the level of the middle of the slab (with double lathing, the bottom one is laid at a level of 25 mm from the formwork and the same amount on top, but here you should choose a neutral option). To secure it, you will need to use metal brackets, which can be made manually from the same rod (it can be calculated separately as 0.4 * area / 4). All connections are made tightly with soft wire. After completing the fastening, the reinforcement should be checked for mobility - if possible, it should not be set in motion.
Order the solution. You shouldn't even try to do it yourself, because... It is advisable to fill it in one go. The reason for this is the uniformity of hardening - if this does not happen, then wear may be faster. The solution should be grade 400-500, but not lower, because strength will still be required, despite the beam floors. When making calculations, attention should be paid to one aspect - one automixer contains an average of 8-9 m³ of solution. You should also make sure that the mixer has a sleeve for feeding to the second floor.
Design diagram for flooring using metal beams.
During pouring, it is advisable to have one or two assistants so as not to interrupt the process. They will have to plow the solution to release trapped air. Less air means less to worry about. But at the same time, do not forget about the roofing felt laid in step 5, which should not be damaged. Pouring is done in constant motion so as not to create unnecessary load on the supporting structures. In addition, this will ensure uniformity of work and the opportunity for assistants to do their work independently and as efficiently as possible. If you do everything correctly, the filling is completed in half a day.
Upon completion of the work, cover everything with plastic wrap and leave for 28 days. In this case, you should regularly moisten the stove with water.
A month later, the supporting system is removed, the formwork is dismantled using a crowbar, the polyethylene is removed manually and the main part of the work can be admired.
Final stage
At this stage, care should be taken to hide the I-beams. For this, there are 2 development options - the use of any building mixture (which will make almost all calculations on savings futile), or a suspended / suspended ceiling. Most often in country houses in this case they use a suspended ceiling made of plasterboard, because it will be very convenient to install, and the dimensions of the room will not be affected at all. It will also be very convenient with wiring, because... the beams can be drilled without compromising strength.