A concrete curb, curb or side concrete stone is an element of landscaping that performs the function of zoning a site and strengthening the boundaries of roads, sidewalks and playgrounds. Thus, curbs help to divide the territory into zones and sections that differ in purpose and type of coverage. The main advantages of concrete curbs are their strength, durability and affordability. They have good resistance to temperature changes and frost. Products can be reinforced with reinforcement, which further increases their strength characteristics. Therefore, this element is widely used both in urban construction and private gardening. Among the disadvantages, we can note the large weight of the products, which complicates their installation and dismantling.
Types of borders
According to their purpose, curbs are classified into:
- Road. Installed along highways and sidewalks, as well as near them to maintain the integrity of the coating. It differs from other types in its large size and high strength characteristics. Made from heavy concrete.
- Sidewalk. It has compact dimensions, is quickly installed and allows you to give pedestrian paths a neat and finished look. It separates pedestrian areas and prevents the destruction of paths.
- Garden. Allows you to zone a landscape area, improve garden paths, platforms, flower beds, and trees. Ensures the reliability of the coating of garden paths, protects it from dirt that can get from lawns and flower beds. It differs from previous options in smaller size and shape.
Their size, weight, marking, and manufacturing method depend on the purpose of the curbs. All these parameters are specified in GOST 6665-91. According to the method of location, borders are:
- one-sided, used to limit roads, sidewalks and tiered areas;
- bilateral, allowing you to delimit zones that are connected at the same level.
What to consider when designing
Designing garden paths involves solving another problem. It's a matter of coverage. Will you have to clear snow out of the way? How will the path behave if there is heavy rain. All these points will need to be provided for so that after the first season you don’t have to do everything all over again. If you are worried that the path will become covered with ice, then you can stretch a heat cable under it. In this case, the path will be dry and non-slip all winter.
Typically, the arrangement of garden paths serves several purposes:
- creating a comfortable surface for moving around the site.
- Development of a composition compatible with landscape design.
- Territory zoning.
- Hiding utility lines.
If the land on the site is flat, then the most unusual solutions can be implemented. If your dacha is located on a slope, then, most likely, the designers will offer you a zigzag path. If the slope exceeds 5 °, then perhaps the path will have several steps. It will be more difficult for those whose terrain is similar to a saucer. In this case, a suitable option would be a radial arrangement of paths that will intersect in the central part. But do not forget to do drainage in this case.
Materials for production
Garden borders can be made from different materials, so you can realize any decorative idea. They can be selected taking into account the material and color of the road surface. Available in concrete, natural stone, clinker bricks, ceramics, plastic, wood and metal. One of the types of garden borders is the border for a lawn mower. Its edge on the lawn side is lowered flush with the ground, which allows you to run the lawn mower along the very edge of the lawn and prevent damage to the blades during processing. Concrete side stone is the most common due to its advantages: strength, durability, low cost. Concrete curbs can be purchased ready-made or made yourself using casting molds (purchased or homemade). They can also be made monolithic, which allows you to get products of any shape and size. With the help of coloring pigments added to the solution, you can get a product of any color that will match the coating of the paths.
Creating a mixborder
If you need to decorate the space that is located along the walls, then you can use the mixborder method. This is another option on how to make a flowerbed from stones and cement with your own hands. By choosing the right floral design, you will be able to create an original composition by planting different varieties of plants.
Also read: How to make a flowerbed from a tire with your own hands
To create such a structure, stones are simply laid out along the perimeter of a fenced area of the selected size. After planting the plants, you can lay down geotextiles and use decorative filler.
Technical characteristics and markings
During the construction of private houses, main curbs are not used due to their large dimensions and high cost. In most cases, garden and sidewalk borders are used to improve private areas. In factory conditions, curbs are made using the semi-dry vibropressing method. Manufacturers offer curbs with the following technical characteristics:
- concrete products with a minimum strength grade of M400;
- concrete class B30;
- frost resistance 200-300 cycles;
- The estimated operational life is 20 years.
Methods for making borders
To improve a private local area, curbs can be made in two ways:
- install piece products;
- pour concrete into a monolithic structure of the desired shape and size.
In the first case, you can buy completely finished products in the required quantity, or you can make them yourself. To do this, you will need forms that you can buy or make yourself. The advantages of this method include the possibility of reusing the mold and the simplicity of the technology for manufacturing concrete products. For the second case, the installation of formwork will be required, which complicates the work. But you can make borders of unusual shapes, with curves, turns and other decorative elements. Which method you choose depends on the complexity of the shape of the path or area that you plan to improve.
Golden rules for planning bordered beds
Before you start implementing your design ideas, there are several important aspects to consider. To make flower beds delight the owners and make the plants comfortable, follow these principles:
- Harmony and unity of composition . Look around carefully. Evaluate what material the paths, house, and outbuildings are made of. In what style. Borders for flower beds should fit harmoniously into the overall style. Avoid heterogeneity, overload with colors and textures - it is better to experiment with form than with design elements of flower beds.
- Combination of plants and decoration . When creating fences, consider what garden plants will be placed in the designated area. Tall flowers and shrubs, including bush roses, require taller fences, but for miniature, groundcover or creeping crops, the borders should be kept low so as not to block the plants.
- Easy to care for . When creating fenced flower beds, it is necessary to provide for the possibility of watering, weeding and other agricultural work. Try to cut off cultivated plants from the lawn. To do this, use recessed sides, special fabric or tape that prevents the growth of weeds.
- Plant comfort . The place for the flower garden and fenced plantings must meet the needs of the selected ornamental crops in lighting, humidity, and soil fertility. For their full development and growth, the soil is carefully dug up and saturated with fertilizers, and an irrigation system is thought out.
- Constancy of location . Fenced areas are usually planned for a long time. The contents of the ridges and flower beds can change even every year, but the size, shape and placement remain unchanged. Therefore, you need to immediately provide convenient passages and optimal sizes so that you can freely care for the plantings and harvest.
Many gardeners prefer floral edging of flower beds, using low-growing foliage and floral ornamental species, for example, border roses
All these rules can be combined and expressed briefly: comfort for the eye, comfort for plants, comfort for people.
Required materials and tools
To make a custom concrete garden border with your own hands, you need to purchase the following materials:
- cement grade M400 or M500;
- crushed stone or gravel (fraction up to 40 mm);
- coarse river or washed sand;
- plasticizer for concrete (can be replaced with liquid detergent);
- water in large quantities;
- pigment dye for concrete (if necessary).
To make a monolithic curb, you need to add formwork materials to all the materials listed above. It can be constructed from dense sheet material with a smooth surface (metal sheets, wooden boards, plywood). You can buy a ready-made small-panel formwork structure manufactured in a factory. To fix the formwork elements, metal pins, nails and bars are needed. The concrete structure of the curb can be strengthened by using reinforcement with a rod diameter of 6 mm. The reinforcement is connected using a special binding wire. To work you will need the following tools and equipment:
- concrete mixer;
- vibration machine or vibrating table;
- solution container;
- forms for pouring concrete;
- tape measure, building level;
- trowel, spatula, shovel;
- for prefabricated formwork - cord, hacksaw, hammer.
Homemade and purchased forms
Molds for making curbs can be made in different ways. The main requirement for them is a smooth surface of the sheet material. Can be used:
- sheet steel with a minimum thickness of 0.7 mm;
- laminated or waterproof plywood;
- boards.
The finished form can be a channel marked 16 and higher. Its preparation consists of closing the ends. This can be done by welding metal plates. If you don’t have a welding machine, you can do without welding by making grooves in the shelves at the ends of the channel into which to insert the plates. The curb length should not exceed 2 m in length to avoid the risk of the finished product breaking. Making a garden border much wider than recommended is also not recommended. Otherwise it will look rude. You can also buy or rent ready-made molds to make curbs yourself.
Average expenses
Considering that cement curbs consist of affordable and widespread materials that are sold almost everywhere, their prices are approximately the same in each region of the Russian Federation. The same applies to services for their installation and production.
For materials
On average, materials will cost:
- Cement M400 – from 250 rub. per bag 50 kg
- Cement M500 – from 300 rub. per bag 50 kg.
- Medium grain sand, washed – from 450 – 500 rubles/m3.
- Aramid fiber – from 200 rub. for 500 g.
For production
The cost of manufacturing such a structure using external specialists will be from 8 to 10 thousand per 1 m3. Considering that a standard border has a volume V = 0.5 x 0.2 x 0.04 = 0.004 m3, for this money you can make up to 250 borders
To ready
On average, ready-made elements can be purchased at the following price:
- With dimensions 500 x 200 x 40 mm, gray - from 70 to 130 rubles / piece.
- 500 x 200 x 40 mm, color – from 80 to 150 rubles/piece.
- 1000 x 300 x 80, gray - from 200 to 350 rubles/piece.
- 350 x 100 x 35, gray – from 60 rub./piece.
The prices indicated above may vary slightly depending on the season, delivery period, number of goods in one order and other criteria, including the seller’s internal pricing policy.
Preparation of concrete
The solution is best mixed in a concrete mixer. Thus, the finished products will be durable and of high quality. Manually thoroughly mixing concrete with a mixer is a difficult task, since the solution contains crushed stone. This will negatively affect the final result of the work and the quality of the product. It is important that the water and sand are clean. The sand should not contain clay impurities, which reduce the grade of concrete and reduce the service life of the curb. Therefore, before work, the sand must be sifted. It is best to take tap water or from a well. To easily remove finished products from the molds, it is recommended to lubricate their inner walls with machine oil. A concrete solution of grade M400 is prepared from cement, sand and gravel in a proportional ratio of 1:2.5:3, and grade M500 - in a ratio of 1:3:4. First, half of the required portion of sand and crushed stone is poured into the concrete mixer, and the resulting mass is mixed for 2-3 minutes. After this, cement and the remaining parts of sand and crushed stone are added and mixed again in dry form for 4-5 minutes. A plasticizer or liquid detergent is diluted in water and gradually added to the dry mixture in a concrete mixer until the solution of the desired thickness is obtained. Colored borders can be obtained by adding a coloring pigment to water. The concrete mixer must operate continuously at all stages of adding materials. The procedure for preparing a concrete solution for pouring into molds and formwork is the same. The only difference is the required amount of solution. The more forms, the faster the process of making borders will happen. It is recommended to have at least 8-10 forms.
Recommendations for the use of dyes
To make as few mistakes as possible when making colored products with your own hands, you should adhere to the following recommendations:
You should not add a large amount of pigments in an attempt to improve the color of the solution; this will reduce the quality of the finished product and cause delamination of the surface. It is important to maintain proportions. The quality of the finished product depends on the correct mixing. Pigments are poured into the mixture in small portions, thoroughly mixing the ingredients
The solution must be uniform in both color and structure. If you want to save on coloring compounds, you can fill the area 2/3 with a simple solution, and fill the rest with a colored mixture. It is important to pour the layers continuously, this will ensure strong adhesion and economy of dyes. The quality of the finished product will not deteriorate. Using gray cement for concrete mortar will not give it a bright color, so it is recommended to use white cement.
Pouring concrete into molds
A high-quality concrete product can be obtained by using a vibrating table. Forms filled with concrete are placed on it, and air is removed from it through vibrations. If this is not available, then compaction of the concrete solution can be achieved manually by tapping the form with a hammer until all air is removed from the solution. If it is necessary to make a more durable reinforced product, then the forms are first half filled with concrete, after which metal rods are placed in them and filled again with the remaining mortar. Its compaction is performed in the same way - vibration. The concrete poured into the molds must be kept for at least 48 hours, the molds must be removed and the product must be left to gain strength for another 3-4 weeks. Only then can you begin installing the curbs. If you rush and do it earlier, there is a high risk of the product breaking.
Possible difficulties
Some difficulties may arise during the work :
- the material for the mold is incorrectly selected;
- Fewer screws were used for fastening;
- partitions in the form of road curbs are not used;
- parts for the product are cut unevenly.
You should not make these mistakes to avoid consequences. If you still miss important points during manufacturing, the shape will turn out uneven, crooked, and the border, which will later be poured inside, will turn out to be of poor quality and geometrically incorrect.
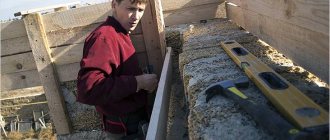
Installation of border
Installation of the curb begins with removing the top layer of soil to a depth of at least half its height and a width of at least 1.5 times the thickness of the manufactured product. The area is marked and fixed with pegs and a cord stretched between them. The cord is stretched along the outer edge and at the level of the installation height of the curb stone. The level of the upper plane of the curb should exceed the plane of the road surface or ground by 3-5 cm (if the path is separated from the flower bed). A layer of crushed stone and sand 5-8 cm thick is poured into the bottom of the trench and compacted thoroughly. After this, a solution of cement and sand is mixed in a ratio of 1:4. The curbs are installed on the mortar and compacted with a rubber hammer. At the same time, their horizontal position is controlled by the tensioned cord and the building level. When the entire row of curb elements is completely installed, sand is poured on both sides of the structure and water is poured to compact it.
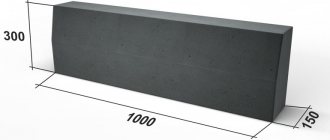
Dimensions
Curb blocks are usually produced in a length of 1000 mm, those designed to separate pedestrian paths from fertile soil - 850 mm in length. There are also elements with a length of 500 and 400 mm. Usually these are curbs for paths made of paving slabs. They are produced not only using cast concrete technology, but also using vibrocompression technology, which is used to produce the paving slabs themselves.
Sizes vary
The height of the curb stone can be:
- 300 mm - to separate the sidewalk from the roadway;
- 200 mm, 180 and 150 mm - for paths.
Width 200, 180 mm (road stone), 150, 100, 80 mm (curb stone).
Concrete monolithic curb
The process of installing a curb made of monolithic concrete is easier and faster than that of precast concrete, since there is no need to mold curb blocks. In this case, concrete is poured immediately into the formwork on the prepared area. To install a monolithic border, you need to prepare the following tools, equipment and materials:
- concrete mixer;
- container for delivering the solution to the site;
- shovel;
- hammer;
- boards or metal sheets for formwork;
- beams made of wood and metal;
- metal pipe;
- crushed stone;
- cement;
- washed or river sand.
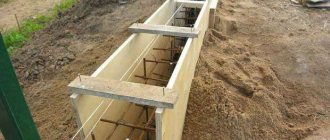
The phased installation of a monolithic border will look like this:
- Work begins with preparing a trench for the curb. It should be made with a depth equal to 1/3 of the height of the planned border and slightly wider than it. The bottom of the ditch is carefully compacted and covered with a layer of sand and crushed stone.
- Along the walls of the trench, formwork is constructed from smooth sheet material, which will have a rectangular shape. Concrete will be poured into it. The formwork is secured with beams, which will prevent the sides of the structure from breaking and will not allow the solution to leak out. The height of the formwork should exceed the depth of the pit and be approximately at the level of the upper plane of the curb.
- Preparation of concrete mixture.
- The formwork is filled to the brim with the resulting solution. To prevent the occurrence of voids in the product, the solution is compacted using a metal pipe. To do this, you need to lower it into the solution and swing it in different directions.
- The solution poured into the formwork is covered with plastic film or other waterproof material to prevent the structure from drying out quickly. Once a day, concrete should be moistened generously with water. This will prevent it from cracking. After this, you need to wait about a week until the product hardens, and then you can remove the formwork.