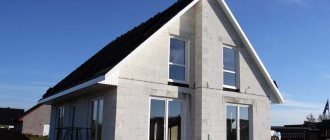
The pediment is a triangular or trapezoidal extension of the walls, located between the roof slopes.
The main purpose of the pediment is to take on part of the load-bearing load that is applied to the building from the rafters.
At the same time, it protects the attic from external atmospheric and mechanical influences.
Is it possible to construct a pediment from aerated blocks, what sizes of blocks are suitable for these purposes, and how best to arrange them - read in detail in the presented article.
Attic installation: how to make gables from aerated concrete blocks with your own hands?
How to make gables from aerated concrete blocks yourself?
Where to begin? What are the nuances and features? What should you pay attention to? Aerated concrete blocks are a good material from the point of view of heat and sound insulation properties, which are quite capable of constructing a pediment with your own hands. But there are certain nuances here:
- firstly, the specificity of aerated concrete is that it is afraid of exposure to moisture and therefore you will have to protect it from the outside (plaster it, or cover it with siding, clapboard, etc.);
- secondly, this is a fragile material and when constructing a pediment, it is necessary to make a reinforcing belt at the base of the pediment.
The technology for laying aerated concrete blocks is similar to brickwork.
The pediment can be erected first,
What should you pay attention to?
You need to pay attention to the design documentation according to which the structure is being erected.
Attic installation: how to make gables from aerated concrete blocks with your own hands?
If you build “by eye”, then decide for yourself what height of the pediment you need, how to make reinforcement, and so on, including whether an armored belt is needed, or you can do without.
The pediment made of aerated concrete blocks is a continuation of the building wall (end).
Externally, it is an isosceles triangle (as an option).
In order to stay within the framework of this triangle, we attach a rail to the end of the wall at the height of the future attic.
The rail is strictly in the middle of the end wall (we find the middle with a tape measure).
We stretch the cord from the top of the slats to the edges of the wall, that is, the pediment is visually already formed.
Next is the masonry itself within the boundaries of the markings.
Masonry is no different from masonry walls.
It is better to use glue for aerated concrete blocks.
The glue is applied to the surface with a trowel, then grooves are formed with a notched trowel (don’t forget about the ends of the blocks, we also form grooves on them).
Masonry with brick-type ligation (in a run-up).
Lay the block down and press it slightly against the one next to it, you can tap it a little with a mallet.
Near the cord (see above about the isosceles triangle), the blocks are cut at an angle, or the masonry is laid in steps; at the end, the voids are filled with cut blocks.
Every three or four rows, we reinforce the masonry; a groove is cut into the block into which the reinforcement is laid (this is when laying with glue, because the thickness of the seam is minimal).
We do not leave the gables unfinished for a long time.
Aerated concrete is a good material for building a house, including for building an attic, but in order to do it you need to be thoroughly familiar with the characteristics of aerated concrete itself, first of all you need to know that this material is quite fragile and absorbs moisture very well. And therefore it must be protected from the external environment.
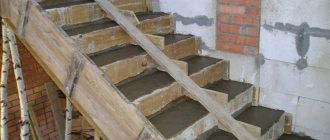
To build gables from aerated concrete, it is necessary to build an armored belt; it will strengthen the entire structure of the rafter system and will hold the attic gable well. Here is an example of how an armored belt is made directly on aerated concrete blocks from wooden formwork, everything is extremely simple:
We make formwork around the entire perimeter, put in reinforcement and fill it with concrete. It is on this armored belt that the pediment is placed. In general, it is not recommended to build a structure made of aerated concrete more than two floors due to its fragility, but when an armored belt is made, it increases its power.
There are no special nuances for the construction of a pediment; it is laid like an ordinary brick; the main thing in the design of such pediments is that it does not need to be made very high in order to avoid overloads on the walls.
And lastly, the entire aerated concrete structure must always be protected with plaster.
Construction conditions
The design is an end wall of the attic floor , protecting the attic from natural phenomena (wind, rain, frost). The most common form of pediments is considered to be triangular, but there are also trapezoidal, pentagonal and polysyllabic types, depending on the design of the house.
The height of the gable made of aerated concrete can be from 1-1.5 m. But, if an attic floor is planned, then its dimensions are permissible from 2.5 m.
The pediment can be a continuation of the aerated concrete wall or be built on frame sheathing , which is the rafter part of the roof (aluminum, board).
The wall pediment is more durable, so it is used much more often as the main option.
The gable structure is installed on both sides of the house. It must have geometrically correct dimensions on each side, identical to each other, so that there is no distortion of the roof slope.
The construction of pediments begins from a reinforced monolithic belt (mauerlat), and is always secured with anchors during construction, in the last row of the upper wall. The basic rules for the construction of all aerated concrete structures are contained in SP 339.1325800.2017 .
The main features of pediments are that they depend on:
- size and configuration of the future roof;
- wall strength (continuation of the structural external load-bearing part);
- load distribution from the roof and attic;
- presence of windows in the attic and attic entrance.
Important ! It is best to entrust the construction of gables to professionals who will correctly make calculations, markings, and quickly and professionally carry out the work process.
Suitable blocks
Requirements for all blocks made of cellular aerated concrete are determined by a number of standards (GOSTs):
- R 57334-2016/EN 771-4:2011;
- 25485-89;
- 31360-2007;
- 12852.5-77;
- 21520-89;
- 12852.6-77;
- 27005-86;
- 31357-2007;
- 31359-2007;
- SN 277-80.
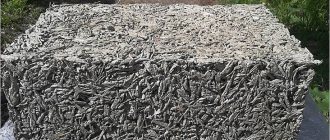
Of the existing types, the most preferable for the pediment would be a material with density markings D500-D700 (and higher), a structural series that is considered to be the best for the construction of load-bearing walls.
A detailed description of the types of blocks with density D can be seen in the photo below:
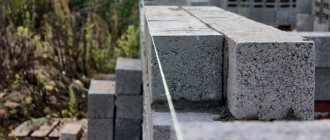
Different shapes of cellular concrete divide it into rectangular, with grooves, U-shaped, and with handles. For gables, blocks with standard dimensions according to GOST can be used - 600 x 400 (300) x 200 (300) mm or 400 x 400 (300) x 300 mm.
To make the pediment structure strong, it is reinforced with spacers and lintels . At the same time, the roof frame is made as strong and reliable as possible. The required thickness of the aerated concrete block is standard (for all external load-bearing walls) - 375 mm.
Correct calculation
In order not to make mistakes in construction, in a pre-drafted project, the necessary parameters are calculated, according to which the ratios of the parallel sides must be identical. When carrying out independent calculations, the following parameters are taken into account:
- Height . Represented by the distance from the base of the structure to its top point. This indicator is always included in the design documentation.
- Width . Shows the distance along the base of the structure - in the widest part.
- Roof slope angle . To determine it, you can use the photograph table below, created according to regulatory requirements. To find out its value, you need to measure 1 m from the edge of the pediment and the height of the slope - this will be the angle of inclination:
- Area of a triangle. It is determined by the standard formula: the height is multiplied by the width and divided by 2. If there is asymmetry of the slopes, then the area of each half is calculated separately and then summed up. The basic formula for calculating the pediment:
S= L /2 x H, where: L – base of the triangle (width of the building), H – height. The use of the formula is shown in the picture below: - Area of the pediment-trapezium. Here the height is multiplied with the middle line (half the sum of the lengths along the upper and lower bases). Additionally, the area of the triangular area of the top is calculated using the formula described in the previous paragraph. The resulting amounts are added together to obtain the exact area of the structure.
Foam block pediment: work order
This front part of the building is located between the roof slopes. Based on the configuration features of the latter, pediments are oval, triangular and trapezoidal. This design has a dual purpose. It is a supporting element of the rafter structure and creates protection from moisture entering the attic. The area formed by the gable walls is in most cases allocated for additional premises. Today we will figure out how to make a pediment from a foam block.
Advantages of a foam block pediment
Foam block material has long been used for the construction of structures or gable sections of buildings. The main advantages include:
- reasonable cost of materials;
- good strength indicators;
- convenient processing of blocks due to their porous structure;
- the relatively light weight of the pediment masonry made of foam blocks, which does not create a large load on the foundation;
- The principle of masonry is the same as that of brick material, only an adhesive composition is used instead of cement mortar.
It is possible to carry out all the work yourself.
Preparatory work and calculations
Experienced craftsmen recommend erecting the pediment first, and then moving on to installing the roof. This will greatly facilitate the process, since the roofing creates certain obstacles during masonry work.
Making a pediment from a foam block with your own hands involves certain calculations. Having decided on the height, finding the total area will not be difficult.
Before starting work, markings are carried out. For this purpose, a rail is strengthened on the wall, the length of which corresponds to the height of the future pediment element. Its upper edge is connected to the corners of the walls with nylon cord. The end result is a triangle, the slatted top of which is considered the pediment apex, and the sides are highlighted with cords. After this, construction work begins.
Note that the construction of a pediment is possible before installing the roof or after carrying out such work.
Gable sections for sloping roof types are determined similarly. You just need to divide the façade plane into sector sections and determine the necessary parameters for each of them separately.
During the preparation of the project and carrying out all the necessary calculations, an important nuance arises. For one-story buildings, the height of the pediment is set in relation to 1 to 1 to the wall. As a rule, the wall with the basement section does not exceed three and a half meters. This value is quite enough to equip the attic space.
An excessively high roof will dominate the walls, visually putting pressure on them. An attic whose height does not exceed a two-meter mark will create the impression that the house has grown into the ground and will not add to the attractiveness of the property.
To find out the area of a triangular pediment, if its base and height are known, just use the formula from the school course. But in other cases, you will have to apply Heron’s formula, into which you simply substitute the values of the three sides. Calculations are complicated by determining the square root, but this task is simplified if you use special calculators that will perform all the calculations in a few seconds.
Having specified all the parameters, you can draw up a diagram of the pediment, buy material and begin construction.
Possible difficulties and errors
Errors or difficulties in construction may arise in the following cases:
- Purchase of low-quality materials (blocks, glue, foam, fittings). It is necessary to pay attention to certified material and guarantees from trusted manufacturers. Here, saving and purchasing fakes is not appropriate.
- Errors in designs and calculations , especially in load distribution. Cracks may appear, which will then need to be eliminated with the help of additional investments and the expenditure of your own time. To create a project and the correct drawings, it is better to contact specialists.
- Refusal of reinforcement . Supporting the gable wall with steel rods will strengthen the wall many times over and distribute the load evenly. So the structure with reinforcement will last for many years and will never collapse.
- Failure to comply with technological standards, which relate to the selection of consumables, installation of walls and the sequence of construction stages. To prevent this from happening, it is necessary to comply with the requirements of a number of GOSTs regarding the quality of aerated blocks and construction with them:
- GOST R 57334-2016/EN 771-4:2011;
- SP 339.1325800.2017;
- STO 501-52-01-2007.
- Failure to comply with the temperature conditions for masonry and work. Most experts believe that it is more advisable to carry out construction work in dry weather, with atmospheric temperatures starting from +5 °C.
Since gas blocks are the basis for the construction of the pediment, the greatest attention is paid to them.
Firstly, the color of the material matters. It should not be yellowish - only light gray.
Yellowness indicates that the material was manufactured with violations , and its composition contains a huge amount of sand, which is unacceptable for the composition according to GOST, and indicates a fake, and not high-quality work from the manufacturer.
The appearance of the gas block is also of great importance. If it has large cells, then it has low density, and for fronts D should be as dense as possible. The higher the indicators, the stronger and more durable the wall will be - this is the main requirement for the structural type of cellular material.
Finishing work
Exterior finishing of a block pediment can be done in three ways:
- The simplest and most affordable option is puttying over insulating material. Sheets of foam plastic are glued over the surface and, as an additional measure, fixed with dowels, on top of which a mesh of fiberglass material is fixed. Now you can take the decorative putty mixture and apply it in a thin layer.
- Siding panels cause certain difficulties in work. First, the sheathing is installed under the insulating material, then the slats are attached under the siding. Everything looks beautiful, but the cost of materials and services immediately increases at least twice.
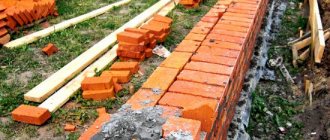
- A long process - brick cladding. In addition, this type of work is more expensive than others, and difficulties may arise in its implementation, requiring certain experience.
How to calculate and arrange a pediment with your own hands for a block house
The pediment is usually called the end part of the roof located between the slopes. I will not say that making a pediment with your own hands is easy, but believe me, such a task is quite within the capabilities of an ordinary home craftsman. Without going into architectural subtleties, we will step by step analyze the technology for constructing the gable roof gable for a house made of aerated concrete, plus I will give a simple calculation of this sector of the roof structure.
The upper part of the facade, “sandwiched” between the planes of the roof slopes, is called the pediment.
In addition to the gable structure with two gables, there is also a multi-gable or three-gable roof, the rafter systems are different, but the technique for arranging the fronts does not change depending on their number.
A three-gable roof at the ends is arranged in the same way as a gable roof.
Creating a Project
The rules for drawing up a garage project allow you to determine the size and nuances of the building, determine the volume and cost of materials. The project can be ordered from specialists or done independently.
Drawing up a drawing yourself requires certain skills. Professional versions of the project will look like this:
Features of the project will depend on:
- number of cars – 1 or 2;
- number of storeys;
- planned communications;
- gate;
- wall thickness;
- shape and size of the roof;
- inspection hole;
- mini workshop;
- bearing load on walls;
- foundation.
The project, in addition to dimensions and design features, must also take into account:
- climatic and landscape conditions;
- nature of the soil;
- location of groundwater;
- proximity to other buildings and communications;
- type of future finishing.
Depending on the soil, a strip or monolithic foundation is developed, which is installed after excavation and backfilling of the sinuses. Each project is individual.
Briefly about gables
Often this part of the facade of a building in private houses has the shape of an isosceles triangle, but sometimes the vertex of the triangle can be shifted towards one of the walls, and in some attic structures the pediment can be polygonal.
What are gables made of?
The pediment can have different shapes.
- Basically, such structures differ in the material from which the walls are made. Thus, a house built from blocks is most often equipped with the same pediment. This solution is much simpler, both in terms of construction technology and design;
In block houses, it is easier to lay out the upper part from the same blocks.
- The so-called chopped gables are installed in houses made of rounded logs or timber. Arranging a gable wall from rounded logs is considered the highest level of skill among professionals. It’s a little easier with timber, but in any case, you shouldn’t tackle it without preparation;
Arrangement of a log facade is considered the most difficult.
- The most affordable option for installation is the arrangement of a frame structure. Here it doesn’t matter at all what the house is built from, just a frame is assembled at the ends of the rafter system, after which it is sewn up and finished with any material you like, usually a board or siding.
The frame structure can be mounted on any building.
A block and wooden pediment made of timber or logs is installed before the rafter system is erected, and the frame structure is constructed after the rafters are installed.
Simple design calculation
The pediment parts are mostly made in the form of triangles; accordingly, all formulas relating to this figure are applicable to them. It all starts with determining the height of the roof at the ridge. Once you decide how high your roof will be, calculating the area is not difficult.
The height of the roof at the ridge is considered one of the reference parameters.
Gables with sloping roofs are calculated in a similar way, only here you will have to divide the facade plane into sectors and calculate the necessary parameters for each sector separately.
Conclusion
It took me a week to lay the block pediment without experience, I spent 4 days on the parallel plane, and everything together with finishing the ends took about a month. So rest assured, the technology described above works. The video in this article contains visual instructions. If you have any questions, write in the comments, I will try to help.
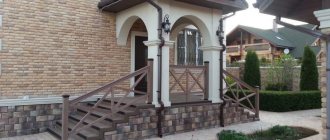
An original pediment can become a true decoration of the house.
If you want to express gratitude, add a clarification or objection, or ask the author something, add a comment or say thank you!
How to fold a block gable yourself
For a brick pediment, as well as for any other block structures, the same technology is used, only the dimensions of the blocks change. In fact, we continue the construction of the end walls, only we narrow them into a triangle shape.
To display the triangle correctly, we need to indicate its height:
- As a central post we use a metal corner or a wooden beam with a section of 50x50 mm;
- In the ridge area, usually the center of the building, we drill several holes in the wall for fastening;
- We screw the stand plumb, strictly vertically.
Now we need to mark the sides of the triangle. To do this, we stretch 2 cords from the top of the central pillar to the corners of the facade.
If it is planned to install windows on the facade, then it is advisable to immediately make marks on the central pillar that will indicate the bottom and top of the window openings.
Next, rows of blocks and window openings are laid out in the traditional way.
Our cords indicate the side cut of the wall. At first it will be stepwise and here you need to decide:
- For brick walls, it is better to have the cord run along the tops of the steps. Then the steps are leveled with mortar;
- Aerated blocks are easier to cut, so you can either cut them right away and make them flat, or focus on the bottom point of the step and cut them after laying.
In our example, windows with bevels parallel to the roof plane are planned.
To arrange them, you need to lay wooden boards in the masonry. The thickness of the boards is about 30–40 mm, and the width is equal to the width of the wall.
The upper bevels above the windows are laid out in 2 rows. Between the rows, reinforcing mesh must be placed in the solution. The thickness of the reinforcement should be from 12 mm.
By the way, when laying blocks, every third row also needs to be laid with reinforcement.
Theoretically, after construction is completed, the support boards can be pulled out and the area can be plastered with mortar, but in the vast majority of cases they are left immured in the wall.
A block wall is a strong thing, but until the mortar has completely set, at a height a strong gust of wind can simply topple it.
Therefore, during the construction process, you must immediately install rigid removable supports.
On top of the bevels we will place another row of blocks, in this case they are sawn from standard blocks.
Theoretically, you can do without this, but it is more convenient to make grooves for the intermediate horizontal crossbars of the rafter system.
It is very important to make a good groove for the ridge run. The width and depth of the groove should be slightly larger than the purlin itself, because according to the rules, the ridge beam must be wrapped in roofing felt or some other waterproofing material.
The parallel plane is laid out in exactly the same way. Only there, in addition to the oblique guy wires, you also need to pull a horizontal cord, indicating the ridge run. Otherwise, you may make a mistake and the skate will come out with a slope.
Some craftsmen immediately prefer to equip the skeleton of the rafter system, consisting of 2 outer trusses and a ridge girder between them, and then lay out the pediment on it.
This method works well if the end part is thin and is laid out only from facing bricks. True, then it still needs to be insulated.
Features of the structure of the roof frame along the gables
The most common technology for constructing a roof frame in low-rise construction is to lay rafters on load-bearing walls that differ in height. Instead of a solid internal wall, a “frame” made of timber can be installed in the middle of the attic. It consists of racks resting on a bed, a ridge girder installed on top and struts that provide structural rigidity.
However, both of these methods significantly reduce the possibilities for planning the attic space, which prudent owners are increasingly seeking to equip as a bedroom, billiard room, etc.
In order not to clutter the future attic with posts, arches and partitions, you can simply use the end walls of the building as supporting structures. They will serve as a support for the ridge run.
Methods for attaching a ridge beam
Purlin - a support beam for the top of the rafters, defining the break of the pitched roof, its ridge edge. It is performed with a horizontally laid log, board or timber. In the case of a frame supported by gables, the purlin is installed using three methods:
- With walling into the gable wall. In this case, niches are formed in the end walls at the height of the purlin installation, into which the edges of the purlin wrapped with waterproofing are placed.
- With a through intersection of the pediment. According to this scheme, through holes are formed in the end walls, through which the edges of the purlin extend beyond the building from the outside.
- With installation on brackets. Almost a folk method, according to which, at the height of the purlin, galvanized brackets are attached to the gables, on which the edges of the purlin are supported. The method is used mainly in the construction of lightweight roofs of country houses.
The first option does not involve sealing the edge of the beam in stone or brickwork. The wall material and wood should not be in direct contact, so as not to cause premature rotting of the rafter system. Therefore, the run is made 2 - 5 cm shorter in length than the size of the span to be covered plus the depth of both recesses.
An oiled or bitumen-impregnated wooden spacer from a scrap board is placed at the bottom of the niche selected in the pediment. The edges of the beam are filed at an angle of about 55 - 60º. In a similar way, the area of the end of the wooden element is increased in order to optimize drying of the wood and air exchange.
Before installing the ridge beam, mandatory treatment with an antiseptic composition is carried out. Then the parts located in the niche are wrapped with rolled waterproofing material. Any suitable water-repellent material, ranging from roofing material to a polymer membrane, is used as a wrapping waterproofing of the edges of the purlin.
In the second option, with the girder crossing the gable walls, preparation for laying and waterproofing of the beam is carried out in a similar way. The advantage of this scheme is that due to the removal of the consoles from the walls, the purlin beam is significantly unloaded.
The force acting on the console outside the house will bend them downward, bulging the central part of the beam upward. The considerable weight of a long wooden element, traditionally directed downwards, will resist this phenomenon. Thanks to the counteraction of two differently directed forces, the ridge girder will not bend in either direction.
Options for rafter structures on gables
The use of gables as supports eliminates the need for numerous structural elements placed within the attic or attic space. There is no need for the construction of very expensive internal load-bearing walls; the number of vertical supports is significantly reduced, and for short spans the number of vertical supports is reduced to zero.
The construction of a three-gable T-shaped roof is most often carried out according to the scheme with the purlins supported on the gable walls, because When performing work in the usual way, the design turns out to be unnecessarily complex. The construction and installation of numerous struts and truss trusses slows down the pace of construction. And when building a roof, it is strictly not recommended to reduce the speed, so as not to “get caught” during the rainy season.
Note that when constructing roofs with spans over 6 m, the structure, simplified by eliminating a number of supporting parts, will still have to be complicated. Ridge beams turn out to be too massive. In addition to the fact that special equipment will be required to lift them to the place of installation and installation, there is a risk of too much deflection in the middle of a heavy run.
The list of standard solutions for covering large spans with purlins supported on gables includes:
- Construction of a load-bearing wall in the box of a house with installation of a support or truss truss on it. The wall is built across the direction of the run.
- Dividing the ridge beam into two parts and installing a support post or building truss under the junction point.
- Installation of jibs supported in gable walls.
If the span does not exceed 7 - 8 m, then to unload the ridge beam it is permissible to use jibs or capitals on the gable walls under the edges of the long element. They will take on part of the load and decorate the interior.
Another effective way to unload a ridge beam that is too long is to install additional purlins that rest on the gable in the same way, but on the side and lower along the roof slope. The implementation of such a method prompts the thought: are rafters now needed in the roof design? After all, the lathing for installing the covering can be attached directly to the purlins.
Perhaps for structures without insulation you can easily do without rafters. In the history of construction there are such solutions, for example, rafterless roofs built on log houses. Their likeness is now being installed over houses with foam concrete or brick gables.
However, in the case of installing an insulated attic roof, some kind of imitation of rafter legs will still have to be installed, because thermal insulation requires the organization of natural ventilation. To do this, it is enough to install a block with side dimensions of 40×50 or 50×50 mm perpendicular to the purlins in increments of 0.7 to 1.2 m. It does not need to resist loads, it should simply form ventilation ducts.
Selection of material for ridge girder
It is clear that the main structural element of the gable roof frame is the ridge girder. It absorbs the main load and transfers it to the gable walls. Therefore, all calculations for the construction of a rafter system of this type are carried out specifically for it.
Suitable for installing a purlin:
- Beam. It is used when spans of up to 6 m are covered. When using longer elements, it is necessary to install additional support posts and struts.
- Log. Timber is purchased based on the design dimensions of the run with a reserve for processing the ends. The logs are not completely cut into two ropes, but only at the points of contact with the gable walls and rafters.
- Glued beam. Suitable for spans over 6 m, because has impressive strength and bending resistance, much greater than that of solid wood beams.
The cross-section of the material is selected by calculation, taking into account the typical wind and snow load values for the region. First, determine the values of bending moments M, expressed in kg×cm. If the purlin is composed of several beams, then the bending moment is found for the most curved part of the composite purlin.
When the result of the calculation of the bending moment becomes known, you can begin to select the cross-section of the material for the purlin device. To do this, either the height or width of the beam is arbitrarily set, and calculations are made using the formulas we provide in the graphical appendices.
The result obtained during the calculations must be checked for the maximum deflection value, which should not exceed 1/200 of the total length of the ridge beam. If the result meets the technical requirements, then a check is made for the maximum internal stress that appears inside the beam during its deflection.
If for both limiting states the “margin” of strength turns out to be quite large, you can reduce the height or width of the block. It is possible that as a result of repeated calculations it will be possible to significantly save on material. If the calculated deflection is greater than the technical limit, then the dimensions of the material for the purlin beam must be increased and calculated until the ideal result is achieved.
If a log is used to construct a ridge beam, then it should be remembered that the load-bearing capacity of wood that has preserved its structure is much higher than that of sawn timber due to the fact that its natural fibers are not damaged. Calculations are then made according to a formula aimed at calculating the characteristics of a solid scaffold.
By using logs to cover large spans, you can visually minimize the deflection using one of the ancient methods used by builders of large-scale log towers. They hewed the logs used to construct the ceiling beams in the form of a rocker, creating a kind of small arch in the middle of the log. The edges were hemmed from above to maintain the overall thickness of the element.
During operation, the rocker-shaped heavy logs bent in the middle and, as a result, turned into impeccably even floor elements. Nowadays, the described technique has also found application. It is used when pouring prestressed concrete beams; just a slight bend is almost unnoticeable, especially if the structure has already stood for several years.
Facing and insulation of the pediment
Exterior finishing in block houses can be done in 3 options:
- In my opinion, the simplest and least expensive is putty on the insulation. The idea is that sheets of foam plastic or EPS are glued to the wall surface and additionally fixed with umbrella dowels. Next, a fiberglass mesh is attached to these sheets and a thin layer of decorative putty is applied;
Foam insulation with finishing is the simplest option.
- Siding will be a little more complicated. In short, the structure of the system looks like this: first, the sheathing is installed under the insulation, after fixing the insulation, the sheathing is placed under the siding and the siding itself is attached. It looks decent, but it also costs 2 times more than the previous version;
Siding finishing technology.
- But the longest, most complex and expensive will be the installation of the façade with facing bricks. It is advisable to lay a layer of foam plastic under the brick. While a home craftsman can still handle laying aerated bricks, I don’t advise you to take on facing bricks without experience; it will cost more.
Finishing with facing bricks requires high professionalism.
It took me a week to lay the block pediment without experience, I spent 4 days on the parallel plane, and everything together with finishing the ends took about a month. So rest assured, the technology described above works. The video in this article contains visual instructions. If you have any questions, write in the comments, I will try to help.
An original pediment can become a true decoration of the house.
Conclusion
It took me a week to lay the block pediment without experience, I spent 4 days on the parallel plane, and everything together with finishing the ends took about a month. So rest assured, the technology described above works. The video in this article contains visual instructions. If you have any questions, write in the comments, I will try to help.
An original pediment can become a true decoration of the house.
If you want to express gratitude, add a clarification or objection, or ask the author something, add a comment or say thank you!
Reinforcement of aerated concrete - necessary materials, technology
Reinforcement of aerated concrete is a technological method that involves measures to strengthen constructed structures made of porous material. At the moment the masonry dries, and under the influence of alternating loads during operation, processes can occur that cause deformation - shift or shrinkage of the building.
Technically correct reinforcement of aerated concrete masonry allows you to protect the structure from the occurrence of such defects.
General information
Autoclaved aerated concrete is a representative of the group of lightweight cellular concrete, obtained through a series of complex production processes:
- Mixing lime, quartz sand, gypsum, cement and water.
- Forming the finished mixture.
- Cutting blocks to size using a wire cutting machine.
- Autoclave processing of products, allowing to obtain a material with specified properties.
Aerated concrete products have the following advantages:
- low volumetric weight (400–600 kg/m3), which reduces the load on the building foundation;
- in terms of their environmental friendliness, products made from porous concrete are not inferior to wood, but unlike it they are not subject to rotting;
- the optimal size of the blocks allows you to increase the speed of masonry several times and significantly reduce the labor intensity of the process;
- small thickness of the seams (up to 3 mm) - the laying is carried out using a special adhesive composition;
- low thermal conductivity;
- frost resistance F25 and higher;
- good sound insulation (Rw = 43–58 dB);
- high heat resistance (up to 1000 °C);
- vapor permeability;
- ease of processing - cutting the material can be done with a regular hacksaw.
- High water absorption , which makes it difficult to carry out finishing work associated with wet processes (quick drying of the surface - the appearance of cracks).
- Low resistance to mechanical loads . Even a slight settlement of the foundation can cause cracks to form on the facade of the building.
One of the ways to protect structures made of porous materials from the above defects is to reinforce aerated concrete blocks.
Types of garage blocks
The first thing you will have to decide before starting to build a garage is what material you will use. There are quite a lot of durable materials for construction: brick, concrete, iron, wood, foam blocks. Recently, blocks for garage construction have been used most often. This is due to reasonable cost and practicality. But foam blocks are also different, let's look at their features.
Foam concrete garage
Foam concrete is a mixture of cement and foam, which is made using special equipment. Air bubbles are evenly distributed throughout the entire volume of the block and form small cells. The density of foam concrete is different, it varies from 200 to 1200 kg/m³, which indicates the strength and reliability of the material.
There are three main types of foam concrete blocks, based on density:
- D200-500 - such blocks are often used for thermal insulation; they are not very durable, but have low thermal conductivity;
- D500-900 - blocks are used in the construction of residential high-rise buildings, they are highly durable and do not allow heat to escape;
- D900-1200 – high-strength blocks, used in the construction of high-rise buildings.
Cinder block garage
Cinder block is one of the most inexpensive materials for construction. It is made by vibration pressing from ash, sand, crushed stone, gravel or shell rock. The binder in the production of cinder blocks is cement. In addition, a cinder block may have additives that increase its thermal conductivity (for example, expanded clay). The density of such blocks, as a rule, varies from 500 to 2000 kg/m³. Use the hint when calculating the brick consumption for a cinder block garage.
Cinder blocks are divided into two types:
- hollow (12-14 kg);
- full-bodied (15-28 kg).
Garage made of expanded clay concrete blocks
The technology for manufacturing expanded clay concrete blocks is similar to the production of foam concrete, but the composition necessarily contains expanded clay. Thanks to him, expanded clay concrete blocks are light and very porous. Such blocks have good thermal insulation and are almost eternal.
Expanded clay concrete blocks come in three types:
- thermal insulation;
- structural and thermal insulation;
- constructive.
Garage made of aerated concrete blocks
Aerated concrete blocks are made from gypsum, sand and a special gas generator. Their structure is similar to foam concrete, but with much smaller pores. This provides aerated concrete with the correct even shape, dense structure and low weight. In addition, aerated concrete blocks are easy to cut and can be easily given the desired shape. In addition, they have fire-resistant properties.
Aerated concrete buildings are durable and economical. However, they require mandatory reinforcement in order to prevent cracking during shrinkage.
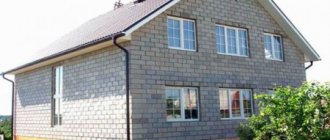
Garage made of gas silicate blocks
Gas silicate blocks are similar to aerated concrete blocks. However, they also have differences. Firstly, the main binding element in gas silicate blocks is lime. Thanks to lime, such blocks, unlike other foam blocks, are white. Secondly, autoclaving technology is necessarily used in production. The density of gas silicate is from 300 to 900 kg/m³. It retains heat well, has a smooth, even surface and is highly fire resistant.
Strengthening masonry - features
First, let's look at the areas of aerated concrete masonry that must necessarily be strengthened when constructing the walls of a building made of cellular concrete, these are:
- The first row of masonry for the outer walls of the structure (masonry roll mesh or reinforcing tape for aerated concrete).
- Every fourth tier (reinforcing bars).
- Lintels for window and door openings (rebar frame).
- The upper belt of masonry reinforcement at the floor level (reinforcement frame).
- Reinforcement of aerated concrete partitions (masonry mesh or perforated tape).
- Strengthening the masonry of gables.
Reinforcement of aerated concrete masonry is carried out in several ways. The main method is to strengthen load-bearing walls using hot-rolled steel reinforcement of periodic profile AII, AIII. Available in skeins or measuring rods of 6–12 m.
It is a corrugated profile with two longitudinal ribs. The weight of one meter is 6.3–7.9 kg.
To knit the jumper frames and install the upper reinforced belt, low-carbon reinforcement VR-1 and soft knitting wire 0.8–1.2 mm are additionally used.
In some cases, in order to save material resources, the use of fiberglass (composite) reinforcement of the same diameter is allowed.
The price and low weight of the profile determine its widespread use when performing masonry work from aerated concrete blocks.
The main disadvantage of composite reinforcement is:
- low heat resistance;
- impossibility of connecting rods by welding;
- cannot be bent.
Therefore, in any case, reinforcement of masonry made of aerated concrete blocks in the corners of load-bearing walls must be carried out with steel reinforcement.
To reinforce the first row of blocks, galvanized masonry mesh Ø 3 mm, with a cell size of 50x50 mm, is usually used. The use of mesh is possible if the masonry is carried out using cement-sand mortar, since the thickness of the adhesive layer is 2–3 mm, and reinforcement with such material will increase the masonry seam by another 3 mm.
An alternative to mesh and fiberglass reinforcement can be perforated reinforcing tape. It is a strip of galvanized steel 4–8 mm thick and 25–100 mm wide. Available in rolls.
The reinforcement technology is the same as when using reinforcement, with the exception of masonry scraping. The strips are laid with glue or fastened with screws to aerated concrete masonry.
Reinforcing tape is mainly used when it is necessary to reinforce a pediment made of aerated concrete or to lay interior partitions.
Tools
To perform work on reinforcing aerated concrete walls, you will need the following tools and devices (see table):
Rules for installing gas blocks
What you need to know in advance:
- Before laying begins, beacons are installed on the foundation and the mooring line is tensioned.
The first along the perimeter of the future walls and a few more along the diagonals to check that there is no difference in height.The maximum permissible height difference between the sides of the foundation is 4 cm. This distance can be adjusted using a cement-concrete mixture.
- Before laying the first row, the surface of the foundation is reliably waterproofed. A rolled material, for example, roofing felt or membrane, is placed on top of it. The joints are treated with bitumen mastic.
- Before starting work, the blocks are leveled in height using a special hacksaw. This is done so that there are no differences between the surfaces of the elements and the seam is formed evenly. After creating a row and hardening the solution, the blocks are sanded again with a plane. This reduces the likelihood of cracks occurring.
- Start laying from the highest corner, then the rest can be adjusted to the height as you go. Geometric parameters are constantly measured and angles are checked.
- The first row is placed exclusively on cement-sand mortar. It does not shrink, is strong and can be used as a pillow when leveling out heights.
- The mixture is kneaded in portions so that it does not have time to harden.
- To apply the solution, use a trowel, which is the same size as the thickness of the wall. A tool with teeth is suitable, which will form an even, thin layer. The height of the teeth is 4-5 mm.
- The second row is placed 4 hours after the first so that the solution has time to harden. Subsequent rows are also laid after at least 4 hours. Thus, we can answer the question of how many rows per day you can lay - about 3-4.
- The blocks must be clean, all external debris must be removed from them and swept. If there are irregularities on the elements, they are rejected and used for cutting.
- If there is a height difference between the blocks, a grater is used. It helps align the elements.
- Reinforcement of aerated blocks begins from the first row and continues along the course of the laying every 3 rows. The procedure is also carried out at window and door openings.
- The connection of load-bearing walls and partitions is carried out by installing flexible connections. The dressing of load-bearing and load-bearing walls is done through the block.
- The masonry is created with rows laid out: each subsequent row is shifted by ½ or ⅓ (but not less than ¼ block). This is done so that the pressure on the walls is distributed evenly.
- The last row is reinforced with an armored belt, which helps to support the weight of the floors.
- After completing the work, it is recommended to wait 10-12 months until the house is completely dry and partially shrinks, then begin finishing. If brick cladding is planned, it is done immediately, connecting the walls with flexible connections. A ventilation gap of about 4 cm is maintained between the masonry.
Reinforcement of aerated concrete - necessary materials, technology
Reinforcement of aerated concrete is a technological method that involves measures to strengthen constructed structures made of porous material. At the moment the masonry dries, and under the influence of alternating loads during operation, processes can occur that cause deformation - shift or shrinkage of the building.
Technically correct reinforcement of aerated concrete masonry allows you to protect the structure from the occurrence of such defects.
General information
Autoclaved aerated concrete is a representative of the group of lightweight cellular concrete, obtained through a series of complex production processes:
- Mixing lime, quartz sand, gypsum, cement and water.
- Forming the finished mixture.
- Cutting blocks to size using a wire cutting machine.
- Autoclave processing of products, allowing to obtain a material with specified properties.
Aerated concrete products have the following advantages:
- low volumetric weight (400–600 kg/m3), which reduces the load on the building foundation;
- in terms of their environmental friendliness, products made from porous concrete are not inferior to wood, but unlike it they are not subject to rotting;
- the optimal size of the blocks allows you to increase the speed of masonry several times and significantly reduce the labor intensity of the process;
- small thickness of the seams (up to 3 mm) - the laying is carried out using a special adhesive composition;
- low thermal conductivity;
- frost resistance F25 and higher;
- good sound insulation (Rw = 43–58 dB);
- high heat resistance (up to 1000 °C);
- vapor permeability;
- ease of processing - cutting the material can be done with a regular hacksaw.
- High water absorption , which makes it difficult to carry out finishing work associated with wet processes (quick drying of the surface - the appearance of cracks).
- Low resistance to mechanical loads . Even a slight settlement of the foundation can cause cracks to form on the facade of the building.
One of the ways to protect structures made of porous materials from the above defects is to reinforce aerated concrete blocks.
How effective this process is and what methods of reinforcement exist in modern construction will be discussed later in this publication. And in order to better visualize how to reinforce aerated concrete and understand what surprises may arise during the work, we recommend watching the video in this article.
Materials and tools
So, what do we need for work?
Materials:
1. OSB board (thickness 10-12mm) quantity depends on the length of the reinforced belt being poured (divide the perimeter plus the length of all partitions by four)
2. Self-tapping screws, length 76mm, for wood, hardened
By the way! It will be interesting to know: Sealing a chimney on the roof: what is it for?
3. Self-tapping screws, length 40mm, hardened wood
4. Reinforced mesh, masonry. Cell size 50x50mm. The number of square meters is four times greater than the number of OSB sheets.
5. Threaded rod. Diameter 10-12mm (the quantity is determined as follows: the number of ceiling beams is multiplied by the points of contact with the walls plus along the gable walls every meter and multiplied by 0.2)
6. Nuts that screw onto studs of the diameter you choose.
7. Washers of size: the inner diameter is the diameter of the stud, and the outer diameter is 10-20mm larger. The larger the outer diameter, the better. There will be a large plane of resistance to tearing.
8. Cement (at the rate of grade 400 -220 kg per 1 m3 of ready-made concrete mixture)
9. Crushed stone fraction 5-20mm (based on how many cubic meters of concrete are needed, the same amount of crushed stone is needed)
10. River squeak (based on how many cubes of concrete are needed)
11. Plasticizer for concrete.
12. Pine slats 25x50mm
13. Plastic clamps, or knitting wire.
Tools:
5. Hacksaw, or electric circular saw, miter saw
7. Grinder (angle grinder)
9. Scoop shovel and a couple of buckets
11.Scaffolding or scaffolding
12. Personal protective equipment:
(glasses, gloves, shoes)
Strengthening masonry - features
First, let's look at the areas of aerated concrete masonry that must necessarily be strengthened when constructing the walls of a building made of cellular concrete, these are:
- The first row of masonry for the outer walls of the structure (masonry roll mesh or reinforcing tape for aerated concrete).
- Every fourth tier (reinforcing bars).
- Lintels for window and door openings (rebar frame).
- The upper belt of masonry reinforcement at the floor level (reinforcement frame).
- Reinforcement of aerated concrete partitions (masonry mesh or perforated tape).
- Strengthening the masonry of gables.
Reinforcement of aerated concrete masonry is carried out in several ways. The main method is to strengthen load-bearing walls using hot-rolled steel reinforcement of periodic profile AII, AIII. Available in skeins or measuring rods of 6–12 m.
It is a corrugated profile with two longitudinal ribs. The weight of one meter is 6.3–7.9 kg.
To knit the jumper frames and install the upper reinforced belt, low-carbon reinforcement VR-1 and soft knitting wire 0.8–1.2 mm are additionally used.
In some cases, in order to save material resources, the use of fiberglass (composite) reinforcement of the same diameter is allowed.
The price and low weight of the profile determine its widespread use when performing masonry work from aerated concrete blocks.
The main disadvantage of composite reinforcement is:
- low heat resistance;
- impossibility of connecting rods by welding;
- cannot be bent.
Therefore, in any case, reinforcement of masonry made of aerated concrete blocks in the corners of load-bearing walls must be carried out with steel reinforcement.
To reinforce the first row of blocks, galvanized masonry mesh Ø 3 mm, with a cell size of 50x50 mm, is usually used. The use of mesh is possible if the masonry is carried out using cement-sand mortar, since the thickness of the adhesive layer is 2–3 mm, and reinforcement with such material will increase the masonry seam by another 3 mm.
An alternative to mesh and fiberglass reinforcement can be perforated reinforcing tape. It is a strip of galvanized steel 4–8 mm thick and 25–100 mm wide. Available in rolls.
The reinforcement technology is the same as when using reinforcement, with the exception of masonry scraping. The strips are laid with glue or fastened with screws to aerated concrete masonry.
Reinforcing tape is mainly used when it is necessary to reinforce a pediment made of aerated concrete or to lay interior partitions.
Step-by-step guide to carrying out the work
Calculation of material consumption, tools
The most important stage is the installation of the first row of blocks:
By the way! It will be interesting to know: Installation of Shinglas soft tiles; special installation technology and secrets for roof care
The dressing of subsequent rows is done in half a block. Every five rows, the aerated concrete masonry is reinforced with welded mesh. In addition, the first row of the foundation, the supporting sections of the lintels and the seams of door and window openings must be reinforced.
After installation is completed, the distances between the blocks in the partitions are sealed with polyurethane foam, which, after hardening, is leveled with a solution. If the work is done efficiently, then the wall is not plastered, but only puttied.