When it comes to installing windows in a house made of cellular blocks, two different approaches to fastening technology collide.
Proponents of polyurethane foam claim that this material is so reliable and airtight that it does not require the use of fittings. Fans of dowels, on the contrary, rely on mechanical contact between metal and blocks.
The truth, as often happens, lies in the middle of polar opinions.
Therefore, we decided to consider in detail the features of high-quality installation of windows in aerated concrete and foam concrete walls.
When to install windows in a new house?
Experts note that the shrinkage of the blocks themselves should not be higher than 0.3 mm per 1 m of wall. Consequently, its influence on the quality of installation is not critical. The overall shrinkage of the building will require at least a year, during which time the soil freezes and thaws, and the concrete and glue gain the necessary strength. However, with proper design of the building and high-quality performance of all construction work, installation of windows can be carried out within a couple of months after completion of construction.
The installation (installation) of a plastic window is regulated by several documents:
If it is mandatory for the customer to install windows in accordance with GOST, then the contract must indicate which GOST is meant. Because many provisions in GOST are for voluntary use and special cases, for example, with or without the use of vapor-permeable self-expanding sealing tapes (PSUL).
At what stage of construction should Euro windows be installed?
Wooden windows. It is better to install them after completing “wet” work inside the house. If they are installed before, the high level of humidity in the room (about 90%) can cause irreparable damage to wooden frames. Although manufacturers claim that modern wooden windows are resistant to moisture from precipitation and do not deform, they do not recommend installing them before plastering and screeding. Some of them even warn that the guarantee offered for euro-windows made of wood loses its relevance if, after installing the joinery, “wet” work was carried out in damp, ineffectively ventilated and poorly heated rooms.
PVC windows. It does not matter whether their installation is planned before or after “wet” work. It is always necessary to ensure effective ventilation of the room (if necessary, heating) so that moisture does not condense on the surface of the glass unit, because it can then transfer to the slope and subsequently cause mold.
“Wet” work in winter. Often construction work is completed at the end of autumn and the installation of windows and finishing work falls into the winter. In this situation, it would be better to choose plastic windows, which in principle can be installed at any time of the year (although days when the temperature drops below -5 ° C should be avoided, even if winter foam is used for sealing, which can work at temperatures up to - 10 °C). If the winter is cold, it is best to postpone the installation of plastic windows until the spring. Very low temperatures will cause the PVC to become brittle, which can lead to cracking of the profile during transportation, unloading and installation.
It is also better to wait until spring to install wooden euro-windows. However, if Euro-windows have already been installed, and there is a desire to finish the house in winter, it is worth considering whether wet work should be replaced with dry work. Laying plasterboard and plasterboards does not have a big impact on the humidity in the room, and also does not delay further finishing work
When work is interrupted for the winter, and the windows have already been installed, it is important to ensure ventilation in the rooms, otherwise the accumulating moisture will condense inside the house - most likely on the windows
Basic moments
It should be noted that indicators of high-quality installation of PVC windows in a private house are: ensuring tightness of joints between the frame and the wall and from the blocks, long service life, absence of heat loss, ideal alignment of the frame, high-quality installation of ebb and window sills.
READ ON THE TOPIC: How to properly install a plastic window sill and make slopes on the windows
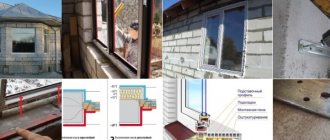
For more hermetically sealed joints, special protrusions-quarters are cut out in the blocks (during the process of laying the blocks, it is possible to provide and cut quarters in advance); special sealants and PSULs are also used. The insulation is polyurethane foam; it is used to fix the area of direct contact between the wall and the frame. Mechanical strength is achieved by fastening the frame with dowels or mounting plates.
The installation depth (from the frame to the edge of the opening) can vary between 8-12 cm depending on the thickness of the block wall. If the masonry is additionally insulated, then the window is mounted closer to the outer edge of the wall so that the dew point is outside the window frame. This will protect the glass unit from condensation and freezing.
Work technology
Initially, replacing wooden windows with plastic ones involves choosing a manufacturer. But before you make a choice, you need to know some nuances:
plastic frame designs can be of different colors, which allows you to choose the shade you need
Please note that a white frame will be cheaper; the cost depends on the country of origin. However, it is difficult to find truly imported goods; most often products sold are manufactured under license; a double-glazed window can consist of a different number of chambers
The more there are, the more expensive the design; the price is also affected by the fittings and thickness of the glass unit; Manufacturing a window will cost more if its shape is non-standard.
The design of PVC windows can be of different colors and configurations
Most often, measurement services are provided free of charge. If you need to replace several units of double-glazed windows, then most likely the seller will offer you a discount. You can save money by installing everything yourself.
Removing the old window
The first stage in the process of installing plastic double-glazed windows is preparatory work. First of all, you need to dismantle the old window frame. To do this, you need to pull the frame structure out of the tray. The next stage is dismantling the window sill. You need to know that there are different window sills: concrete - then they are broken with a hammer and cut with a grinder; metal, plastic and wood, using a chisel and a hammer drill, are removed entirely. This is followed by the removal of low tides. If the slopes are made of plastic or plasterboard, they must be removed. Then the remaining insulation is removed and the ends are protected from dirt and dust.
At the first stage, the old window frame is dismantled
Look at your window opening. It may need to be restored using a concrete screed. If the edges are uneven, use putty to smooth them out.
Measurements must be taken correctly
Please note that when taking measurements, you need to take into account the size of the opening, its shape and the type of structure of the house. Most often, measurements are taken by professionals; this is especially true if your windows have figured elements, a non-standard appearance or an arch shape
To correctly measure the window, you need to contact a specialist.
Measuring a simple rectangular window is easy. However, if it is of a non-standard shape, then problems may arise, which is why manufacturing companies offer measuring services free of charge.
Installing a new window
When the measurements have been taken, the products have been manufactured and delivered to the site, and the window opening has been prepared, it is necessary to proceed directly to the installation of the plastic window. To do this you will have to stock up on the necessary tools:
- roulette;
- drill;
- hammer;
- perforator;
- level;
- screwdriver;
- anchor bolts;
- pliers;
- self-tapping screws;
- wedges for spacers;
- polyurethane foam;
- glue or sealant.
Before installation, substrates are laid at the bottom of the opening
Installation of new double-glazed windows is carried out in several stages:
- Laying the footrests. At the bottom of the window opening in the middle and along the edges of the frame, you need to place bars, which can be made of wood or plastic.
- Installation and fastening of the frame. Pegs are driven between the wall and the window, most often closer to the top of the frame. Using a level, the location of the window in the horizontal plane is checked. Using a plumb line, level it vertically.
- Fastening structures. First of all, the lower part is secured using anchors. After checking that everything is level, secure the top and sides.
- Hanging the sashes. After hanging the sashes, you need to once again check the position of the window vertically and horizontally. Next you need to foam the structure. Do not forget that the foam, being in the open air, can very quickly lose its properties, so you should cover it with a top layer, which can be made of plasterboard, plastic or plaster.
- Window sill installation. It is necessary to trim the window sill from each edge so that it fits tightly under the frame. The gap under the window sill is foamed or sealed with cement mortar.
- Slopes. In order to create a slope, the following materials are used: plaster, drywall, plastic panel. The sheet material must be cut, leveled on the surface and secured with foam. The edges are covered with a corner or treated with a profile. If you choose the option of plaster, then you need to cover the surface in several layers, and each of them must dry completely. The surface is sanded and painted.
Having completed all the steps, you will receive a structure that will serve you for a long time, working without failures or repairs.
Fixing the frame in the opening
There are 2 ways to fix the frame in the window opening. In the first case, you must first remove the glass. Drill the plastic profile in several places and secure the frame with long dowels. The disadvantage of this method is that it is difficult to dismantle; it is not possible to change the position of the frame relative to the opening after final fixation, even before the foam is blown in. The disadvantage is significant, especially when installing windows in a private house yourself. There is not much chance of doing everything perfectly on the first try, even if your hands are growing out of the right place.
The second method does not require removing the glazing. The frame is secured using anchor plates, which are installed around the perimeter of the plastic frame using self-tapping screws. Next, fixation to the wall occurs with dowels-nails through the holes in the plates.
Vertical reinforcement of door and window openings
It is recommended to perform door reinforcement:
- when using a building for non-residential purposes;
- with significant loads on aerated concrete walls due to natural disasters;
- with possible tilting of the foundation of the structure to one side;
- with low block strength. In this case, vertical reinforcement of door openings should be used. Increase the load-bearing capacity of walls using blocks with a round hole. These blocks can be purchased from foreign buyers or invented by yourself. When laying the walls, support platforms are installed to strengthen the steel frames. At the end of the installation process of the O-shaped platforms, the hole is filled with a liquid solution with high strength and waterproof characteristics.
An aerated concrete block with a door is secured with anchors for cellular concrete in the house. Considering the inherent fragility of aerated concrete, it is not recommended to install heavy doors in large openings. The door is not installed in commercial premises and individual homes.
Installation of windows in a private house. Stages of work
1. Mounting plates are secured to the window frame with 4.8x12 mm self-tapping screws.
2. Special adjusting wedges (wooden or plastic) are installed under the PVC frame. They create a gap for the subsequent application of insulation - foam.
3. The position of the glass unit is adjusted by level. Holes for dowels are drilled in the blocks, taking into account that to prevent the blocks from splitting, the holes should not be closer than 5 cm from its edge. Initially, the plate is fixed with one dowel (6x100 mm), then the second one is leveled and screwed in.
4. Check the opening and closing of the window sashes.
5. Foam all joints between the frame and the wall around the perimeter of the frame. Frost-resistant foam is selected for the territory of Russia. Before foaming, the seam is sprayed with water from a spray bottle. This simple procedure will improve the quality of adhesion of the foam to the wall and plastic.
6. After the foam has hardened, excess foam is trimmed off.
7. The wedges are removed, the voids are foamed.
8. Next, an expanding tape or frost-resistant putty is used at the outer joint of the frame and the foam block. You can also use waterproofing tape. The internal joint is puttied.
9. The ebb and window sill are installed. Above the low tide, holes are placed in the PVC profile to remove condensate.
Source
Construction of a window structure
When installing the structure, first install the window frame, which consists of upper, lower and side parts. They begin work by treating the walls with an antiseptic to avoid rot, fungi and mold. It will be more convenient to mount the box separately and then insert it into the window opening, which is pre-lubricated with drying oil and painted. To ensure the sides of the window are even, check it horizontally and vertically using a building level. After fixing the box, the doors are hung. When installing them, take into account the presence of cracks so that there are no difficulties with opening and closing the sashes.
A gap forms between the wall and the window frame, which can be filled with polyurethane foam. After it hardens, the foam is carefully cut off with a knife. When the work on installing the block is completed, they begin to install window sills and ebbs.
When installing a wooden ebb, it is treated with an antiseptic in advance, but if a metal water drain is used, it is treated with an anti-corrosion agent.
When installing windows with balcony doors, the intermediate seam is leveled and possible gaps are removed. Before installing the window sill, you need to get rid of the cracks by driving a block into the bottom of the window block. If the hole is uneven, it is leveled with a gypsum mortar and lime before the window installation begins.
The last step is to install the decoration; this is an optional design element, but it makes the window frame look more beautiful. The platbands are installed once all installation work is completed. We can summarize and define a number of requirements that will help avoid cracks in the window, condensation, mildew and mold:
- The surface of the slopes must be flat; this is achieved using a rubber hammer or a building level.
- The window openings are impregnated with a primer, but before that all debris, dirt and dust are removed.
- Thermal insulation of internal slopes is carried out using polystyrene foam, mineral wool, polyurethane foam or polystyrene foam.
- Apply vapor barrier tapes 6 cm wide in an even layer.
- Get rid of possible joints.
- Seal cracks in windows.
- They fix the trim, drain, and window sill.
Description of installation of plastic windows in aerated concrete
The construction of aerated concrete houses has recently become in demand among developers. With all the advantages of this material, it has one feature related to filling openings. Installation of windows in an aerated concrete house is performed slightly differently than in buildings made of other materials. This is due to the low ability of the material to hold fasteners.
Requirements for aerated concrete before installing plastic windows Windows in the house perform several functions:
If ventilation, lighting and decoration of the house are provided for at the design stage, then high-quality protection from external influences also depends on the correct installation of windows. And if the technology for installing plastic windows in buildings made of traditional materials - brick and wood - does not differ much from the procedure for installing other windows, then for cellular concrete a slightly different approach is required. How to properly install PVC windows in an aerated concrete house?
Before installing window units, it is necessary to prepare the opening. To do this, you need to clean the slopes from dust and loose material, dry them and prime them. The primer will protect the sealing layer of polyurethane foam from the penetration of moisture from aerated concrete into it. Before installing windows, the wall material must be dried. It will take some time from erecting the walls and roof to filling the openings. In dry summer weather, one to two weeks is enough for this.
Which is better - single-chamber or double-chamber?
When choosing modern plastic windows, people often have a question about which double-glazed window is better to choose.
A double-glazed window is a product that consists of a certain number of glasses.
A sealed chamber is formed between the glasses, which is mainly filled with sealed gas. A special aluminum profile is used to connect the glass.
Among all the possible options, people often think about single-chamber and double-glazed windows. What interests them most is the difference between products and which one is more effective and acceptable for a particular region.
Advantages and disadvantages of single-chamber double-glazed windows
This double-glazed window is a structure that consists of two glasses. They are separated from each other by an aluminum frame.
The space between the glasses is sealed and filled with absorbent. Such designs have certain advantages and disadvantages.
As for the advantages, they include:
- light weight of the structure, which reduces the load on the fittings. As a result, the service life of the window is significantly increased;
- possibility of using energy-saving glass. The design with such glass has high thermal insulation properties, no worse than that of a two-chamber package; windows with such a package let in a significant amount of light;
- low cost.
Unfortunately, such designs also have some disadvantages. Among them are:
- condensation formation at a temperature of 8 degrees;
- low noise insulation properties.
But, despite the presence of shortcomings, windows with single-chamber double-glazed windows are especially popular among the population. They are often used for glazing loggias and balconies.
Advantages and disadvantages of two-chamber structures
As for the two-chamber ones, they consist of three glasses, which are separated by an aluminum profile. In such double-glazed windows, two chambers are created, which are filled with inert gas.
The advantages of double-glazed windows include:
- high resistance to heat transfer. Condensation on glass forms at very low temperatures, which are 30 degrees below zero;
- good sound insulation properties.
As for the disadvantages of such structures, experts highlight:
- heavy weight, which significantly makes the window unit heavier;
- significantly low light transmittance. If single-chamber windows transmit 80% of light, then double-chamber windows - 74%;
- high price.
Often, plastic windows with double-glazed windows are used for glazing residential premises. They allow you to reduce heat loss and maintain the temperature in the room for a long time.
What is the installation depth
When determining the installation depth of windows in the opening, that is, the distance from the outer surface of the wall, you need to take into account several features:
If the facades of the house will be covered with any decorative material without insulation, the windows can be installed directly along the line of the outer surface of the facade. Shifting them inward may only be necessary due to the design features of fastening the cladding.
If it is necessary to insulate facades (when this is required in accordance with the climatic conditions of the area), window blocks must be installed inside the opening at some distance from the outer surface. This is due to the fact that high-quality insulation of aerated concrete at the junction of the window will be structurally difficult to perform if the window is installed along the line of the wall. The aerated block wall around the perimeter of the window may freeze, since its calculated thickness will not exceed the thickness of the frame. Usually this is no more than 120 mm.
How to install PVC double-glazed windows
Installation consists of several stages:
- Pre-installation work.
- Installation of plastic structures.
- Checking the location of the window in the axial plane.
- Foaming seams.
For a correct understanding of the entire process of installing window structures in wooden houses, this article is proposed for further consideration.
Carrying out preparatory work
The beginning of the work is the taking of exact dimensions. When taking measurements, you need to take into account all the nuances for proper placement of the product. To do this, determine the width and height of the opening, its depth and the location of the future structure. Select colors and fittings for normal window operation.
Cutting out a window opening
As soon as the purchased products are delivered to your home, you can begin installation. To do this, follow these steps:
- After deciding to replace the old material, dismantle the old structure.
- Then clean the opening from dismantling products.
- In case of geometry violation, level the surfaces.
After preparation is completed, a new plastic window is installed in the opening of a wooden house. If you have no experience in carrying out installation work, you can always use the services of specialists.
Fastening the window structure into the prepared opening
The work begins with step-by-step preparation. First, you need to remove the double-glazed windows if the frame is designed without doors. If they are provided there, it is better to dismantle them. This is done so that the work does not cause inconvenience from the heavy structure.
Upon completion of the preparatory work, we fasten the brackets.
Attaching the staples
They will be needed for the final fixation of the window. On each side, two fasteners are installed. They must be screwed to the frame with self-tapping screws.
Next, we install the plastic structure. At the same time, you need to leave a gap under the window, for which you need to put blocks (or as they are called in common people - chibuchki).
Wedging
After installing the product on the bars, we begin to wedge the frame on the sides and top using pre-prepared wedges.
In this case, it is necessary to periodically check the vertical and horizontal parts using a level. Moreover, the vertical is checked in two planes - so that the window does not fall inside the room or does not move to one side
Do not forget about one more important detail - the proportionality of the slopes. To do this, use a tape measure to measure from the frame to the corner of the inner wall (right and left)
When the structure is level and the dimensions of the slopes are ideal, then we perform final fixation using fastening brackets. To do this, you need to press them slightly against the wooden opening and tighten the screws. This procedure is considered the last and affects the overall stability of the entire structure.
Fastening with staples and self-tapping screws
Upon completion of the entire installation, clearances must be maintained. The minimum size should not be less than 2 cm, because this space is left specifically for foaming. But it should not exceed 4-5 cm, otherwise stability is lost.
At the next stage, it is necessary to install the double-glazed windows in place; we fix them with plastic glazing beads.
Putting the bead in place
If the structure has sashes, we also return them to their rightful place. Next we install the handles. The process does not require any special skills.
It is enough to insert the handle with its tongue into the hole, and from the street side install it on the core. Fixation is carried out from the inside of the room. This is necessary to protect yourself from thieves entering a residential building.
Control and foaming of the structure
After completing the installation, make sure once again that the installation is normal and check the sashes to see if they open. When installed correctly, nothing should interfere with them when closing or opening the sashes. Also, when the door is opened slightly, it must maintain its position without moving to open or close.
After making sure that the shutters work well, you need to foam the entire window. You need to start from the bottom and pull the mounting foam up.
Instructions for passing polyurethane foam:
First of all, we go through the bottom of the frame. If the gap is no more than 2 cm, then it is enough to walk once. In the case of higher sizes, you will have to go through two, and in some cases even three layers.
Foaming
- Next we foam the side parts.
- At the end, we pass the top of the structure.
The next stage, masters do it differently. Some people prefer to install the window sill after the foam has partially dried, and then carry out installation, while others prefer to install it immediately, without allowing the foam to dry. The second option is considered more correct.
Quarters in aerated concrete (size)
To effectively insulate window openings, when installing plastic windows in aerated concrete walls, you can install a quarter. This is the name of the protrusion along the outer surface of the wall, covering the opening by 60 mm along the vertical and upper horizontal slopes. This element is made during the construction of brick walls. The size of 60 mm is one fourth the length of the brick, hence the name.
In aerated concrete walls, this element is not installed during laying, but only after the window slopes in the openings are leveled. Sections of blocks 100 mm thick are glued along the perimeter of the window opening. The adhesive joints on the outside and inside of the building must be reinforced with plastic mesh.
The presence of a quarter in the opening will allow you to more thoroughly seal the gaps between the windows and the wall. At the same time, the polyurethane foam will be reliably protected from the effects of ultraviolet exposure to the sun.
Instructions for installing a large window on plates:
- A hole for the dowel is drilled in the plates.
- The plates are secured to the window frame with two short self-tapping screws.
- The number of plates used is usually from 4 to 6 pieces or more.
- The window is installed and leveled using stands.
- The plates are pressed and a hole for the dowel is drilled through their holes using a hammerless drill.
- All dowels and screws in them are screwed in.
- The space between the frame and the wall is filled with high-quality polyurethane foam. It is desirable that the gap is about a centimeter, for convenient filling with foam and its economical consumption.
- Excess foam is cut off.
- Next, the window sill and internal slopes are installed.
If the window is small, the plates can be secured with ordinary self-tapping screws, without using dowels, since the main load will be supported by the mounting foam.
And in this video you will learn from an experienced self-builder how to quickly and easily install small plastic windows in an aerated concrete house. The presented method has some tricks that greatly simplify the installation process.
How to correctly insert windows into aerated concrete with your own hands
If you have the tools and skills, you can install plastic windows in aerated concrete with your own hands. In order to insert the window correctly, you will need:
Before installing windows, the sashes must be removed from the frames. Without them, the window will weigh much lighter and access to the inside of the frame will be provided.
Blind frames need to be unpacked, that is, the double-glazed windows must be removed from them if they are to be installed on dowels. Since this operation can cause difficulties for non-professionals, for solid glazing windows it is recommended to install using plates.
Before installing the frame in the opening, it is necessary to cover its perimeter with PSUL tape along the outer edge. This is necessary so that subsequently a vapor-permeable seal appears in the gap between the frame and the gas block, preventing the wind from blowing through the joint. This must be done immediately before inserting the frame into the opening, since the time for this is limited due to the rapid (10-15 minutes) expansion of the tape.
How to attach heavy window modules
If it is necessary to install massive window modules in the area of an aerated block opening, there is a possibility of deformation of the aerated block followed by the window falling out. Therefore, in such cases, they resort to the additional use of structures that can evenly distribute the load along the entire perimeter of the opening. Usually, additional frames are used as such structures, which are fixed in the area of the opening and act as a kind of adapter between the window profile and aerated concrete. Subsequently, the window block is attached to such frames using self-tapping screws.
If we talk about materials for the manufacture of such intermediate frames, then it can be dry board (construction), laminated wood (panelboard), timber or even plywood. Moreover, a prerequisite is pre-treatment of the material with compounds that prevent the spread of fungus or mold.
Now, as for fixing the wooden frame to the gas block. In order to prevent the formation of voids between the wood and the gas block, the frame should be installed using glue for the gas block. Whereas mechanical fixation should be done using anchors for cellular material, plus use self-tapping screws (L=100mm) to enhance rigidity (the self-tapping screws are screwed directly into the material in increments of 100 - 200mm). (By the way, if you are interested in how to attach doors to aerated concrete, we recommend that you look here: https://domgvozdem.ru/index.php/okna-i-dveri/654-ustanovka-vkhodnoj-dveri-v-gazobeton).
Sometimes the reinforcing frame is attached in a more complex way (this applies to the installation of garage-type swing structures). In this case, the studs to hold the frame are installed (using the embedding method) at the stage of construction of the structure and two-component epoxy compounds are used for these purposes.
Flexible stone: how to install the material yourself
How to lay gas silicate blocks - correct laying of the first row
How to lay Lego bricks with your own hands
DIY foam block house: construction technology
Video on the topic:
If you liked the material, I will be grateful if you recommend it to friends or leave a useful comment.
Options for installing plastic windows in an aerated concrete wall (mounting)
Having installed the frame in the opening, it is necessary to fix its position relative to the wall. To do this, use special clamps and adjusting wedges made of wood or plastic. By pointing the tops of the wedges in opposite directions and shifting them relative to each other, it is easy to adjust the amount of the gap. The horizontal and vertical position is verified using a level and plumb line.
Fastening windows to the wall can be done with steel plates or dowels, which can also be used as self-clamping anchors. After fastening, the parts of the wedges protruding beyond the plane of the frame must be cut off with a knife.
Installing windows on plates
If the installation option is used on plates, it is necessary to pre-drill holes in them for screws and dowels. Ready-to-install plates must be attached to the outer surfaces of each of the four sides of the frame at a distance from the corners equal to 1/8 of the length. Fastening must be done using at least two screws or self-tapping screws to ensure rigidity.
After fixing the position of the window, the plates are attached with special dowels and screws to the aerated concrete wall. Subsequently, the plates will not be visible, as they will be covered with finishing material when decorating the slopes. If the slopes are to be plastered, it is necessary to use a cement-sand mortar with the addition of lime. An alkaline environment will prevent corrosion of metal plates and screws.
Installation on dowels
When installing windows using dowels, you need to drill holes on all four sides from the inside of the frame. The distances from the corners should also be 1/8 of the length of the side. Having installed and fixed the window in the opening, you need to drill an aerated concrete block through the holes in the frame to a depth corresponding to the length of the dowel or anchor. The diameter of the drill must match the diameter of these fasteners.
Having inserted dowels and anchors through the holes in the frame, you need to press them into the aerated concrete with light blows of a hammer. In this case, the frame should hang on all eight elements. Self-clamping anchors must be tightened with a screwdriver.
After the frame is fixed in the opening, the gaps between the frame and the wall must be sealed with foam. To do this, it is better to use professional compounds, which are applied using a special tool - a foam gun. When hardened, this composition forms a seam, the voids in which are smaller in size than in a seam made from household foam. This contributes to better thermal insulation of the window opening.
It is important to immediately remove the protective film from the windows that is applied during their manufacture immediately after installation. If you do not do this, after some time, under the influence of ultraviolet light, the film material will become brittle and it will be very difficult to peel it off.
Properly installed windows in aerated concrete walls with high-quality finishing of the slopes will ensure a healthy microclimate in the house and will serve well for decades.
Source
Installing the window sill and ebb, sealing the frame
First of all, the bottom under the frame is foamed. To do this correctly, processing is carried out on the inside and outside, then the appearance of empty spaces can be avoided. While the foam hardens, prepare the canvas.
Measure the depth of insertion of the canvas, its width near the window and at the beginning of the wall. Add an allowance that will extend beyond the partition and cut along these measurements. When determining the allowance distance and length, the following feature should be taken into account.
Many people are well aware of the problem of “crying windows”, when water accumulates. This problem occurs due to the formation of condensation. This happens as follows. In a warm house, the air is constantly saturated with water vapor, this can be either natural, for example, the evaporation of water from open vessels when drying clothes, or forced - steam generators on batteries, from a boiling kettle, an iron with a steam generator, etc.
When the air begins to cool, its volume decreases, the water molecules in it begin to combine, forming droplets of water that fall to the surface. When the window opening is shallow, warm air flows to the top point, comes into contact with the glass, cools and descends. Flowing down the windowsill, the vapor-saturated air reaches the battery, where it mixes with hot air and returns to its normal state. In this case, condensation does not have time to fall out.
Another example. The opening has great depth. In this case, due to the large horizontal distance, the circulation slows down; this slowdown will be greater, the greater the horizontal distance, determined by the length of the window sill. In this case, the “crying window” effect appears. The situation can be corrected by using forced ventilation. To do this, a heating element (electric or water) is installed in the window sill.
Installation of a ventilation system
It is worth noting that precipitation depends on many factors:
- saturation of warm air with water vapor;
- volume of ventilated space;
- temperature difference between heated air and window surface.
When the workpiece is ready, foam rubber pads are placed on the stands under the window; they will help to insert the window sill more tightly into its place. To level the canvas, additional wedge-shaped stands are installed. This is necessary to set the width level. The length is inclined at 2-3 degrees. The side plugs are glued and the window sill is put in place. The gap between the canvas and the wall is filled with foam. To prevent the canvas from rising under the influence of foam, a load is placed on top.
Subsequent sealing and adjustment
The drain is installed in a similar way. It is attached to the installation profile with screws. All voids are filled with foam, drainage holes are opened and checked for cleanliness. If they are missing, you need to drill holes. Remove the protective film from the window.
Correct and incorrect installation of drip sill
The slopes are installed according to the window sill installation scheme, with the only difference being that they are flush with the wall. To fasten them, screws are used that will be screwed into wooden plugs installed in pre-drilled holes in aerated concrete. Fastening is done at the corners. When all the pieces are prepared, begin foaming the window frame. Sealing is carried out from the inside and outside. At the final stage, the remaining foam is removed, the corners are glued and all joints are covered with sealant.
Using waterproofing
The sashes and double-glazed windows are hung. The sashes are adjusted horizontally using the top hinge, and vertically using the bottom. Use a 4mm hexagon. The lower loop allows you to additionally adjust the horizontal position; for this you need to use an open-end wrench size 13. Finally, the plugs are installed and the handle is screwed on. Plastic surfaces are cleaned with a special product.
Sash adjustment
Installation of windows in a house made of aerated concrete or foam blocks
When it comes to installing windows in a house made of cellular blocks, two different approaches to fastening technology collide.
Proponents of polyurethane foam claim that this material is so reliable and airtight that it does not require the use of fittings. Fans of dowels, on the contrary, rely on mechanical contact between metal and blocks.
The truth, as often happens, lies in the middle of polar opinions.
Therefore, we decided to consider in detail the features of high-quality installation of windows in aerated concrete and foam concrete walls.
When is it better to install plastic windows?
There is no consensus on this issue. Beginner developers ask when they can install windows in a house made of aerated concrete or foam block. They are given advice that is more ridiculous than the other. Some argue that cellular blocks have a very large shrinkage and windows can only be installed a year after the construction of the box.
Others try to provide a “scientific” basis for this statement and argue from three types of shrinkage of gas silicate and foam block. At the same time, all advisors unanimously ignore the manufacturers’ data. They clearly state that the natural shrinkage of cellular blocks does not exceed 0.3 mm per 1 meter of wall height. Therefore, there is no need to talk about its critical impact on window frames. Confusion arises due to the substitution of the concepts of shrinkage of lightweight concrete and building settlement.
Deformation settlement of a structure (walls and foundation) does not occur due to the evaporation of moisture from concrete and blocks. It is caused by uneven subsidence and rise of soil under the influence of freezing and thawing water in it. It is from such shrinkage that load-bearing structures need to be protected. For the foundation, frames made of reinforcement are used, and for walls made of aerated concrete and foam blocks, reinforced concrete belts are used, which are poured at the level of the interfloor ceilings. If these measures are not taken, then cracks in the walls and foundation during construction on weak and water-saturated soils are guaranteed.
What practical conclusions can be drawn from our theoretical reasoning?
Very simple: you can install windows in a house made of gas or foam concrete blocks 2-3 months after the completion of wall laying. This period is sufficient for the foundation and masonry mortar (glue) to gain the necessary strength.
Some may object, saying that the house must stand for at least 1 year before the installation of windows and finishing begins, in order for the soil stabilization processes to be completed. Our answer to this is that the process of soil movement is continuous. Therefore, you need to rely not on the complete settlement of the building, but on the quality of construction - a solid foundation and load-bearing walls.
The nuances of high-quality installation of windows in aerated concrete and foam blocks
Let's say right away that inserting a plastic window into a foam block is not difficult. It is much more difficult to ensure the tightness and durability of the joints between the wall and the plastic frame.
To do this, three conditions must be met:
The tightness of the seams can be partially ensured by quarters - protrusions that are cut into blocks. In addition, it is necessary to use sealing materials - frost-resistant sealants or self-expanding tape (PSUL). The contact area between the frame and the wall is insulated in the traditional way - with polyurethane foam. Dowels or mounting plates are responsible for the mechanical strength of the fastening.
There are two ways to fix the window frame in the opening:
Installing plastic windows in a house made of aerated concrete using the first method has its disadvantages: dismantling and installing double-glazed windows is labor-intensive, and the position of the frame in the opening after it is fixed cannot be changed. The second installation method is more convenient, since if necessary, the position of the window before blowing in the foam can be changed and only after that can it be finally fastened.
Standard installation of windows in aerated concrete begins with the installation of spacers made of plastic or wood under the frame. They are necessary to create a gap into which insulating foam will be blown.
The mounting plates must be secured to the frame before this operation. For this, self-tapping screws with a length of 19 mm and a diameter of 4.8 mm are used.
The window installation depth can be from 8 to 12 cm (from the edge of the frame to the edge of the opening) and depends on the thickness of the wall (20 or 30 cm). If the outer part of the masonry will be insulated, then the window can be placed closer to the outer edge of the opening by the thickness of the insulation.
These indentations are chosen not for reasons of aesthetics of the appearance of the windows, but because of the need to protect the frames from moisture condensation and freezing (the dew point should be outside the frame).
Having adjusted the position of the glass unit using a level, holes are drilled in the blocks for dowels (with a hammerless drill). The outermost hole of the plate should deviate from the edge of the block by at least 5 cm so as not to split it. First, the plate is fixed with one dowel (diameter 6 mm, length 80-100 mm). After final alignment, screw in the second one.
After making sure that the window sashes open and close easily, proceed to foaming the joint along the entire perimeter of the frame. For this work, it is better to take frost-resistant foam with a low expansion coefficient. This will increase the durability of the insulation and reduce pressure on the frame. To improve the quality of adhesion of the foam to the block and window, before blowing it in, the entire seam must be treated with water from a sprayer.
After the foam hardens, its excess that protrudes outwards is cut off. The adjusting wedges are removed and the resulting voids are foamed. Having completed these operations, the external joint of the frame with the block is sealed with expanding tape (PSUL) or protected with frost-resistant breathable putty. Another common option is to install waterproofing tape around the perimeter of the opening using adhesive-sealant.
The internal joint is treated with putty, carefully leveling it over the entire contact area with the insulation.
The installation of the ebb and window sill completes the installation. An important nuance of this work is the correct placement of holes in the plastic profile through which condensation from the window escapes to the outside. They should be higher than the tide to prevent moisture from getting onto the blocks.
In conclusion, I would like to say about the quarters, which protect the joints of plastic windows from blowing and freezing. Any cellular concrete cuts well, so during the laying process you can make quarters of the desired size in it in advance.
Another option is to install quarters made of dense (extruded) foam. It insulates the slopes and frame well, but is quite difficult to finish, since it requires the installation of a mesh and high-quality putty. The foam is attached with glue and additionally fixed to the blocks with plastic dowels with wide caps.
Source
Preparing for installation
It is recommended to protect the surfaces of window openings with moisture-repellent preparations.
Before installing the openings, builders carry out preparatory measures. Since the cellular structure does not tolerate moisture, you may be advised to cover the work surface with construction adhesive tape. This method is not reliable. The hygroscopicity of the blocks ensures that water gets in between the joints. To avoid shrinkage, the materials are impregnated with a specialized primer. The high cost of this method will be paid off by the durability of the building due to the strengthening and waterproofing of the blocks.
During installation of the opening, you can make quarters. These are protruding parts of concrete blocks, which are designed to additionally seal the seam and protect contact with the wall from blowing. If it was not possible to make quarters, use specialized foam. The material is difficult to adjust, but it will provide additional insulation. The polystyrene quarters need to be puttied and fixed additionally.
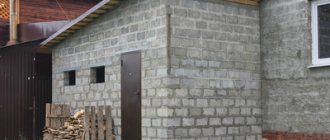
Glazing of a foam block house
Today, foam block is one of the most popular materials for the construction of private housing. Thanks to its porous structure, this material is lightweight and easy to process, however, it is these properties that create some difficulties when installing plastic windows in a foam block house. Therefore, for a long service life of the window, it is imperative to follow the installation and fastening technology of the structure.
Correct installation of plastic windows in a foam block house
Standard installation involves attaching the window frame to the wall directly through a plastic profile. To do this, remove the glazing, install the frame and return the glass unit to its place. This method has a number of significant disadvantages when installing windows in a foam block house.
Despite its solid appearance, the porous material from which the foam block is made is quite easily destroyed under mechanical stress. Therefore, the standard method of attaching the frame to the window opening is not suitable here. A conventional fastening anchor or dowel used during installation will not provide a reliable and durable fixation. Foam concrete will begin to crumble and crumble already when windows are installed in the foam block, and simply opening the window during operation will lead to weakening of the entire structure as a whole.
Therefore, the installation of windows in a foam block house is carried out using a different method, based on the use of reinforced mounting plates attached to the base using metal or polymer dowels. This method allows you to distribute the operating load over most of the foam block and prevent its destruction.
Window installation
Let's figure out how to install PVC windows in aerated concrete. Due to the fact that to fasten the frame, holes are first drilled in aerated concrete, it must be placed on wedges, the arrangement of which depends on the dimensions of the structure:
- a pair of wedges must be placed under each half of the frame;
- an additional spacer element is located on the bottom right and top left;
- a wedge is temporarily installed in the upper right part of the frame.
Installing a window block using wedges is convenient because the location of the block can be adjusted by tapping on the supports. It turns out that you can give the window the correct position yourself, without resorting to outside help.
The evenness of the installation is checked by a level or plumb line. If everything corresponds to the standard, then holes are marked on the wall for anchors with which the frame will be fixed. Now you need to remove the structure, drill holes at the designated points, and install dowels made of plastic material.
Now we move on to installing the window and fixing it with screws that are screwed into the installed dowels. If the window opening has a selected quarter, then the outer side of the window frame before installation must be glued with self-sealing tape, which is overlapped at the corners of the joints.
If the installation was carried out without the use of plates, then the screws should not be screwed in all the way. This can cause the frame profile to take on a barrel-shaped shape. It is best to leave the screw head in such a position that it does not interfere with the installation of the double-glazed window.
It should be noted that aerated concrete material, due to its porosity, does not hold fasteners well. For this reason, experienced craftsmen recommend using self-tapping screws, the length of which reaches one hundred and twenty to one hundred and fifty millimeters, and the thickness - six.
When fixing the window unit, you should monitor its correct location. Having screwed the plate on one side, you need to check if there is any displacement of the frame. After this, you can fix the remaining fastening points.
The final stage is checking the diagonals. This is the only way to make sure that there is no distortion from the created pressure. The permissible error in dimensions is no more than two millimeters.
The work is completed by removing the spacer wedges. Only the diagonal elements remain.
Products and services of Window Factory
The latest plastic windows effectively reflect heat and retain heat in the house. Provide fresh air without dust, drafts and street noise.
Custom manufacturing of windows of any shape from plastic, wood and aluminum. Individual selection of glazing types depending on the architectural features of a country house.
Durable and modern aluminum windows are reliable, safe and durable in use. An excellent alternative to plastic and wood at an affordable price.
Naturalness, environmental friendliness, durability and sophistication are the main advantages of wooden windows. The products provide a high level of thermal insulation.
Presentation and large sizes are the main difference between panoramic windows. An excellent option for decorating a terrace, swimming pool, bay window, roof, winter garden.
Window lintels for aerated concrete
When the construction plan provides for the use of reinforced elements to increase the strength of aerated concrete walls, for example, in private cottages, special lintels are used. They are also installed when decorating windows and doors. The use of these elements allows you to professionally distribute weight loads and prevent cracks in the foam block opening.
What jumpers are used
There are several types of jumpers, differing in design and installation method:
- Reinforced gas jumper according to GOST. This is a factory product, which is a beam made of aerated concrete with an internal reinforcement frame and an anti-corrosion coating on top. This solution will require high financial costs, but is simple and can be done by a non-professional. The main positive aspects are: durability, long service life, high thermal efficiency.
- U blocks. The jumpers are supposed to be installed above the gas blocks. They have a prefabricated construction and are easy to saw, even with a hacksaw for aerated concrete. The frame elements are placed in the furrows. After this, installation is carried out using wooden formwork. In the absence of wall insulation, there is a need to place polystyrene foam insulation inside the structure.
- Reinforced concrete lintels are concrete beams with reinforcement inside. They are not as thermally conductive as gas silicate. Therefore, it would be correct to additionally insulate the walls with mineral wool.
What are the pros and cons of jumpers made of different materials?
The advantages of reinforced aerated concrete lintels include:
- durability;
- moisture resistance;
- good resistance to fungal infections;
- lack of flammability;
- strength.
The use of reinforced lintels requires attention to the thickness of the wall into which the window is mounted. To speed up the installation process and simplify the work, you can take industrially produced rectangular jumpers. The industry produces them in various sizes. This is convenient when selecting consumables when working with sections that differ in width.
Aerated concrete lintels are characterized as follows:
- they have a low thermal conductivity coefficient;
- light weight;
- the ability to select the size of interest depending on the thickness of the block.
When installing the selected jumper, you need to maintain a depth of 20 cm and point the indicating arrow on the packaging upward. Subsequent steps consist of fastening them together using a hammer and assembly glue. To level the surface, use a wooden block with a wide blade. Leveling is carried out after the exposure for the masonry mixture has been maintained.