When planning to fill an armored belt under the Mauerlat, it is important to consider the dimensions and characteristics of the fastening system. Mauerlat is an intermediate beam through which the rafter system is connected to the walls with anchors, studs or wire. After laying the Mauerlat, it is important to securely fasten the roof of the house. When making walls from cellular blocks, you should consider attaching the Mauerlat to expanded clay blocks without an armored belt, as well as together with it. Let's consider how to install the Mauerlat so as not to destroy porous concrete. After all, if fastened incorrectly, the blocks can crack.
Armored belt for Mauerlat: purpose, dimensions and characteristics
Mauerlat, a kind of “intermediary” between the building and the roof, plays an invaluable role in the issue of reliability and strength of the structure.
Therefore, the closest attention is paid to its design and structure. Professionals, as a rule, recommend installing an armored belt under the Mauerlat, thanks to which the latter does not budge. The armored belt under the maeurlat helps to increase the rigidity of the structure and allows it to be used as a reinforced support.
Purpose and functions ↑
Such reinforcement is a fairly important stage in the process of building construction. To begin with, let’s look at why the installation of a reinforced belt is needed.
The structure is affected by various forces:
- vertical, created by the weight of the roof, as well as external influences such as snow, wind and others; When the rafters are supported on the wall, a thrust force arises, as a result of which the walls of the building tend to move apart. In this case, the thrust load increases as the forces on the roof increase.
For some modern building materials, a point load may well be destructive. Therefore, for them, in particular, expanded clay concrete walls, an armored belt under the Mauerlat is an extreme necessity. Thus, the question of whether an armored belt is needed under the Mauerlat on walls made of similar materials has a clear answer.
- during the process of drilling holes for studs, cellular blocks may crack or burst under the influence of a point load; the expansion force from the hanging rafters creates different loads from different sides, as a result of which the blocks can begin to move apart, and the roof, like the walls, can deform; if the rafters are placed directly on aerated concrete, then even a slight deviation of the roof level from the calculated one leads to the occurrence of a point load with possible consequences for the foam blocks. Laying the Mauerlat on the armored belt will prevent complications arising during construction.
As for brick walls, they have excellent mechanical strength. To install the murlat in this case, it is quite enough to use anchors or embedded elements. Nevertheless, in regions with seismic activity, when building houses, it is recommended to install an armored belt under a brick mauerlat.
The reinforced belt in practice performs the following functions:
- It prevents the walls from deforming during soil movements or in the event of their uneven shrinkage, thereby maintaining the strict geometry of the structure. Allows you to align the wall structure on a horizontal plane and correct errors during masonry. Gives additional rigidity. Any resulting load on the load-bearing walls is evenly distributed. Thanks to its mechanical strength, it allows for reliable fastening of all important structures, including the Mauerlat.
Dimensions and characteristics ↑
To ensure the strength and reliability of the structure, it is necessary to select the correct dimensions of the armored belt for the Mauerlat:
- the height of the armored belt under the Mauerlat is usually 20 cm (minimum 15), but in any case no more than the width of the wall; width – as close as possible to the width of the wall; length - to the corresponding walls; the minimum section is 250 by 250 mm.
In this case, it is necessary to achieve continuity of the structure. It must also be taken into account that it should have the same strength as possible. The concrete belt is made monolithic. The armored belt is poured under the Mauerlat at a time, and a reinforcing layer is inserted inside. Metal reinforcement is selected with a diameter of at least 10 mm, firmly fastened and tied together.
The size of the reinforced belt for expanded clay concrete blocks under the Mauerlat depends on the thickness of the blocks used. Let's do a little calculation for similar structures. According to SNiP, the reinforcing belt is made narrower than the load-bearing wall by about a third of its thickness. Therefore, if we assume that the wall has a thickness of 40 cm (one third of it is 133 mm), then the armored belt cannot be narrower than 300 mm (rounded value 267). Thus, with a wall of 400 mm, 300 will fall on the inside of the U-shaped block, which serves as formwork, and on the outside of the blocks there will be 80 and 20 mm.
If the wall is brick, then the outer formwork is built in half a brick, and the inner formwork is made of boards.
How to attach a Mauerlat to walls
Mauerlat is used as a base for any type of roof. It is the connecting element between the roof truss system and the walls of the building. Most often, this element is a solid strong beam or log, which is rigidly fixed to the supporting structure. You can read more about what a Mauerlat is and why it is needed in the corresponding article. The link will be below. Here we will look at attaching the Mauerlat to the wall.
The roof of a house is subject to various loads - wind, rain and snow. Therefore, it is extremely important to securely fix the roof to the main load-bearing walls, and also to evenly distribute all applied loads. Otherwise, the roof may be torn off by gusts of wind or become warped in some place over time. To avoid these problems, it is necessary to qualitatively, and most importantly, correctly attach the Mauerlat to the armored belt or wall.
Insulation
To keep the house warm, not only the armored belt, but also the Mauerlat are insulated, since otherwise, at low outside temperatures, cold air will enter through them into the building, and temperature stresses between the warm room and the cold part of the wall will become sources of their destruction.
The insulation of these structures is carried out during the installation process , the armored belt is insulated from the outside, and the Mauerlat from the inside. If such operations were not initially performed, they are done when the house is built and finishing work is completed.
Otherwise, condensation moisture will accumulate inside these structures, which will lead to rotting of the wood, destruction of the wall material and disruption of the integrity of the entire house.
Thermal protection work on the roof and walls of the house can significantly save on heating costs in the winter.
When is it required?
Insulation of the armored belt and Mauerlat is mandatory for all house structures, as part of a complex of heat protection works . It is preceded by waterproofing of protective surfaces. The durability of the structures will depend on this, otherwise the roof will have to be repaired in the first year of operation.
Waterproofing with 2 layers of roofing felt over the entire area of the mauerlat is carried out after treating the wooden surfaces with stain to prevent rotting of the logs and the formation of ice that will destroy them. This method of insulation from moisture has shown its best performance over a long period of operation.
How can you insulate it?
When choosing the material and design of the heat-protective “pie”, it is important that the protected surfaces “breathe”; as a rule, this is a material of the mineral wool group :
- mineral wool;
- glass wool;
- basalt wool.
On the building materials market today there are enough such insulation materials from both domestic and Western manufacturers:
- TechnoNikol;
- Rockwool;
- Isoroc;
- Knauf;
- Isover;
- Ursa and others.
Insulation materials made of polystyrene foam and polyurethane foam, despite the fact that they have fairly good heat-protective characteristics, are not considered fireproof, and in addition they can release substances hazardous to humans when burning, so they are not recommended for installation inside residential buildings. At the same time, mineral wool insulation has an NG class and is 100% fire-resistant.
Process
The insulation of the armored belt should be properly performed during the installation process; for this, space is left for the external installation of rigid insulation or non-removable U-blocks with installed insulation are used.
If such protection is carried out after completion of installation work, then several installation options are used :
- There is free space on the armored belt along the cut of the external wall. For this purpose, take rigid Penoplex insulation with a width that allows its installation in the space between the protective belt and the cut of the wall; it is better if its thickness is 50-80 mm, but so that the belt does not stand out, you will need to take into account the size of the cladding. When mineral wool is used as a heat insulator, it will be necessary to install a ventilation gap between the insulation and the cladding.
- When it is necessary to provide thermal protection for an armored belt, but there is no gap between it and the cladding, additional thermal protection is applied along the façade at the level of the belt in the form of a protruding contour.
In the case when two armored belts are installed in the house, the thermal protection is installed on two. External insulation is made with 80 mm polystyrene foam, the height of the insulation is calculated using the following formula; 150 mm + armored belt height + 150 mm. An ebb is placed in the upper part to protect the protruding structure with a slope from the wall.To fix it, a cut is made in the wall above the heat insulator, the top of the ebb is inserted into it, sealing is performed and secured in increments of 300 mm.
The Mauerlat is insulated from the inside. In areas of the support beam for the rafter system, it is necessary to lay thermal insulation even before installing the hydro-wind protection and roof. But if, after all, the hydro-windproof membrane has already been installed, then the workers will need to push the mats into the gap between the beams and the film, in which case there is a possibility of breaking the under-roof ventilation gap, which is very necessary for ventilating the roof space.
It follows that first it is necessary to lay thermal insulation in areas that will be difficult to reach after the installation of hydro-wind protection is completed, and only after that the membrane is covered.
As a rule, the Mauerlat has uneven surfaces on the base, so that they do not become “cold bridges”; they are filled with insulation, and not cement-sand mortar, and certainly not polyurethane foam.
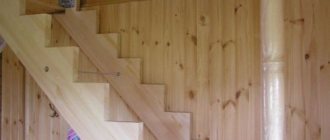
Mounting the Mauerlat
Coniferous wood is usually used to make this element. Most often, beams with a section of 150x150, 150x100, 80x180 are used. In addition, ordinary logs with a diameter of 18 cm can be used, but it must be cleared of its bark. In addition, in order for the mounting of the Mauerlat to the brick wall to be tight to the wall, one side must be filed and sharpened.
Fixation can be carried out in several ways, including fastening the Mauerlat to aerated concrete without an armored belt :
- Wooden or metal dowels;
- Steel corners. By the way, fastening rafters to the mauerlat is also often done in this way;
- Studs or pieces of reinforcement placed in the armored belt. Be sure to see how to make an armored belt with your own hands. Link after the article.
The methods of attaching the rafters to the Mauerlat and itself to the walls are selected based on the material of the walls and financial capabilities.
Mounting to a wooden wall
When the walls are made of rounded or laminated timber, the element is laid on the upper crown of the walls. Fastening is carried out in the same way as other wall elements. Also in wooden houses the upper crown can be used. In frame wooden houses, the top frame of the walls can be used.
Attaching to a brick wall
On such walls, the element is laid along the entire perimeter, placing it closer to the inside. From the outside it is protected by a small projection of the wall. The place for installation must be prepared at the stage of wall construction. In addition, you need to decide in advance on the method of fastening. This is especially true when you need to figure out how to attach the Mauerlat to aerated concrete.
Aerated concrete and other wall blocks
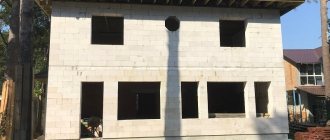
In recent years, a strange trend or fashion has been observed in the construction of private low-rise buildings - for all buildings made of lightweight, porous, cellular blocks, the design of an armored belt is included in the design solutions. If a private one-story house is built without an attic reinforced belt, then the developer is considered ignorant, and the forecasts for the house from all professional builders sound the same: “the house will definitely fall apart very soon.” What this opinion is based on is not entirely clear.
Let's try to consider the general stages of construction from a practical point of view.
Design and calculation of loads
The customer, a person completely far from construction, decided that it was best to build the house from aerated concrete blocks. In his thoughts, he assumes that the house will be quite durable, inexpensive, and construction will be quick and uncomplicated. He is absolutely right from the point of view of a naive, honest person.
Designers are required to calculate the expected loads on the load-bearing walls of the house and issue a ready-made solution. This means that the house must meet all the parameters of strength, stability, and reliability. Therefore, they include in the house design blocks made of aerated concrete of a grade of at least D 500 with a compressive strength class of B2.5. The grade means that the block can work as a structural (capable of withstanding design loads) material with thermal insulation properties. That is, the project “kills two birds with one stone”: the house must be warm and durable.
A strength class of 2.5 means that 1 square centimeter of the bearing surface of the block must withstand 25 kg of load.
Then, through simple calculations, we determine that a linear meter of a wall made of a 30 cm wide block must withstand a weight of 75,000 kg or 75 tons.
But designers must know that there is a concept of “design resistance of masonry,” and for B2.5 aerated concrete it is 10 kilograms per centimeter of area. It turns out that the strength of aerated concrete is 2.5 times higher than the strength of masonry, and a meter of wall will withstand “only” 30 tons.
Next, imagine that the attic floor is made of a monolithic slab supported on the wall by only 12 - 14 cm. This type of load is called eccentricity - deviation from the center of the support. As a result, the load is distributed unevenly, a bending moment appears, and the load-bearing capacity is reduced by approximately half.
The remainder: a meter of masonry must withstand a load of 15 tons. An excellent indicator.
The load on the blocks is the total weight of the floor, rafter system, roofing material, additional sheathing, and insulation. You can add a layer of snow and even a layer of ice if there is a constant strong wind. Let's add the weight and dynamics of the crowd of guests dancing in the attic (under three pianos). But even adding up all the listed imaginary and real loads, it turns out that they are very, very far from critical.
And yet, in most projects the armored belt is present. Assuming that the designers are professionals and do not benefit from adding useless elements to the design of the house, then it is worth understanding their goals.
Reinsurance and other factors
It is the expression “reinsurance” that defines the essence of the problem.
Aerated concrete block is essentially an excellent building material. As well as foam block, expanded clay block, wood concrete and others, the names of which pop up every now and then in advertising, and their list is very long. Aerated concrete products occupy a leading position in this list because their manufacturing technology cannot be used outside of continuous factory production. But counterfeit goods have grown so much in our country that in garages and dachas they have even learned to sculpt some kind of gas blocks.
There is no talk at all about other similar products with a simpler technological process. Because all the best, invented and developed for the strength and reliability of such products, is a thing of the past. There is no exaggeration: more than half of the block products do not correspond to the declared properties and characteristics.
Even from well-known brands, products produced on modern production lines do not fully comply with the standards and designated parameters. Here the reason is not counterfeit, but a simple overestimation of the quality characteristics of bad materials, which are impossible (or no one needs) to refute.
Competent designers and builders know about the state of the market. It was they who began to use the armored belt wherever it was needed and not needed. Just in case, otherwise they will be found guilty.
Not a modern alternative
In 90% of cases, the construction of a one-story residential building can easily be done without installing an armored belt. This is personal experience from many years devoted to the construction craft. A traditional Mauerlat made of well-dried wood is the best solution in every aspect, from quality and reliability to cost.
But there is one important point that needs to be done well when constructing a Mauerlat - this is attaching it to a wall made of light blocks.
In what cases is an armored belt needed and how to make it
This unit plays the role of an “intermediary” between the building frame and the upper structure, consisting of a rafter system and a roofing pie. Point loads from each rafter leg are transferred to the supporting structure and are evenly distributed along the upper plane of the walls. The nature of the loading consists of two vectors:
- Vertically directed, due to the mass of the rafter system and wind loads on the roof.
- Horizontal, transmitted by an inclined element - rafters. Ultimately, the pushing force can lead to deformation of the walls and their destruction.
Therefore, a reinforcing belt is a mandatory element if the building frame is made of foam concrete, expanded clay concrete, brick and similar materials. It should be noted that the installation of an armored belt does not eliminate the need to install a power plate, since these units perform fundamentally different functions:
- the armored belt strengthens the structure of the building box;
- The Mauerlat is the basis for the construction of the rafter system.
A reinforced belt along the top of the wall is necessary to strengthen the structure of the house
Strictly speaking, most modern building structures contain several armored belts. The first of them is located below, under the building frame, and has its own name - grillage. Its purpose is the same - distribution of loads on the foundation. The second and subsequent ones are higher, the last one is on the top of the wall under the Mauerlat.
It should be understood that the main reinforcing element is the grillage. The construction of subsequent belts of reinforced structure (due to the installation of more powerful reinforcement) without a lower reinforced belt is pointless and is a waste of money.
Interfloor armored belts give the building additional strength
Materials for reinforced belt
The reinforced concrete monolithic belt is formed directly on the construction site. For this use :
- concrete mixture;
- cement binder;
- reinforced rods are ribbed or smooth.
All these components are placed in a pre-fabricated formwork on the top of the wall.
The formwork is made in the form of a continuous closed structure along the perimeter of load-bearing walls, both external and internal. Reinforcement is carried out both with single rods and frames created using knitting wire.
The longitudinal rods must have D = 12 mm, length - at least 8 m, and their overlap must be at least 50 cm. The cross-section of the frame is rectangular. Longitudinal reinforcement should have D = 8 mm, and be installed at intervals of 200-400 mm.
At joints and along angular turns of walls, the mesh is additionally reinforced in order to increase rigidity in such areas. For this purpose, curved L-rods of 400 mm are used on each side. Recently, developers have widely and successfully used a new type of reinforcement - composite.
Concrete mixture for reinforced structures is prepared from cement binder and components :
- sand;
- crushed stone of various fractions;
- additional additives to increase frost resistance and reduce the thickening period.
Concrete is produced both in the factory and directly on the construction site.
For such a protective structure, it must have special strength, therefore, as a rule, grades M200/350 are used with the following proportions :
- 1 part cement M500;
- 2 parts sand;
- 3 parts crushed stone.
Water is added in a volume of 80% of the mass of cement.
The formwork can be removable or permanently insulated. Both modifications are subject to special strength requirements, since they must withstand a significant mass of liquid concrete with a reinforced frame.
In the first case, low-grade edged boards with a thickness of 20 to 50 mm and a width of at least 200 mm, particle boards and high-tech polymer boards are used. Also, to enhance the strength of these structures, it will be necessary to pour the use of various supports that hold the formwork in the design position until the concrete mortar finally thickens.
Quite often, developers make a protective reinforced belt from brickwork reinforced with reinforcement. It can hardly be called monolithic, but for small and low private buildings it quite copes with the role of reinforcing the walls under the Mauerlat. In this case, this design justifies itself with lower material costs and labor intensity.
The developer should know that modern requirements for energy efficiency of houses require thermal protection of the armored belt, since otherwise it will become a source of increased condensation formation and, as a consequence, the occurrence of sources of destruction of load-bearing walls.
Insulation is carried out from the outside of the armored belt along the cut of the external load-bearing wall, during its construction. The type of insulation is selected by the project, according to the general scheme of insulating the house; as a rule, vapor-proof materials from the mineral wool group are used for breathable foam concrete.
For the efficiency of construction of reinforced protective belts, reducing the cost of work and increasing installation time, the domestic industry has launched the production of special cellular U-blocks, acting as permanent insulated formwork, which have proven themselves excellent in practice and therefore today are especially popular among developers.
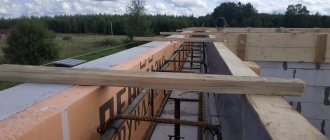
Dimensions and design of armored belt
Typically, the width of the reinforcing belt under the mauerlat should be close to the width of the wall masonry. The minimum size is 25x25 centimeters. When using aerated concrete blocks for masonry walls, the top row is made of special U-shaped blocks, designed specifically for creating an armored belt.
U-shaped blocks simplify pouring the armored belt, serving as formwork for it
On brick walls, the role of the outer wall of the formwork is played by half-brick masonry, and the inner wall is made of various materials, such as OSB, plywood, boards and other similar products.
If the construction of a house with an attic is planned, the rafter system, as a rule, uses racks, beams and other parts characteristic of such a structure. In this case, the load should be distributed onto the walls inside the house, and an armored belt should also be installed on them. In all other cases, such support is placed only along the outer perimeter of the walls.
Installation of armored belt
Installation of the armored belt under the Mauerlat begins with the installation of formwork under it. The latter can be used as an edged board or laminated moisture-resistant plywood. Shields are knocked down from edged boards to a height that will correspond to the height of the future armored belt. The bars that will be used to secure the boards must protrude beyond its edges by a size equal to the height of the shield. With the help of these bars, the shields are attached to the walls. Fastening is carried out both from the inside and from the outside. A trench should form into which concrete can be poured.
You should be careful that there is no gap between the shield and the wall, since the solution will definitely go into this gap. It is also too early to pour the ready-made solution, as it will destroy the formwork. It requires additional strengthening. It can be made with wooden spacers that are nailed to the upper end. You can also strengthen the formwork for the armored belt under the Mauerlat with studs. To make it easier to dismantle the formwork, the studs are placed in metal tubes, which should be slightly larger in diameter than the studs. After this, washers with a large diameter are put on the stud and clamped with nuts.
The next step is laying the reinforcing base. If the walls are made of a material that quickly absorbs moisture, then before pouring it on the wall it is better to lay waterproofing material in the form of roofing material or cover the surface with bitumen mastic. Next, concrete is poured. To fill all the voids, you will need a deep vibrator. It will bring all the air bubbles to the surface.
Filling the armored belt under the Mauerlat
The peculiarity of the work on filling the armored belt is that it is carried out at height. That is, the supply of concrete or its components to the work site is significantly difficult. And the filling of the armored belt must be done in one step. It should be understood that ordering a concrete pump in this case is inevitable.
Using a concrete pump guarantees filling of the belt in one step
How much concrete to order
Calculating the material requirements for this case is simple. For example, with an armored belt size of 25x30 centimeters and a perimeter length of 40 meters, you will need concrete: 0.25 x 0.3 x 40 = 3 cubic meters. We must agree that it is very difficult to prepare such a quantity of material and raise it to a height.
How to fill an armored belt
Filling must be done with concrete grade no lower than 200, which requires the following recipe:
- cement grade 400 - one part;
- washed sand - three parts;
- gravel - three parts;
- water - one part with control of the consistency of the solution.
To make concrete more fluid, plasticizers are introduced into its composition that do not affect the quality.
The concrete solution is fed into the formwork continuously and fills the formwork to the brim. During the process of pouring concrete, it must be constantly pierced with a rod, or better yet, treated with a submersible vibrator. Otherwise, voids may form in the mass, affecting the strength characteristics of the reinforced belt.
Vibrator processing guarantees the quality of concrete
To secure the Mauerlat during the pouring process, you need to install a fastener. The following options are possible:
- A wire with a diameter of 5–6 millimeters is tied to the reinforcing mesh so that its ends up to 40 centimeters long extend beyond the concrete level on both sides of the reinforced belt.
- It is also possible to release the fastening ends of the wire along the axis of the armored belt at a distance of 20–25 centimeters. In this case, the two ends are released through two holes, and the beam is attached to the concrete surface by twisting.
- In addition to these methods, anchor bolts or threaded rods are also used, with the help of which the Mauerlat is attached over the armored belt.
Installing the Mauerlat on studs to an armored belt or concrete
This method is one of the most reliable. When immersing the studs directly into the brickwork, the rods must be positioned in a strictly vertical position, with a protrusion of 30 mm above the mauerlat.
You can also use a method based on the use of support pillows. Its difference from laying on a monolithic reinforced belt is that the support pad has a length of only 40 cm, with a height of 22 cm. Before pouring concrete, the threaded areas on the studs are wrapped with tape to protect against dirt getting into the threads.
Before installation, holes are made in the Mauerlat using a special feather drill.
The power of the drill used should be sufficient to drill through thick timber without any snags. Before this, markings are applied, for which the timber is laid on the edge of the pins and hit with a heavy hammer. This simple procedure will allow you to get clear marks at the right points.
It is very important to ensure that the studs are positioned along the edges of the mauerlat. The center line is used to lay the base of the future roofing structure. It is also possible to move it outward or inward, which is influenced by the design features of a particular building.
In this case, it is important to maintain a distance of 50 mm between the Mauerlat and the outer surface of the wall. When laying waterproofing on a wall, it is most convenient to pin it on studs. Next, the main installation procedure begins.
When adjusting the structure, it is important to remember that cutting the Mauerlat is strictly prohibited. Only rafters are allowed to undergo such an operation. At the same time, constant monitoring of the reliability of their support on the base is carried out: they must rest, and not just touch.
Installation and fastening of the Mauerlat
This important operation is performed taking into account a number of circumstances:
- For the load-bearing element of the rafter system, a wooden beam with a cross-section of 100x150 or 150x150 millimeters is used.
- Only when metal products are used for it (in particular, a profile pipe), the Mauerlat is made from a channel or beam.
- If necessary, when the length of the base exceeds 6 meters, the timber can be spliced. To do this, cuts are made and the parts are tightened with a screw.
- Before laying the timber, the surface of the armored belt is covered with waterproofing; most often, roofing felt in one or two layers is used for this.
- Before installation, the wood must be treated with antiseptics and fire retardants.
- Anchor bolts are an L-shaped rod with M12 - M16 threads. Before concreting, the parts are attached to the reinforcing frame along the axis of the reinforced belt at a distance of no more than one meter. When pouring, while the concrete has not yet set, you need to go through and adjust all the bolts so that they stand strictly perpendicular to the surface of the reinforced belt.
A common method of fastening the support beam is with a pin or anchor bolt.
The Mauerlat is installed on galvanized threaded fasteners
Video: how to make an armored belt with your own hands
A structure with an armored belt will ensure the operation of a country house for at least 50 years with minimal repair costs. And most importantly, living in such a fortified house will be comfortable and safe.
What you will need
Required materials and tools:
- Beam with a section of 150x150 mm.
- Waterproofing. Roofing felt is mainly used for these purposes.
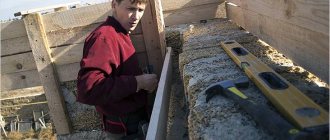
- Level. Designed to control the horizontal laying of structural elements.
- Drill.
- Adjustable wrench.
- Hammer, bolts, nails.
This list may undergo some changes, depending on the mounting method used. So, if the Mauerlat is tied with wire, for these purposes you will need rolled steel wire. The optimal diameter of this fastener is 5 mm.
If the fastening is carried out with wooden plugs, then some additional elements will be needed:
- Wood bars. Their dimensions should resemble as much as possible a standard brick.
- Steel staples. We are talking about products with a length of 250 mm.
Connections with building studs require the presence of:
- L-shaped metal pins for the Mauerlat with a diameter of 12-14 cm, equipped with threads. It is best if there is 50 mm on the threaded part.
- Metal washers.
- Concrete grade 250. It is necessary if the installation of concrete pads is required.
- Nut. They must fit the threads of the metal pins. Most often we are talking about M12 thread.
How to make a Mauerlat on aerated concrete with and without an armored belt, what nuances to pay attention to
People uninitiated in the nuances of capital roof construction are unlikely to know why a Mauerlat is needed, what kind of structure it is. And the question of how to make a Mauerlat on aerated concrete causes complete misunderstanding. In fact, it attaches simply. The main thing is to prepare all the components: reinforcement frame, fasteners, timber beams and competently carry out waterproofing and wood processing.
Mauerlat - description in detail
This structure is made of wood beams. Performs the function of additional support for the load from the roof, with further uniform distribution along the entire perimeter of the walls.
If we summarize all of the above, we come to the conclusion that the Mauerlat is responsible for two important tasks:
- uniform distribution of the weight of the rafters on the walls;
- fixing the rafters to the frame of the building;
The Mauerlat can be made not only from wooden beams, but also from metal channels or beams.
In this option, the rafter system also needs to be made of steel. But this option is used extremely rarely due to the high cost of the material and difficulties in installation.
Mauerlat cross-sectional dimensions SNIP
Recommended parameters in accordance with SNIP rules should be at least 100x100 mm for wooden beams. These are the indicators that are considered average, allowing you to reliably hold the roof on the walls. Builders recommend increasing the dimensions to 150x150 or 100x150 mm to increase the reliability of the structure.
There are several requirements for the section:
the wood must be treated with an antiseptic not only on the cut, but along the entire length; individual elements are secured using a direct lock; beams are laid over the entire area of the walls.
If you reduce the cross-section of timber or boards, the structure will not be reliable: the roof may not be resistant to adverse weather conditions.
Materials and calculations
The strength and reliability of the roof depends on how securely the Mauerlat is attached to the aerated concrete. Therefore, everything needs to be calculated correctly. The minimum cross-sectional dimensions of wood beams must be no less than 10×10 cm. Experienced craftsmen and designers recommend using higher values.
When using wooden logs for the mauerlat, one side should be hewn. This is necessary for a tight fit to the surface of the upper aerated concrete wall.
As for the type of wood, it is better to choose hardwood. Before installation, be sure to treat it with an antiseptic. Arrange the beams so that they evenly cover the entire upper part of the walls. Fasten adjacent parts with a straight lock and reinforce with nails.
The width of wooden beams is smaller than that of gas blocks, so they must be installed by moving them towards the inner edge, not reaching the end by 5 centimeters.
Ultimately, a solid structure with high levels of rigidity and reliable support for the rafter structure should be formed.
Preparing wooden beams before installation
As already mentioned, the beams should be treated with antiseptics before installing the Mauerlat on aerated concrete. They will prevent putrefactive processes in wood. Take logs with a section of 100 by 100 mm, but it is better to choose stronger ones 150 by 150 mm. Wrap them with waterproofing material, for example, bitumen-polymer. Ruberoid is not used for these purposes.
Only high-quality materials can create a durable structure; there should be no knots in the logs. Wood moisture content deserves special attention - it must meet standard values. If wet material is used (meaning beams), then the anchor nut must be adjusted.
The nut should be tightened once a year for 5 years. This is necessary because in the first few years the wood is subject to intense shrinkage. And as the material dries, the nut must be tightened all the time. After 5 years, this procedure will have to be done less and less often. The Mauerlat is secured with special anchors with a nut and washer. They must have an L- or T-shape with a thread size of M12 or M14.
According to European and international standards, the distance between two adjacent anchors should be no less and no more than 1-1.2 meters. This is especially true for earthquake-prone regions.
Method of fastening a structure with an armored belt
When choosing aerated concrete for building walls, you need to understand that the frame of a house made from it will not cope with the weight of the roof placed on it. The construction of a reinforced belt will help her cope with this problem.
Dimensions of the armored belt and its purpose
An armored belt is a reinforced concrete closed structure that envelops the building perimetrically (that is, around the entire building). Tasks put forward to him:
- protection against wall deformation;
- additional rigidity for aerated concrete buildings;
- adjusting the load on all wall surfaces evenly.
An armored belt is a kind of foundation intended for the roof of a building. Its dimensions are selected in accordance with the width of the walls and are approximately 25 cm. The outermost row should be laid out in blocks like the English letter U. They will subsequently perform the task of formwork when pouring concrete.
It is extremely important that the Armopoyas is produced in a continuous monolithic structure.
Installation of armored belt
The step-by-step technology for producing armored belts is as follows:
- First, formwork should be built around the perimeter of the house.
- Next, an armored belt is made from monolithic blocks.
- Then the frame is assembled from reinforcing bars.
- Studs are installed for fastening.
- Now everything needs to be filled with concrete mortar.
- When it hardens, the formwork must be removed.
After completing the construction of the armored belt and removing the formwork, it will be possible to begin installing the Mauerlat.
How to properly install and secure the Mauerlat
This element and the rafter system must consist of the same materials.
Before installing the Mauerlat on aerated concrete, you must remember to treat it with antiseptic substances. Then wrap it in a layer of waterproofing material such as: hydroisol, steklomastelastoizol.
The Mauerlat is fixed to the wall structure with studs, iron wire or anchors. If it is made of wood, then it can be secured with special metal brackets.
After this, it will be necessary to fasten the Mauerlat to the rafters. The connection is made by tapping, tapping or sawing down to no more than 25% of the thickness. It is fixed with bolts, self-tapping screws, special angles, and steel plates.
The construction of a reinforced concrete armored belt will be able to prevent unwanted punching in aerated concrete blocks. It will contribute to the uniform distribution of gravity on the house box and the influence of dynamic and static forces pressing on the walls.
Installation technology without armored belt
The SNiP requirements state that installing a Mauerlat on an aerated concrete house without a reinforced belt is in principle unacceptable. This is allowed to be done only in rare cases. This can be explained by the fact that an aerated concrete structure is not able to cope with the thrust snow load, dynamic and wind. The armored belt provides significant protection against deformation. As an exception, the Mauerlat is allowed to be mounted on a building without an armored belt.
This construction option will speed up and reduce the cost of the construction process. But in this case, you should adhere to the following requirements:
- for the base, a light but larger beam is selected, having a cross-section of at least 20 cm;
- it should be reinforced with steel elements: metal profile, nails or locks;
- The climate where construction is taking place is not harsh and there are snow or wind loads, but they are of insignificant force.
- The Mauerlat should be positioned in relation to the outer edge in the load-bearing walls at a distance of 0.5 - 1 cm. The Mauerlat is fixed with chemical anchors, steel wire or special pins.
It is very important before installing the Mauerlat on aerated concrete to accurately calculate the number of fasteners, as well as the distance between two adjacent fasteners.
You need to understand that the service life of the roof directly and largely depends on the strength and correct installation of the Mauerlat. And for this reason, errors, even seemingly insignificant ones, should not be allowed. This is the only way the roof will not cause deformation of the house, but will serve as reliable protection from external and weather factors. This work should be entrusted to experienced developers and roofers.
How to choose the method of mounting to the wall and the shape of the structure
For frame and panel houses, as well as buildings made of lightweight concrete or lightweight brick, the best option is a continuous Mauerlat along all walls. On massive structures, the base for the rafters is mounted flush with the interior of the wall.
Brickwork acts as an external fence. The procedure can be carried out with a piece of log or beam at least 50 cm long. Similar pieces are placed under each of the rafter legs.
Buildings with a small roof area are usually equipped with a structure like a rigid frame.
To splice beams, a direct lock is used, where nails and bolts act as fasteners. Next, the frame must be secured to the plugs using staples. Corks are made from wood pre-impregnated with antiseptics.
Installation of plugs is carried out by embedding into the masonry. The mauerlat frame and brickwork are laid with a layer of waterproofing. A regular two-layer roofing material is suitable for this.
For roofs with an area of more than 250 m2, it is recommended to choose a different fastening method.
Most often we are talking about pre-laying a concrete pad on top of the wall. As the concrete hardens, steel threaded rods are embedded into it: they must be installed strictly vertically. The length of these inserts should exceed the thickness of the Mauerlat by 30-40 mm.
The distance between the pins of the Mauerlat is approximately 2 m. The products are pre-equipped with holes into which the rods are threaded. To make the rods, you can use reinforcement of the required length: all that is required in this case is to weld them with bolts with cut off heads.
The ends of the reinforcement protruding above the beam can simply be bent.
You can also attach the Mauerlat to the armored belt with anchors. In each specific case, you are allowed to act in the way that is best for the strength of the fastening. To ensure reliable seating of the rods in concrete, they are equipped with welded plates at the bottom.
As a result, the rods will not move even during significant winds. Roofs with an area of up to 200 m2 do not particularly require fastening the Mauerlat to the concrete: reinforcement walled into the masonry in the top 3-4 rows will be sufficient. In this case, the pitch of the rods and rafters should not coincide.