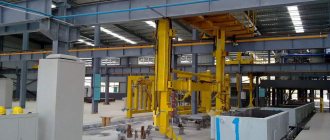
The properties of the building material, its convenience, excellent performance characteristics, against the background of its affordable cost, were appreciated and began to be actively used for private households.
Let's figure out how aerated block differs from other materials, what are the specifics and how the process of creating residential buildings from this building material goes.
Is it possible to build with aerated concrete blocks?
In the late 1980s - early 1990s, gas blocks first began to be used by builders in the USSR. The material gained popularity quickly, primarily due to its size, which made construction several times faster than with other elements. However, the lack of information about the specific properties of aerated concrete played a role; the elements were laid on incompatible cement mortar.
As a result, houses quickly became covered with cracks and required constant repairs. Aerated concrete blocks fell out of favor for a long time until information about it became available to the public.
It turned out that with proper handling and adherence to the technological process in production and construction, the material reveals all its advantages :
A light weight .
This advantage allows you to save on the height of the foundation; aerated concrete is much lighter than brick. It is also easier to transport and you can carry out the work yourself. Despite the large format of the block, it can be easily lifted by a person with average physical capabilities.- Fire safety . When heated strongly, aerated concrete blocks do not burn and do not emit toxic substances. They can withstand exposure to an open flame for 2 hours and do not change properties.
- Large format . Larger blocks are easier to stack into the wall, the work is completed faster, and less labor is required. A small amount of solution is required to connect the elements; no cold bridges are formed.
- Thermal insulation . Aerated concrete retains heat well; this indicator is 4 times higher than that of solid brick. Economically, building a house from an aerated block is profitable; significantly less money is spent on heating.
- Long service life . The material is not susceptible to the appearance of microorganisms, does not rot and cannot serve as food for rodents. With careful use, the structure will last more than 60 years.
There are disadvantages:
- Fragility . When there is a difference in height between elements, soil movement, shrinkage, cracks form. This is due to the difference in pressure. This is why it is so important to check the geometry of the masonry.
- Susceptibility to hacking . The gas block can be sawn, so it cannot be used for the walls of storage rooms with valuables.
- Hygroscopicity . The material perfectly absorbs moisture, it remains inside the elements. Some builders wet the blocks before laying them, and water is also collected from the atmosphere, from the solution. If the walls are not dried out enough time, with the arrival of frost, the water cells will freeze and grow in size inside the block. Then the pressure will change and the element will simply rupture from the inside, resulting in a crack.
High-quality waterproofing, the right choice of material and adhesive solution will help to cope with the shortcomings of aerated concrete blocks.
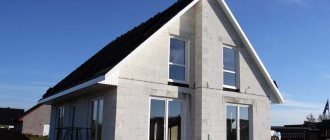
Aerated blocks are now actively used for private construction. Suitable for houses up to 5 floors high, outbuildings and sheds, garages, fences. Due to its thermal insulation properties, for baths, for example, it will be a better option than brick.
Which blocks are suitable?
For private construction, a structural and thermal insulating aerated concrete block is used . It must meet all the requirements for maintaining heat indoors, have sufficient strength and density. The optimal option is from 500 to 900 kg/m3 with a density, which in the marking is designated as D500-D900, respectively.
Experts recommend choosing aerated blocks that have been dried in an autoclave for the construction of private houses. After such drying, performance characteristics improve.
Important properties of gas blocks and their optimal values for houses:
- safety, environmentally friendly composition, without toxic impurities;
- large format, fits standard size up to 30 cm in height, up to 62.5 cm in length, up to 40 cm in thickness;
- low thermal conductivity, 0.12-0.19 W/m°C;
- vapor permeability 0.15-0.20 mg/mchPa;
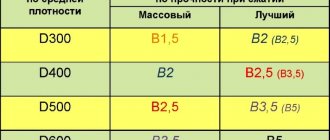
- good compressive strength 1-1.5 MPa: D400 is suitable for one-story buildings, D500 for two-story buildings (density greater than 2.5), for three floors and above from D600 (density grade B3.5), for partitions from D500 to D700 ;
- as the density of the material increases, its thermal insulation characteristics and ability to block sound decrease;
- choose trusted manufacturers, preferably domestic ones, whose products are more consistent with Russian weather conditions;
- for load-bearing structures it is allowed to use only smooth, neat blocks, without chips, of symmetrical shape;
- the surface color is uniform, without streaks or impurities, light gray;
- there is packaging, certification, product passports (not always provided, you need to ask).
Aerated concrete block is a wall material; only walls can be built from it. Not used for foundation.
Depending on the part of the wall, a solid block or a U-shaped one is used . The latter is suitable for placing a reinforced belt and other additional elements inside it.
What is an aerated block?
Aerated concrete block is a building material made from foamed concrete mortar.
This solution is based on lime, quartz sand and aluminum powder. As a result of a chemical reaction between the components, foaming of the mass occurs and pores are formed. The building material does not emit harmful substances into the atmosphere , so it is safe for humans.
The solution is poured into molds and dried. The finished stones are light in weight, but at the same time durable, have good thermal insulation properties, and therefore are widely used for civil construction.
Read more about what a gas block is here.
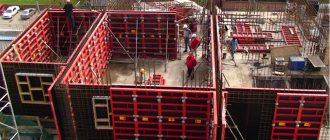
Rules for building walls
All rules and regulations for aerated concrete blocks are specified in the regulatory documents: GOST 31359-2007, 10884-94, 9561-91, SP 22.13330.2011.
Let's highlight the main nuances:
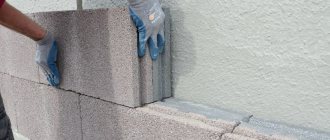
- For aerated concrete masonry, it is allowed to use only an adhesive solution. Cement-sand is used at the base of the wall; the first row is placed on it so that it is possible to change the height of the blocks.
- The first row needs to be given special attention; it will become a guide for the rest of the order.
- Construction begins from the corners, checking for height differences. If a discrepancy is detected, the issue can be resolved by grouting the blocks with a plane over the gas block.
- When connecting rows in the middle, there may be insufficient space for the whole element. You will need to cut a solid gas block, use a saw and a triangle for an even cut.
- A layer of waterproofing is laid between the first row and the base. Use rolled material, for example, roofing felt or membrane.
- It is necessary to wait at least 4 hours between laying rows so that the solution has time to harden.
- After completion of construction, it is recommended to wait until the masonry is completely dry. It lasts from 10 to 12 months. If you apply the finish all at once, cracks will appear.
- Every 3 rows the blocks are reinforced with a metal rod. A reinforced belt is installed in the last row.
- The placement of gas blocks takes place with bandaging, offset by no less than ¼ element relative to the previous row. Only in this case the pressure on the wall will be uniform.
- The connection of the load-bearing walls occurs through the block.
- The connection between the partition and the load-bearing wall is created with flexible connections.
- It is recommended to carry out work at outdoor temperatures from +5 to +35 degrees. If construction took place in winter, frost-resistant components are added to the solution so that moisture from it is not absorbed into the building material.
The thickness of the adhesive mortar joint is 1-3 mm, cement-sand joint – up to 10 mm.
Insulation
To insulate walls made of block aerated concrete, first prepare the facade: level its surface, clean it, and prime it . Then the profile for the insulation is installed. If it does not require a frame, then this stage is skipped.
Next, the insulation is installed: on the frame or with glue and fasteners. At the final stage, decorative finishing is performed: first a primer is used, then a reinforcing layer, again a primer and the final decorative layer.
You will learn more information about insulating walls made of aerated concrete from this article.
How is a project compiled?
Sections included in the project:
- Architectural . All parameters of the house and each of its elements (dimensions, height, thickness, etc.) are indicated here. The soil parameters, terrain features, and the location of plants in the area next to the building are noted. From this part you can understand what the house will be like, its location and general appearance.
- Constructive . Here are details about each individual element of the structure. For example, details about the type of foundation, roofing components, type and documentation for wall material, features of floors, etc. The amount of required material is indicated with a reserve for each element.
- Engineering . Here are details about the location of ventilation, sewerage, water supply, electrical and other communications. A water supply connection plan and any things that may be of interest to the customer may be indicated.
It is recommended to entrust the preparation of the project to professionals; this documentation will be useful for drawing up and submitting applications to government agencies and for the work of specialized specialists during independent construction.
Crack repair
Cracks in walls appear for several reasons: movement of the foundation or temperature changes during masonry. Another factor is the excess moisture of the mortar on which the laying is carried out.
Important ! Before sealing cracks in a block aerated concrete wall, it is recommended to thoroughly clean them, removing debris and dust from the cracks.
The crack is sprayed with water or covered with an aqueous solution , then primed with a mixture of PVA and water. Small cracks up to 0.4 mm are sealed with any solution. If the crack has a diameter of 10 mm, use a porous type adhesive composition. Large cracks up to 20 mm are sealed with glue or cement with the addition of crushed stone or gravel.
You can learn about repairing cracks in aerated block walls here.
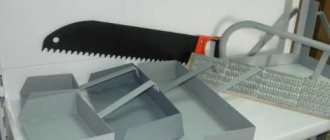
What materials and tools will be required?
Used for working with aerated concrete blocks:
special hacksaw;- trowel;
- double-sided hammer with rubberized top;
- building level, beacons, mooring line;
- plane;
- hand tool for creating grooves;
- hard brush;
- guide angle;
- template for applying the solution (to speed up the process).
Materials:
- gas blocks;
- adhesive and cement mortars;
- fittings;
- on the foundation (sand, clay, crushed stone, concrete, geotextiles);
- roll waterproofing;
- ceiling slabs;
- roofing materials;
- boards for formwork and rafters.
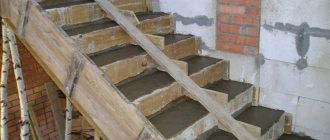
Correct installation of floors
Before installing floor slabs on a box of aerated concrete blocks, it is necessary to construct a reinforcing belt around the perimeter .
This is necessary to evenly distribute the load on the walls of the lower floor house. The reinforcing belt is made 150-200 mm thick above the load-bearing walls. The support area inside the wall should be 100-170 mm.
There must be joints between the floor slab and the walls: their thickness should be 170 mm. To avoid chipping, it is recommended to use reinforced mesh in load areas .
More extensive information on the installation of floors for walls made of aerated concrete blocks can be found in this article.
Step-by-step instructions with DIY construction technology
Let's look at the stages of work on building houses made of aerated concrete:
- Foundation. For a house made of aerated concrete blocks, a monolithic concrete base or a strip base is suitable. They are able to support the weight of the house. A hole is dug for it, the bottom is strengthened with sand, clay and crushed stone, and formwork is installed. The foundation is poured in stages so that all layers have time to harden. The foundation should rise 40-60 cm above the ground level so that the walls do not touch the ground.
- Basement and blind area. The basement part is built of concrete and can be finished with brick or other durable, moisture-proof material. If you plan to have an underground floor or basement, you will need to install insulation. The blind area is built approximately a year after the walls and roof are completely completed. During this period, the soil near the house will stop moving.
Waterproofing. Once the base has hardened, it is covered with rolled material for waterproofing the walls.- Walls.
Before starting work, markings are carried out. If there are differences in height, you will need to level the aerated blocks. The first elements are placed in the corners and the geometry of the masonry is checked. Then the row is connected. For the first horizontal row, a cement-sand mixture is used; it allows you to change the height. An adhesive solution is used vertically. - Between rows you need to wait 4-6 hours until the solution hardens. Continue the second row again from the corners, using an adhesive solution. The second and subsequent rows are performed in a running motion. The gas blocks are shifted by ¼, ⅓ or ½ parts relative to the previous row.
- Every 4th row the masonry is reinforced. 2 grooves are cut at a distance of 5-6 cm from the edge of the block, 2-3 cm deep. The reinforcement is placed inside and sealed with mortar.
- A reinforced belt is placed in the last row. Holes are formed for the beams.
- Lay the ceiling, then the second floor or pediment in the same way as the previous walls.
- Roof. Installation begins with the rafter system. Afterwards the roof is covered with the selected material.
- Warm circuit. This includes installing windows and doors. At this stage, you need to let the structure dry completely, for which you need to form a canopy and leave it for 2-3 seasons.
- Finishing of the facade and interior. Insulation, waterproofing, vapor barrier, and coating with finishing materials are carried out.
Features for a country house and cottage
A dacha is a summer home that is not used in the winter . Here, more attention is paid to protection against overheating and high-quality ventilation is organized. It makes no sense to insulate a country house from an aerated block; the structure is preserved for the winter and temperature changes will not be scary for it. The durability of such a house is reduced.
A cottage is a more solid structure, there are communications inside it, it requires high-quality thermal insulation, protection from moisture and mechanical damage. Such construction takes more time and financial expenses, but it will last longer and is ready for use at any time of the year.
Reinforcement of aerated concrete
It is impossible to build a house from aerated concrete with your own hands without reinforcement - it will not be reliable enough and may soon become covered with cracks or completely collapse. Experience shows that it is necessary to reinforce aerated concrete houses in any case, paying special attention to construction in earthquake-prone regions, on subsidence soils, and in places with hurricanes.
Reinforcement rules
In standard projects, provided there are no seismological factors, winds and other influences, reinforcement is performed in a certain way.
Where standard reinforcement of aerated concrete houses is needed:
- The first row, which rests on the base.
- Every 4th row, provided the wall length is more than 6 meters.
- At the junctions of the walls and at the corners.
- In the areas of support of rafters, lintels, beams, ceilings, balcony slabs, stairs.
- All columns and vertical pillars.
- The lower part of the window opening structure.
- All sites with increased load.
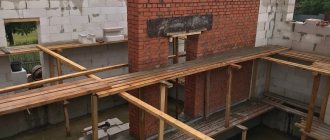
Armopoyas
The reinforcement frame is created along the top row in the areas where the slabs or floor beams rest. The belt connects load-bearing walls made of blocks and partitions into one structure, taking them away from the elements located above and distributing the load evenly.
The formwork is assembled in a continuous strip running along the entire perimeter of the building and the partitions inside. They use wooden panels, bricks or U-shaped profiles. Thin partition blocks can be mounted outside and the board inside.
The rods must be made of class A3 steel, with a cross-section of 12 millimeters, which are placed 2 at the top/bottom (in 2 rows). The diameter of the clamps is 8-10 millimeters, mounted in increments of 20-30 centimeters. The rods are joined with an overlap, and U/L-shaped products are used at the junctions of the walls and in the corners.
To protect the structure from freezing, polystyrene foam boards 3-5 centimeters thick are placed in the formwork along the outer wall, which must be taken into account when knitting the frame. Next, concrete M200/M300 is poured with pre-mounted anchors or studs securing the rafters and floors.
Masonry reinforcement
To prevent wall deformation and maintain their stability and rigidity, different types of reinforcement are used. The construction of cottages from aerated concrete provides several options.
Types of reinforcement to strengthen the structure:
- Horizontal reinforcement with metal rods - holes 25 millimeters deep are made in the blocks using a wall chaser, they are filled with glue, reinforcement with a cross-section of up to 8 millimeters is placed with an overlapping joint, bent at the corners, pressed in, and excess glue is removed.
- Using perforated strips - galvanized steel 1 millimeter thick, cut into strips 16 millimeters wide, attached to the blocks with self-tapping screws (no grooves needed). Reinforcement involves a two-layer laying of tapes.
- Masonry grids - steel, glass-basalt or fiberglass - are laid out over the masonry with a distance of 5 centimeters from the edges. Metal meshes are embedded in the solution, composite meshes are secured with glue.
Polymer meshes are considered more preferable, since they do not create cold bridges, do not corrode, provide high adhesion, and show high tensile strength.
Strengthening window openings of aerated concrete houses
It is necessary to strengthen the locations of window openings and this is not as difficult as it might seem. If reinforcement fails or is incorrect, cracks may appear.
Step-by-step instructions for strengthening the structure under the windows:
- Cutting grooves in masonry with a wall chaser that are 60 centimeters longer than the width of the window on both sides.
- Pouring glue into the furrow.
- Installation of class A3 reinforcement 8-10 millimeters, pressing it into the glue, removing excess mass.
- You can make lintels yourself from monolithic concrete or a metal corner. You can also buy ready-made ones. The cross-section of the structure depends on the width of the opening.
Where the jumpers rest, multidirectional stresses operate. To evenly distribute the weight of the wall, the beam must be laid in compliance with the minimum extension length beyond the masonry. It is better not to increase the width of the wall between the openings by more than 60 centimeters. To lay out a narrower structure, you can take brick or reinforce it with vertical reinforcement.
The lintel need not be installed where the width of the openings does not reach 120 centimeters, and above them the height of the masonry is at least two-thirds of the width. In this case, it is allowed to lay 2 rows of reinforcement, which must be inserted into the wall at least 50 centimeters.
Vertical reinforcement
When we build a house, the plan must be stage-by-stage, including all mandatory and optional items. Horizontal reinforcement is done in any case, but the vertical type of strengthening is relevant only in the following situations: the location of the house in an earthquake-prone region, if there is a strong wind load, when the site has complex terrain, in columns/pillars, when using aerated concrete with a density of less than 400 kg/m3, with wide openings and narrow partitions, at points of support of heavy structures and elements.
To perform vertical type reinforcement in the walls, grooves are drilled in the direction from bottom to top, O-shaped profiles are mounted, 1-4 steel rods with a diameter of at least 14 millimeters are inserted inside, then filled with M250/M300 concrete.
Possible difficulties and errors
What you need to know in advance:
- Only concrete foundations are suitable for such buildings. Others may not be able to bear the weight.
- Installation of the base and blind area is required. The walls should rise above the ground and not be accessible to direct moisture.
- The structure must be reinforced. If cracks do appear over time, they can be repaired.
- Waterproofing is mandatory. Insulation - at the request of the owners, it is recommended to carry out in the northern regions and the central zone.
- Aerated concrete blocks must be completely dry before finishing. Otherwise, the water will not be able to evaporate and will begin to destroy the walls from the inside. Therefore, it is necessary to observe a break between stages of work.
- When forming masonry walls, an adhesive solution for aerated blocks is used, not a tile solution, and especially not a cement-sand solution.
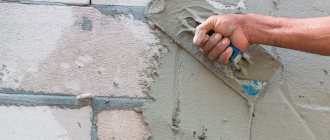
Waterproofing
To prevent the block material from deteriorating from moisture, it is additionally protected with a layer of waterproofing. To do this, they use a primer and plaster compositions, treat the aerated concrete with decorative tiles, stone, and cover it with bricks. First, the walls are cleaned of dirt and other foreign objects, then the protruding parts of the tongues are polished.
Next, a primer is applied to the wall. When it dries, apply a one-component putty and reinforcing material. Then a leveling layer is applied and at the final stage it is finished with finishing materials.
Read about waterproofing walls made of aerated concrete in our material.
Interior decoration
Decorating the inside of a house can be done with any materials that match the properties and characteristics of an aerated concrete block. Plaster mixtures and screeds must be selected from highly specialized raw materials, and finishing materials must meet all the requirements stipulated by GOST and SNiP.
First, you need to decide what you want to see in the end. Let's consider the possible options.
Search for design solutions and a brief description of the progress of work
For clarity, we will use the method of stage-by-stage planning of the design of individual parts of the premises.
Table 3. Alternative designs for interior decoration of the house:
| The ceiling in a house can be finished in several ways: by plastering and subsequently painting, or by installing plasterboard boards. In the second case, the choice of design options is extremely large. With the help of gypsum plasterboards it is possible to create complex multi-level ceilings with specialized lighting of any desired shape. Drywall is attached to a pre-assembled frame. Plastering will not be necessary, but insulation will be quite important. |
| First, before applying the finishing layer, the walls should be plastered and leveled at the same time. Priming and laying the reinforcing mesh is mandatory, since the adhesion of aerated concrete does not allow the materials to be reliably fastened together without additional impact. Next, the finished surface should be painted, covered with wallpaper or covered with textured plaster. Individual areas can be decorated with artificial stone or any other material. The emphasis can be placed on the corners, window openings of the room, as well as highlighting certain areas of the room. |
| One of the most common options is laying laminate, parquet and linoleum. Ceramic tiles and porcelain tiles are used more often than usual in bathrooms, kitchens and hallways. The device begins with the installation of wooden logs. Next, the floors are insulated and, as an option, covered with floorboards. |
| With the help of gypsum boards you can diversify the interior with arches. Since drywall is easy to process, you can create even the most incredible designs and shapes. |
Installing jumpers
Installing Lintel Formwork
Once things get moving, you will need to install the lintel over the door and window openings. To do everything right, you need:
- Place a board over the window.
- Lay blocks 15 cm thick outside.
- Inside there are blocks, 10 cm thick.
- In the center is a block 15 cm thick, sawn in half.
- Make a frame from Ø12 mm reinforcement.
- Install the finished structure between the blocks.
- All that remains is to fill it with concrete.
You can make doorways in the same way, although there are other options for constructing a lintel. It can be made from reinforced concrete, metal corners and filled with concrete, making formwork.
You can buy ready-made jumpers that are easy to install.
Pouring the foundation
This stage of work can be divided into several steps:
- Determining the required volume of concrete. To calculate how much mixture will be used for pouring, there is a formula: V=S×L, where: V is the required volume of concrete, L is the length of the foundation, S is the cross-sectional area. And to find out the area, just multiply the height of the tape by its width. For example, the length of the foundation strip is 44 m, height 1.3 m, and width 0.5 m. To determine the cross-section, multiply the height by the width: S = 1.3 × 0.5 = 0.65 m2. After which: V=44×0.65=28.6 m3. It turns out that to fill your foundation you will need 28.6 m3 of concrete solution.
- Now you need to decide whether to order concrete from a construction company or make it yourself. The easiest way is to order the solution - it will be quick, without extra effort, but the service costs more. If you want to save money, you can make the concrete yourself, which is a more labor-intensive process. It is better to have a concrete mixer, because mixing such a large volume by hand is unrealistic. To ensure high-quality concrete, strictly adhere to the proportions: 1: 1: 3 - cement, crushed stone, sand. Water must be added until the mixture reaches the required consistency.
- If you have never poured concrete, you should know that it is wrong to dump all the concrete into the trench. It is important to pour concrete in an even layer of 20–30 cm so that the concrete comes out monolithic. There is no need for haste in this matter, since the foundation is the foundation and support of the house, which allows it to stand for a long time.
- It is important to expel the air from the concrete by tamping each layer. To do this, use a vibrator. If this is not available, simply compact the concrete with a stick or reinforcement. Continue pouring until you reach the line level. To better compact the concrete, tap the formwork with a mallet from the outside.
- After finishing the pouring, the surface of the foundation must be leveled using a trowel.
The concrete needs to be covered.
The foundation is poured. The cement will dry in 3–5 days, but it will only be able to reach the desired “condition” and gain strength in a month. To prevent precipitation from falling on the surface and eroding the concrete, the entire surface should be covered with something, you can use plastic film. If you are building in the summer and it is hot outside, the composition needs to be moistened from time to time so that the concrete does not crack. After 10 days you can remove the formwork.
Waterproofing the foundation
Before you start building walls, you need to carry out waterproofing work. The base can be coated with bitumen and several layers of roofing material can be laid.
Armopoyas
Reinforced belt for aerated concrete
When the masonry of the walls comes to an end, the last row needs to be strengthened by organizing an armored belt. Thanks to it, the integrity of the structure can be ensured. To fill the armored belt, formwork must be formed from 10 cm thick blocks around the perimeter of all walls, laying them parallel to each other. You need to lay reinforcement into the resulting groove. Then prepare the concrete and pour everything around the perimeter.
To simplify the task of installing the Mauerlat for the roof, threaded metal studs can be inserted into the armored belt. They can be welded to the fittings. It is important to adhere to the exact dimensions so that they rise at the same level. Having done this, it will be much easier to install the Mauerlat.