- By density
- Where on the site to build a utility block at the dacha from gas blocks or foam blocks?
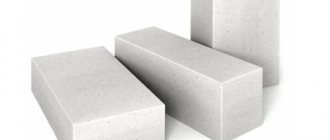
A utility block or barn is an auxiliary building on the site for storing gardening, cleaning, sports equipment, tools, car wheels and accessories. The structure may have only load-bearing walls or several internal partitions dividing the room into blocks. For the construction of a shed, it is optimal to use gas or foam concrete blocks. A utility block made of aerated concrete, unlike wood or metal, does not freeze in winter and is suitable for year-round use. In addition, a do-it-yourself aerated concrete shed, if you have special skills and knowledge, can be built at minimal cost in literally a short time.
Pros and cons of foam blocks and gas blocks
Having decided to make a utility block at your dacha from gas blocks or foam blocks, you need to comprehensively evaluate the pros and cons of the materials. The properties of foam concrete and aerated concrete are similar. Both types of blocks belong to lightweight concrete, have a regular geometric shape, high thermal conductivity, and are non-flammable. Let's consider the technical characteristics of materials that are important in the construction of a commercial building:
| Estimated parameter | Aerated concrete blocks | Foam concrete blocks |
| Thermal conductivity | 0.10…0.14 | 0.09…0.38 |
| Density, kg/m³ | 400…800 | 400…1200 |
| Water absorption,% of weight | 25 | 10…16 |
| Strength | B25 | B25 |
| Vapor permeability | 0.25 | 0.15 |
| Frost resistance, cycles | at least 25 | at least 10 |
| Soundproofing | excellent | good |
| Wall thickness for the Moscow region. , cm | 20…40 | 40…60 |
| Masonry on material | only glue | glue or DSP |
| Thickness of joints in masonry, mm | 3…5 | 7…10 |
| Service life, years | from 50 | up to 50 years |
As can be seen from the table, the main difference between aerated concrete and foam concrete is frost resistance, the thickness of the masonry joint, the thickness of the walls, and therefore the consumption of blocks, and water absorption. To the question whether it is possible to make a shed from a block of aerated concrete, the answer is: of course - yes. When choosing a material, you need to take into account such parameters as the availability of appropriate materials in your region and the type of foundation for the shed.
The recommendations of civil engineers will be as follows:
- For the construction of load-bearing walls and partitions, it is better to use aerated concrete blocks. They have higher heat-retaining properties and service life, and lower consumption due to thinner walls.
- There are practically no restrictions on the use of aerated concrete blocks on the foundation of a barn. The only aspect is the choice of the optimal and reliable foundation for a specific type of soil, the presence of groundwater, and differences in elevation.
- It is better to make a foundation for an aerated concrete shed from monolithic reinforced concrete - strip, slab or pile-grillage. These are the best options that are suitable for almost any soil.
Finishing and landscaping of the barn after completion of the construction process
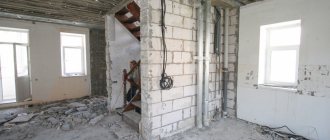
When the most difficult part of building the barn is already behind you, you can begin finishing and insulating the walls, as well as the general improvement of the barn. First of all, it is advisable to place a table inside the room; it will be useful not only in the future, when the barn is completely ready, but will also become your assistant and a useful addition in the process of interior decoration.
All utility structures and shelving inside the barn can be built from any available materials suitable for these purposes. The walls in sheds are usually not insulated, since this is a non-residential space and there is no special need to retain heat inside it.
Classification of foam blocks
By density
- thermal insulation D300…D500;
- structural and thermal insulation D500…D900;
- structural - D1000...D1200.
Expert opinion Vitaly Kudryashov builder, aspiring author
Ask a Question
For load-bearing walls of a one-story barn, grades D500 and higher are used.
According to manufacturing technology
- cut or sawn - cutting a monolith from cellular concrete;
- molding or pouring - poured into molds of a certain size.
The manufacturing method does not affect the technical characteristics of foam blocks, but, as a rule, the molding block has more precise geometric dimensions. The geometry of the sawn foam block depends on the cutting accuracy.
Conclusion
Almost finished building
There is absolutely nothing complicated in the construction of a non-residential structure, as we have seen. The recommendations are simple, the advice is rational, and all the work will take at most a few days (also find out how to build a garage from cinder blocks yourself).
If you are interested in this and are ready to get started, then in the video presented in this article you will find additional information on this topic.
We build a barn from aerated concrete with our own hands: step-by-step instructions
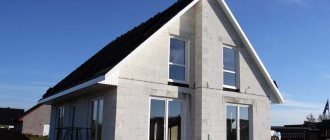
A one-story shed made of aerated concrete with a pitched roof can have any area, which is limited only by the size of the plot and the needs of the owner. When building a shed from aerated concrete, you should start by choosing its location.
Where on the site to build a utility block at the dacha from gas blocks or foam blocks?
When deciding where to build a shed from aerated concrete, the future owner must take into account the requirements for site development that apply in the territory of a cottage village or SNT. You can find out these requirements on the partnership website or from the chairman. If such standards do not exist, or it was not possible to find them, you need to be guided by SNiP. By the way, local standards should also not contradict the specified SNiP.
In accordance with the standard, a shed made of aerated concrete or any other material must be located at a distance of at least 15 m from a residential building. Regardless of whether you are building a small or large utility block from aerated concrete, the distance from the fence should be at least 4 m for farm buildings and 1 m for others. If there is no fence, you need to measure from the cadastral boundaries of the plot +0.3...0.5 m for the future fence.
It is recommended to choose a place where to build a utility block from aerated concrete taking into account its purpose:
- it is better to place the garage shed near the border of the site adjacent to the road;
- outbuildings associated with communications - as close as possible to the house;
- utility block with gardening equipment - near plantings, etc.
Calculation of the barn structure:
What a shed made of aerated concrete with a pitched roof will look like in terms of area and layout depends on its purpose:
- Small wood shed made of aerated concrete:
- Two-section utility block made of aerated concrete:
- Large three-section aerated concrete shed:
The choice of layout is not limited in any way, just remember that if you decide to build a utility block from aerated concrete with your own hands, then it should be as simple as possible.
Selecting wall thickness
It is better to lay out an unheated utility block made of aerated concrete in the Moscow region from aerated block of the D400 brand, 1 block thick, from 250 to 300 mm thick, depending on the project.
Expert opinion Vitaly Kudryashov builder, aspiring author
Ask a Question
The most popular thickness is 250mm which will suit most shed projects. Aerated concrete walls of this thickness have sufficient load-bearing capacity.
What materials and tools are needed
A shed made of aerated concrete with a pitched roof can be built with a set of standard construction tools:
- construction mixer or mixer attachment with a hammer drill;
- rubber mallet;
- wall chaser
- building level with bubble;
- roulette;
- hacksaw for blocks;
- metal corner for laying corners;
- cord for marking;
- container for preparing masonry glue;
- notched spatulas for applying glue to blocks.
The amount of materials needed to build a utility block from aerated concrete with your own hands is calculated based on the project.
Masonry adhesive or mortar. Aerated concrete blocks on the foundation of the shed through laid waterproofing with cement-sand mortar (CSM) or glue. Starting from the second row, gas blocks are laid with special glue. The foam block is placed mainly on the DSP. The consumption of both materials depends on the thickness of the seam. When laying with glue, the thickness of the seam is 1-3 mm. A utility block made of aerated concrete, even in the Moscow region (temperate climate), turns out to be warm, without cold bridges. Glue consumption depends on its brand and averages 1.5...2.9 kg per 1 sq. meter of masonry with a seam thickness of 1-5 mm. Consumption of DSP for a seam thickness of 10 mm is 5-7 kg.
It is also necessary to correctly calculate the materials for installing a pitched roof: timber for the mauerlat, studs for fastening, boards for rafters, bars for sheathing, waterproofing and roofing. Either the surface of a monolithic slab or paving stone material, which is placed directly inside the utility block, is left as the floor.
Foundation for a shed made of aerated concrete
When building a utility block from aerated concrete with your own hands, it is recommended not to skimp on the foundation, because This building is capital and its construction requires a reliable foundation! It is not recommended to consider foundations made of FBS blocks or pile-screw foundations. The choice should be determined only among different types of monolithic foundations - pile-grillage, slab or strip.
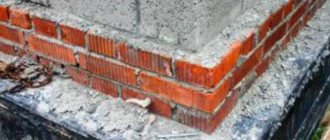
How to make a brick foundation for a shed made of aerated concrete
We do not recommend using this type of foundation in practice! It currently exists only in Internet theory, and such technology exists only because they used to build it from everything that was nearby. You can't get good concrete during the day with fire. And even aerated concrete blocks were laid on the brick foundation. We provide the following information solely for historical reference - how it was built before.
Under an aerated concrete shed, the foundation is laid out of ordinary solid red brick. Since brick is much heavier than aerated concrete blocks, and the structure will be one-story, the width of the base is taken to be equal to the width of the load-bearing walls. Aerated concrete blocks are placed on the foundation of a brick shed in the following sequence:
- Brick base laid on underlying bedding and waterproofing.
- A layer of rolled waterproofing: waterproofing, isolan or ordinary roofing felt.
- A layer of lean concrete - footing or thick CFRP.
- The first row of aerated concrete blocks.
- Cement-based adhesive composition.
- The second row of gas blocks, then again a layer of glue, etc.
How to make a concrete foundation for an aerated concrete shed
The reinforced concrete foundation for an aerated concrete shed can be of two types: prefabricated or monolithic. The prefabricated one is assembled from FBS blocks produced at the plant. For a one-story light structure, such as a barn made of aerated concrete with a pitched roof, FBS 9-3-3 blocks are suitable. The weight of one FBS block is 180 kg. At present, when it is possible to inexpensively make a monolithic foundation, it is recommended not to consider a foundation made of FBS blocks due to its unstable characteristics.
The monolithic base is poured in the following order:
- Installation of a compacted crushed stone-sand base and waterproofing under the foundation for an aerated concrete shed.
- Installation of removable formwork.
- Knitting and laying a reinforcing frame on 3-4 threads in the formwork. Spatial reinforcement frame.
- Order and delivery of ready-mixed concrete.
- Laying concrete mixture with compaction using an internal vibrator.
A monolithic foundation for a shed made of aerated concrete gains strength in 28 days. You can start laying aerated concrete blocks on the foundation within 2-3 days, depending on the air temperature.
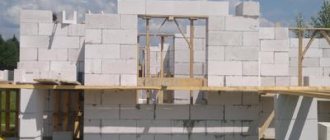
Laying the walls of a barn from aerated blocks
Laying load-bearing walls and internal partitions of a utility block from aerated concrete with your own hands is done in the same way as laying a block when building a house from an aerated concrete block. The blocks are laid out in rows from one corner to another along the markings - a stretched cord. The evenness of the masonry is controlled by a bubble level. If necessary, move the gas block using a mallet. A mauerlat - a wooden beam with a section of 30x30 or 20x20 mm - is placed on the upper crown of the aerated concrete utility block. The Mauerlat is attached with pins 30-40 cm long. Now that the Mauerlat is ready, you can rest the roof on it.
Roof for a shed made of aerated concrete
A shed made of aerated concrete with a pitched roof, as a rule, has a simple design: single-, double- or hipped roofs.
All structural elements of the roof rest on the Mauerlat, under which bitumen waterproofing must be laid. Do you need sheathing for an aerated concrete shed with a pitched roof? Of course - it is necessary! It doesn’t matter what size the roof is - large for a house or small for a barn, the roof design is no different and must be carried out according to the project. If you treat the issue of building a barn roof negligently, then get ready for the fact that in a couple of years it will begin to rot, which will lead to major repairs. It's better to do everything right right away.
As a roofing covering for a shed made of aerated blocks, it is better to use the same roofing material as on the roof of the main residential building. The roof of a barn can be not only pitched, but also flat.
Installing a floor in a barn made of aerated concrete
The floor in a barn can be made inexpensively from aerated blocks in the following ways:
- If a monolithic slab was used as the foundation, then it is simply sanded, primed and painted. Or, porcelain stoneware is laid on top of it. Or the slab remains as is - without finishing.
- If a strip foundation or a pile-grillage foundation is used as a foundation, then paving stones are placed on the floor of the barn directly from the path and laid inside the utility block.
- The floor is laid on the ground, on top of which any type of wear-resistant floor covering is laid.
Aerated concrete utility block: how to protect walls from freezing
When choosing how to protect a utility block made of aerated concrete from freezing in the winter, you need to determine the basic requirements for insulation:
- low price - it is not advisable to use expensive thermal insulation for a shed;
- resistance to rodents - mice are often found in outbuildings;
- high vapor permeability - the walls of a utility block made of aerated concrete must breathe.
One insulation material meets these criteria - mineral wool. Thus, to the question of how to protect a utility block made of aerated concrete from freezing, the answer is unequivocal - mineral wool. For a utility block made of aerated concrete in the Moscow region, a thickness of 50 mm is sufficient. Mineral wool is attached to the walls using glue and fasteners. A plaster reinforcing mesh is installed on top. Finishing: façade plaster.
Material requirements
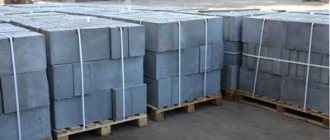
To build a shed, you need to choose materials manufactured at the factory. Since the production process is simple, they are often stamped in artisanal conditions.
You should not use such material, as it will allow moisture to pass through, will not be able to retain heat inside, and will quickly crack. As a result, the building will collapse in 2-3 years.
Factory foam blocks are always packed in plastic film, designed to protect them from moisture. It must be marked with information about the characteristics of the building material.
It is recommended to build the barn from D600 foam blocks. They have optimal strength class B2.5, which corresponds to the M-35 concrete grade.
The building will not freeze or collapse in the cold season, thanks to the following properties:
- The thermal conductivity of the blocks is low (the coefficient is 0.13-0.14).
- Frost resistance is moderate (coefficient F15-F35).
The blocks are not very heavy, so you can cope with the task on your own, or hire a small team.
Development of a drawing of a lean-to shed
It is much easier to build according to a detailed drawing, which contains all the necessary information. You can take ready-made graphic material from the Internet or develop it yourself, taking into account your requirements. If you have experience in using special programs - SketchUp, AutoCAD, nanoCAD and others - then creating and drawing a project is much faster.
The drawing for building a shed must contain:
- plan with axes;
- facades;
- cuts;
- detailed frame with rafter system;
- dimensions;
- layout of cladding sheets and roofing material;
- node solutions;
- specification of materials.
It is advisable that the diagrams be drawn to scale and show all proportions. When developing a project, you need to take into account the standard sizes of lumber, blocks, sheets, etc. This will help you use them optimally, without waste. It is also better to make standard door and window openings, since finished products are much cheaper than custom-made ones.
Price for construction work
The cost of building a shed from foam blocks in different cities of Russia:
- In Moscow and the Moscow region, the cost of building a turnkey shed starts from 180,000 rubles.
- In Yekaterinburg, prices start from 155,000.
- In Kazan, such a service can be provided for 190,000 rubles.
Prices are negotiated individually and depend on the volume and complexity of the work to be done.
What's inside?
Pleasant appearance, of course, wonderful
But no less important is what the shed looks like from the inside! After all, we see it more than once a day, so it is very desirable that it be as good inside as it is outside. A window, even a small one, will create the feeling of a living room, and not a warehouse for shovels and rakes. Can you imagine how pleasant it will be to sit by the window, writing down the date of planting seedlings or calculating the deadline for the next feeding of tomatoes?
A garden shed with a window will be more comfortable
For the arrangement, improvised materials will do: several boards and drawers will provide us with a work desk.
Desk made of boards and drawers
You can continue to sort through successful design options for garden sheds ad infinitum) Perhaps it’s time to return to reality.
Svetlana, Krasnodar region, 7dach.ru
Why foam block
Of course, there is a huge temptation to simply ignore this point, because we just have a barn, and in fact we should not be interested in what we will build it from. However, this is a room in which you can arrange a warehouse for certain food products, tools, and equipment.
That is, we can still make certain demands on the internal atmosphere.
So, building a shed from foam blocks allows us to talk about the following features of the material:
- Thermal insulation , how important it is for a shed, depends on its purpose.
- Easy to use . We will consider this point especially carefully below.
- Relatively low cost.
Where to begin
Of course, we are not talking about any project here, but we still need to do some sketches and calculations.
Our building will not stand on the ground; we need a simple foundation - pour it, calculate the amount of material. Decide on the construction site.
It’s quite easy to calculate the material, for this:
- Selecting foam block parameters. Let the standard size be 200x300x600 mm.
- We calculate the perimeter of the barn. For us it is 4x3, that is, 14 meters.
- The wall area will be, at a height of 2.5 meters, 35 square meters.
- The standard amount of material per square is approximately 5.6 blocks, which means we need 196 blocks.
- Next, we subtract the area of the door and window, if there is one, and we get a completely accurate version of the number of foam block products.
Important! This instruction allows us to make calculations without jointing, which, however, will be minimal if we use special glue.
Next, we will calculate the amount of glue based on the fact that given our dimensions we will need approximately 5 kg of glue per 1 square meter, and that is 175 kg or 8.75, rounded to 9, bags.
From the point of view of masonry, we are almost ready, but we will still need reinforcement for laying into the walls and a set of simple tools:
- Roulette and corner.
- A pair of trowels and a hammer.
- Twine for guides and a weight for a vertical plumb line.
- Wood saw.
Foundation
There is absolutely no point in making a powerful foundation - we’ll just fill in a simple strip foundation (see also the article Foundation foam blocks 300 by 600 by 600).
- We dig trenches 30 cm wide and 30-40 cm deep.
- According to technology, we pour sand to the bottom and tamp it tightly.
- We install reinforcement, it can be metal with a cross-section of 8 mm.
- We install the formwork, 15-20 centimeters above the ground level, the shed made of foam blocks with your own hands should rise slightly above the soil, since foam concrete easily absorbs moisture.
We also mix concrete in standard proportions, one portion of cement to four portions of sand and gravel. In total, we will get 1.8 cubic meters of concrete, and we can pour this ourselves. That is, there is no question of a mixer.
A small volume will allow us to fill everything in one go, therefore, this will only add strength to the entire base.
In a few days we will remove the formwork and carry out waterproofing. This is a mandatory condition; foam blocks should not constantly gain moisture from the foundation. For waterproofing, we use a simple mastic, with which we prime the base in several layers and cover the top with roofing felt.
Important! In principle, laying can be done within 3-5 days. The concrete has already fully bonded by this point, and the additional load that will be exerted by the masonry of the walls, on the contrary, will only strengthen the foundation.
Masonry
So, before building a shed from foam blocks, we completely calculated everything, prepared the material and now we are starting to build the walls (
Advantages of a utility block with a pitched roof
A roof with one slope contains a minimum number of structural elements in comparison with gable or hip roofs. The system consists of a support beam - Mauerlat, rafters and sheathing. When using waterproofing materials, a counter-lattice is also installed to create a ventilation gap.
The slope is formed due to the fact that 2 opposite walls are different in height. It ensures the drainage of precipitation and snow removal.
Pros of a lean-to shed:
- simplicity;
- reliability;
- efficiency.
If the width of the building does not exceed 4.5 m, no additional crossbars, struts or other reinforcing elements are required. With a larger span, the rafter system is made in the form of triangular trusses, which is quite difficult to manufacture independently and is rare in dacha construction.
Rules for choosing a place
The choice of location for a utility facility is regulated by a document such as SNiP 30-02-97. In this case, you should definitely take into account its purpose and the placement of neighboring buildings.
In order to save space, combine all the utility rooms under one roof, forming something like a multifunctional block. Externally, it will look like an ordinary house, differing from a residential one in the degree of insulation and size.
A utility block with a toilet and shower, and even without these amenities, will never be out of place in your country house.
Therefore, take its construction as seriously as possible, because it is desirable that it serves faithfully for many years and is not just a functional object, but a decoration of the site.