Porches of country houses are built from different materials. This is usually wood, metal, concrete, stone or brick. The last three options are characterized by the greatest reliability and durability. However, such structures are somewhat more complex in construction than wooden and metal ones.
There are certain technologies for constructing such structures, which must be observed. Next, we will consider in detail how to build a porch with your own hands from bricks or blocks.
Construction of stairs
“Reading and counting” took six months; construction began in April 2017.
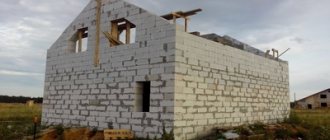
The construction site was cleared and markings were made on the wall.
Cut roofing felt was used as waterproofing - laid overlapping, glued with mastic along the perimeter and seam. We marked out the supports and laid out the first row on ordinary mortar, the rest on masonry mixture.
The height of the span from the slab to the step is a little more than two meters. By the end of the second day of work, “the blocks became incredibly heavy,” but things were moving forward.
And the third day.
As a result, according to the pros, the result was “a rattle on the corners with the hum of a drum” with the goal of “satisfying curiosity by spending money” and reworking in the future. Roman is satisfied with the design.
Roman_Buryakov
I respect the opinion and experience of the craftsmen and do not try to promote or praise my result, and the quality of the aerated block is questionable. But yes, I indulge my curiosity.
- Initially, the idea was not mine, the idea of a gas silicate brand, I replayed it.
- Now the stairs are already standing. Only 6,000 rubles were spent (the unit was free).
- We needed access to the second floor to install windows and create a ceiling. The goal has been achieved.
The staircase was made in three days of work without experience in block and concrete, quickly and cheaply. As money comes in, I still have to fill the floors on the second floor and plaster them. That is, about three years of work. If the staircase shows poor performance, dismantle it and fill it with another one. By that time, the thickness of the floor on the floors will already be known exactly. I didn’t discover anything new with my staircase, I showed that anyone can do this, quickly and inexpensively, and possibly as a temporary structure. As for the first sensations, I screwed sheets of plywood, 15 mm thick, onto the steps, there was no hum or ringing, although I constantly run between floors with the tool.
It is interesting that the staircase also passed the “combat test” with honor - when pouring the screed on the second floor, with an area of 80 m³ (35 mm thick), “they dragged the mixture, sand and the rest with a wheelbarrow.” Such a harsh operating mode did not affect its condition in any way, no play, no cracks. They did not appear even after the winter, during which the house was mothballed.
If the condition of the staircase does not deteriorate even after finishing, the steps will be leveled (self-leveling floor) and lined with wood. At the moment, the design has worked flawlessly for three seasons and will most likely continue to do so in the future. And Roman’s experience was useful to another of our craftsmen.
kirkinromanFORUMHOUSE Member
Welcome to the club. Thanks to Roman Buryakov for the project, photos and comments! If anything, I’m Roman too. My goals were the same as his: to do it inexpensively, to gain experience. There is also a desire to cut off the floors so that only the first floor can be heated. The gas block is ideal for this.
Kirkinroman worked alone, also, without any experience, he completed it in a week. Perhaps it would have been faster, but the block left over from the previous owners turned out to be of different sizes - there was a lot of cutting and adjustment involved.
Expenses:
- A block is free, about two pallets.
- Glue - three bags and a bottle (glue-foam).
- Metal corner - 12 thousand rubles.
Kirkinroman
I like the result myself. It's not finished yet, a couple of days of work on sanding, fitting, and fastening the plywood. But it’s quiet, there is a feeling of reliability. Nothing is loose, nothing moves - monolithically.
Perhaps over time, aerated concrete stairs will become more widespread, but it is a fact that people who have set certain goals for themselves have already achieved them.
You can monitor the further state of the structures in the author's topic. For lovers of original designs - a “double frame” staircase. If there is very little space, a goose step ladder will help out. The video shows a convenient DIY staircase.
Advantages of concrete stairs
With your own hands - How to do it yourself How to make a two-flight staircase to the second floor with your own hands photo drawings Do-it-yourself two-flight staircase to the second floor
The main advantages of concrete steps include their noiselessness. They do not create a hum when walking, like iron ones, and never creak like wooden steps. A concrete staircase will not rust like an iron one or rot like a wooden one. Concrete steps should also not be afraid of fire and the grinding beetles that pester wooden structures. If desired, they can be refined by beautifully lining them with various materials. Concrete steps are also distinguished by their enviable strength and durability. But even if they require repairs, in the vast majority of cases it can easily be done with your own hands.
Summary
As you can see, building a porch is a rather labor-intensive task. But using it will only bring pleasure. If desired, a porch with a canopy can be made larger and a small veranda can be organized on it, where it will be convenient to spend time with friends or family. On the porch you can place a barbecue and organize a small corner for gatherings. If you have a good canopy, bad weather will not pose any difficulties. Additionally, you can make the side walls from polycarbonate, which will provide good protection from the wind.
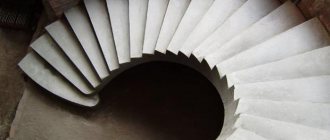
PHOTO GALLERYConstruction of a rounded curved staircase in a house made of aerated concrete.
| The first row of the front wall is also placed on a standard layer of mortar. When the profile is sawn off, a thin layer of mortar is applied to the joint. Level the blocks using a rubber hammer and spirit level, then continue laying the wall. |
| When marking a flight of stairs, you need to work carefully. Think also about the future floor covering! If supports are provided in the wall, you now need to cut them out. The beams, which are connected to the wall with dowels, form the base of the round formwork. |
| Now to the point: the planks are quickly nailed to the base. A cubic meter of concrete weighs approximately 2500 kg, so the reinforcement of the formwork must be reliable and powerful. The reinforcement is laid on the film. Reinforcement is also introduced into the side supports. |
DIY staircase to the attic
The house, built by Senin, consists of: basement, first floor and attic. The entrance to the first floor turned out to be high - 170 cm and the flight of stairs was the same width. So it's time to build the stairs. Suggested options for staircases Now we had to decide what to make the staircase from to enter the house. He immediately rejected the wooden staircase due to its fragility. For several reasons, we had to abandon the finished reinforced concrete staircase:
Firstly, the high price. Secondly, due to the trees growing nearby, it is impossible to install it with a crane. Well, thirdly, for the lower end of the staircase it is necessary to make a foundation, and rest the upper end on the house. In this case, the staircase may shift due to the disconnection of these foundations from each other. Staircase made of foam blocks Having weighed all the pros and cons, Senin began building a staircase from the remains of foam blocks 20x30x60cm. On Senin's instructions, the builders quickly concreted the site and laid down the stairs. The staircase consisted of 8 steps. The height of each is 21cm and the tread (step width) is 30cm
The entire staircase is made only of foam blocks without any frame. To save money, he added rubble to the middle of the stairs. It took about 0.5 cubic meters. Across the stairs under the foam blocks at the required height, he placed two pieces of reinforcement 190 cm long in the places where the supports for the railings were supposed to be located. Subsequently, the supports were welded to the reinforcement.
After testing, it turned out that walking up the stairs is inconvenient - you have to raise your legs too high. Senin wanted to change it. To do this, we had to change the height of the step from 21 cm to 16 by reducing the tread from 30 cm to 24 cm. As a result of the alteration, due to the reduction in height, 8 steps turned out to be 10. Calculations for altering the steps First of all, he drew a section of the staircase in Photoshop on several sheets of paper, and then began to alter it step by step.
The tools he used were a grinder with a concrete wheel and a hammer drill with a wide blade.
It is also very important that there is a gap of about 1 cm between the stairs and the house. After redoing the steps, he tiled the entire staircase. It turned out to be easy to use and compact in size. Stairs in a house Stairs in a house always take up a lot of space, so buying a ready-made staircase and fitting it into the layout of the house is extremely difficult, especially if the conversation turns to a stone one. “If you don’t skimp on the thickness of the steps and stringers, and don’t bring a platoon of soldiers in boots into the house, then a wooden staircase is quite durable.”
Reasoning this way, Senin made the drawings for the stairs in his house himself, and the builders brought his project to life. Posted by a member of the Senin forum https://www.forumhouse.ru/forum24/thread2596-12.html Editor: Roman Adamov
The design of the steps to the house, although important, is not the most complex. Making a porch on your own is not a very difficult and time-consuming job. If you choose a material with which you have sufficient general knowledge and skills in construction, then success will be guaranteed. For example, when using blocks as the main material, it is enough to have the skill of masonry operations and the ability to knead and use mortar. The photo shows an excellent example of a house where .
What you need to know before getting started
A monolithic or prefabricated concrete staircase can be a marching or spiral staircase - the choice of option depends on spatial possibilities. The width of the structure usually depends on its purpose; in the basement it is recommended to make it as wide as possible.
Usually this figure corresponds to the width of a standard doorway, which is 90 cm. Usually the height of the step, together with the thickness of the cladding, does not exceed 19 cm.
To find out how many steps there should be in a flight, you need to divide the height of the basement by the height of the step. The width of the tread should be at least 28-30 cm - this is the average size of a person’s foot.
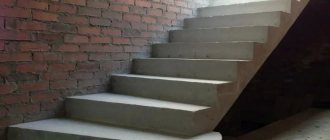
Concrete staircase near supporting wall
The staircase has rectangular steps. In a screw type, they are trapezoidal, so in such designs the steps are narrow and higher. In any case, the staircase structure begins with the construction of a wall to support the flight.
Support
If the staircase has a side support in the form of a wall, pins can be driven into it, to which the reinforcement will subsequently be attached. If there is no such wall, it can be erected from brick, having previously made a shallow strip foundation.
In this case, embedded parts should be provided. Since the supporting wall bears all the loads, the finished staircase will resemble a standard flight.
Formwork for concrete stairs
- In cases where there is no way to build a side support, it is necessary to provide support from above and below. The formwork for such a staircase looks something like the one in the picture above. It must be assembled from durable material that can withstand the weight of concrete.
- In addition, you need to keep in mind that moisture should not leak out of it. Therefore, strong timber is used for supports, and OSB boards are used for spans and steps. This is a wood-polymer material that does not absorb moisture and has a smooth surface, which is especially valuable for a concrete structure.
Assembling the frame and filling it
If you use ordinary boards to assemble the formwork, then they must be edged, and in order to prevent them from absorbing cement milk, the formwork cavity will have to be covered with plastic film.
Next, load-bearing reinforcement will be installed in the formwork. Steel rods are firmly tied together with wire or welded.
Metal frame for concrete stairs
- The reinforcement must encircle all edges of the flight of stairs, and to prevent destruction of the front edges of the steps, a metal corner is installed along their future perimeter. All this is done before pouring concrete. To ensure that it adheres to the metal as firmly as possible, steel wire tendrils are welded to the corners. In principle, the entire frame can be welded from a corner.
- After the staircase is ready, the wooden formwork elements will be dismantled, and the metal ones can, if desired, be sheathed with plasterboard or boards. You can even make shelves or drawers in the space under the cellar stairs. And since we are talking about this, we give you an excellent example of using the space under a flight of stairs.
Built-in wardrobes under the stairs
- If you decide to make a staircase yourself, watch videos from professionals. This way you will better understand how to make formwork, install reinforcement, make concrete, and pour. A staircase that will rest on a reliable, solid foundation may not be reinforced. Only in this case, concrete of a higher grade should be used: not M-200, but M-300.
- If the stairs lead to the basement from the street, it is better to add a waterproof additive to the concrete composition. After pouring, the surface of the concrete is leveled and sprinkled with dry cement. By the way, a concrete staircase can be assembled, like a constructor, from reinforced concrete span elements and set-up steps of various shapes. They are installed on a metal stringer or laid on a solid base.
Monolithic staircase ready for finishing
- In principle, if space allows, you can install a standard flight of stairs. Regardless of the installation option for a concrete staircase, it is better to take care of its surface immediately, namely, tiling it with ceramic tiles with an anti-slip surface, or stone.
If the structure is located in a house, and the basement is used as a living space, you can choose another finishing option. These can be overhead steps made of wood or marble, laminate, carpet, and even parquet. The choice is practically unlimited, the main thing is what the price is.
- ← Pouring the basement: technology and sequence of work
- DIY basement walls: pro tips for making →
Victor Martovich
He worked as a foreman, head of the construction and installation site. Organization of work and supervision of the quality of construction and installation works of construction sites on the territory of the Balakovo NPP, maintaining and submitting as-built documentation (magazines, acts, documents), purchasing materials, equipment (performing the duties of a supply engineer, quality engineer). Management of construction teams (registration, training in labor protection and industrial safety). Victor completed training courses under the program “Major repairs of buildings and structures. Organization of work and construction control.”, 2015 Balakovo Institute of Professional Retraining and Advanced Training, Occupational Safety and Health Specialist, 2012 Pugachevsky Irrigation College, construction technician, 2000 prof. school, accountant, 1996
vote
Article rating
Laying blocks
DIY staircase to the 2nd floor
When making external stairs from blocks, masonry can be done in two ways.
First
: we lay the blocks in a continuous manner, layer by layer, in each subsequent tier we make 1 row of blocks less (the result will be steps).
Second
: to save blocks, we lay out only the “frames” of the tiers or “formwork”, and fill the space inside with crushed stone (can be concreted if the staircase is very large).
After the structure is constructed, it can be faced (with tiles, stone, etc.) or plastered.
My house has only one floor, so there was no need for a staircase to the second floor, but many people prefer two-story houses and are faced with the question of what technology to use to build a staircase to the second floor. Building a wooden staircase in a stone house is not the most optimal solution, so usually most developers choose monolithic staircases. But there is a better and cheaper option - aerated concrete stairs.
The first and most important advantage of aerated concrete stairs is that they are very easy and quick to erect. Aerated concrete stairs do not require reinforcement, formwork or concrete. The staircase consists of reinforced steps made of aerated concrete with a density of D600, which are mounted either on aerated concrete retaining walls using a masonry mixture, or hung on iron corners.
All that is needed to build such a staircase is 18 reinforced steps and additional retaining walls (from the edges and in the center). In this case, you can buy steps of greater length and cut each one in half (this will be cheaper). For builders, such stairs are not so profitable because They are built quickly and you can’t make much money from it (compared to a monolith). The developer saves almost 2 times compared to the cost of constructing a staircase from a monolith.
And here is an example of a staircase from another facility, where, firstly, the upper flight on one side rests on iron corners fixed to a load-bearing wall made of aerated concrete, and secondly, corner winder steps are used, which are made of special reinforced slabs 600 mm deep (for ordinary steps depth 300 mm) - they can be sawed diagonally.
The result is a single aerated concrete-aerated concrete system, on which any type of finishing can be applied. The steps themselves can be finished with tiles or wood. Under such a staircase you automatically have a storage room or technical room.
Well, the most important point is the cost. The budget for materials for this staircase was less than 50 thousand rubles. And you can assemble such a ladder yourself without resorting to lifting mechanisms. The weight of one such step is no more than 60 kg. Here, for example, is the price list from Ytong (staircase elements on page 10), you can independently calculate the cost of materials for your stairs.
And you can read about why a country house should be built from aerated concrete.
And don't forget to subscribe to my blog so you don't miss new articles!
Types and features of foam blocks
The following products are classified in this segment of materials, any of which is suitable if you need to build a porch:
- By size. A very wide choice, but when making a porch, preference is given to blocks that have a edge of no more than 200 mm. In this case, each layer will be equal to the height of the standard step. The recommended width of 300 mm will give the optimal angle of inclination of the staircase. A do-it-yourself porch will be convenient and safe to use;
- Material of manufacture. The substances included in the composition play a decisive role in the density of the product. This is not of decisive importance in the construction of the foundation for the porch, but it is much easier to work with lighter blocks. Thus, the density of standard bricks is from 2000 kg/m³. Concrete has an even greater volumetric weight. The density of foam blocks ranges from 400 -1300 kg/m³. An extension made from expanded clay concrete blocks will be 2 times lighter than one made from brick. Sand is not always or to a limited extent used as a filler. The best qualities were noted when using expanded clay and other mineral additives and chemical additives. For example, in aerated concrete blocks a special foaming agent is used, which saturates the solution with air bubbles;
- Form. Foam blocks are offered with both flat and profiled surfaces for reliable fixation. There are also radial products if you plan to build an arched porch. It is better to purchase high-quality blocks with exact dimensions, as in the photo.
Installation of stairs from ready-made blocks
So, you have decided on the approximate appearance of the stairs. From the above it can be understood that the best option in conditions of a limited budget and to ensure a high level of security is better based on ready-made blocks. Therefore, we will consider it step by step.
Preparatory work
Fastening a steel stringer to a beam.
Before you begin the process of installing the stairs, you need to prepare everything and stock up on materials. First of all, it is necessary to make the necessary measurements. The key parameters will be the height, width, angles of permissible bends of the stairs and the parameters of the steps and the level of descent. You need to measure as accurately as possible, double-checking several times. After all, a staircase made from ready-made blocks is bought according to size. It will be impossible to change the design during installation.
Then you need to make sure the strength of the walls. This is an important issue, since in this case it is the walls that will bear the entire main load. If the side walls to which the ladder will be attached are strong enough and the plaster on them does not crumble, you can begin installation. Otherwise, you must first strengthen the walls.
The first step in the process of installing a staircase using pre-made blocks is to attach special slots to the side walls
It is important to strengthen the support using reinforced concrete beams. This will be an additional measure of safety and overall reliability of the entire staircase system
It happens that the design of the staircase is made in such a way that the main support is not on the side walls, but on the ceiling and floor of the basement. In this case, the side openings are not touched at all. Then you should take care of strengthening the ceiling, also checking its reliability. But it is still necessary to install reinforced concrete safety beams; they will simply be located in other places, according to the staircase assembly diagram.
Installation of reinforcement, formwork and steps
After installing the slots, stair fittings are mounted on top of them. This is the so-called frame on which absolutely everything will be attached: steps, handrails, and supporting mechanisms. Therefore, it is also necessary to approach this process extremely carefully and responsibly.
Then proceed to fixing the reinforcement and installing the formwork for the stairs. The formwork is usually made of strong, thick wood, which is attached to the walls, ceiling and floor using anchors or large nails. Please note that the steps to the formwork will need to be additionally nailed, so immediately monitor the quality of the formwork installation.
After this, we begin to attach the steps to the reinforcement structure and formwork. But before you start doing this, you need to calculate in advance the height of both the openings between the steps and the steps themselves. This is necessary so that all steps are equal, and the staircase fits into the opening exactly according to the diagram attached to it. This will be the main condition in order to avoid distortions or any inconsistencies in the future.
During the calculation process, do not forget that clear parallelism must be maintained after installing the entire staircase between the top and bottom steps. The last step at the bottom should be level with the basement floor. It is useful to make a separate drawing for yourself, from which you can once again verify the accuracy of all dimensions.
The steps themselves are attached clearly according to the diagram attached to the instructions.
At the same time, it is important to screw them as tightly as possible to the base, constantly checking that they do not wobble. It is recommended to fix the bolts with special rubber nuts, which will not only further strengthen the bolts, but will also prevent the threads from being damaged over time.
https://youtube.com/watch?v=hiMX5JQm_-E
The final stage is attaching the railings and concreting the stairs. The layer of concrete on the steps should not be made thick, as this will increase the load. As for the railings, they must be screwed according to the instructions, while relying on the degree of personal comfort when moving along the stairs.
Step-by-step instruction
When marking, it is important to maintain 90° angles so as not to disturb the dimensions of the structure. After installing the stakes and tensioning the cord, check the diagonals of the rectangle at the base of the porch. If the porch and steps are planned to be semicircular, check the radius of the circle and the intersection points of adjacent arcs so that they fall into the same vertical and the porch looks harmonious.
Construction of formwork
The form for pouring is a box with walls closed along the contour of the future structure. The formwork for each level of steps is installed after the construction of the underlying frame, and the configuration for pouring the site is separated last.
After installing the boards in the installation position, external spacers are placed to counteract the mass of concrete. To prevent the boards from opening up and spreading to the sides, they are pulled together at the top with wooden blocks, which are secured to the edge of the boards with nails or staples. There should be no through cracks or gaps inside the formwork.
The formwork of the steps is made 5 cm higher than the planned surface, and the platforms - 10 cm for easy leveling of the solution.
Frame installation
Frame reinforcement increases service life
Reinforcement increases the strength of concrete and increases service life. The metal frame is made so that the grid of steps forms a single whole with the frame of the platform and together bears the load. The metal in the treads is installed first, but releases are left, which are used for fastening when installing the reinforcing bars of the platform.
For connections, welding is used or the joints are tied with wire. Purchase or make your own special hooks that speed up the pulling of the wire into a knot. The frame is placed on pads inside the formwork so that the reinforcement does not reach the walls by 5 cm on all sides and does not protrude from the finished concrete structure.
Pouring concrete
The mixture is kneaded so thick that it holds together as a total mass when scooped onto a shovel. The less plasticity of concrete, the stronger the finished structure will be. The prepared solution is produced in 2 - 3 hours, and if it is necessary to postpone placing it in the mold, it is constantly shoveled. This can be done if you have a concrete mixer, but it is not recommended to keep it for more than 5 hours.
The concrete is taken out of the mortar mixer into a trough, it is placed into the formwork with a shovel, small spaces are filled with a trowel, and the surface is leveled with an ironing board and spatula. If there is no vibrator, the mass is often pierced with a pin or shovel to compact it. Antifreeze additives are added if pouring is carried out in winter and the concrete is heated using electrodes inserted into the mass.
Finishing
For the porch, it is better to select finishing materials with a rough surface.
Various materials are used for finishing, taking into account the overall exterior of the house and landscape elements. Steps are often covered with ceramics with a rough surface or boards are sewn on.
For side surfaces use:
- clinker, glass, ceramic tiles;
- wood, facade brick, metal;
- decorative plaster and putty with painting;
- natural and artificial stone, sandstone;
- plastic, corrugated sheets, siding.
A common combination of brick or wood with wrought metal railings is common. Decorative plaster or hanging systems are performed if the surface of the adjacent plinth is finished with these materials. For a canopy over the porch, metal tiles on a frame, polycarbonate, slate are used, and I make a soft roof.
How to make a porch out of brick
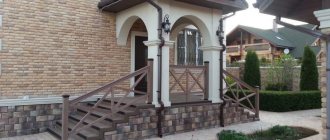
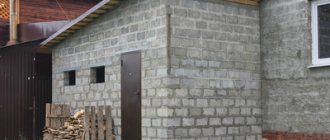
Here we will describe the process of building a brick porch with our own hands, using rubble masonry on the inside of the steps and sides. You can use scraps of gas silicate or expanded clay concrete blocks as rubble. The point of combining brick with rubble is to reduce the cost of the structure, so if you have the desire and opportunity, you can get by with just brick. A brick porch, a photo of which will accompany the description, is attached to the house on a high base.
What needs to be done before laying the first bricks
First of all, we need a detailed drawing of the porch along with its underground part - the foundation. Using the drawing, we calculate how much concrete will be needed to fill the foundation and the central part of the porch, as well as bricks for masonry. It is better to purchase the latter with the expectation of possible losses - pruning, fighting, etc.
Next, we need to prepare a shallow slab foundation for the masonry. It is done in the same way as for an ordinary concrete porch: in the form of a monolithic slab with reinforcement and buried in the ground by about 50 cm. You can start laying out the brick porch a week and a half after pouring the foundation.
How to build a porch out of brick: laying out the first step
Beginning of construction of steps and sides of the structure
First we lay the bricks in three bricks:
- We raise the outer row to the height of the first step.
- We lay out the inner bricks in one layer.
- We lay the rubble row.
- Another row of bricks
The height of the butt must be selected so that the last row rises to the level of the first step.
Please note: for greater convenience, control markings are applied to the walls to which the building will adjoin. Where there are no walls, we organize markings from a stretched cord
This will make it easier for you to navigate the height of the masonry. The previous photo shows the approximate location of such markings.
How to lay a brick porch: laying a row of rubble
Having retreated 30 cm from the edge of the first step, we begin to lay out the second, third, etc. Following the steps, we raise the rubble masonry. We draw the sides in the same way. The following photo clearly shows the internal organization of the future porch.
Please note: the largest elements of rubble masonry should be located at the edges, the smallest trimmings should be placed in the center. They should be well coated with the solution and pressed as tightly as possible to one another.
Porch made of stone. Photo of the process of laying out the side of the porch
Completion of masonry
We raise the masonry to the height we need, checking the markings. During the entire construction process, do not forget to check your work using a level, and it would be good to do this every two or three bricks. And by the way, look at how the bricks are arranged on the steps: the bottom row is across, and the top row is along. This installation scheme will provide the steps with a longer service life.
Stone porch of a country house: photo of installation of the upper steps
And one more important point. The next photo clearly shows that the front edge of the platform is not laid out in the same way as the steps were made before. If you look from the inside, you get one step with a side the size of half a brick. This was done with the expectation of further filling of the central part. We carry out internal concreting as if we were pouring a simple concrete base.
Inside the brick well we install reinforcement, 10-12 mm, with a cell of 15-20 cm. On it, in a layer of 20-30 cm, we fill it with a layer of crushed stone, broken bricks or any stone construction waste. Fill everything with a concrete-sand-crushed stone mixture so that it is equal to the upper brick side, which you see in the photo. Cover the surface of the concrete with cellophane and leave until it hardens, for one to one and a half weeks.
How to fold a porch at your dacha with your own hands: a side for pouring concrete
A little about finishing the finished building
If the porch was laid carefully and using new bricks, then you do not need to use any additional cladding. You can also use clinker bricks for the outer layers of the masonry. This is even preferable, since the clinker is much stronger, and the appearance of the porch will remain unchanged for a long time. The semicircular brick porch from the next photo was made in exactly this way.
Beautiful porch of a brick house. Photo of a semicircular design
Drafting
You should start not with purchasing material or building a foundation for the porch, but with drawing up a project that will allow you to accurately calculate the number and size of the required blocks. In addition, it is important to think about how the finished porch structure will be faced. The materials should be compatible with those used in the main structure. In order not to think for a long time about the choice of blocks, you can use those that are used in the construction of a house at the level to which the porch will rise. If it is monolithic expanded clay concrete or blocks made of it, then the same can be used to build a porch.
The same approach applies to finishing. If in a building it is made by plastering, then the side walls of the porch can be decorated in a similar way. If clinker tiles are laid on the wall, they will perfectly protect the blocks that will make up the porch from moisture. When choosing a finishing material, you should think about its practicality. Tile is rarely a good idea to cover steps. During rain or frost, you can slip on it and get seriously injured.
It is important to think about whether the porch will be closed or whether there will simply be a canopy over it. The latter can be increased by constructing a canopy with supports. If the porch is closed, then foam blocks are an excellent material that will provide some thermal insulation. In some cases, it can be made to be heated from electrical appliances rather than from the main system. When choosing sizes for a future porch made of blocks, you must be guided by the following recommendations:
- suitable span width;
- correct dimensions of steps;
- presence of railings;
- total width of the site.
The flight of stairs on the porch should be so wide that two people moving in opposite directions can easily pass each other. This means that the minimum figure can be considered 1 meter. A porch staircase with a smaller width will look awkward against the background of the overall width of the building and entrance. For convenient ascent and descent along the porch, it is necessary to provide the correct size of steps. As a basis, you can take the width of the step as 30 cm. In this case, the foot is placed on it and has sufficient support. The height of the step should not exceed 20 cm, since children and elderly people can walk on the porch.
Advantages of stairs made from ytong aerated concrete blocks
Such stairs are more durable and reliable than wooden ones. Their load-bearing capacity is much higher than that of similar wooden structures (150 kg/m2).
This is an ideal option for rooms with limited space.
The main advantage of such stairs is ease of installation using an adhesive solution and appropriate tools. If necessary, they can be easily repaired or disassembled.
These stairs are characterized by increased fire resistance parameters.
Low price for staircase structures.
Variety of shapes.
Wide selection of finishing and decoration.
Allows you to organize useful space under the stairs.
Quiet during operation.
Construction of a rounded staircase
If the radius of the stairs is small (up to 2 m), you need to pre-order or manufacture blocks of the required shape and size. If the staircase has a larger radius, then you can get by with aerated concrete blocks of standard sizes. First we need to make a so-called “compass”. How it's done? A nail is driven into the center of the circle and a cord is tied to it. The free end of the cord is wrapped around the pencil, and the “compass” is ready. The first row of aerated concrete blocks is placed as usual on a standard solution
(don’t forget to lay a waterproofing layer made of roofing felt or waterproofing material).
The next rows are placed on a thin layer of adhesive solution. Don't forget to periodically measure the distance from the center. When the curved walls are erected, it is necessary to draw on their surface the location of the steps of the future staircase. As a rule, the length and height of the steps are always the same. This greatly simplifies further work. For example, if we were building a curving staircase in a corner flight of stairs, then each step would have its own shape and size. Next, we grind out the side support of the staircase in the side wall (to a depth of 7-10 cm). The next stage is the installation of wooden formwork for monolithic work. Wooden beams (4 x 6 cm), which are connected to the wall with dowels, form the base. Next, we begin to nail the planks to the base. Since the distance to both walls of the staircase is the same everywhere, planks of the same length are used. This operation is very simple, for example, with a floor height of about 2.60 m, to the bottom edge of the ceiling you need about 110 roofing strips (section 2.5 x 5.0 cm). Using a power tool, you can literally make the required number of planks in one hour. And after installing all the elements of the lower formwork in a couple of hours, you will immediately understand all the advantages of making a round flight of stairs. Do not forget to strengthen the formwork structure well with supports from below, for example, by making them from remnants of construction wood or pallets from aerated concrete blocks. Then, in accordance with the design documentation, we will reinforce the structure. Parts of the reinforcement are inserted into the slots of the side walls to a sufficient depth to ensure the strength of the reinforced concrete staircase. Tip:
Place plastic film between the formwork and the steel reinforcement. Later, it will be easier to remove the formwork from below, and you can reuse the undamaged boards to construct the formwork for another staircase. The final stage in the construction of a rounded (curvilinear) staircase is the installation of step boards. And in this case, all the boards have the same dimensions. Be sure to carry out measures to strengthen the rigidity of the structure (see photo gallery)
. Before carrying out concreting work on stairs
it is necessary to wet the formwork.
Next, concrete the steps and compact the concrete thoroughly. The advantage of a rounded staircase design is not only a more rational and less labor-intensive construction process, but also a more elegant and beautiful appearance .
We advise: Make a preliminary calculation of all the necessary concrete mass that you will need for the ring anchor of the floor and the stairs in the room (in our case, this is the basement). It is rational to concrete them at the same time, since in this case you can order an automatic concrete mixer, rather than having to mix concrete with great effort in your own concrete mixer.
Formwork assembly
When the drawings are ready, the formwork is knocked down. It is made from sheets of moisture-resistant plywood and edged boards. The elements are fixed with self-tapping screws; metal corners are used as fasteners.
First, the lower part of the formwork is assembled. Plywood sheets or boards are tightly fastened, all fastenings should be located on the outside. The bottom is reinforced with supports, they are made from small cross-section bars. A flange is knocked down from the edged board and installed outside.
After this, they proceed to the installation of the riser bars, they are attached to the wall or flange on metal corners. With the help of cross bars, the structure can be given additional strength.
After completing the assembly of the formwork, concrete mortar is poured into it. To ensure that the concrete surface remains smooth, the wooden parts of the formwork panels are carefully sanded. This is not required when using plywood.
Self-production of a monolithic staircase
Before starting work, you need to make a project.
The photo shows the dimensions required for calculations
You should decide on the angle, a convenient lifting step, measure what the thickness will be, and calculate the number and height of steps. During construction, it is necessary to adhere to GOST 13015-2012 “Concrete and reinforced concrete products for construction”, GOST 9818-2015 “Reinforced concrete flights and landings of stairs”.
Installation of stairs indoors
To carry out the work we will need:
- cement (grades M400, M500);
- sand;
- crushed stone (fraction 10-20 mm);
- water;
- fittings;
- timber, boards or plywood and self-tapping screws for formwork.
Let's look at the devices.
After the design has been determined, the site for its installation has been measured, the necessary calculations have been made, a drawing has been drawn up and material has been purchased, you can begin to work.
Step-by-step instructions on how to install:
| Markings are made on site. |
|
| Reinforcement is being carried out. The frame is assembled from connected reinforcement bars. It should extend 3 cm from the base so that all the reinforcement is in the body of the concrete structure. The entire length of the frame must be attached to the wall. |
|
| The formwork is being installed. The appearance of the future product depends on the quality of its assembly. |
|
| The elements are filled with solution. Concrete is poured starting from the bottom. It is recommended to use a deep vibrator to compact the mixture and remove air. Next, the surface should be leveled with a trowel. Concrete must be covered with polyethylene. |
|
| After 3-4 days, the stairs can be freed from the formwork. It will be possible to use it for its intended purpose no earlier than in a month. | Finished building |
| Fences or handrails are installed. |
|
| The surface is polished, finishing work is carried out in accordance with the tastes of the owner and the interior. |
|
Construction of concrete stairs on the street
When building a staircase on the street, it is very important to properly prepare the base for the concrete structure. To do this you need:
To do this you need:
- Dig a pit 30-40 cm deep. Its size should exceed the dimensions of the stairs.
- Add a layer of gravel. Compact it, moisten it.
- Create a sand layer 5-6 cm thick.
- Lay a layer of waterproofing (you can use roofing felt).
After this, the formwork can be erected and poured.
How to make a concrete staircase with your own hands - video:
As a result, you can get a staircase that will decorate your home.
Wood finishing
Dismantling of the structure (if necessary) should be carried out with great care (due to the bulkiness of the structure) and with the help of special tools - wall saws and grinders. You should start from the top, cutting it into strips of 30 cm each.
The railings must first be removed. Whatever stairs you use for your needs, whether they are ready-made concrete stairs or built with your own hands, they must be practical, durable, comfortable and safe
You should start from the top, cutting it into strips of 30 cm. You must first remove the railing. Whatever stairs you use for your needs, whether they are ready-made concrete stairs or built with your own hands, they must be practical, durable, comfortable and safe.
Foundation preparation
Building with blocks requires a high-quality foundation. This is due to the fact that the blocks themselves are quite fragile, so at the slightest distortion or shrinkage, cracks can form in them. The surface where the installation will take place is being prepared. The first step is to remove the top layer of turf. Using fishing line and pegs, markings are made according to the dimensions of the future porch and a trench 40 cm wide is dug. It needs to be deepened by 60–70 cm. The bottom of the trench is sprinkled with sand and compacted well.
After this, the formwork is set to the required height. The formwork is made from edged boards, which, if necessary, are knocked together into panels. A reinforcing mesh of reinforcement rods is placed inside. The walls of the formwork are fixed together with spacers so that they are not squeezed out by the solution. After this, concrete is poured and compacted so that it fills all the cavities. The base should stand for three weeks. Much depends on air humidity and ambient temperature.
The space that was created inside the contour along which the foundation was poured must be filled. This can be done with a mixture of cement mortar and rubble. Waterproofing in the form of geotextile or roofing felt is laid at the bottom, after which large stones are laid, and then smaller crushed stone. Next, the solution is poured. It must have sufficient fluidity to fill the spaces between debris items. The top of the poured base must be leveled to make laying easier.
In this case, the sequence of work will be similar. But instead of a trench, a small pit is dug, sand is added to the bottom and waterproofing is laid. After this, the formwork is set up, reinforcement is performed and concrete is poured.
After preparing the foundation and before laying the blocks, it is necessary to ensure its waterproofing. To do this, you can use roofing material and bitumen mastic. The surface is cleaned and covered with bitumen mastic. Roofing material is laid on it with an overlap of 10 cm, which should cover the entire plane. This approach will prevent the porch from being damaged by moisture.