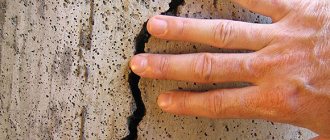
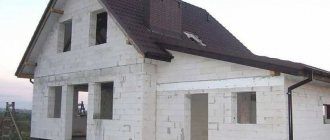
Foam concrete has recently been in high demand among developers. Residential buildings of various heights, outbuildings, and garages are erected from it. The material is durable, environmentally friendly, light weight, warm and easy to process. However, during the operation of a foam block house, one unpleasant defect may appear - cracks in the walls. The purpose of this article is to familiarize readers with the causes of cracks in foam concrete walls and ways to eliminate the problem.
Operation of structures
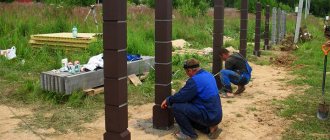
The service life of the building depends on the correct operation of the structures. If you want to make major changes, you should take into account the characteristics of the blocks and realistically assess the possibilities of carrying out a certain number of works. For example, if you decide to build a ventilated facade, and a block with a density of D 500 is used for the walls, then it is better to abandon the idea. The façade structure experiences strong dynamic loads, so weak wall strength will lead to the formation of cracks in aerated concrete walls.
Nuances
How long it takes for aerated concrete houses to shrink is also influenced by the block manufacturing technology. Autoclaved aerated concrete blocks undergo intensive drying in a special chamber. Therefore, they have less moisture at the output. Consequently, they dry faster and are ready for further work; give less shrinkage.
The composition of the blocks also influences the period during which shrinkage will last. For example, blocks made of cement with the addition of lime finally dry out after 2 years. But windows and doors can be installed immediately after the block “box” is ready. For comparison: in a brick building, window and door openings can be decorated only after a year or two.
Sealing cracks
Let's look at how you can repair cracks in a brick wall:
- In case of a shallow split, we clean the damaged part of the wall from crumbling pieces and dust. Apply primer. We make a solution of sand and cement, to which we add PVA glue. We plaster the crack.
- We close a medium-sized split using a metal mesh. We remove and clean all cracked surfaces. We prime. We make holes for the dowels every 20-30 cm. We fasten the mesh to the wall using large washers and screws. We press the plaster so that it sticks to the walls. We do light leveling and wait for complete drying. Apply the finishing layer.
- Using polyurethane foam we foam the gap. We wait for it to dry and cut off the remains. We apply plaster. The technique of applying plaster is not very complicated, so you can learn it very quickly.
Now let's look at how to repair a crack using an anchor in a brick wall:
Wall installation and the influence of the foundation on it
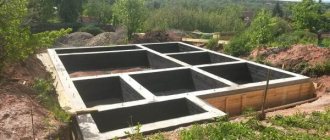
The foundation differs from other parts of the building in that it has an influence on all the structures of the future building. The reliability and service life will depend on its design.
Attention: If suddenly the aerated concrete walls begin to crack, you must first of all turn your attention to the condition of the foundation. A “weak foundation” will not do without irreversible mechanical deformations.
- In other words, it will float. If so, then deep cracks may appear on the walls, running from bottom to top. They may vary in location, but in most cases they appear in the middle of the wall. These are critical cracks that weaken the strength of the walls. They also pose a threat to the strength of the entire building.
- If the foundation is weak, repairs or work related to it cannot be started. In half the cases, it is necessary to strengthen the foundation in order to eliminate the appearance of cracks in the walls.
- In rare cases, a building needs to be dismantled.
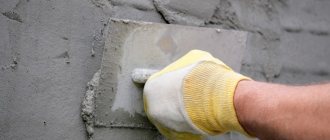
- You should not use ordinary plaster on aerated concrete walls, as they will crack. It is better to take plaster with a specialized composition (see. Let's look at how to plaster walls made of foam blocks).
Exploitation
The durability of the building will depend on compliance with operating rules.
Attention: If there are any major changes, it is necessary to take into account the characteristics of the blocks, as well as assess the feasibility of carrying out this or that work. For example, a ventilated facade is not needed if the D500 block was used.
If the walls have been installed recently, there is a risk of defects in the form of small cracks. They are safe and repairable. Such microcracks appear due to atmospheric humidity and aggressive reagents. You can avoid them with plaster, paint or putty.
How to fix cracks
There are many methods that are used to remove cracks yourself. First you need to understand what kind of crack has appeared - shrinkage or mechanical.
- If it is mechanical, then this is a direct sign of problems in the foundation, and if it is shrinkage, then it appeared due to a temperature difference.
- They are easy to eliminate. In the case of mechanical cracks, it will be necessary to expose a small portion of the foundation and carry out investigations of it, as well as investigations of the base.
Now let's look at how to repair cracks in a foam block:
- The first step is to clean the area where the crack appears. There it is necessary to remove all dust, and then wet the area with water and properly prime it;
- After this, you need to slightly widen the crack that appears. If it is 1 centimeter long, then the crack expands to 2 centimeters. The expansion must be sealed with a special composition of cement, crumbs and water;
- The last step is a series of measures aimed at eliminating possible runoff of the mixture.
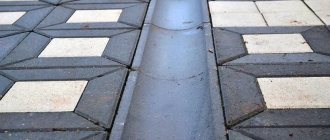
Repairing cracks along the seam of foam blocks
Attention: If there are deep cracks between the foam blocks, then it is necessary to reinforce the seam with nails, reinforcement or mesh. Then the crack will still be sealed with mortar, but with coarse filler.
- If you do not have large cracks along the plane, then you just need to putty them. To do this, you need to go through the crack itself with a chisel and remove all the elements that are peeling off. Now we apply a layer of soil along the depression. After that it is simply puttied.
We putty the cracks
In exceptional cases, you should seek help from qualified specialists.
Repairing cracks in foam block walls is not difficult, but it is better to prevent their occurrence. After all, the price of the issue is life. After all, the room may collapse. The instructions will help you avoid mistakes during construction.
What to do if a block bursts
It is necessary to ensure that cracks that appear on the foam blocks are not transmitted to the finishing; this can be achieved in several ways:
- the cracks are sealed with putty , the facade is leveled, and only then the finishing coating is installed;
- when applying plaster, it is recommended to use fiberglass mesh , due to which the surface is reinforced, this helps prevent the appearance of cracks in the finishing material;
- use of decorative plaster having wear-resistant fillers, such as basalt or granite chips.
These methods do not eliminate the formation of cracks, they allow them to be hidden and prevent their appearance on the façade cladding.
Strengthening
To prevent further formation of cracks on walls made of foam blocks, it is necessary:
Deformations
Diagram of a foam block wall.
Taking into account all the shortcomings will help minimize the likelihood of cracks. But what to do if it does appear? Firstly, you cannot despair; you can always find a way out of any situation. There are many different methods of elimination, using which you do not have to disassemble the finished wall.
Let's consider a situation where the erected wall was already plastered, but there was no putty on it yet, and one or more cracks appeared.
- First you need to apply putty using inexpensive material, one layer is enough. This will help cover all the resulting unevenness in the plaster.
- After this, you need to glue the fiberglass using a special glue used for glass wallpaper.
- We putty the fiberglass in several layers of finishing putty.
As a result of the work carried out, fiberglass will interfere with the continuation of education. As a result, they seem to disappear, after which the walls are even suitable for painting.
For this work you will need the following materials:
- Putty;
- Plaster;
- Fiberglass;
- Glue;
- Spatulas.
What to do with a burst wall made of foam blocks
Foam concrete has recently been in high demand among developers. Residential buildings of various heights, outbuildings, and garages are erected from it. The material is durable, environmentally friendly, light weight, warm and easy to process. However, during the operation of a foam block house, one unpleasant defect may appear - cracks in the walls. The purpose of this article is to familiarize readers with the causes of cracks in foam concrete walls and ways to eliminate the problem.
Drywall as an alternative
An acceptable alternative to strengthening walls with plaster is to cover them with frame materials, such as plastic panels or plasterboard. This method is much simpler, faster, cleaner and cheaper than plastering. Drywall is an environmentally friendly material, it creates a pleasant microclimate, provides good sound and thermal insulation, and in addition, it will help level very uneven walls without excessive hassle. Its architectural and design qualities make it possible to experiment interestingly with interiors. A wall made of foam blocks covered with plasterboard can be painted, covered with non-woven wallpaper or tiled.
However, it is worth considering three important points: firstly, you still can’t do without putty. Secondly, drywall can only be used in small, regularly heated rooms with normal humidity levels. Thirdly, you should think in advance where you are going to hang kitchen cabinets, shelves, heavy lamps, etc., in order to maximally strengthen the metal frame on which the drywall is mounted in the right places.
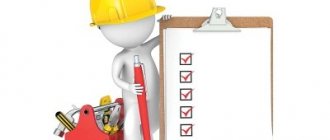
Possible difficulties and errors
What to pay attention to:
- Before starting repairs, the crack must be cleaned and degreased. Otherwise, the connecting solution will not work and all efforts will be in vain - the defect will transfer to the facing coating.
- The reinforced mesh is attached to the foam block with brackets or anchors. Holes for fasteners should be in places where there are no cracks. Otherwise, the metal will jump out of the cell, the mesh will sag or crack the finish coating.
- Do not work with wet foam blocks or in high humidity conditions. It loses its strength. You need to wait for dry weather or install the canopy in advance.
- Waterproofing under brick is a mandatory procedure, since the material is hygroscopic and can draw moisture from the foundation. The result will be a crack on the brick itself.
- It is necessary to connect a brick wall with a foam block with flexible connections. Thin brickwork may not withstand the overall stress without additional support from load-bearing walls.
How to strengthen?
The walls are completely strengthened in case of an emergency or many small cracks after shrinkage. The process is carried out with caution; it is first recommended to consult with specialists about the most appropriate method.
What will you need?
There are several options for carrying out the procedure, they differ in the strengthening material and technology:
Mesh reinforcement for finishing .
In this case, a reinforced mesh (25*25) is attached to the cleaned, primed wall, after which it is covered with putty and facing material. This method is the simplest and most inexpensive. To be sure that the house will withstand several more decades, this procedure is carried out on both sides of the walls.From the outside they are covered with plastic panels, tiles, siding or other materials.
- Covering with plasterboard, siding or plastic panels . Not the most reliable option. Suitable if the cracks are very small, there is no threat of destruction of the building.
- Additional brick facing wall . This material is denser and is able to hold up walls and buildings. It turns out to be a kind of brick box, inside which is a foam block house. The option is more expensive than reinforcement, but the result is more durable. Experienced builders recommend installing a wall inside the house too, so that the beams and ceilings rest on the brick.
- Pillars made of brick or concrete . They are installed in important places where the pressure is strongest (in places where beams are installed, in corners). Construction requires a lot of time and expense.
Strengthening a wall, whether with reinforcement or brick, requires that there be a solid foundation underneath the entire structure. If it is not enough, an additional few centimeters of concrete must be poured, otherwise the walls will not even support their own weight.
What tools are needed?
For a reinforced belt you will need:
- metal mesh 25*25;
- cement-concrete mixture;
- staples and anchors;
- putty knife;
- shovel;
- solution container.
For brick finishing:
- connecting solution;
- trowel;
- double-sided hammer;
- putty knife;
- brick;
- flexible connections;
- perforator;
- anchor;
- solution container or concrete mixer.
For siding, drywall and similar:
- the material itself for strengthening;
- metal profiles;
- straight hangers;
- single-level connectors;
- anchor;
- self-tapping screws;
- knife.
For concrete pillars:
- formwork;
- reinforced mesh;
- cement-concrete mortar;
- solution container.
Advice . Instead of anchors, you can use dowels, but they must fit under the cellular foam block. In this case, only special plastic fasteners are suitable.
Strengthening stages
Before starting work, the wall needs to be prepared. To do this, the cracks are processed according to the same principle as in less critical situations: they are cleaned, washed, and fixed with a connecting solution. Next, after the wall has dried, work begins on strengthening the wall.
Reinforced belt:
- Drill holes every 60 cm vertically and horizontally from each other.
- Lay the reinforced mesh and secure it tightly with anchors over the entire surface.
- Cover with a thick cement layer, level the wall, wait until it dries completely. Afterwards you can begin facing work.
Installation of a brick support:
- Waterproof the base under the first row of bricks with 2 layers of roofing felt or membrane. Stretch the mooring thread, which will be used to check the geometry of the rows.
- The laying is carried out in ½ or ¼ brick, as desired. The first row is without mortar, on dry. First, raise 4-5 rows from the corners of the walls.
- Check the horizontal alignment and correct angles (if any).
- Connect the corners into a single composition in compliance with the order (offset the bricks by ½ or ¼ in adjacent rows).
- Place reinforcement bars into the seam.
- Drill holes in the foam block. Attach flexible connections, drive in anchors.
- Start the next row of masonry again from the corners and follow the same principle as in the previous ones. It is not recommended to raise walls more than 1.2 meters at a time. Otherwise, the unhardened solution may not withstand.
Important! You can drill the foam block only in those places where it is intact and does not crumble. In some cases (in the northern regions or central Russia), insulation is laid between the walls. It will be necessary to leave vents in the brickwork.
Reinforcement with plasterboard:
- Metal profiles are installed and secured with anchors or self-tapping screws.
- Drywall is mounted in them and secured.
- Covered with finishing material.
This option for strengthening foam block walls is suitable for rooms where there are no plans to hang heavy equipment or furniture on the wall.
The room should be small in area and well heated.
Installation of concrete pillars:
- Place a mark in the places where you plan to install floor beams.
- Install formwork with a height of 30-40 cm, a width equal to the width of the beam multiplied by 3.
- Pour the concrete and wait until it dries completely. Lay a 10*10 reinforcement mesh.
- Enlarge the formwork, pour another layer of concrete, wait for it to dry, and reinforce it. Continue until the structure is completely built.
Pillars are the most labor-intensive and time-consuming process. In addition, the walls will still have to be repaired to eliminate cracks so that the finish does not deform over time.
How to choose the right aerated concrete block
Compliance with documents and acts, as well as timely work and support from highly qualified specialists - these are all the necessary conditions that must be met for aerated concrete production.
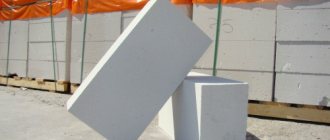
What blocks are used and where?
Attention: Consumers need to select products only from trusted and competent suppliers who have proven themselves not only in the domestic but also in the international market for construction materials. In the process of choosing the right blocks, you should familiarize yourself with the characteristics.
So:
- First of all, you need to select a foam block according to the type of structure. After all, they eat differently and each one is suitable exclusively for its own job. The photo above shows a table on this matter.
- The main indicators in this process are strength, density, size and, of course, frost resistance. These indicators are basic, therefore they are all indicated in the passport data on checking the quality of an aerated concrete product.
- Also, the certificate or passport must have a specialized blue seal, which must be supplied by the manufacturer. In some cases, quite frequent, an additional mark from the organization that conducts the tests is required. Quality indicators must be fully suitable and consistent with the requirements of the project.
Attention: If the project involves the construction of a building with more than one floor, it is necessary to select aerated concrete products above grade 500 in density.
- Separately, you should pay attention to the fact that a good quality block is distinguished by a light color shade, smooth corners and edges, as well as a uniform structure. Therefore, if there are stains, stains or oily films on the surface of the block, you must refuse to purchase it.
- If all the rules of the technological operation have been followed, then the pores of the block will always be only closed, round and even. They will be distributed evenly over the block area.
- Also, when purchasing, you should pay special attention to the cut of each block. If there are pores that differ greatly in size and are not round in shape, this indicates that the rules and parameters of thermal conductivity were not followed. This may also be a sign that the block has poor sound insulation properties.
- If a monolithic aerated concrete block is used, special attention should be paid to the surface level of the mixture. If there are watery compartments, this indicates that the required recipe was not followed when creating the block.
Aerated concrete monolith is subject to shrinkage deformations more than others. Therefore, to prevent the walls from cracking, it is necessary to comply with all preparatory work, including work on holes and possible microcracks. There should also only be clean formwork. It would be useful to take sufficient care of concrete products during the hardening process.
Types and concepts of cracks
The definition of a crack includes any structural defect if it is formed due to stress in the composite base. These tensions can be caused by both external causes and internal temporary imbalances.
If we talk about this and similar processes that cause a crack in aerated concrete, then it can be caused by almost any incorrect calculations in the composition of the material. And with incorrect calculations, the properties of the blocks also deteriorate.
Attention: In cases where the strength of the monolith or each individual block for some reason does not meet the specified parameters, there is a possibility of back collapse.
Any cracks are divided into two types:
- The main parameters by which a crack is determined are its maximum penetration depth, total length and opening width. Another important parameter is the localization of the crack on the material.
- Today there are many documents that specify permitted and unacceptable cracks depending on the type of contraction. Among them there are load-bearing structures, as well as enclosing elements.
- Among other things, regulatory documents make it possible to further establish requirements regarding the resistance of concrete and products made from it to cracks.
The main causes of cracks
Today, a lot of research and work is devoted to the nature of crack formation in various materials. Aerated concrete is one of the most complex composites with a porous structure.
On the one hand, this structure is an excellent and functional compensator for any permissible deformations, but on the other hand, it weakens the mechanical performance and properties of the entire system as a whole.
Most causes of cracks fall into one of three groups:
- Incorrect or incorrect selection of composition, non-compliance with official preparation technologies (see Composition of foam blocks and their production);
- Non-compliance related to the requirements for installation of the structure;
- Operation in critical conditions.
Causes
Diagram of the causes of cracks in concrete.
Of course, a crack cannot just appear out of nowhere; there is a reason for its formation, which will need to be found out first before eliminating it. After all, repairing a crack, as we found out earlier, is not so difficult. But if the cause is not eliminated, it will appear again and again. Before you build a wall of foam blocks, you need to know the reasons why the shortcomings of this material may be revealed.
A crack may appear due to displacement of the soil or foundation, temperature changes, high humidity or improper technology for mixing materials. It turns out that it is possible to build walls from foam blocks only on a reliable foundation, without fail using reinforcement in the walls, and so on. That is, construction using this material must be carried out in strict compliance with all the rules of construction and masonry technology.
Of course, if the wall is ready and it has cracked, it is no longer possible to disassemble it. Therefore, we have to resort to various methods of sealing. One method of sealing a crack in a wall has already been discussed above. Of course, this is not the only method that can be used; there are other options. Here, for example, is another option for how to repair a crack in a wall made of aerated concrete:
- The plane on which the crack has formed must be cleared of the destroyed layer of building material.
- After cleaning, remove the dust with water; you can also use the dry dust removal method using a hairdryer or vacuum cleaner.
- When the wall is clean and free of dust, a primer is applied to the surface.
- Now you can start sealing, selecting the right material depending on the size. You can repair a small crack using absolutely any solution. Large cracks must be repaired using an adhesive composition. The larger one is sealed with a mixture of glue or cement with the addition of crushed stone. For ease of work, you need to use a spatula and grout.
- The selected solution is filled into the seam or crack and stabilized for a while using a sheet of plywood, which can be secured using self-tapping screws.
- When not cracks have appeared, but a large hole has formed, concrete reinforcement will be required using nails or iron mesh. In this case, the aerated concrete needs to be cleaned, the resulting hole needs to be metalized with nails, and a metal mesh must be put on them. And only after this the cavity is filled with a solution of glue and pieces of aerated concrete.
In the case of the chosen method of restoration and repair, the following materials and tools will be needed:
- Water (or aqueous solution);
- Vacuum cleaner (or hair dryer);
- Glue;
- Cement;
- Crushed stone;
- Grout;
- Putty knife;
- Sheets of plywood;
- Self-tapping screws;
- Nails;
- Iron mesh.
All these materials must be prepared in advance, even before carrying out repair work.
From all of the above, we can conclude that cracks arise due to non-compliance with wall laying technology, with an incorrectly chosen type of foundation, with incorrect consideration of the ratio of advantages and disadvantages of a given material.
If a person is not confident in his abilities, then it is better to entrust this work to craftsmen or specialists who can both complete the work and independently eliminate the shortcomings obtained during the work.
Why do they crack?
There are several reasons why cracks may appear in foam block walls, usually due to subsidence of the foundation or due to a violation of the block production technology.
There is another reason that arises when creating a ventilated facade, when the wind load is transferred through the frame to the walls of the house.
Violation of manufacturing technology
Some manufacturers, when creating blocks, may experiment with the composition of the mixture and violate their manufacturing technology.
This may be the use of inappropriate additives, when they begin to set earlier and the gas-forming processes do not have time to complete; there may be no hardening accelerators or additives that ensure uniformity of the structure.
Violations of the production technology of foam blocks lead to the deterioration of the performance characteristics of the material.
In this case, cracks usually appear almost immediately or 1-2 weeks after the walls are erected. It will not be possible to correct this drawback , since the structure of the building material has been changed, so the way out of the situation is to dismantle the walls and use normal foam blocks.
It is imperative to carry out high-quality waterproofing, since foam concrete absorbs moisture well and this can cause cracks.
If you plan to install a ventilated facade with additional insulation , then you must use blocks of grade D600 and higher, otherwise they may not withstand the wind load that is transmitted from the cladding to the walls.
If the rafter system is created incorrectly , the load is unevenly distributed, which can cause damage to the walls made of foam blocks.
To compensate for the forces created by the rafter system, it is necessary to install tie rods (a beam connecting the rafters at the level of the mauerlat) and use an installation scheme with inclined legs.
Errors during construction
Often, the cause of cracks is associated with a violation of the technology for creating both the foundation and the walls of the building:
- during the installation of the foundation , the characteristics of the soil were not taken into account and as a result of heaving forces, soil layers shift, which destroy the concrete foundation of the house;
- the masonry was not reinforced , this must be done every 3-4 rows, as a result of which the rigidity of the wall decreases and cracks may appear on it;
- a homemade solution is used , which does not comply with the recommended proportions or contains impurities that reduce the strength of the seams.
Unlike brick walls, foam blocks must be efficiently and reliably protected from precipitation, wind, and sunlight; this is best done by creating a wet facade.
What mistakes do beginners most often make when repairing cracks in an apartment?
When repairs are done by yourself, it is easy to make a mistake. Usually, beginners incorrectly assess the level of the problem. Or they choose the wrong material to fill the gap. It is also popular to neglect the stage of cleaning the surface from contamination. To prevent them, it is recommended to consult with a specialist in advance and perform each step carefully.
Usually, beginners incorrectly assess the level of the problem.
A crack in the wall may appear unexpectedly; it is important to understand the cause and fix the problem in a timely manner. You can cover up the defect yourself, but professional advice won’t hurt
The putty agent is selected based on the wall material.
Crack in a wall made of foam blocks: causes and repair
Cracks in a foam block house, what to do
Cracks in foam blocks can lead to irreversible consequences; they simply should not be used in construction. But if a crack occurs in a wall made of foam blocks, then it is necessary to determine the reasons for its occurrence and then repair it. Otherwise, it will increase constantly and lead to the destruction of the structure.
Today we will tell you about the causes of cracks and the rules for repairing them. The video in this article and photo will provide additional information that will help you do everything yourself.
Advantages of use
To build a house, modern materials that are radically different from conventional ones are increasingly being used. We are talking about the use of aerated concrete, which is characterized by countless advantages, especially in comparison with others.
The composition of aerated concrete includes the following materials: sand, cement, lime and duralumin.
Among the advantages it is worth noting:
Light weight of blocks. There are about 200 kg per 1 m2 of brick, and for a multilayer and already insulated wall this value is about 1000 kg per 1 m2. This event requires the presence of a bulky foundation, and the construction of a house can only be on solid ground. For aerated concrete, this value is much lower, in other words, the cost of building a foundation is lower, and there are many more construction options. Aerated concrete can be used for the construction of any house, including a country house, where only seasonal residence is planned. For example, a brick house requires constant heating; in other words, it is impossible to make a country house out of it, which will be very cool in winter. Aerated concrete has amazing thermal insulation qualities; walls made of this material are extremely warm. The development of construction does not differ in complexity, but there is one drawback here: if drying is not done correctly, a powerful shrinkage of the house is observed, which can be minimized.
This is what you need to know if the wall of a foam block house is cracked: what to do and why it burst
During construction work, various unpleasant situations may arise from which no one is immune. One of them is a crack in the wall made of foam blocks.
In such cases, it may be dangerous to build further, and dismantling the wall is impractical. Let's consider how we can correct the situation and what to do to prevent it from happening?
Deformations
Diagram of a foam block wall.
Taking into account all the shortcomings will help minimize the likelihood of cracks. But what to do if it does appear? Firstly, you cannot despair; you can always find a way out of any situation. There are many different methods of elimination, using which you do not have to disassemble the finished wall.
Let's consider a situation where the erected wall was already plastered, but there was no putty on it yet, and one or more cracks appeared.
- First you need to apply putty using inexpensive material, one layer is enough. This will help cover all the resulting unevenness in the plaster.
- After this, you need to glue the fiberglass using a special glue used for glass wallpaper.
- We putty the fiberglass in several layers of finishing putty.
As a result of the work carried out, fiberglass will interfere with the continuation of education. As a result, they seem to disappear, after which the walls are even suitable for painting.
For this work you will need the following materials:
- Putty;
- Plaster;
- Fiberglass;
- Glue;
- Spatulas.
Work that will help eliminate some types of cracks
After the walls are built, putty them with finishing, strengthening mixtures. Any cracks that appear are sealed with cement mortar or special glue.
Don't lose sight of anything, control every stage. After all, cracks have the ability to grow and expand. As a result, an option may arise in which you will have to completely dismantle the already built structure.
Options for sealing cracks depending on their characteristics
For each type of crack, the material and sealing technology are selected individually. For non-through internal cracks up to 5 mm wide, you can use a strong cement or gypsum mortar.
Cracks appear when the stress in the material exceeds the mechanical strength of the structural element. By scratching, the increase in tension is limited. The most common features are caused by tensile or compressive stresses. There are many causes of stress in structural components. In most cases, scratches are caused by the following stresses.
Stress due to workload
When a load is applied to a structural element, stresses are transferred to the material. Loads that affect a building or structural component are caused by, among other things. On vehicles driving on the bridge and even wind hitting the building. The weight of a structural element is also the load that the building material must support. If the load on a structural element exceeds its load-carrying capacity, cracks appear in the material.
Crack elimination process
- Before starting to seal the crack, it is necessary to carry out preparatory work. They consist of cleaning the repair site from dirt, debris and dust.
- Moisten the resulting cavity generously with water and allow to dry.
- The damaged area is treated with putty or cement mortar.
- After drying, a reinforced tape is laid on top.
- Place a layer of putty or cement mortar on the tape.
For wide cracks, a brick castle is suitable:
- It is necessary to remove cracked bricks from the outside and outside of the wall.
- Clean the defect area from dirt and dust. For this it is better to use a construction scarpel.
- Lay new bricks on the mortar.
- You can also eliminate this kind of crack using a metal anchor, which is a plate with two pins (anchors).
Cracks with a width of more than 10 mm are considered critical.
Stress caused by contraction
Concrete contracts during bonding. In addition, heat is generated in the concrete during the hydraulic reaction. Both factors, especially in long structural elements, lead to strong internal stresses and, as a result, scratches. Generally, structural joints prevent scratches in concrete. If structural elements do not have joints or do not perform their function, stresses arise in the building material, leading to the formation of cracks.
Stresses caused by ground movements
Stresses caused by ground movements occur as a result of earthquakes, land subsidence, falling or rising water levels, and the impact of nearby construction projects. Due to these movements, changes may occur in the loads transferred from the building through the foundations into the surrounding soil. These changes result in stress in structural components, leading to the formation of cracks.
To eliminate them, the following method is suitable:
- Clean the damaged area from contamination.
- Fill the defect with polyurethane foam.
- Wait for it to dry completely.
- Trim the foam to a depth of 2 cm.
- Fill the resulting depression with cement or cement-sand mortar.
- At the final stage, finishing material is applied.
If it is not possible to dismantle the damaged brickwork of the house, then you can use the following method:
Stress caused by temperature changes
Thermal loads caused, for example, by strong solar radiation, heating elements. Building elements at higher temperatures expand if the temperature suddenly decreases, resulting in scratches. The expansion caused by the insulation and cooling cycles of the concrete causes stresses in the structural components, which in turn results in Fig.
How to repair leaks?
When repairing leaking cracks, you must first stop the flow of water. Then seal the fracture forever. In all other cases, the repair procedure is described below. On a construction site, it is often difficult to determine whether cracks are leaking. Therefore, it is difficult to select the appropriate material for performing the injection.
- Clear the repair area of debris and dust.
- Cracks are sealed with cement mortar.
- T-shaped steel anchors are driven into the crack, which must be secured with dowels on both sides of the crack. They are attached to the surface of the wall of the house.
Through cracks can be eliminated by strengthening the walls from the inside
- Carry out preparatory work, namely clean the damaged area from old finishing material, dirt and dust.
- Wet the tear with water and let it dry.
- Fill the gap with cement mortar and small fraction crushed stone.
- If necessary, secure steel plates made of rolled steel. The strips are fastened using anchors and dowels.
- Carry out finishing work on the damaged area of the wall of the house.
Application of metal staples
For through cracks, two metal plates and tension bolts are used, which are passed through the wall. It is also possible to hammer steel brackets into the wall on both sides of the resulting gap. The ends of such brackets are bent to the wall and secured with bolts. This prevents the crack from opening further. The holes for the bolts must be filled with cement before fixing. For large defects, it may be necessary to install several such brackets. The repair of the crack itself occurs in the same way as in other cases. The most suitable material for this is cement.
One material, two effects
The ideal material would be a resin that reacts by foaming in the presence of water and, in dry scratches, hardens to form solid particles that fill them. The material in contact with water reacts to highly elastic foam. Under dry conditions the material reacts to form an elastic hard resin. In the first stage of injection, the cracks form foam, which stops the flow of water. The resin reacts with water to form foam and significantly increase its volume. The reaction uses water inside the cracks. At the second stage, the material is introduced by the same packers. There is no water in the varnish, so the material heals elasticity. This ensures a stable seal.
Elimination of cracks on walls
For cracks that have appeared on the walls of external brick walls, use a metal clip. Its dimensions and design solution depend on the width of the wall.
Elimination of dangerous cracks
For serious cracks that threaten to destroy the house, steel joists are installed on both sides of the wall. As a result, the entire building ends up in a powerful steel bandage.
Minor scratches will be removed
Fortunately, not all cracks should immediately indicate a defect in the building in which we live. Most of them can easily remove themselves. To get rid of a small scratch on the wall, we only need a spatula that is adapted to the type of plaster that covers the walls of our apartment. Let's remember that not every mass is suitable for every type of plaster. Other weights are recommended for repairing gypsum plasters and others for cement-lime plasters. Its packaging. First, the scratch on the plaster should be enlarged, preferably with metal plaster. Cracks in brickwork are a common problem that requires immediate attention. This is necessary in order not to violate the structural integrity of a residential building or other structures.
All buildings collapse over time, and this process is irreversible. However, it is possible to extend the service life of a property; to do this, it is necessary to carry out timely repair work and seal the resulting cracks. When carrying out renovations in their homes, many are forced to face this problem. in the wall so that the further repair process turns out to be of high quality?
The second step is to thoroughly smooth and clean the edges of the cracks. We must clean them thoroughly of residual paint and damaged plaster. The best way to do this is to use three tools - start with putty, then a wire brush and finally fine-grit sandpaper. This will ensure the edges are cleaned properly.
The next step is to remove any dust that appears in the slot. If it's small, just apply it with a brush. You can use a vacuum cleaner to clean the inside of the cracks more thoroughly. Then the gap must be carefully primed. To do this, we need to buy a special reinforcing primer that will significantly improve surface adhesion. We can use it with a regular sponge.
Methods for sealing cracks on foam concrete walls
First of all, you need to determine the reason why the wall is bursting. Then try to eliminate this reason. After this, you can begin to seal the cracks. Several methods are proposed for this.
Small cracks (shrinkage)
- The place where the crack appears is cleaned of plaster, removed dust with water and primed.
- The seams are being unstitched. They are expanded with a metal spatula to the required width. The length of the seam is also forced to increase.
- We seal the seam with adhesive for foam concrete or a mixture consisting of foam concrete chips, water and cement.
- A certain amount of time is allowed for the sealing mortar to harden.
Large mechanical cracks
To eliminate wide cracks, it is necessary to reinforce them, and seal the seams themselves with one of the following materials:
- Adhesive composition for foam concrete masonry.
- Cement mortar with silicate crumbs.
- Polyurethane foam.
- Epoxy adhesive.
Reinforcement is carried out over the entire area where the crack occurs with a distance of at least 40 cm from it on the sides. This can be done in several ways:
- The reinforcement area is cleared of plaster. At equal distances on the sides of the seam, anchors are driven in, between which wire or mesh is stretched. You can use chain-link mesh or metal construction mesh. The mesh or wire is plastered on top. The thickness of the plaster layer is about 2–3 cm.
- All plaster is removed from the crack area. A reinforcing mesh made of fiberglass is glued onto the crack. For this purpose, an adhesive composition is used for laying foam concrete. The reinforcing mesh is sealed on top with the same solution. After it dries, the wall is puttied and plastered.
The appearance of cracks on the walls in a house built from foam blocks is a common occurrence. In the vast majority of cases, this phenomenon does not pose a danger, since it is a natural process of shrinkage and drying of building materials. It is recommended to adhere to certain building codes during the construction of houses to prevent the appearance of cracks. Well, if they occur, take measures to eliminate this unpleasant phenomenon using one of the methods described above.