Read in the article:
- What are strip bases?
- Foundation marking
- Excavation
- Prefabricated strip foundations
- Monolithic tape
Strip foundations are most popular in individual construction. They are reliable and durable - the service life of such a foundation exceeds 150 years. In what cases is it better to install prefabricated or shallow structures, and when is it worth laying the tape below the freezing depth?
Application, characteristics, differences from other types of bases
A strip foundation is a contour of reinforced concrete walls with different depths into the ground, laid under all external walls, as well as under the main internal partitions of the structure.
Like any other foundation, it absorbs and distributes all operational loads, ensuring the stability of the building.
The main design feature of a strip foundation for a private house is that it is laid only under the load-bearing elements of the structure (unlike a slab foundation), but forms a continuous, closed contour, unlike a columnar and pile foundation.
The option under consideration is suitable for residential, industrial, commercial and other buildings of almost any design (log, timber, brick, panel, frame and other houses). Depending on the depth of the strip foundation, its laying allows the construction of high-rise buildings. Concrete strip can be laid in most types of soil.
Strip foundations cannot be installed in swampy soils or soils capable of uneven shrinkage (weak, heterogeneous structures). Application in highly heaving and deeply frozen soils, as well as in high groundwater levels, is limited.
Foundation marking
The first stage is marking the future foundation and, accordingly, the house itself. First of all, the axes of the structure are outlined. After this, two future walls, perpendicular to each other, are drawn from one of the corners of the house with a stretched cord. Most often these are the main and side facades. At the same time, the dimensions of these walls are noted. The fourth corner of the foundation is determined using a square. Additionally, the correct marking of the resulting rectangle is checked by measuring its diagonals, which must be equal. If the house is a rectangle in plan, the marking is complete; if it is a more complex shape, then other elements are built according to the same principle.
Recently, instead of a cord, measuring tape and square, builders have been using modern laser rangefinders, which significantly simplifies and speeds up the marking process, while significantly increasing its accuracy.
But it is important not only to draw the axes of the trenches, but also to indicate their width and depth, to determine which, in turn, it is necessary to outline the horizontal level of the future foundation.
Advantages and disadvantages
Centuries of experience in operating strip foundations indicate the following advantages:
- Increased load-bearing capacity.
- Uniform distribution of loads on the ground. This is facilitated by a closed structure located around the entire perimeter and a significant support area.
- The ability to optimize the design depending on operational factors by changing the width of the belt and depth.
- Versatility of use.
- Simplicity of manufacture allows you to do everything yourself.
- Increased durability with reliable thermal and waterproofing.
- The optimal combination of cost and reliability. With equal strength characteristics, a strip foundation will cost much less than other types of foundations.
- Quite high construction speed. It is inferior to a columnar foundation, but noticeably superior to a slab foundation.
- The possibility of forming a large, insulated basement, as well as a full-fledged basement. If a large basement is not needed, you can plan a structure with a basement under part of the house.
Certain disadvantages of strip foundations should also be noted:
- Impossibility of construction on weak and highly moist soils.
- Large penetration with a large depth of soil freezing.
- Large volume of excavation work, especially when constructing a deep foundation and a large basement.
- The need to conduct thorough geological studies to determine the required depth of the tape.
- A long period of maintenance of concrete, which lengthens the period of suspension of further construction of the house.
When choosing a foundation, you must carefully weigh all the pros and cons. In general, the advantages of a strip foundation usually outweigh the disadvantages, which is what ensures its popularity.
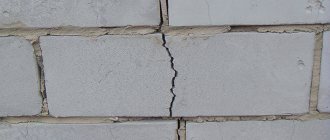
Errors when constructing monolithic foundations
1. Filling the bottom of a trench or pit with sand and compacting it immediately after rain. If we consider that the bulk of soils are clays and loams, then when wet they mix well with sand and form a very weak support for the foundation. 2. Making a sand cushion under the foundation without careful compaction and pouring water. Dry or heavily moistened sand cannot be compacted. Failure to comply with this rule may result in uneven settlement of the foundation. 3. Reinforcement of the foundation according to an arbitrary pattern can lead to incorrect placement of the concrete mixture and a decrease in the strength of the structure.
Materials used
When constructing a strip foundation, the main material is concrete , which, in fact, is what the foundation itself consists of.
Strength characteristics and resistance to operational influences depend on concrete. In order for the concrete base to be durable, it must correspond to a grade of at least M300. For self-production, a mixture of cement, sand and crushed stone is used in a ratio of 1:3:5.
For a prefabricated strip foundation, reinforced concrete slabs FL 12.12 or FL14.12, as well as FBS blocks measuring 0.8-2.5 m can be used.
Concrete must be reinforced with steel rods . According to the specifications for the project, the frame is based on corrugated steel reinforcement of class AIII (A500) with a diameter of 12 to 16 mm. For vertical linking, smooth reinforcement with a diameter of 10-12 mm is used. The frame is tied together with steel binding wire.
An important element is the cushion under the concrete tape. It is made from layers of sand and crushed stone or gravel of the middle fraction. For waterproofing, bitumen or bitumen mastic, roofing felt, and thick polyethylene film are used.
Insulation can be provided by bulk, tile, sheet or roll thermal insulation materials. The most commonly used are expanded clay, expanded polystyrene (foam), polyurethane foam, mineral wool, glass wool.
In addition to the main materials, the consumption of auxiliary materials should be taken into account . To install the formwork, you will need an edged board with a width of at least 20 cm and a thickness of at least 15 mm. You can use plywood, plastic or metal sheets. To strengthen the formwork you need timber.
Depth of slab foundation
Due to the fact that it is prohibited to fill monolithic structures on the arable layer, the black soil is removed from the pit entirely. The depth of the layer is usually 40 cm, which is covered with non-metallic material that does not contain clay. Features of the shallow slab technology are as follows:
The maximum construction budget is observed for a slab buried below the freezing mark. This option is justified exclusively for buildings with a basement. The outer perimeter of the underground walls will have to be completely insulated, the cavities will have to be filled with non-metallic material, having previously laid wall or ring drainage.
Attention: Taking into account the removal of the fertile layer and its replacement with non-metallic material, a foundation 30 - 40 cm thick is buried into the ground by 10 - 20 cm maximum. Therefore, you will need either a brick base or monolithic beams under the load-bearing walls, which perform the same function of increasing the distance between the ground and wall materials.
Price
The cost of a strip foundation consists of the costs of materials (including their transportation) and work. The lion's share of costs falls on concrete.
Based on average prices in 2022, the following cost figures can be given for typical examples: 30x60 cm - 3900 rubles/m, 40x80 cm - 4800 rubles/m. The cost of work is on average 30-40% of the cost of materials. This article can be significantly shortened when making a foundation with your own hands.
When ordering the manufacture of turnkey strip foundations, you can give the following approximate prices:
- with a house size of 4x6 m - 130,000-150,000 rubles (cost of work - 50,000-65,000 rubles);
- with a size of 6x8 m - 165,000-190,000 rubles (work - 70,000-80,000 rubles);
- with a size of 6x10 m - 220,000-250,000 rubles (work - 90,000-110,000 rubles);
- with a size of 9x9 m - 245,000-280,000 rubles (work - 100,000-125,000 rubles).
The cost of the foundation depends significantly on the depth and structure of the soil. On excessively hard soil, special earth-moving equipment must be used.
High altitude
The total height of the supports consists of 2 components: above-ground and underground parts. Typically, most of the part is located below the surface of the earth for stability. If the project includes a high base, its above-ground size cannot be more than ½ of the total value.
A limitation on the lower mark may be a high groundwater level.
If the groundwater level on the site is lower than 2.5 m, then the foundation will allow you to immediately place a room with a height of 1.7 m to 1.9 m in its underground part, without a high base going above the ground. It is necessary to maintain a distance of 0.5 m to the level of the maximum seasonal rise of water in the soil. The beneficial use of the internal volume of the foundation structure significantly increases the scale of excavation work, since it is necessary to remove all the soil in the pit and go deep to the solid load-bearing rocks.
The house will have a basement
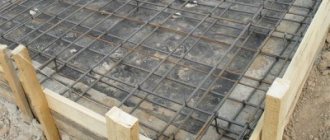
Do-it-yourself work when installing a buried foundation can be seen in this photo:
All requirements that a high foundation must meet are set out in SNiP 3.03.01-87, SNiP 3.04.01-87.
Kinds
The classification of strip-type foundations is divided into several varieties:
- According to the design, there are 2 main options - monolithic and prefabricated. A monolithic strip foundation is made by pouring concrete into the formwork in one step along the entire contour with reinforcement. The prefabricated version is built from ready-made reinforced concrete blocks (panels), which are laid in a trench, and the joints between them are filled with concrete mortar.
- According to the material used. The most common option is a reinforced concrete strip foundation. In some cases, the foundation can be made of brick, gas or foam blocks, stone and even wood.
- According to the depth of occurrence in the soil. Strip foundations can be: shallow and deep (high). The first option involves deepening the concrete strip by 40-75 cm. It is used in the construction of lightweight structures, as well as in the construction of houses on hard (rocky) areas, when the soil itself has a high bearing capacity, and the foundation only evenly distributes the load. The depth of the shallow tape is less than the freezing level, which means it cannot be used when the soil is highly heaving. In a recessed strip foundation, the underground part is lowered below the freezing level. Such deepening makes it possible to erect large structures, as well as eliminate the influence of soil heaving.
The choice of the desired strip foundation option is made based on specific conditions - operational loads, composition and structure of the soil, climatic and natural features of the area. To make a decision, geological studies and the necessary calculations are carried out.
Monolithic tape
Monolithic strip foundation in section
The most common material for the construction of strip foundations remains concrete. After all, the technology of constructing a monolithic base makes it possible to obtain a tape of almost any geometric shape, while all the joints and joints of the internal and external walls form a single whole.
The process of casting a strip foundation is as follows. To begin with, a leveling layer (sand, sand-gravel mixture, etc.) is poured into the bottom of the trenches. The filling of the pillow is carried out in several stages with careful intermediate compaction and pouring with water. The total thickness of these layers is usually 0.3–0.5 m and should not exceed a third of the thickness of the entire foundation of the house. After this, in the trenches and in the above-ground part of the future foundation, inside the formwork, a metal frame is mounted from reinforcing bars, fastened together with knitting wire. And only then concreting is carried out.
Filling trenches and formwork with concrete can be done using chutes or using a concrete pump. The most important requirements for the manufacture of monolithic foundations are strict adherence to technology and the use of materials specified in structural calculations (grade of concrete, reinforcement of a given thickness, etc.).
The production time for monolithic strip foundations is slightly longer than when using other materials, which is explained by the need to wait for the concrete to harden and gain the required strength (28 days)
All of the above concerns the simplest shallow strip foundation for a building without a basement or ground floor. If the house is supposed to have underground premises, instead of trenches, a pit of the required depth is dug, the bottom of which is carefully leveled and compacted with sand or gravel, and, if necessary, with cement laitance. The formwork is installed on the prepared base and the reinforcement cage is mounted inside it, then the formwork is filled with concrete.
The most important requirement in this case is the continuity of the pouring process - this avoids the formation of so-called cold joints in the concrete, which have lower strength characteristics compared to the bulk of the concrete and greater moisture permeability.
Once the concrete has hardened, the formwork is removed and work is carried out to waterproof and insulate the underground parts of the foundation, and a ring drainage system is installed. And only after that do they backfill.
The most important parameters
The reliability and load-bearing capacity of a strip foundation is determined by its dimensions:
- Tape width (thickness). It is selected taking into account the thickness of the load-bearing walls. The width of the strip should exceed it by at least 10-15 cm. The minimum width of a concrete strip foundation is 25 cm, and a stone one - 50 cm. Most often, the width of a strip foundation with a monolithic concrete strip is selected in the range of 45-52 cm.
- The height of the underground part, i.e. deepening For a shallow strip foundation, the depth is 40-75 cm, depending on the location of the groundwater. For a recessed strip foundation, the base is located 25-30 cm below the freezing level, but does not reach the water layer by 15-25 cm. A deep strip foundation can have a height of more than 1.7-2 m. The most common option is 1.2- 1.4 m.
- The area of the sole, i.e. foundation supports. This parameter is calculated taking into account actual operational loads and soil resistance. It ties together the length and width of the foundation strip. The following condition must be met: S > 1.2F/kR, where F is the total operating load; k – coefficient in the range 1-1.4; R – soil resistance (taken from reference tables).
The listed parameters depend on the weight of the entire structure and its design features.
How to calculate the cubic capacity of the foundation
It is better to take into account the mass of the foundation by calculating its volume: this figure will be useful to you when pouring the foundation: you will know how much concrete to order or how many materials you will need to purchase.
All initial data are already known: height, width and length of the tape. You multiply them and you get the cubic capacity of the foundation.
For example, let’s calculate the volume of the foundation for the previously calculated tape: length 44 m, width 30 cm (0.3 m), height 1.75 m. Multiply: 44 m * 0.3 m * 1.75 m = 23.1 m³.
In fact, the consumption will most likely be a little more: about 25 cubic meters. Use this figure as a guide when ordering concrete. The cubic capacity of the foundation is calculated based on the found (estimated) dimensions of the tape: length, height and width by multiplying them
Differences for one-story and two-story residential buildings
Strip foundations are widely used in the construction of one- and two-story houses . It is important to understand that the number of floors increases the total operational load, which must be taken into account when choosing the width and depth of the strip foundation.
The width of the tape for a one-story house can be selected based on the minimum acceptable values, i.e. 25 cm, but not less than 10 cm more than the thickness of the load-bearing walls. For a two-story building, the support area should be increased. It is recommended to ensure the width of the tape exceeds the thickness of the walls by 25-30 cm.
For both buildings, erected on sufficiently strong and non-heaving soils, a shallow strip foundation can be used. At the same time, for a one-story house, a depth of 40 cm is sufficient. For a two-story building, the depth should be increased almost 2 times - up to 75-80 cm. More accurate values are provided by calculations taking into account the total operational load.
When using a recessed strip foundation, the depth is usually selected based on freezing levels and the location of groundwater. The increased height of the underground part of the foundation is quite capable of withstanding heavy loads, and therefore it is almost the same for a one- and two-story house.
To summarize the above
It is necessary to determine the height of the above-ground part of the foundation. We take into account a minimum of 200 mm. We evaluate the thickness of the snow cover and, if necessary, change the parameters of the base of the building.
The higher the foundation is located above the ground, the better and the less effort is required to preserve the lower part of the house. Optimal values are considered to be 350–400 mm above ground level. Do not forget about hydro- and thermal insulation of the above-ground part of the foundation! These measures will not only preserve the foundation of the building (prevent moisture seepage and destruction of the foundation reinforcement), but also reduce heat losses.
Methodology for calculating the foundation A reliable and durable foundation can only be when all the necessary calculations have been carried out before its construction. First of all, this concerns determining the size of the sole area.
This indicator is directly related to the soil conditions at the site. We tried to describe in detail the methodology for calculating the foundation. Reviews about foundations on screw piles Why, when considering foundation options, do many developers choose screw piles?
Although this type in our country is considered relatively new in suburban construction, at the same time it is interesting from an economic point of view. What do people say about this? We separate the wheat from the chaff by studying reviews. Heating installation in a private house In winter, the house should be warm - one of the important conditions for permanent residence in a country cottage.
Another question is what kind of heating system will it be? There are many options, which makes the final choice not the most convenient. We decided to help you and tried to look at the main examples of heating systems successfully used in private homes.
- Date: 06-03-2015 Rating: 49
Before erecting any building, every serious builder will draw up a competent and detailed design of the structure, including the foundation. The project must indicate all the necessary parameters of the foundation: the width of the foundation itself (this applies, first of all, to the strip foundation), the area of its base, the depth, the material used during construction and the height of the foundation above the ground. All this must be taken into account at the design stage.
Scheme of a shallow strip foundation.
But knowledge cannot be used without understanding its essence, even if confirmed by the word of experienced builders. And in order to do any task correctly, it is necessary to understand the reasons for precisely such parameters and requirements. Here we are going to deal with the last parameter of the house foundation listed in the listing.
What should be the height of the foundation and why is it necessary to know this? Why are certain numbers indicated in recommendations and projects? What experience do builders rely on?
Return to contents
Scheme of a recessed strip foundation.
It is believed that the price of the foundation in the total estimate for the construction of a house is about 30%. Therefore, if there is an opportunity to save money, then most will definitely do it.
And in the parameters of the foundation there is an obvious point where costs can be greatly reduced - this is its height above the ground. The fact is that if the depth and width of the foundation depend on objective and obvious reasons for everyone, changing something there, in terms of economy, is fraught, then the distance from the ground to the wall simply attracts the thrifty. After all, in fact, what is above the ground is the above-ground part of the building, and there is a temptation to make it all from cheaper materials.
After all, every cm of foundation in terms of cost is much more expensive than the same cm of walls, especially if the latter are made of cheap materials (wooden, panel, etc. buildings).
But such savings are a mistake, and it is better for the owner of the future home to carefully read the requirements for this part of the foundation and understand why they are needed in order to take a balanced approach to the issue of the height of a strip or other foundation.
Return to contents
Having carefully studied the role of the foundation of the house, you can see that it experiences various unfavorable factors.
This is especially noticeable at the boundary between the soil and the atmosphere. From this it can be seen that the parameters of a conventional strip, block and other foundation include not only such functions as providing reliable support for the entire structure, insulating the house from harmful factors from the soil (primarily moisture), but also the function of raising walls and the residential level in general over all negative weather manifestations. Let's look at what this means point by point.
Block foundation diagram.
A highly erected foundation in its upper part can be well used as the base of a building. The benefit here is obvious; a solid structure will have better characteristics than in the case where the foundation and base are clearly separated.
This will affect both the operational characteristics of the house and its integrity. A high strip or block foundation has the best characteristics for protecting the walls of the house from moisture. Even if you use protection for the lower part of the walls (waterproofing, blind area, etc.), it will still be constantly moistened under the influence of ground moisture or precipitation.
A high base in this case will protect the house from moisture much more reliably. The upper boundary of the foundation should rise 10 centimeters above the level of snow that falls in the snowiest winters. But in any case, the upper limit of the strip base must be no less than 30 cm above ground level. The base, elevated above ground level, is sometimes part of the basements under the house, reflecting the design characteristics of the building.
As in the case of the base, such a house design will have a good effect on its operation. An elevation of 20-30 cm is also typical for pile and columnar foundations. There, this measure was taken as part of the fight against unstable soils. Heaving soils with this design have less impact on the structure during seasonal movements.
In some cases, due to the slope of the terrain, this height above ground level can be much greater. Very often, a high foundation is a measure to combat the shrinkage of the structure. That is, taking into account the characteristics of the soil, builders add some additional height to the base in advance in anticipation of future subsidence of the house. During construction, materials that are extremely unstable to high humidity and other environmental influences, such as wood, are often used. In this case, builders can also use a high base to prevent the wood from coming into contact with the wet soil.
Return to contents
Pile foundation diagram.
Let's look at the example of a strip foundation and calculate the parameters of its height for an average house.
The practice of the modern construction industry shows that the height of the above-ground part of the base of a house should be related to its width as one to four. We are talking about a classic shallow monolithic strip foundation, without basements and a plinth, with the inter-foundation space filled with soil. That is, the height of the part of the foundation above the ground should be 4 times the width.
In this case, the above-ground part cannot be larger than the underground, and the opposite situation will be quite normal. In our area, both parts of the foundation, as a rule, have the same height and depth characteristics and are about 45-50 cm. If the house has an underground floor, then the foundation must have vents for proper ventilation of underground spaces.
Return to contents
If the developer initially built a foundation of insufficient height, there is a need to somehow correct this. Solid brick is used to raise the base. With its help, you can both strengthen and raise the base part of the entire structure.
Such masonry is strengthened according to the principle of reinforcement with masonry mesh. The most suitable solution for strengthening will be a solution of grade M100. If for light wooden and frame buildings the base is strengthened with red solid bricks, then for houses made of foam and cinder blocks it is better to use concrete.
Having considered the reasons that force us to build high foundations, let us summarize some results.
Raising the upper boundary of the base is necessary for many reasons, but at what height should we stop? As mentioned above, the minimum height of a strip or other foundation is 20 cm. But it will be adjusted upward after assessing the thickness of the snow cover in your area.
Schemes for building up the foundation.
Ideally, the higher the foundation, the better your home will be protected, but based on the compromise between quality and price, you need to settle on a specific optimal figure.
In central Russia, the optimal height for a foundation is considered to be 40-50 cm above ground level. But at the same time, it is necessary to remember about proper waterproofing and insulation of the above-ground part of the base.
These measures are aimed at protecting the house from environmental influences, preventing destruction and preventing heat loss.
Even if you are tempted to save money by reducing the height of the foundation above the level of the house, do not give in. Remember the saying that the miser pays twice. It is quite possible that due to the savings of a few centimeters when constructing the foundation, in a year or two you will have to invest much larger sums in home repairs, and even pay more expensive heating bills.
A high foundation protects the structure from many unfavorable factors.
Bases can have complex shapes
The parameters determined when designing building structures include the height of the foundation, determined from the level of support on the underlying soil (fill cushion) to the upper plane on which the crown, floor slab or heel of the structure’s column rests. The value of the height of the foundation above ground level, which has its own selection criteria, is taken separately. Recommendations for drafting all types of supports, instructions on what requirements the foundation for a house must meet, are contained in SNiP 2.02.01-83* (2011 edition).
Features for a building with a cellar
When building a house with a cellar, the walls of the strip foundation simultaneously become the walls of the basement. This circumstance causes additional problems:
- For a full-fledged cellar (basement), you need a space under the floor with a height of at least 1.7-1.8 m, and taking into account the concrete screed and pillow - at least 2-2.2 m. Accordingly, the deepening of the strip foundation should be based on this condition . At the same time, to prevent water from seeping into the cellar, there must remain a distance to groundwater of at least 40-50 cm. If the entire height of the basement cannot be ensured by deepening the foundation, then its above-ground (basement) part is raised.
- When removing soil from the inside of a strip foundation during operation, additional lateral loads arise when the soil heaves on the outside. To compensate for these loads, the strength of the walls will have to be increased. The minimum thickness of the strip foundation will be 40-50 cm, depending on the composition of the soil and the depth of the cellar.
In addition to these features, when arranging a cellar, the requirements for waterproofing and insulation of the walls of the finished strip foundation increase. It is advisable to protect the walls both outside and inside.
Painting compositions, sprayings, roll materials and impregnating compositions are used . Waterproofing should cover the entire surface without gaps. Pasting is carried out in two layers with overlap.
A prerequisite is insulation. The lack of thermal insulation disrupts the thermal regime not only in the basement, but throughout the entire house. Insulation can be installed inside and outside.
The most commonly used are slab polystyrene foam, sprayed polyurethane foam, thermal panels, and insulated plaster. It is necessary to make a blind area on the surface of the earth.
What determines the apparent (above ground) height of the foundation?
It is necessary to understand that this part of the base serves as a connecting link, a kind of jumper in the adjacent area “soil - external environment”. And this area, like no other, during the operation of the building is exposed to external factors - high humidity and temperature fluctuations. The foundation must be raised above the zero level for the following purposes:
for constructing the basement of a house, when part of the foundation takes on the role of a basement.
Obviously, the solid structure has better characteristics than the “foundation + plinth” design for protecting the walls of the house from high humidity. Even despite the blind area, the lower side part of the house will be constantly moistened, so it is better to raise the “foundation-walls” transition as high as possible. How specific?
At least 200 mm from the ground, higher is possible. An observant developer in one of the winters can estimate the thickness of the snow cover on the site, to which you can add 100 mm and get the optimal height of the foundation; often the foundation rises above the ground due to the construction of the basement. In this case, the height of the base is determined based on the design data; for columnar and pile foundations, the minimum rise above the ground is also 200 mm, this is required so that the heaving soil does not affect the building.
The height may be greater, for example, if the topography of the construction site has a slope; when calculating the height of the foundation, it is also necessary to take into account the possible shrinkage of the house, the magnitude of which depends on the characteristics of the soil and the load on it from the structure; increasing the height in some cases helps prevent the destruction of the material walls of the building. This is especially true for wooden buildings, for example baths. In this case, either a high foundation (about 500 mm) is immediately installed, or a base is erected from other building materials.
Design Process
When designing a strip foundation, special attention is paid to the following factors:
- Operating loads. They are summed up from the weight of all structural elements of the house (walls, floors, roofing) and the weight of the foundation itself; weight of equipment, furniture, household appliances and people; snow and wind loads.
- Soil type and condition. For classification, GOST 25100-95 is used. The tables determine soil resistance, swelling, mobility, heaving and other parameters necessary to determine the bearing capacity and loads on the foundation from the soil.
- Soil freezing level. It varies in different parts of the country. So in the Moscow region the soil freezes by 1.4 m, and in Novosibirsk by 2 meters.
- Groundwater level. It can vary from a few tens of centimeters to several meters. Moreover, even in one area, significant differences can be found in different places.
- Terrain. The presence of slopes creates special requirements for the project when different heights of the strip foundation walls are laid on different sides of the contour.
Analysis of the above factors allows you to make the necessary calculations and plan additional measures (for example, drainage system, insulation, additional strengthening, etc.).
Columnar foundation: design features
The name speaks for itself. The basis of the foundation are pillars that are buried in the ground to the calculated depth. A concrete or metal frame (the so-called grillage) is installed on the tops of the pillars.
The material for making pillars is concrete, solid clay brick, rubble stone, concrete blocks or metal pipes. At the bottom, the pillars may have a wider base, which increases the support area. Support pillars are placed at a distance of 1.5-2.5 meters from each other.
The basis of a columnar foundation is pillars buried in the ground
Helpful advice! It is not recommended to combine additional buildings (porch, veranda, etc.) into one whole structure. They must be equipped with a separate foundation and separated by an expansion joint from the main building. The load from the porch is much less than the load from the house, so they will have different shrinkage.
Calculation of a columnar foundation according to the formula
Before calculating the number of pillars for a particular building, it is necessary to calculate the load on the foundation, the mass of the foundation and find out from the reference book the maximum permissible load on one support. When making calculations, the following condition must be met: the pressure on the base of the foundation must be less than the soil resistance index.
The following formula is suggested:
Minimum number of supports = (“load on the foundation” + “mass of the foundation”) / “permissible load on one support.”
For a safety margin, an increase in the number of pillars by 40% is allowed. The location of the pillars should take into account the loads on the walls (there should be more of them under load-bearing ones). The posts must be located at the corners of the house and under the intersection points of all walls.
To increase the safety margin of the foundation, it is allowed to increase the number of pillars by 40%
Example of calculation of a columnar foundation
We will calculate the foundation for a frame house with dimensions 6x7 and a ceiling height of 3 meters. The soil is clay, the roof is made of metal tiles, there are one floors. Construction location: middle Volga region, Saratov city.
Initial data:
- foundation pillars – round reinforced concrete;
- freezing depth 1.08 meters (calculated for each region);
- groundwater was not found closer than 2 meters deep;
- the soil at the construction site is clay; the load-bearing capacity Ro is 6 kg/cm², taken from the table below.
Table of soil bearing capacity values:
| Soil type | Ro (kg/cm²) |
| Pebbles with clay | 4.5 |
| Gravel with clay | 4.0 |
| Coarse sand | 6.0 |
| Sand medium | 5.0 |
| Fine sand | 4.0 |
| Dusty sand | 2.0 |
| Sandy loam | 3.5 |
| Loam | 3.5 |
| Clay | 6.0 |
| Subsidence soil | 1.5 |
| Filled soil with compaction | 1.5 |
| Filled soil without compaction | 1.0 |
Determine the total load:
- the total area of all walls is 78 m², their weight will be 78x50 = 3900 kg, where 50 kg/m³ is the specific weight of the frame walls. Specific gravity values for each building material can be obtained from reference books;
- the mass of the basement floor with an area of 42 m² is 42x100 = 4200 kg, and the weight of the attic floor is 42x150 = 6300 kg, where 100 kg/m³ is the specific unit. the weight of the interfloor ceiling with insulation, and 150 kg/m³ – specifications. weight of the attic floor with insulation;
- the total roof area is 68 m², it will weigh 68x30 = 2040 kg, where 30 kg/m³ is the specification. metal roof weight;
- the snow load will have a coefficient of 0.5 from the standard one with a slope of 45˚, which will be 68x0.5x100 = 3400 kg, where 100 kg/m² is the snow load in the construction area;
- the operational load on each floor will be 42x200 = 8400 kg;
- Now let’s calculate the mass of the foundation: the number of pillars for a building size of 6x7 will be 12 (based on the step between pillars being 1.5-2.5 m), and their minimum permissible diameter will be 400 mm. So, the mass of 12 pillars 1.5 meters long will be equal to
- (3.14x0.16)x1.5x12x2500 = 22608 kg, where the cross-sectional area is calculated in brackets, 2500 kg/m³ is the specific gravity of reinforced concrete;
- The mass of the grillage consists of the mass of all reinforced concrete crossbars with a cross-section of 400x400 mm connecting the support pillars. It will be equal to 0.16x24.2x2500 = 9680 kg.
Before calculating the number of pillars, you must first calculate the load on the foundation
Adding up all the obtained values, we get the total load of the house along with the foundation. The weight of the house will be 54228 kg.
Next, to determine the total cross-sectional area of the pillars, we divide 54228/6.0 = 9038 cm².
Accordingly, the cross-sectional area of each of the 12 pillars will be equal to 753 cm², which corresponds to a diameter of 310 mm. But since the minimum diameter cannot be less than 400 mm, we accept this value. We take the diameter to be 400 mm and determine that for this building the minimum number of pillars required is 10 pieces. But we must also take into account the strength coefficient of 1.4 or 40%. Therefore, the foundation will require 14 support pillars with a diameter of 400 mm.
Construction device
The classic strip foundation scheme includes the following elements:
- compacted layer of soil;
- geotextiles to keep the cushion from migrating into the soil;
- a cushion made of sand and gravel layers, acting as a damper during soil swelling and drainage function;
- waterproofing of the sole, made of roofing felt or polyethylene film, to prevent water seepage from below;
- body of the strip (concrete base of the strip foundation in the form of a monolithic pour or individual blocks, brick, stone or block masonry, etc.);
- reinforcing frame made of steel reinforcement located inside the body of the tape;
- insulation attached to the outer wall of the strip foundation;
- waterproofing the walls of the strip foundation from the outside and inside.
Recently, permanent formwork has become increasingly used, which, after pouring concrete, becomes an integral part of the foundation. It can act as thermal insulation and waterproofing.
If you need to know more directly about laying a strip foundation with your own hands, read our article: “A reliable foundation for your home: step-by-step instructions for building a strip foundation.”
Calculation of the amount of concrete, wire and reinforcement
Having decided on the size of the foundation, we need to calculate how much reinforcement, wire and concrete we will need.
With the last one everything is simple. The volume of concrete is equal to the volume of the foundation, which we already found when we calculated the load on the ground.
But what metal to use for reinforcement has not yet been decided. It all depends on the type of base.
Reinforcement in strip base
For this type of foundation, only two reinforcement belts and reinforcement up to 12 mm thick are used.
Horizontal longitudinal reinforcement bars are subject to greater loads than vertical or transverse ones. Therefore, ribbed reinforcement is placed horizontally, and smooth reinforcement is placed vertically.
The length of the ribbed reinforcement can be easily calculated by multiplying the total length of the base by the number of rows of rods. If the foundation is narrow (40 cm), two longitudinal rods for each belt are sufficient. Otherwise, the amount of reinforcement in the belt will have to be increased.
Transverse rods are installed every 0.5 m, retreating 5-10 cm from the edge of the foundation. We determine the number of connections by dividing the entire length of the foundation by 0.5 (the step between intersections) and adding 1.
To find the length of smooth reinforcement required for one intersection, we use the formula:
(ShF - 2*ot)*2 + (VF - 2*ot)*P, where ShF and VF are the width and height of the foundation, from is the offset from the edge of the foundation, P is the number of rows of reinforcement in the belt.
the amount of smooth reinforcement required for the foundation
The cost of binding wire for the foundation is the product of the wire consumption for one bundle (30 cm), the number of bundles at one intersection (equal to the number of rows of reinforcement multiplied by 4) and the number of connections.
Reinforcement in slab foundation
For a slab base, ribbed reinforcement with a thickness of 10 mm or more is used, laying it in a grid, in increments of 20 cm.
That is, for two reinforcement belts you will need:
2*(ShF*(DF/0.2+1) + DF*(SF/0.2+1)) m reinforcement, where ShF is the width, DF is the length of the foundation.
connect the intersection of the upper grid with the corresponding intersection of the lower one
Taking into account the thickness of the slab and the distance of the frame from the surface of the slab, we determine the amount of reinforcement required to connect the belts using the formula:
((DF/0.2+1)*(SF/0.2+1))*(TP-2*from), where TP is the thickness of the slab, from is the distance from the surface.
how much reinforcement is needed for a slab foundation
The length of the knitting wire is calculated based on the formula:
(DF/0.2+1)*(SF/0.2+1)*4*0.3
Concrete pouring stage
Concreting is carried out in one go to prevent the formation of cold seams, air cavities and delamination in the concrete mass. In addition, the cause of these negative factors may be incorrect concrete formulation, prolonged or intensive compaction of the mixture.
Which to choose
For pouring into formwork, it is advisable to choose heavy grades of concrete, the filler of which is fractions of rocks. Granule size – from 6 mm.
You should focus on one of these brands:
- M100. Suitable for 1-story houses made of aerated concrete or wood. You need to make a pillow with a layer of 100 mm, consisting of the same mixture.
- M150. Designed for light buildings made of cinder blocks, aerated concrete and similar materials.
- M200. Refers to universal brands used in the construction of 2-story houses.
- M250. It has increased frost resistance and density.
- M300. Used for pouring foundations for heavy buildings.
- M350. Characterized by a high cement content. Wear-resistant, waterproof and durable compound.
- M400, M450. Designed for watery soils. The mixture is strong, but expensive. Rarely used in private construction.
To pour the foundation, use heavy grades of concrete.
Most often, the choice of developers falls on the concrete grades M250 and M300.
How to make the mixture yourself
To prepare a concrete mixture, you need to choose the right components. Among them are cement (grades M300, M400), sand without clay, granite crushed stone (fractions of 5–40 mm) and water. Various plasticizing additives and reinforcing fibers (fiber) can be included in the solution.
To prepare concrete without a concrete mixer, you need:
- Pour all components into a large container in the required proportions. Standard - 1–4–2–0.5, where 1 is cement, 4 is granite crushed stone, 2 is sand, 0.5 is water.
- Pour in water (leaving 1/3 of it).
- Stir and check consistency. If the concrete density is too high, add the remaining water.
Algorithm of actions with a concrete mixer:
- Turn on the device.
- Fill in all the components - first water, then cement, then sand and crushed stone.
- If the concrete is very thick, add water.
You can prepare the mixture yourself without a concrete mixer.
The total mixing time is no more than 10 minutes.
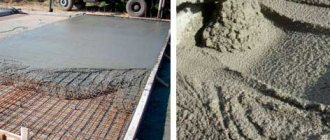
Correct filling
Concrete is poured in layers 20 cm thick each. Moreover, they should be laid along the entire length of the formwork, and not in parts.
After pouring, the concrete must be leveled with a flat board or trowel. Then compact the layer manually (with a crowbar, shovel, mechanical tamper) or using a deep vibrator. Each subsequent layer of concrete is poured no earlier than the previous one is compacted.
It is important that the concrete cures in a damp environment. 1.5–2 hours after pouring, it is important to cover it with covering material or sawdust.
Shallow strip foundation MZLF
According to SP 22.13330.2011 “SNiP 2.02.01-83*. Foundations of buildings and structures,” the type of MZLF depends on the degree of heaving of the soil.
RolandspbFORUMHOUSE Member
There are restrictions on the type of foundation for different types of soil heaving. Loam with different fluidity indicators can be classified into any group according to the degree of heaving; therefore, with more fluid loam, according to the joint venture, it is necessary to make a monolith.
Thus, it is recommended to make MZLF made of monolithic reinforced concrete on heaving soils with a groundwater level no higher than 1 meter from the ground surface.
It is laid above the freezing level, at a depth of 200-500 mm from the surface. With a low manufacturing cost, these foundations are characterized by high reliability; they last 15-20 years without repair.
The only thing: MZLF needs high-quality insulation - both the tape and the blind area - to reduce the impact of frost heaving. According to their design, MZLFs are divided into two types: classic rectangular section and T-shaped.
The MZLF sole with a T-shaped section makes the support area larger and works on bending, and the upper rib receives vertical loads from the structures above.
Heavy stone buildings are built on shallow strip foundations with a sole, while rectangular ones are suitable for frames and wooden buildings.
On slightly heaving and non-heaving soils, you can make a shallow tape of FBS.
What to do next
After concreting the foundation, you need to dry it by covering it with insulating material. The strip base gains strength in 26–28 days (at low temperatures, the period can increase to 4 weeks).
Removing formwork
It is recommended to dismantle the structure after the concrete has reached grade strength. Dismantling the formwork should begin from top to bottom, from the protruding parts of the foundation and corners.
Removal of formwork is done from protruding parts of the foundation.
The process goes like this:
- First, unscrew the bolts and remove the top ties.
- The lower ones are released.
- Separate the shields from the racks.
- The supports are removed.
- Remove the formwork boards.
It is undesirable to abruptly tear off all structural elements, because in this case, chips and cracks may appear in the concrete.
Insulation and waterproofing
Protection of the foundation from the effects of groundwater is carried out before pouring concrete or simultaneously with it.
For waterproofing the base, the following materials are used:
- Bitumen-polymer emulsion.
- Liquid rubber.
- Rolled pasting materials – fiberglass, fiberglass, polyester.
Roll materials are used for waterproofing.
Experienced builders do not recommend using parchment, roofing felt, roofing felt, etc. for waterproofing the base.
It is best to insulate the foundation at the stage of its construction.
The work can be divided into 4 stages:
- Preparation and cleaning of the base.
- Laying waterproofing materials.
- Insulation with polyurethane foam, foam boards or backfill method.
- Finishing.
Other popular insulation materials include expanded clay, mineral wool, penoplex and slag.
To insulate the base with bulk materials, it is necessary to dry the soil and remove dirt and sand from the surface. Slag, gravel or sand are used as backfill.
The process of creating a foundation with your own hands
Since the strip type foundation is the most popular for self-production, we will talk about it, although the principles of marking the site, forming the formwork, installing bulk cushions, and concreting too, are the same.
- The decision on what exactly the foundation for a two-story house should be is made based on the results of a soil study. But in any case, the preparatory pie contains a bulk layer of sand, crushed stone or a mixture of them, which depends on the specific construction conditions.
- The minimum thickness of such a cushion is 200 mm, but on highly heaving soils it can reach 60 cm. Although in such a situation it is much more profitable to make the bulk layer thinner - by laying a heat-insulating layer of polystyrene foam under the sole, which will ideally protect the structure from frost heaving.
Option of tape with insulation under the sole, for installation on highly heaving soil - The sand cushion should be three times wider than the base of the foundation. It is very important that it is compacted with a compaction coefficient of 0.95 with an optimal humidity of 8-12%. To prevent the sand from being washed away by water and mixed with the mainland soil when moistened, geotextiles are laid under it, as in the case of a slab.
- When installing gravel pads, additional moisture is not required. They are laid on waterlogged and weakly bearing soils under sand, or in a mixture of crushed stone or gravel with sand in a ratio of 60:40. The sand should be of coarse or medium fraction. Fine-grained and silty sand has a high degree of heaving, so it is not used for foundation embankments.
- On soils with insufficient bearing capacity, the section of the foundation strip is given a T-shaped configuration. It is quite difficult to assemble stepped formwork at once. It’s easier to first make a box for a pillow, say 80 cm wide, install a grid of 4 rows of working reinforcement in it and provide a connection with the tape itself.
- Before installing the reinforcement in the formwork, a PVC membrane is laid in such a way as to cover the ends of the monolith with a reserve. After the vertical part of the tape is poured, overlaps are provided at the joints of the waterproofing. If polystyrene foam is installed under the sole, the membrane may not be used, since EPS itself has good waterproofing properties.
- To reinforce the tape, AIII steel reinforcement with a diameter of at least 12 mm is used (if composite, then 8-10 mm). For pouring, concrete B20 (M250) is used, but B22.5 (M300) is better.
- After the reinforced concrete cushion has gained stripping strength, you can mount panel formwork on it under the tape itself - or simply put on top permanent formwork made of perforated expanded clay concrete blocks or expanded polystyrene. A tape width of 50 cm is enough to build walls 400 mm thick on it, also with insulation.
Expert opinion Vitaly Kudryashov builder, aspiring author
Ask a Question
Alternatively, the vertical part of the tape can be made from FBS blocks. But in this case, a monolithic reinforced belt must be formed on top of them, otherwise the tape will not be rigid, which is very important for walls made of cellular concrete.
After the concrete of the foundation strip reaches 50% of its design strength, the formwork (if it is removable) is removed - and waterproofing work can begin. The easiest way for this purpose is to use the same PVC membrane glued to the base with bitumen-polymer mastic. The canvas should be launched from the vertical surface onto a horizontal plane, on top of which the wall masonry will then be erected.
Is it necessary to use fittings?
The presence of reinforcement is not a prerequisite for a concrete monolith, and proof of this is the FBS foundation blocks, which are made without internal reinforcement. Here the main role is played by the density of concrete, which in this case should be no lower than 1800 kg/m³. It is almost impossible to achieve such a density under construction site conditions, so the lack of strength is compensated for by reinforcement.
Without reinforcement, only rubble concrete foundations can be poured, since the density of rubble stone is the same as that of solid brick - no less than 1600 kg/m³. The density of the finished rubble concrete varies between 1800-2200 kg/m³, which fully ensures the high compressive strength of the monolith.
Mistakes when building foundations
Each type of foundation has its own design features - and, accordingly, individual errors can be made. However, there are certain nuances, non-compliance with which can lead to undesirable consequences in any case.
- When performing excavation work, a pit or trench should always be dug with a gap of 10-20 cm, and then the bottom should be cleaned by hand. Overdoing it violates the natural density of the base and provokes uneven subsidence, since it is equally impossible to compact the topped-up soil. Unless the holes will have to be concreted - and this is an additional expense.
- The sand cushion should be poured and compacted in layers, with moisture content not exceeding 12%. Too wet sand is just as difficult to compact as dry sand, and even spreads in different directions, which is especially fraught with shallow foundations.
- For monolithic foundations, concrete of at least class B20 (M250) must be used - this is a requirement of building codes. The grade may be higher, it all depends on the perceived load. Concrete B22.5 (M300) is most often used in projects, with a water resistance grade of W6 and plasticity grade of P4.
- Laying the foundation must be done immediately after digging a pit or trenches. Open excavations are eroded, washed away by water or frozen out, and the strength of the soil begins to decrease. If this does happen, the pit will have to be drained and the bottom cleaned of the liquefied layer.
- When laying the foundation, it is necessary to immediately provide technological holes for communication inputs - so as not to drill into the monolith later. While drilling holes is still permissible for a strip foundation, it is not for a slab foundation.
- Mistakes can also be made at the stage of formwork formation. If wooden panels are being assembled, it is very important to use a board with a thickness of at least 40 mm. Thin lumber will bend under the pressure of concrete, thereby violating the geometry of the monolith. The boards must be joined without gaps, and the inside must be covered with waste oil or covered with geotextile or roofing felt.
- The bars securing the formwork boards are located on the outside of the panel, and the nail is driven in from the inside. In this case, the length of the nail should be such that it pierces the board and block, and the free end can be bent, which will prevent the possibility of spontaneous pulling out of the fastener. For self-tapping screws, bending is not necessary, since they are held in place by the thread.
- When assembling a reinforcement frame, mistakes are most often made when splicing rods along their length or joining them at the intersections of walls (for strips and grillages). The overlap of the rods must be at least 50 times the diameter of the reinforcement. Between joints in parallel rows of working reinforcement there should be a displacement of 61 cm.
- It is impossible to cut and bend long reinforcement at right angles; special L-shaped elements are used for corner connections.
- The foundation frame must be protected on all sides by a concrete shell. If there is no concrete preparation under the tape or slab, the thickness of the shell should be 70 mm from below (if there is a footing, 50 mm is enough), on the sides and top - 35 mm.
- When pouring concrete, the most important thing is quality compaction. The height of the layer that can be poured and vibrated in one go is 30 cm, so a slab with this or slightly less thickness is poured immediately over its entire height. Strip foundations are poured in horizontal layers, each compacted with a deep vibrator.
Example of calculating the weight of a house
To determine what size the tape will be, you need to calculate the mass of the future structure.
We calculate the approximate mass of the future structure; the area of the walls, the surface of the floor and ceiling, as well as the roof will be required.
Let's consider an example: a house is being built with walls 6 m and 5 m long, with one main transverse wall inside, the length of which is 5 m. The height of the walls is 3 m. The length of the external walls is 22 m plus a transverse wall of 5 m, it turns out 27 m. Multiply the length of the walls is 27 m by their height of 3 m - we determine the total area of the walls is 81 sq. m.
The floor and ceiling area will be 30 square meters. m.
Next, we calculate the roof area. We measure the height of the pediment using geometric formulas, calculate its area, then calculate the area of the roof.
We multiply each resulting area by the specific gravity of 1 square meter. m. of relevant material. We add up the numbers and get the approximate weight of the future house. To this you need to add the weight of the attic and basement floors.