- Tape
The construction of the foundation is a third of the cost of the frame of a low-rise building, and mistakes made are difficult or impossible to correct when the house has already been rebuilt. So that all the work does not go down the drain, you need not only to know how to draw the diagonal of the foundation and mark out areas of complex shape, but also to have in hand a project drawn up based on soil analysis. However, many developers decide to go it alone, and we hope that the information presented here will be useful to them.
What tools will you need?
You can mark the foundation yourself using the following tools:
- Roulettes;
- Cord;
- Hydraulic level and plumb line;
- In addition, you will need wooden pegs.
Where to start marking?
So, how to mark the foundation? First, you need to determine two starting points by driving pegs into the corners of the future building, located on the same straight line from the side of its longest wall. Next, you will need to draw perpendiculars from them, thus marking the outer contour of the adjacent walls.
"Egyptian Triangle". The simplest method
Marking the foundation with your own hands can most quickly be done using the “golden” triangle method, which has a side length ratio of 5 * 3 * 4. The event is carried out in several stages:
1. First you need to find a long rope and tie four knots on it. The first is at the end, the second is at a distance of 3 m, the third is four meters from the second and the last is five meters from the third; 2. After this, the very first and very last nodes are connected with a nail. A nail should be driven into each of the intermediate nodes; 3. In this case, the long side of the resulting triangle must be positioned along the line between two already driven pegs; 4. The required perpendicular is drawn along the short side; 5. On the resulting straight line, drive in the third peg at a distance equal to the width of the building.
Important: All measurements must be checked for accuracy. To do this, two cords are pulled diagonally between the driven stakes and tied at the intersection
Two arc method
Marking the foundation yourself using this method is also done using a rope. First, equal distances are measured from one of the pegs in both directions along an existing straight line and the found places are marked. Next, a rope with a nail tied at the opposite end is attached to one of the resulting points. Having pulled it, draw an arc opposite the peg from which the distances were measured. Then the rope is attached to the second marked place and another arc is drawn. From the point where the arcs intersect, draw a line to the peg. The result is a right angle between it and the existing line.
At the final stage, a cord is tied to the stakes at the height of the future foundation, checking the horizontal position of its position on all four sides, using the building level. For a strip foundation, draw an internal contour parallel to the found external one and also pull the cord.
Advice: If you plan to dig a trench using equipment, it is better not to use cords. They may break during operation. In this case, the lines between the found points should be drawn with sand. To find the centers of the columns of a columnar foundation, the necessary distances are measured from the found corners along the drawn lines and marks are placed. Next, check the squareness of the corners obtained at the intersection of the lines (connecting the obtained points on opposite sides and the perimeter line on which the marks are located).
Marking the foundation with your own hands, as you might have noticed, the procedure is not that complicated. The most important thing is to do everything carefully, pull the rope well and be sure to check the result using the diagonal method.
Video on the topic:
https://youtube.com/watch?v=66CDCNNuep8
Side walls
External walls are leveled if the differences are more than 1 centimeter. It would seem that no one sees the underground part of the tape, why give it evenness?
Firstly, the waterproofing simply won’t fit tightly on it, which leads to leaks and rapid destruction/erosion of the wall.
Secondly, the part of the foundation protruding above the ground surface in most cases is the base. Accordingly, wall defects will be visible, which is undesirable.
- The easiest way to level a wall if unevenness is found is by plastering. Moreover, if the level differences exceed 5 cm, a reinforcing mesh should be used, which will improve the non-load-bearing capacity of the facing layer.
- Brick laying of the basement part of the foundation wall. In this case, direct leveling of the side surface of the foundation is not required - it will not be visible behind the brickwork.
- Tiling with adhesive, which can be laid in a thicker layer. This option for masking irregularities is only suitable for walls with small defects.
Leveling the base is necessary if there are significant level changes. This applies to both lateral planes and horizontal planes. If you build a house on an uneven base during operation, the walls and the weight of the structure will create excess pressure on areas with curvature, which will affect the durability of the building.
Standard construction tools are required for leveling. Alignment is carried out in two ways - horizontally and under the cladding . During the execution process, errors may occur that must be eliminated at the stage of pouring concrete into the formwork.
How to mark a strip foundation
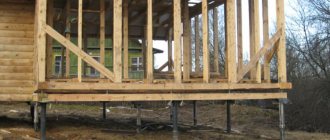
The foundation got its name “ribbon” because of its shape. It is laid in the form of a continuous tape across the entire perimeter of the building. It is used for light buildings, for example, frame houses or one-story timber buildings. The direction of the load-bearing wall is determined by the first peg. The required distance is measured and the second peg is installed. To obtain the second axis, the second cord is pulled at a right angle relative to the first axis. The corners of the foundation are marked with special devices:
- goniometer;
- level;
- theodolite.
If they are absent, use the so-called “golden triangle” method. One side is taken 3.4 m, the other 5 meters. The corner peg will be the vertex of the triangle. From it it is necessary to calculate, along the laid axis, exactly 3 meters. The hypotenuse of the triangle will reach 5 meters. The column on which the main axis is fixed moves in any direction until the distance separating the axes reaches the required value.
Then a stake is driven into this point on the site. The result is two found points. The required length is measured from them to the location of the third peg. Other angles are set in the same way. After marking the external axes is completed, the location of the diagonals of the foundation for the house is determined. The resulting length of the diagonal connecting the corners located in opposite directions is measured. The resulting value should have the same indicators. Starting from the obtained angles, in each direction, strictly along the axes, it is necessary to measure the width of the base. Pegs are hammered into each resulting point. After every two marks, cast-off boards are installed. To maintain dimensional accuracy, axial threads are fixed to the cast-offs. They must be at a height equal to the top mark of the foundation surface. Anyone can mark the foundation with their own hands, regardless of its type. You just need to approach this work with full responsibility and follow all the rules. Accuracy in such work will always lead to a positive result.
- Tools required for work
- Preparatory activities
- Marking the outer contour
- Marking the internal contour and load-bearing walls
Before starting construction work, be sure to figure out how to properly mark the foundation. Preliminarily draw up a plan for the future foundation on paper or electronically.
The quality, durability and reliability of the finished foundation directly depend on the correctness of the preliminary marking, so approach this work with full responsibility. The corners of the foundation must be absolutely straight, and the dimensions of the walls must be kept to almost a centimeter.
What is breakdown
Before starting to build a house or even go for materials, it is necessary to determine the type of future construction and develop an action plan. It includes a detailed layout of the building on the site, foundation features and all dimensions. After this, you can begin to lay out the foundation of the house. It’s worth mentioning right away that this work is quite specific, and if you are not confident in your capabilities, the best solution would be to seek help from surveyors. This is especially true for uneven areas with strong differences in height and slopes located near ponds or ravines. Otherwise, problems may arise in the future involving significant shrinkage of the foundation of the house. The price of laying out the foundation axes depends on the complexity and volume of work.
The breakdown consists of transferring the overall axes of the future building, as well as marking the lines of its foundation directly on the ground. Such work precedes the digging of a trench or pit to fill the foundation. The dimensional axis is a conditional guide that marks the center or boundaries of the placement of structural floors and functional elements (formwork). The guides must correspond to the dimensions of all load-bearing elements and the foundation as a whole.
To lay out the foundation with your own hands, you will need the following materials:
- hammer;
- bright paint (red);
- bright colored rags (red);
- boards;
- wooden pegs or metal bars (you can use pieces of reinforcement) with a length of 100 cm or more;
- twine or wire;
- roulette;
- nails.
To properly lay out the foundation, it is necessary to constantly check all the corners of the casting - they must be perfectly level. Otherwise, the walls will stand at an angle, and there can be no question of any strength of the structure.
If you are making a floor with standard elements, it is important to accurately transfer all the dimensions of the axes to the base. Don’t be lazy to take all measurements and check the results 2-3 times
In this case, the saying that recommends measuring 7 times is very useful.
Marking depending on the type of foundation
Each foundation has its own characteristics in connection with which there are its own characteristics in the marking.
Strip foundation
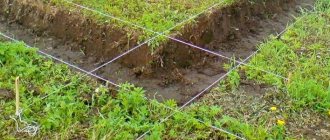
Pegs are placed at the corners of the foundation, between which it is necessary to stretch twine or colored tape. Pegs are driven into the corners of the outer edges, while the trench is dripped from the inside of the marking. It is difficult to find a perfectly level area, so the depth of the trench is usually measured at the lowest point of the foundation marking.
For a small building, a trench half a meter deep will be enough.
It is extremely important that the bottom of the trench is as level as possible. Also, the trench must have strictly vertical walls
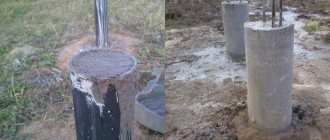
Columnar foundation
Marking a columnar, pile or slab foundation is very similar to conventional marking, but the process is somewhat more complicated. On the edges of the foundation markings, it is necessary to mark the points for placing supports. The distance between them should be no more than 2 meters.
Basic calculation parameters
When creating a drawing of the foundation of a house, it is necessary to use the results of calculations made when designing the foundations. In particular, it is necessary to take into account:
- total weight of the house under construction;
- an increase in the load on the house during its operation, for example, the construction of a second floor;
- groundwater level;
- type of soil on the land plot.
These data take into account not only the geometric dimensions of the foundation, but the materials that will be used in its construction (grade of concrete, size of reinforcement, etc.). In addition, the designer will determine the type of hydraulic and thermal insulation. When building a foundation on land with high groundwater, it is necessary to design a drainage system that will drain excess water from the foundation structure, thereby extending its service life.
Ideally, the design of foundations for buildings and structures should be carried out by a company that has experience in such foundation design work. When designing building foundations yourself, it is advisable to use current guidelines and instructions for foundation design.
Conditions and nuances of the process
In order for the marking for the strip foundation to be adequate, the following tools must be used to carry it out:
- 20-meter metal tape measure;
- reliable thick rope;
- strong wooden pegs and reliable clothespins, which are suitable for marking local points of the future structure.
Before starting work, be sure to determine the point that acts as the corner of the building. It is necessary to draw a special long line through this zone, which becomes the basis for the first wall (whether it is frontal or façade type does not really matter). The peg itself should be installed somewhere at a distance of 50 cm from the original corner, but we mark the last one with a clothespin.
Using a measuring tape, we set aside the required length from the wall itself, after which we drive in another peg at the same distance as the first, and also fix the location of the second corner with a clothespin.
It is not recommended to place the marker in the corner itself: it can either get damaged during the work, or simply interfere with the excavation procedure.
Through the mark-point, you should carefully draw a straight line of the second wall, just as it happened in the first case, to begin with, measure the required angle:
- we set aside four meters from the first wall and mark this point;
- on the second and third - and do the same;
- measure the resulting distance using a tape measure;
- if the result is 5m - great, you can also drive in the next peg of the next wall, measure the next angle;
- other geometric indicators are measured.
You should concentrate your attention - the cord, with which you can qualitatively mark the foundation yourself, must be located at the same height at all points. It is more than impractical to carry out measurements on the soil itself, since there is potentially a large error in the calculations due to the nuances of the relief
In itself, such work, in principle, is not particularly difficult. But sometimes its implementation requires the presence of an experienced and skillful assistant. You can complete the marking procedure by checking whether the diagonals of the resulting rectangle are the same. If a deviation within three centimeters is detected, then this indicator is quite acceptable.
The internal contour is marked in a similar way. Angles are controlled in the same way. If it is only intended to fill a trench using a foundation, the procedure can be performed immediately, always including formwork. In general, marking the area for the foundation is a fairly simple procedure; it is much more problematic to comply with all the geometric parameters of the installation of the formwork itself and the optimal installation of the mandatory upper level, adhering to the correct height. For this purpose, a procedure is carried out to thoroughly clear the construction site and level it even before marking is carried out.
The foundation project itself can be measured using technological reference measurements to the area being worked, which are indicated within its boundaries. Then, any of the potentially constructed corners of the structure are usually fixed, taking into account the selected distances from all control points. This will be the first corner of the structure.
All these facts are very important for the construction process. It is at this stage that we have the opportunity to make changes to the already approved construction plan that are necessary. It is worth taking into account only the fact that the parameters for residential development are maintained, for example, such as the minimum distance from the boundary limits of the site, as well as trunk-type pipelines.
Photo straightening services
There are enough services on the network that allow you to perform maximum photo processing. You can add effects to the photo, remove red eyes, change hair color, but all this will pale in comparison to the fact that the picture is skewed.
There can be several reasons for an uneven photo. Perhaps your hand trembled while taking a photograph, or it was not possible to capture the desired object on camera in a different way. If the photo turns out uneven after scanning, then it was simply carelessly placed on the scanner glass. Any irregularities and distortions can be easily eliminated using online editors.
Method 1: Canva
Canva is an editor with huge functionality in the field of photo alignment. Thanks to the convenient rotation function, the image can be easily placed correctly in space relative to design elements, text, pictures and other necessary details. Rotation is carried out using a special marker.
Every 45 degrees, the photo automatically freezes, allowing users to achieve a precise and even angle in the final photo. Professional photographers will be pleased to have a special ruler that can be dragged onto the photo to align some objects in the photo with respect to others.
The site has one drawback - to access all functions you need to register or log in using your social network account.
How a strip foundation works and its advantages
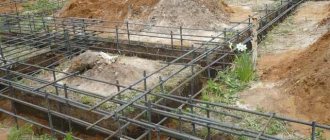
It is called strip because it looks like reinforced concrete strips laid in a trench dug along the contour of the building. If the soil is crumbling, the depth is large, and there are many intermediate walls inside the perimeter of the building, for which it is also necessary to build a foundation, then a foundation pit is torn off, in which all foundation work is carried out.
Structurally, a strip foundation can be monolithic or prefabricated monolithic. In the latter case, its upper part will have the form of a monolithic reinforced concrete belt located along all the walls of the foundation, assembled from individual blocks.
When carrying out private construction, trenches for a strip foundation, in order to save money, can be dug manually. In this case, the soil is either removed or scattered across the site, raising its level.
The depth of the strip foundation is usually determined by the level of soil freezing. For the southern regions of Russia it is a little more than a meter, in the northern regions and Siberia - 1.5 - 2 or even more.
Advantages of strip foundations:
- simple construction technology;
- it is possible to lay a ground or basement floor;
- built on strong soils - stone-sand and clay;
- they are quite economical;
- parameters - width, depth, amount of reinforcement, etc. indicators that affect strength are easily adjusted.
You can build such a foundation for a house with your own hands.
Average prices for work in the country
If you cannot carry out the leveling procedure yourself, you can use the services of contractor companies that offer to level the base part of the foundation with different materials.
For example, in Rostov craftsmen use extruded polystyrene foam, fiberglass mesh, and reinforcing mesh. For this they charge from 2550 rubles per 1 linear meter. In Moscow and the Moscow region, as well as in St. Petersburg, such a service will cost 3,500 rubles per linear meter. At the same time, the visit of the specialist to the point is often free.
The price consists of the individual characteristics of the base part, its size , as well as differences. The final cost is affected by the type of material used.
Marking the external contour and forming the corner of the foundation
For example, a 6 x 8 house will be built. After marking the side that will serve as its length, mark the second side. To do this, hammer in another peg, tie a cord to it and pull it perpendicular to the first one. The intersection point of the cords is fastened. This will be the corner of the foundation. On the second cord you need to make a mark, which should be equal to the width of 6 m.
The Pythagorean theorem is used to form the angle. In order not to engage in deep geometric calculations, take two segments of 3 m and 4 m. On the first cord, which indicates the length of the foundation, measure 4 m from the corner and put a mark.
A mark is placed on the second cord at a distance of 3 m. Then, using a tape measure, connect one mark to another so that 5 m are separated on the tape measure. If the distance between the marks is 5 m, everything is fine. If not, then the end of the second cord with the 3 m mark is moved until the tape measure is set to the desired distance.
Brief description of the laser level
A laser level is one of the devices that belongs to a large group of measuring instruments.
The main purpose of the level is to determine the difference in heights of one place on the surface relative to another place and to construct planes: vertical, horizontal and any intermediate ones in the form of a line - a trace of a laser beam. In addition, such a device can construct point projections - give a point on the surface.
Most often, self-leveling cross levels are used, which build two perpendicular planes - horizontal and vertical. They can be rotated and installed in any direction. The horizontal plane is constantly adjusted by auto-leveling elements.
The main characteristics of laser leveling are:
- measurement accuracy, professional devices give an error of up to 3 mm at 10 m, and household devices up to 0.5 mm at a distance of 1 meter;
- measurement range: for households up to 10 m, professional – 30 m or more;
- number of projected planes - usually two or more, etc.
But a level is, first of all, a measuring instrument.
It will only help you well if you know how to use it correctly.
If you take it for temporary use, i.e., rent, do not expect it to work on its own.
If you do not know what adjustment is, do not rent the device.
When starting to work with it, check the accuracy of the measurements and whether the settings are messed up, i.e. check all the characteristics described in its passport. All verification operations are in the description of the device.
There is no work on laying out the foundation that cannot be carried out without a level. Therefore, an ordinary water level, used correctly, can easily replace it. Although a laser level speeds up and simplifies work on a construction site.
Background
The story happened 7 years ago. In those years, construction for me was more like a part-time job as an auxiliary worker.
And in general, the construction activity itself did not interest me in any way, but quite the contrary.
My uncle, of the most honest rules, built himself a garage on the site
.
It must be said that, as long as I can remember, he is constantly building something,
either at the dacha, then on the plot, or helping a neighbor build something, although he himself is not a builder by training and has never worked in the construction industry.
At the same time, in my opinion, he always builds wisely
, without possessing scientific knowledge.
And so, my dear uncle, having decided to test my intelligence, apparently sets me a task:
“I have put out the formwork for the foundation
.
Before pouring, I need to check all the sides and diagonals
again.
But here’s the problem, I just can’t check the diagonals, because I have pallets with bricks
, I don’t have a level, a theodolite and other expensive things. Think."
Until that moment, I had not encountered such problems, I repeat, because... I worked more on auxiliary jobs. 3 minutes of reflection helped me find the answer. Try to solve the problem yourself, and only then look at the answer.
Cast-off device
A cast-off fence is a wooden fence that is installed at the site of future construction. The cord is attached to it when broken using nails. And on it are marked marks that determine the position of the axes. The classic cast-off fence is a fence made of a row of pegs that stand 60-70 cm apart along the entire perimeter of a leveled area. An edged board is nailed to them on top. The pegs are also tied together with a board at the bottom.
The cast-off may not be complete. For example, if your future house has only four axes, then you can put cast-offs only in the corners. At the same time, the thickness of the walls of the future house must be guaranteed to fall into disrepair. In principle, the cast-off is placed perpendicular to each axis and must grasp it in both directions at a distance of at least a meter, that is, a piece of cast-off made of three pegs is placed. In this case, it is necessary to take into account the distance to the trench - if it is an angle, extend it approximately beyond the edge of the trench by a meter, so that during excavation work it does not slide into the trench along with the ground.
It is advisable to install cast-off pegs at a regular building level or plumb line. The top cast-off board is attached from the outside from the middle of the construction to the pegs on the side, using self-tapping screws and a screwdriver. The top board should be installed at the same level along the entire perimeter.
If the cast-off is solid, make passages in it where possible. You will need to remove the earth and transport concrete in a wheelbarrow to the construction site, and perform other work - it will be inconvenient to step over cast-offs.
Installation of cast-offs
This part of the work should be placed in a separate section, since cast-offs are installed depending on the type of foundation. They are necessary to ensure that the markings are not disturbed when preparing the pit. Cast-offs are pegs with parts of a board about 60-80 centimeters long nailed to them. Nails are driven into their ends so that the string can be secured for marking.
From the corners, cast-offs are dug in at a distance of half a meter. The ropes are stretched so that their intersections are exactly at the corners. All lines laid by cords must intersect each other at an angle of 90 degrees.
A strip foundation requires the installation of additional cast-offs, with the help of which it will be possible to lay out the internal boundaries. They are parallel to the main ones, and the distance between the perimeter lines and the additional ones is equal to the thickness of the future walls. If the foundation is columnar, then using ropes and cast-offs it is necessary to mark squares for future piles. The intersection points of the cords should indicate the locations of future supports.
https://youtube.com/watch?v=66CDCNNuep8
Optimal distance to TV
The comfortable viewing distance refers to the distance from the seat to the monitor itself. Even the number of people influences the choice.
First you need to decide on the installation location of the TV device and the seats. And after that you need to measure the size between them.
Ideal distances to the TV for comfortable viewing:
- 32 inches – 1.2-2 meters;
- at 40 inches, the optimal distance from the screen is 1.5 - 2.5 meters;
- 46 – 1.7 – 2.9 meters;
- 55 – 2.1 – 3.4 meters;
- 65 – 2.4 – 4 meters.
The size should also be chosen depending on the size of the room where the TV will be installed:
- If the room is compact in size, you should use a diagonal of no more than 20 inches.
- If the room area is less than 18 square meters - 20-37 inches.
- For a room larger than 20 square millimeters, forty-inch diagonals are suitable.
Marking strip foundation
To correctly transfer a project with a strip base to a site, there are 2 ways
To correctly transfer a project with a strip base to a site, there are 2 ways.
Method number 1. According to the plan of the future house or extension, determine the position of the main point of the right corner, drive in a peg. Keeping the level, measure the length of one of the sides with a tape measure, drive in 2 pegs and pull the cord tightly. So you should have one side of the building, use the same principle to measure the second side. The result should be a rectangle. The level will help you set the right angle, and the tape measure will help you measure the exact length.
Method number 2. Using the principle of method No. 1, drive a peg in the right corner. Using a tape measure and level, measure the length of the front wall and secure with a second peg. On the thread of the second peg, mark the length of the left wall. Mark the points of the remaining walls in a square and add their values, and calculate the root from the resulting value. Secure the length to the cord and secure it to the right peg. Pull 2 ropes in these places, connect them at the marked points, and drive a peg at the point of contact, which will be the 3rd angle. Calculate the 4th angle in the same way.
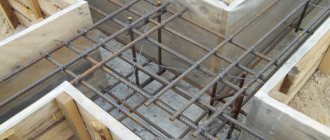
The strip base is made in the form of underground and continuous walls, with crossed reinforced concrete beams. Its width is calculated based on the quality of the soil; as a rule, it is 50 cm, i.e. equal to the average width of the walls.
Recommendations from experts
Thanks to the experience of professionals, the process of marking the site can be simplified and done using the following tips:
- the thread should be tightly stretched, without sagging or tearing out pegs; a damaged thread will not give the exact dimensions of the base;
- pegs can be made independently from remnants of reinforcement; they are perfectly installed in the soil and firmly fixed;
- always focus on the external boundaries of the land plot and the design of the house or extension;
- do not remove the threads until all work is completed;
- If possible, use professional equipment;
- If you are not confident in your abilities, seek help from professionals.
How to do it?
Markings are made for different types of foundations. It is necessary to bind the markup to the type, since it may have its own characteristics in each specific case. All of them must be taken into account. However, first it is necessary to consider the general specific features.
Two methods for constructing a rectangular foundation
In fact, anyone who studied geometry at school can construct a right angle. This does not require any special knowledge. So, in one of the cases you can apply the Pythagorean theorem:
C=√ (A²+B²)
Without delving into the jungle of geometry, it is worth considering the use of the Pythagorean theorem using an example. If there are two sides already built. One is located along the fence. There are no plans to change it. The second one was built nearby, but I am not sure that it is located at a right angle and I want to check it. Then you need to measure a segment from the corner on each side. For example, many take the entire length for a segment.
For example, let’s take sides of 9 and 12 m. Then √ (9²+12²) =√ (81+144) = 15 m. This means that the diagonal between them should be 15 m.
The second method is called the “web”
Here it is important to prepare a string that does not stretch
You definitely need to pay attention to this fact, otherwise nothing will work. First you need to cut the twine exactly to fit the dimensions of the future foundation
Let's take the same 9 and 12 m. It is necessary to cut off a piece in order to measure the diagonals in the future. You will need two sections of 9, 12 and 15 m, as well as a small amount for fastening.
Now you need to fasten the twine at the corners, and also attach the diagonals. After this you can start stretching. First, you should tighten one side, preferably a long one or located along the fence. After this, you need to tighten one of the short sides.
Under a columnar foundation
The cast-off should be made in two tiers. In this case, the lower tier should be located at the same level as the pillars. After this, you can tighten the string. You should check that the strings intersect at right angles. Where the twine intersects, use a plumb line to mark the places for the piles and secure the wedges. The strings should be removed so as not to interfere.
Now you need to drill holes for the pillars and install the pillars. Re-tighten the strings. Now you need to bring all the pillars out of the ground equally so that they touch the twine.
Under strip foundation
In this case, you will need to make double markings, since the strip foundation is a strip. First you need to position the cast-off, then you need to pull the string at right angles. First, the outer contour is made. It should be remembered that the height of the string must be equal to the upper level of the foundation. After this, you need to make an internal contour. To do this, a piece equal to the width of the tape is laid on a cast-off piece of existing twine, after which an internal contour is made.
Later, using a plumb line, the corner locations are determined. Pegs are fixed to the ground at the corners. A string is stretched between them, marking the boundaries of the trench for the strip foundation. After this they dig a trench. When forming the sheathing, it is not necessary to re-tension the top strings if the height of the foundation will be determined by the sheathing.
Under a slab foundation
In this case, marking is much easier than for a columnar or strip foundation. All you need to do is build a rectangle using string
Particular attention should be paid to drawing right angles. Basically, that's where it all ends
In the future, in the same way as in previous cases, using plumb lines you need to find corner places on the ground and mark them with pegs.
Complex markup
When you need to mark an unusual rectangular foundation, or a structure with many protruding corners, you will have to work hard. However, it is still possible.
The step-by-step instructions are as follows:
- To begin with, the general outline of the future structure is outlined. The plan should indicate the distances from the extreme protruding points to each other. Based on this data, a large rectangle is built into which the house will be inscribed;
- after this, it is necessary to correct all angles, re-measure the diagonals and lengths of the sides;
- Next, they move on to the most difficult thing - marking the breaks in the walls. It's worth keeping in mind that in almost a hundred percent of cases, each of these breaks is another rectangle, so all you need to do is build a few rectangles inside. In the future, it is necessary to set and recheck the angles;
- Using plumb lines, it is necessary to calculate the intersections that are also on the plan and form the general outline of the house.
Design Features
Diagonal 22 inches
The range of heating boilers is represented by different models. Some run on gas, others on electricity, and others on liquid fuel. Each type has its own operational advantages and disadvantages. The disadvantages of using certain installations haunt designers and technicians. So they decided to combine some models, and combined heating devices were born. They can operate, for example, on solid fuel and gas simultaneously.
This combination made it possible to minimize emergency risks and organize the operation of the same solid fuel boiler in autonomous mode. How do such installations work, and where is their use more than justified? As a rule, universal boilers are always equipped with an additional number of pipes. They can be used to connect underfloor heating, heating radiators, a greenhouse control system, heating water in a swimming pool or heating a bathhouse.
The gas burner in such a boiler is located below the combustion chamber, where firewood, briquettes, sawdust or coal are placed. Therefore, if necessary and switching, it allows you to completely burn the remaining solid fuel. If work is switched to solid fuel, the gas burner closes automatically. For ease of use, the steel heat exchanger responsible for heating the room passes through the entire body. All walls are thermally insulated with special mineral wool, so the efficiency of the unit is almost 92%. And this is a very high figure.
The heat exchanger for supplying hot water is made of copper and is located in the upper part of the installation. Copper is not afraid of corrosion, so the service life of the coil is equal to the service life of the entire device as a whole. Universal boilers have lever and air dampers that ensure the supply of the required portion of air.
How the installation works
The operating principle of a gas-wood boiler is extremely simple. The design uses two autonomous cameras. The furnace room is located above the gas room. This feature allows you to use two types of fuel simultaneously. Gas burners can operate at low pressure. Therefore, you can often see models that are connected not to central gas lines, but to liquefied gas cylinders.
Note! If there is a power outage, the gas-wood boiler will not be able to operate on gas. And all because the products of its combustion in this case will not be independently discharged through the chimney to the outside, and condensate instantly accumulates on its walls, clogging the chimney
If there is no light in the house, the boiler is heated exclusively with wood.
Advantages of installations
There are quite a lot of advantages of gas-wood boilers, so we will outline only the most basic ones:
- The main factor is the opportunity to save money and use cheap firewood instead of expensive blue fuel. If you run out of wood, you can switch to gas in automatic mode.
- The combined design allows the use of autonomous heating. Gas ensures operation of the installation at night without additional fuel loading. It’s also nice to come home after work to a well-heated house, knowing that the gas will maintain the desired temperature when there is no one to throw firewood into the stove.
- Universal combi boilers can have one or two circuits, so you can use the installation not only for heating, but also for supplying hot water for technical needs. Today, universal gas-wood boilers are equipped with storage boilers, and there are models that can heat water to the desired temperature using a flow-through method. The choice is great, and that makes me happy.
But before deciding to purchase such installations, experts recommend studying the features of their operation and disadvantages.
Preparing to mark the foundation
Before starting work, it is necessary to clear the future construction site of debris, remove grass, eliminate uneven areas, and you may have to fill in low areas of the land. In other words, remove from the territory everything that could interfere with construction work. By the way, tall grass can create certain errors when marking.
Marking the foundation does not in any way affect the strength parameters of the foundation for the house. But the quality of its implementation determines the angles, length of the walls, and sometimes even the layout of the house. Marking the foundation with your own hands allows you not only to save a certain amount, but if necessary, make any adjustments.
As an example of marking, let's consider the most variant when the house and land plot have a rectangular shape. The sequence of actions will look like this.
The first step is to establish the location where the house will be located. It is necessary to select the closest boundaries of the site. By stepping back from the boundaries of the site a certain distance, you can tighten the cords. They will show you the first corner of the house. The cords are pulled onto pre-prepared pegs. Using a construction tape, you can mark the walls of the house. After all measurements have been completed, you can stretch the cords between the marked points. This will be the outline of the future house. At the last stage, you need to check the marked corners.
Useful tips
The following tips will help you mark out the foundation for your house with your own hands:
- before starting marking, check whether the setbacks from the red line and the boundaries of the site prescribed in the development permits are observed;
- To ensure that the lines of the cords run as accurately as possible, it is recommended to use pegs of small diameter - cuttings of reinforcing bars with a diameter of 10-12 mm are ideal, they easily enter the ground and hold firmly in it;
- the cord needs to be tightened so that it does not deviate due to tall grass getting in the way, etc.;
- you should not remove the cords until the trench has been dug, so as not to lose the accuracy of the markings;
- at the stage of installing the formwork and after pouring concrete, or when erecting supports for the grillage, check the diagonals so that the constructed house has right angles and stands firmly on the foundation.
A foundation made by yourself will evenly distribute the load on the ground, provided that the markings are correct and the installation technology is followed.
Marking axes and angles - placing benchmarks outside the perimeter of the foundation
The starting point of all markings should be a point on the ground that is precisely “tied” to the site plan. Most often, this is a corner point, usually associated with the so-called “red line” - the border of your site and public territory, on which neither you nor anyone else is allowed to build. The intersection of the border of your and the neighboring plot with the “red line” will give such a point. Your property's fence should be located inward from the red line.
Typically, the house is located from this fence and from the neighbor’s fence at the following distances:
- according to sanitary standards defined by SNiP 30-02-97, clause 6.7: at least 3 m;
- according to fire safety standards SP 42.13330.2011p.7.1: at least 6 m from windows to the walls of a neighbor’s house or garage, bathhouse, barn, etc., at least 3 m from a residential building to the border of the neighboring plot.
Therefore, you need to retreat to the specified distance or further and you can begin marking the foundation with your own hands.
A. A “red line” is established on the ground. If the owner is going to build a house exactly at the normalized distance from the “red line,” then it is better to invite a professional land surveyor to mark the future corners of the house. But most often they retreat by 1 - 1.5 m from these restrictions.
Accurate orientation to the cardinal points. It is possible at a great distance from the “red line”. But they usually focus on the center line of the street or road.
If you mark the corners of the foundation with pegs, driving them exactly at the points of the future corners of the house, then when digging a trench, the marking pegs will definitely fall into the trench.
Therefore, marking the area for the foundation begins with the installation of wooden support frames outside the trench or pit, or more precisely, outside the excavator operating area. They are called cast-off boards or beams, or simply cast-offs. Some "experts" call them "stools." Cords or wire are pulled over them. The places where the cords intersect will provide the necessary marking points, but not on the ground, but “hanging” in the air. These “points” are later transferred to the ground or to the formwork.
Three or five nail marks are hammered into the top bar of the cast-off:
- in the center - an axial mark for the axis of the foundation wall;
- to the right and left of the axial line are marks for the width of the foundation wall;
- even further - the width of the pillow under the foundation.
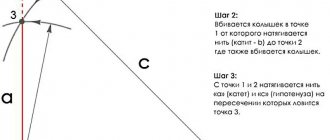
Step 1. Marking the starting side.
We start from the side that is closer to the “red line”.
We hammer two cast-offs 1 - 1.5 m outward from any corner. We tighten the axial cord. Using a water level, set the upper part of the cast-off bars at a height of “0”. Having retreated 1 - 1.5 m, we hammer the first peg into the ground - we make a starting point. From it we use a plumb line to “raise” the point onto the cord. We measure the length of the wall along the axes on the cord and make a mark on it. We lower the point to the ground and hammer in the second peg. Between the pegs is the axis of the first wall.
Step 2. Marking the side perpendicular to the starting one.
Using the Pythagorean theorem and knowing the lengths of the sides of the foundation, we calculate the length of its diagonal (along the axes). On the cast-off of the perpendicular side, on the axial nail we fasten the end of the cord and pull it over the opposite cast-off. From the intersection with the axial cord, measure the length along the axes of the second side and make a mark on the axle cord of the second side. On a free piece of cord we tie knots along the diagonal length along the axes. We fix one knot on the axis mark of the third side and pull the second knot towards the opposite cast of the second side. By aligning the second knot with the mark on the cord of the second side and pulling the cords, we get the first right angle.
Another way to construct a right angle is the “Egyptian triangle” method. On the cord of the first axis, from its intersection with the second axis, we measure 4 meters or a distance that is a multiple of this value. On the cord of the second axis we measure 3 m or an equal multiple of the distance. We make marks on the cords and measure the distance between them with a tape measure. It should be 5 m. By moving the second cord relative to the point of intersection with the first, we achieve the exact value - 5 m. The angle in this case will be straight.
Step 3. We perform these operations two more times and get two more right angles.
The last actions must take place in the zone of one point - the virtual corner of the foundation opposite the first corner. If all measurements were made carefully and the calculations were made without errors, then the last two nodes should coincide.
So, a simple step-by-step guide that will help even beginners
Scheme of a foundation made of reinforced concrete blocks.
Step 1. Find the starting marking point or basis.
And no matter how difficult it may seem at first glance, you can also do it yourself. As a rule, they use the border of their site as the simplest landmark. We fix a point on the facade of the future house at the corner that is closer to the edge of the site. We drive a peg into this point.
Step 2. Draw out all four sides of the future house.
According to the plan, we measure the length of the wall to the right corner on the front side of the house and install the peg again. Next, you should find the opposite third point of the base in the left corner of the rear wall of the house and mark it with a peg. In the same way we mark the fourth point - the right corner of the back wall. Stretch a cord between the pegs. It should be at the same height. There is no point in taking any measurements on the ground, since they may be distorted due to uneven terrain.
The work is absolutely simple, but monotonous and requires the presence of an assistant.
If your house design has protruding parts such as a veranda, the initial markings should be made only for the main part of the building. You'll add everything else later. The exception is, it must be filled in immediately and entirely.
Scheme for marking the area for the foundation
Step 3. Check whether each diagonal of the foundation has been marked correctly.
Using a tape measure, you need to measure the distance between opposite corners of the foundation. This is the diagonal of the base of the building (between points 1 and 4, 2 and 3). To make it easier, refer to Figure 1 below.
Both diagonals of the foundation must be the same size. If for some reason this is not the case, you need to check every corner. The angle should be 90°. A square will help you accurately calculate the angle. It is better to draw right angles using the method of transferring pegs. Your goal at this stage is a perfect diagonal.
Step 4. Mark the partitions and extensions (if you are planning a foundation like a solid slab, this step is not necessary).
At the first stage, you should correctly calculate the partitions; of course, the main walls will help you. You just need to measure the distance exactly. Then we check again whether the markings were made correctly according to the design of your house. The first marking stage is complete, and you can be proud that you did it yourself.
Scheme for marking the foundation of a garden house.
Step 5. Make a cast-off.
The second stage of DIY has arrived. The casting is needed in order to find all the points of the foundation while digging the pit, since the pegs will be in its inner line. Therefore, cast-offs must be done behind the line along which they will dig.
Cast-offs are posts firmly driven in pairs into the ground at a distance of 1.5 - 2 meters from the corner of the building. The columns are connected to each other by horizontal strips at the same height. The height of the cast-off is what it is.
Thus, the cast-off needs to be brought beyond the foundation line. The parts of the cast-off are evenly connected to each other with a cord that will run parallel to the cord on the pegs. An example of how to do this with your own hands is shown in Figure 2.
The cast-off must be brought out in such a way that the cord is on the top line of the foundation. This is where a hydraulic level comes in handy. Using it, you need to calculate the entire cast-off at the level of the top line of the foundation of the house.
Once you have managed to calculate and mark the foundation of the building, you can move on to the next stage.
Step 6...
You need to make a trench slightly wider than the foundation. Keep in mind that the formwork must also fit there. It is believed that marking the base is not as difficult as installing geometrically accurate formwork and leveling it in height.