The foundation for a bathhouse made of blocks is an alternative to a conventional reinforced concrete foundation due to the fact that it is easier and faster to make, and there is also the opportunity to save money.
Let's consider which blocks are suitable for the foundation of a bathhouse, how to properly prepare the area, as well as what are the laying rules and the main difficulties or errors that may arise during the work.
Types of material
Most often, the base for a bathhouse is made from 4 types of materials:
- FBS;
- aerated concrete;
- foam blocks;
- gas silicate.
Each of them has its own pros and cons, as well as the types of soil for which it can be used.
FBS 20x20x40
This type of material has 2 subtypes:
- Monolithic. Can be used for a strip or columnar base. They have high strength and density. Most often used in the construction of low-rise residential buildings.
- Hollow ones are an analogue of the first option, but in their “body” there are special voids.
They are needed to make a kind of formwork from these blocks. Reinforcement is installed inside the holes and then filled with concrete. This type of blocks allows you to arrange various types of communications. More expensive than the first option, but after the concrete hardens, a more durable base is obtained.
Reference. The advantages of FBS are high strength, durability and resistance to low temperature, moisture, and soils with high acidity.
Disadvantages include excessive weight, which requires special equipment for installation, and if the blocks are connected incorrectly, the foundation may sag.
Foam blocks
Foam blocks are a construction material that is obtained by foaming concrete with special substances or using a chemical reaction. There are 2 subtypes of this building material, which differ in their manufacturing method:
- Autoclaved. They are made from cement, gypsum, fly ash (can be replaced by sand), lime and gas-forming materials.
For hardening, an autoclave is used, which, at a temperature of 40° and high pressure, allows the material to be saturated with gas. - Non-autoclave. This is an analogue of the previous method, but hardening occurs naturally, which makes the material less strong, but cheaper. Most often produced using the artisanal method.
The advantages of this material are:
- small sizes relative to FBS, which is why they can be laid by hand, but they are larger than bricks, so the installation process is accelerated;
- light weight;
- low cost;
- vapor permeability;
- environmental friendliness;
- This material can be nailed or cut with a wood saw, which is why it is easy to process.
The disadvantages include:
- Low load-bearing capacity (but it is sufficient for the construction of a bathhouse), as well as the ability to absorb moisture. Because of this, foam blocks require external finishing with materials that will not allow water to pass through, since when wet for a long time, this type of block quickly collapses.
- Also, after construction, foam blocks can shrink (especially non-autoclaved ones), which is why it is necessary to finish the walls and foundation taking into account this drawback.
Expanded clay concrete
Expanded clay concrete blocks consist of cement, sand, water and expanded clay (light baked clay rocks in the form of pieces of gravel).
Pros:
- This material is lighter and cheaper than brick, which speeds up the work process.
- Another advantage is the lack of shrinkage and ease of finishing.
The disadvantages include:
- frost resistance up to 100 cycles;
- hygroscopicity (strongly absorbs water), which is why this material is not recommended for bath structures, but if you finish it with moisture-proof coatings, you can make a base for a sauna that will not be inferior in characteristics to other blocks;
- The size of expanded clay concrete products may vary, which makes it more difficult to select blocks by size.
Note! A supporting structure from such parts can only be made on soils with low groundwater levels, and additional waterproofing will also be required when installing the base.
Gas silicate
Gas silicate blocks are an analogue of aerated concrete products, but their composition is dominated by quartz sand, lime and water ground to a powder state, and concrete is used only as an additional additive. The composition also includes an aluminum suspension (sometimes powder), which, when entering a chemical reaction with lime, forms gas bubbles.
The disadvantage of this type of blocks is their hygroscopicity and low ductility. The advantages include resistance to chemical attack and mechanical damage, low weight, and good strength.
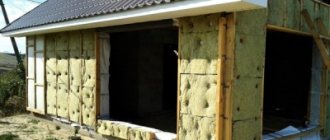
Insulation of aerated concrete bath from the inside
Insulation of a bathhouse from the inside is done by laying heat-insulating material between the frame posts. The frame, in turn, is attached to the walls with hangers or perforated corners.
Frame for laying thermal insulation
You can read more about the thermal insulation of a bathhouse, in particular a steam room, on the website.
To waterproof a bath, you can use liquid glass or film materials. Membranes and films have a long service life and protect the insulation well from moisture.
Let's look at an example of waterproofing a bathhouse using Ondutis R Thermo film. This is a two-layer material, has an aluminum reflective coating, effectively protects the insulation from moisture, and allows for better heat retention in the room.
“Ondutis R Termo”
Step 1. Measure the width of the walls and cut out the insulation sheet.
Step 2. At the bottom of the wall we attach the adhesive double-sided tape “Ondutis BL”.
Step 3. Take the canvas and place it horizontally, with the smooth side facing the room. We tighten it at the bottom of the wall so that there is no sagging. We fix the canvas with a stapler, driving the staples into the sheathing bars.
Step 4. Remove the protective film from the adhesive tape and glue the bottom edge of the canvas to it.
Step 5. Take another piece of adhesive tape and glue it to the top of the already secured canvas.
Step 6. Stretch and fix the second fabric. We maintain an overlap of 10 cm between the ends of the canvases. Next, we repeat the steps described above, fixing the waterproofing film on all walls.
Step 7. We fix the waterproofing on the ceiling, the installation principle is the same. Do not forget about the need to overlap the canvases both in length and width. We also fix the end joints with double-sided mounting tape.
Step 8. On top of the film we stuff counter battens with a thickness of 25 to 50 mm. We fasten the slats with galvanized nails, check the verticality of the slats with a level and plumb line.
The photo shows the fixed vapor barrier and counter-lattice slats. In this case, the joints were additionally taped with foil tape.
Then you can move on to decorative finishing, for example, covering the steam room with wooden clapboard or block house.
Steam room in the bathhouse, finishing work
Installed lamp
An example of finishing a bathhouse inside
Relaxation room in a bathhouse made of aerated concrete
The other side of the rest room, wall decoration with clapboard
Finishing a shower in a bathhouse made of aerated blocks
Tools and consumables
In order to make a base from block building materials, you may need:
waterproofing materials (liquid or in rolls);- fittings;
- shovels;
- concrete mixer or construction mixer;
- perforator;
- pegs;
- thread or rope;
- grinder or gas cutter;
- saw for porous blocks;
- buckets;
- building level;
- trowel, spatula or trowel.
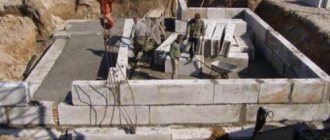
Installation of formwork
To create formwork with your own hands, edged boards with a thickness of 25-40 mm are used.
There are other materials, but wood is more accessible, cheaper and easier to work with. In addition, after completion of the work, the boards can be used for other purposes.
The thickness of the boards directly depends on the height of the tape.
The formwork is assembled in stages:
- Assembly of shields. The height is 5-10 cm greater than the height of the tape; the length of the boards is determined by the length of the walls or the size of the boards.
- Installation of shields in the trench. They are fastened together by support strips that determine the thickness of the future tape. On the outside, the shields are reinforced with supports that prevent the mass of concrete from pushing the walls of the formwork outward.
- If the boards are low (up to 20 cm), supports can be omitted, securing the walls from the outside with pegs.
NOTE! When assembling the boards, gaps between the boards should not be larger than 3 mm (ideally, there should be no gaps at all). If gaps appear, they are filled with tow or slats. The installed formwork is a structure whose internal space is the exact shape of a concrete strip
After assembly, all dimensions should be checked to eliminate the possibility of errors.
The installed formwork is a structure whose interior is the exact shape of a concrete strip. After assembly, all dimensions should be checked to eliminate the possibility of errors.
Nothing can be corrected subsequently, so the assembly process must be monitored with the utmost care.
Rules for arranging a supporting structure
Advice. When arranging a foundation made of block materials, it is recommended to use FBS, since they are the most durable and are also manufactured specifically for these purposes.
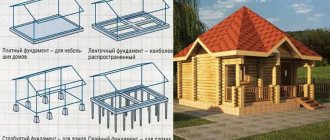
You need to decide on the type of foundation: make a strip of blocks or put the bathhouse on a columnar foundation.
The first option is more expensive and takes more time, but the base will be more durable. The second is used for lightweight buildings, consumes less resources, and also makes it possible to isolate the building from melt water.
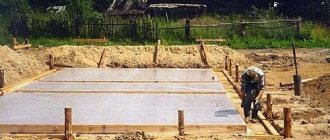
Preparing the area
To begin work on the selected site you will need:
- Remove all bushes, trees and other plants, as well as their roots.
- Dig up 15-20 cm of soil at the approximate location of the future bathhouse.
- Move it beyond the foundation boundary.
- Smooth out all uneven surfaces (fill holes with soil and dig up mounds with a shovel).
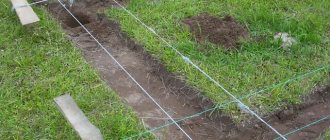
Axle breakdown
In order to break the axes of the future foundation, you will need:
- Take pegs and a thick thread (or rope).
- Using these tools, make one of the sides of the foundation.
- After this, using the rule for constructing Egyptian triangles, make right angles for the base - for this, equal marks are made on the thread (12 pieces).
- Using the marked cord, make a right triangle with an aspect ratio of 3:4:5.
- Connect all the corners together to get the final dotted line for the foundation.
- Check the diagonals to understand the symmetry of the resulting rectangle.
Base structure
To arrange the foundation you will need:
- Along the perimeter of the figure that was created before, make markings for the pillars, starting from the corners. The distance between the two parts of the base should not exceed 100-150 cm, and in some cases it is recommended to take a smaller step so that the lower crowns of the bath do not sag.
- Dig holes depending on the depth to which the pillars will be buried. If the soil is not heaving, then 40-50 cm is enough, and for moving soil this value corresponds to 50% of the freezing depth (for example, if it freezes at 120 cm, then you need to dig at 60 cm).
- For each hole, if it will be dug more than 1 meter, it is recommended to make wooden supports so that the walls do not crumble.
- In width, for pillars 50x50 cm, a hole of 60x60 cm is required.
- You should make a small reserve of depth, since you need to put sand and crushed stone at the bottom of the hole to make a drainage pad.
- After compaction, you need to waterproof the blocks from the soil, for example, with roofing felt.
The principle of laying blocks
The blocks must be laid so that the upper rims do not coincide with the lower ones (in a checkerboard pattern). During the installation process you will need:
Make cement mortar.- Add special additives or coating mastic to it so that you can more conveniently coat all the cracks and joints.
- At the time of laying, the blocks are fastened together with cement, similar to brickwork.
In some cases, reinforcement is used, which is inserted inside the blocks into special holes, which are then filled with concrete.
Important! If the base is made of hygroscopic blocks, then careful waterproofing is required on all sides of the column.
Foundation for a bathhouse with drain
Floors equipped with a drain are sealed; the water goes into a prepared hole in the floor, towards which there is a slight slope. In both cases, after this the water either falls directly onto the ground or is drained outside the foundation, which is much more correct.
To eliminate the influence of water on the foundation, water should be collected in a specially equipped drainage pit, if the soil allows it to be absorbed without residue, or it should be drained from under the foundation - this option is good for clay soils that do not absorb water well. The foundation should facilitate ventilation of the underground space (this applies to all types of strip foundations), for which several holes must be formed in the walls - vents that ensure air movement.
This diagram shows a shallow strip foundation; it must be equipped with vents if you need a foundation for a bathhouse with a drain
Water drainage is organized in advance, during the construction of the foundation. The pipe system must be laid during pouring so as not to subsequently break the finished tape. On clay soils, you can simply make a drainage ditch with a slope towards the drainage, but the passage through the tape, however, must be formed with a pipe to prevent the concrete from getting wet.
Possible difficulties and errors
During the installation process of the base, the following difficulties and errors may occur:
- if you make a sand cushion incorrectly, the pillar may sag or begin to be washed away by groundwater, which will cause the bathhouse to begin to warp, and part of the base may burst;
- after the solution has hardened, the remaining voids must be sealed with cement so that the strength of the pillars does not decrease;
- it is necessary to carefully check the evenness of the base, since the entire building may become skewed, and also plan out the communications so that later you do not have to dismantle the walls or foundation;
- with poor waterproofing, some types of blocks increase their mass due to the collected water, which can cause the pillar to subsidence;
- Due to wetness, the block base can quickly break, so all cracks must be carefully sealed with waterproofing materials.
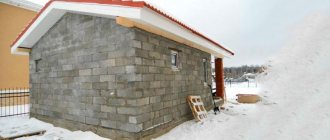
Foundation for a bathhouse made of blocks
One of the most common buildings built on the territory of summer cottages, country cottages and private houses is a bathhouse. It is here that, taking water treatments, you can fully relax after hard agricultural work or a difficult week of work.
Having set the goal of building a bathhouse, you should pay special attention to the issues of building a reliable foundation that will ensure the service life and stability of the building for decades. Among the possible options that ensure the strength of such buildings, a foundation made of blocks for a bathhouse stands out, which has a serious set of advantages
For the construction of light buildings, which include a bathhouse, various types of block structures are used. Let us dwell in detail on their features, selection criteria and construction technology.
Excavation
The first stage of excavation work is the removal of the top layer with simultaneous leveling (leveling) of the site. For this purpose, it is best to use a bulldozer, although for small buildings located on a flat area, manual preparation is also allowed.
The prepared area is carefully marked using wooden pegs. They are stuck at corner and intermediate points that define the contours of the future trench. After marking is completed, a trench is dug to the calculated depth.
The excavated soil is transported off-site or stored nearby for later use.
How to lay FBS
In any row, laying begins from the corners. Then the blocks are placed in the places where the piers are drained. They are called lighthouses, and then all others are compared to them. Their vertical alignment is checked and corrections are made if necessary. Most often, the block must be lifted again, moved and replaced.
After the beacon elements are installed, the moorings are stretched - cords along which they are guided when installing the next blocks. They mark the boundaries of the wall, and so that the FBS stand symmetrically relative to the middle of the FL block (pillow block). The maximum permissible deviation is 12 mm. All subsequent rows of blocks should also be placed exactly above the middle.
When laying blocks, you must ensure that they are stacked one above the other without much displacement
It is more convenient to pull the cords 2-3 mm from the side surfaces of the lighthouse blocks. This will make it easier to display. Intermediate blocks are placed starting from the largest: first they put everything 2.4 meters long, then 1.2 and then 0.9. The correctness of their installation is checked against the marking cords, verticality - with a plumb line.
How to choose the sizes of FBS blocks
You can determine how many blocks you need for your foundation by selection. You can do this yourself on a plan drawn to scale. On the plan, you mark each block to the same scale.
The sizes of blocks for a FBS foundation are selected based on a simple rule: to increase the strength of the structure, you need to use the largest block sizes. Therefore, first you draw the 2.4 meter blocks installed in the corners, then, if they fit, draw them in the places where the partitions adjoin. Between them, you also place the largest blocks that can fit there. Where they no longer stand, place them in a smaller size. If there are any gaps that even the smallest block (0.9 meters) cannot fit into, don’t worry - these gaps are filled with brickwork.
Two types of prefabricated FBS strip foundations - with and without a cushion (shallow strip)
Draw the second row in a similar way, not forgetting about the displacement of the seams. If necessary, draw the third one in the same way. Then count the required number of blocks of each size. Do not throw away the resulting plan: it will be useful to you when installing the prefabricated foundation already on the site.
FBS masonry mortar
For laying foundation blocks, standard cement-sand mortar M-100 is used. It can be obtained using different cement grades and amounts of sand:
- For 1 part of M300 cement take 2.5 parts of sand;
- For 1 part of M400 cement there are already 3 parts of sand;
- when using M500 sand, add 4 parts.
First, mix the dry ingredients until a homogeneous composition and color is obtained. Then gradually add 0.5 parts of water. If the solution turns out to be too thick, add water little by little in small portions. The consistency should be like thick sour cream: not lumpy, but not runny either.
About the benefits of bath procedures
Visiting the bathhouse is a tradition that most people adhere to. The optimal combination of moisture and temperature, which can only be achieved in a properly constructed and equipped bathhouse, has a beneficial effect on the cardiovascular, respiratory, nervous system, as well as the musculoskeletal system. It has been proven that after water procedures, the skin rejuvenates, a state of vigor, freshness, and strength comes. The use of safe building materials for the construction of a bathhouse and the correct execution of construction work will ensure a positive impact on health.
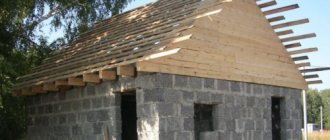
Walls
The following materials are used for the construction of walls:
- Wooden beam.
- Logs.
- Boards.
- Brick.
- Blocks from various building mixtures (cinder block, aerated concrete, wood concrete, and so on).
Since the construction of a bathhouse from logs or bricks is already quite widely described on the Internet, let's consider the option of building a frame bathhouse from timber 15x15 and 5x10 centimeters and boards with a section of 2x15 centimeters:
- Make the bottom trim; to do this, take bars with a cross-section of 15x15 cm and install them on the foundation, connecting them together with special metal plates and corners. There is another way to connect bars, by cutting out tenons and grooves at their ends and then fastening them with screws or nails. When making the strapping, do not forget to place waterproofing under the bars.
- Install vertical posts from 5x10 cm timber. The distance between the posts is usually 50-60 centimeters. First of all, determine the position of the window and door openings and install the racks framing them.
- While working, secure the already installed racks with temporary strips so that they do not warp.
- Make the top trim, securing it to the ends of the vertical posts.
- When making the final fastening of the top trim, carefully monitor the position of the vertical posts, checking their evenness with a level.
- Be sure to strengthen all corner joints with diagonal posts, this will help prevent the frame from warping.
- Make the ceiling sheathing.
- After making the frame, make the external cladding of the walls of the bathhouse with a board with a section of 2x15 centimeters. If you do not want gaps to appear between the boards, then make the sheathing - “overlap”, laying the bottom edge of the board on a nailed board. In appearance, this method resembles finishing walls with siding.
- Having sheathed the bathhouse from the outside, proceed to installing the insulation. Sheets of foam or mineral wool are installed along the vertical posts of the frame.
- On top of the insulation, it is necessary to install a layer of vapor barrier, which is attached to the vertical posts using thin slats.
- After installing the vapor barrier, line the interior of the bathhouse with clapboard or slats.
- Insulate the ceiling by laying vapor barrier sheets on the inner lining, then insulation. Sheathe the ceiling from the outside with sheets of plywood.
Please note that the manufacture and insulation of the ceiling can also be done after the roof has been installed.
Advantages of a block base
The advantages of concrete blocks 20x20x40 include:
- Simple masonry technology. There is no need for formwork, products with this size are easier to level, errors are practically eliminated.
- Less dependence on weather conditions: it is advisable to assemble a foundation from concrete blocks at above-zero temperatures, but there is no need to compact the solution, heat it up during a sudden cold snap, or constantly moisten the poured monolith in hot weather.
- Increased strength and durability of the base.
- Affordable cost of foundation blocks, low installation costs.
- High precision of geometric shapes, which in turn minimizes the consumption of masonry mortar and simplifies the process of waterproofing and finishing.
- Environmental friendliness and compliance with sanitary standards.
It should be noted that these advantages appear only when purchasing high-quality foundation blocks. Wall or hollow products are only suitable for temporary panel sheds; experts do not recommend buying them.
Recommended foundation types
The easiest way to make a strip- or column-type base is from blocks measuring 20x20x40. The first option is chosen when building a foundation for houses with high load-bearing capacity, and in turn can have a shallow (for wooden buildings) and deep (for brick and stone buildings) design.
The second type (columnar) is chosen most often; it is optimal for light, low-rise buildings on deeply freezing but slow-moving soils. The recommended depth of the supports varies from 1.5 to 3 m; it should be remembered that there is no underground space in such houses and the basement requires additional finishing.
Engineering ways to eliminate deficiencies
If we take into account the fact that blocks made on the basis of foam concrete have significantly more “pluses” than “minuses”, then it is simply impossible to refuse the use of such materials. As a result, builders have to look for solutions to eliminate all the shortcomings of the building material.
First of all, the problem with the fragility of building blocks can be solved by strengthening the foundation. For the construction of buildings made of foam blocks, a special slab base is often used, but it is also possible to use a strip foundation (profiles “T”, “G” and “L”, which do not shrink).
As for the increased hygroscopicity and the negative impact of moisture on foam concrete, these disadvantages of the material can be eliminated by additional finishing of surfaces and their insulation.
Thanks to such simple and affordable processes, it is possible to increase the reliability and durability of any structure almost significantly, and eliminate premature wear and destruction.
Building dimensions
What size bathhouse is best to choose for construction? Let's start with the height of the ceilings. To make it comfortable to move around in the room, even if your family members are of average height, you should not make the walls lower than 2.1 m. After all, it is necessary to take into account that the shelves in the steam room are made at a level of 1 m from the floor. A person should sit on it without bending over. Plus, you need to leave free space under the ceiling for the sweep of the broom. You should not make the ceiling higher - it will take longer to heat the room.
Now let's talk about the length and width of the building. As a rule, a bathhouse consists of 3 rooms: a dressing room, where you can undress and relax after the bath, the steam room itself, and a sink. According to the standard, the ratio of such premises is 2:1.5:1. That is, the dressing room is made a little larger.
Steam room dimensions
The size of the sink should be sufficient for at least a couple of people to sit comfortably on benches with basins. There is 1 sq.m. per person. m of free space. It is necessary to leave free space for containers with water. If desired, a shower room or a small pool can be made.
The dimensions of the steam room are minimal. If several people will visit the bathhouse at the same time, then each of them must be allocated 1.5 m2.
The width of the steam room depends on the size of the shelf. Some people like to steam while sitting. In this case, it is enough to build a bench 40-45 cm long. For those who like to lie in the steam room, its length is 95 cm. You can use the space rationally if you build shelves in the letter “L”. In this case, even small benches can accommodate two people. You can make a couple of shelves on opposite walls. For free passage between them, you must leave 80 cm.
The dimensions of the steam room itself depend not only on the size of the shelf, but also on the type of oven. It is also necessary to take into account the recommended distance from it to combustible structures (wall cladding). This is done for fire safety purposes.
You should also focus on the length of the logs. As a rule, it is 6 m.
Landscaping your site with your own hands – (130+ Photos of ideas & Videos) + Reviews
Flooring
At the beginning of laying the walls, it is necessary to leave pockets for installing floor joists if the project plans to have a wooden covering. Provided that a concrete floor will be poured, this is not necessary. The logs, before being installed in the pockets, are treated with fire retardants and waterproofing impregnation. Additional fastening is made with metal corners. During further construction, a rough coating is laid on the logs to make it more convenient to carry out the remaining work. Upon completion of finishing, the floor is constructed according to the technology chosen for these purposes.
Bake
A good stove eliminates the issue of fuel and helps maintain the temperature for almost three days, which completely dries out the bathhouse. And the hot water will boil in a separate remote tank, and not in the steam room.
For example, you can choose a stove with an attached heat exchanger. This design is suitable for covering with bricks, which will serve as a screen. The stove is heated outside in advance to burn through the paint and eliminate the smell in the bathhouse.
For traction they install a meter-long pipe, this is enough, but there may be a little soot. Since the stove foundation is connected to the bathhouse foundation, reinforcement is done when pouring.
The masonry is made with cement to protect the waterproofing, double roofing material is laid, and brick is placed on it. The stove is raised from the foundation 20 cm above the floor. The sand is moistened and compacted to prevent settling.
Take a brick and a stove mixture, dry the mixture and add water. The top rows are sealed with mortar. Immediately install convection doors so that they properly draw air from the dressing room into the steam room.
It is important to carefully bring the stove into the room (a couple of people will be required) and install it in the exact place. A T-shaped branch is placed on top to mount the pipe, which will also stand on the foundation.
Next, hang a heat exchanger from corners, bends, couplings, attach it to the furnace, wrapping the threads with flax soaked in sealant. The masonry is made up to the top of the firebox, a corner is placed with an overlap on the bricks and a gap of 2 cm is left. The front version is almost ready, the contact of the masonry with the stove should be minimal.
Then we cover the entire exchanger with bricks and install pipes to the tank. The holes are covered with steel disks. In the washing room the masonry is done up to the ceiling. They finish the façade work and make a fireplace mantel to redirect hot air.
The last step is to make connections from the pipes to the tank. Prepare the roof for inserting the pipe, drill the ceiling with a margin of 1 cm, lay the pipe and do the masonry at the top. Clean the pipe and coat it with protective varnish three times. Cover the space around the pipe with insulating material.
Now you know how to properly build a bathhouse with your own hands. Calculate all the options, check the availability of materials in the store, make the bathhouse of your dreams for modest money. Also look at DIY bath options and photo projects - they will inspire you to work.
Waterproofing
An important stage of the work is protecting the concrete wall from moisture. Foundation waterproofing can be of several types, which are used simultaneously:
- vertical;
- horizontal;
- blind area around the perimeter of the house.
Scheme for waterproofing the foundation with roofing felt
The blind area prevents rainwater from penetrating the underground walls. Horizontal waterproofing is carried out along the edge of the foundation (the end of the concrete wall and the beginning of the walls of the house) and below the level of the basement floor, if there is one. In this case, the following can be installed as a waterproofing material:
- roofing felt;
- hydroisol;
- linochrome
Vertical waterproofing is carried out up to the planning ground level. For its device use:
- built-up materials (roofing felt, linochrome, waterproofing);
- coating materials (bitumen mastic, liquid rubber).
Construction in compliance with all stages will allow you to build a reliable and durable foundation made of FBS, which is not afraid of anything.