All builders know that reinforcement of a strip foundation is a necessary stage in the construction of buildings, thanks to which it is possible to achieve the necessary characteristics of strength, reliability, resistance to external influences, and significantly extend the service life. The tandem of concrete and metal guarantees the best properties that neither of these materials can provide separately.
Strip foundations are most popular in individual construction of residential buildings, as they are relatively inexpensive, involve low consumption of materials, and quick and simple construction. But without strengthening the foundation, a structure of this type will not have the necessary properties and will not last long. Therefore, hardening must be done; all work can be done with your own hands.
Requirements for fittings
To understand what reinforcement is needed for a strip foundation, it is necessary to perform calculations and consider the main types of material. To perform the work, mechanically strengthened, hot-rolled, heat-treated construction reinforcement is used. The class is selected according to maximum loads, taking into account tensile characteristics, ductility, weldability, corrosion resistance, ability to withstand temperature changes, etc.
The main brands of rods: hot-rolled rod (A), cold-deformed wire (BP), very strong rope (K). For the foundation frames, rods of the A400 (AIII) yield strength class with a crescent-shaped herringbone pattern are selected.
Proper reinforcement involves the use of the following types of rods:
- Workers - for laying around the perimeter
- Transverse vertical
- Transverse horizontal (clamps)
- Additional - usually a binding wire is used instead
To understand which fittings are best to use, you need to remember some rules. To strengthen the base of one- and two-story buildings and light structures, rods with a diameter of 10-24 millimeters are suitable. The strength characteristics of thicker (and much more expensive) reinforcement are unlikely to be used.
The rods must be corrugated, as they provide excellent adhesion to the concrete mortar; their thickness must clearly correspond to the values specified in the documents. Smooth rods are cheaper, but they will not allow you to create a reliable and durable reinforced frame. They can only be used in transverse connections where the load is not very large.
When creating a strip foundation frame on homogeneous soil, you can choose a material with a diameter of 10-14 millimeters; on heterogeneous soil, 16-24 is better. If the side of the building is more than 3 meters, the working reinforcement of the monolithic foundation is made from rods of at least 12 millimeters, but not more than 40.
The technology requires that horizontal clamps in diameter should not be less than a quarter of the working rods - usually 6 millimeters. Vertical rods for low-damage foundations of 80 centimeters or less should be at least 6 millimeters in cross-section. Having thought everything through, you can determine what diameter of rods is needed for different types of work.
Excavation and preparatory work
One of the advantages of a strip foundation is the relatively small amount of excavation work. A couple of people, working every day with short breaks, can easily dig a pit of a suitable size on normal soil. When the foundation pit is ready, you can begin to arrange it.
The first step is making the foundation cushion. Thanks to it, the negative impact of groundwater on the foundation is reduced, and the load from the foundation itself and the entire building is distributed as evenly as possible over the ground. Here you can use different materials. Most often sand or crushed stone is used. They do their job well - the main thing is that the thickness of the pillow is at least 15-20 centimeters.
But some experts recommend a concrete pad. Yes, it costs the most. Expensive cement and the need to reinforce the cushion greatly increase the cost and time of construction. But as a result, you get the most reliable foundation for the foundation, guaranteeing that it will last for many years. Therefore, we can say with confidence that this money will not be thrown away.
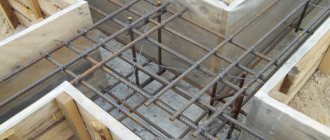
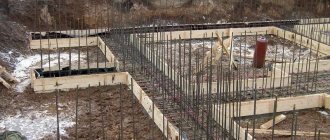
An example of a reinforced strip foundation
If work is carried out on weak, heaving soil, or if you plan to build a heavy brick house, but the use of a monolithic foundation is undesirable for some reason, then you can use a strip foundation with a sole. The widening (glass) can significantly reduce the load on the ground. Of course, do not forget about the reinforcement of the foundation shell - on heaving soils it will regularly withstand significant tensile and bending loads. It is very important to provide it with sufficient strength.
When using a foundation with a sole, the volume of excavation work increases. In addition, you will have to spend additional money on reinforcing the base of the strip foundation - if it fails, this will lead to the rapid destruction of the entire structure.
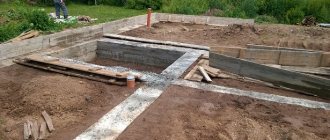
Formwork is installed on top of the finished cushion. When choosing the width, keep in mind that the finished foundation should be 10-15 centimeters thicker than the external load-bearing walls.
The next step is to install waterproofing. Some builders use roofing felt, but this is a rather expensive material. And the heavy weight makes the installation process difficult. Therefore, it is quite possible to use construction polyethylene. Yes, it is less durable. But it is only needed for a few days - so that the cement laitance does not go into the sand. Therefore, cheap and lightweight polyethylene is quite suitable. It is laid on top of the formwork. At the joints, make a larger overlap - at least 10-15 centimeters - and glue with wide tape.
This concludes the preparatory work. Now we’ll tell you about pouring and reinforcing the foundation with your own hands.
Reinforcement requirements
Before reinforcing, you need to decide what size the frame will be, make a drawing, draw a diagram of all the work and structures. The geometric dimensions of the foundation must be such that the location of the reinforcement is free. The concrete layer completely covers the frame, protecting it from external influences and corrosion.
The minimum distances between the rods must be sufficient for effective joining and compliance with all technology rules. Only high-quality fittings are used in the work, in accordance with SNiP 3.03.01. Bending of rods is performed using special devices. The bending radius corresponds to the diameter and physical parameters of the rods.
Video of manual machine for bending reinforcement
And another useful video:
Video on how to bend reinforcement using a homemade machine
What reinforcement are they made from?
Clamps are made from smooth (less commonly, corrugated) reinforcing bars of classes A1 (A240) and periodic profile reinforcement A3 (A400), A500C with a diameter of 6-40 mm. They are used for longitudinal and vertical reinforcement of concrete, in the construction of the following structures and products - column supports, columns, beams, strip and monolithic foundations, monolithic belts.
Products are produced in sizes from 100x100 to 1000x1000 mm; the assortment includes about 50 different geometric shapes. If necessary, it is possible to manufacture products of any non-standard shape, both in production conditions and with your own hands.
Calculation of size, quantity and diameter of reinforcement
It is important to immediately know how much reinforcement is needed to make the reinforcement cage reliable and durable. Knowing the dimensions of the building, you can carefully calculate everything.
Standard frame configuration for small houses:
- Bottom and top row of belt
- 3-4 rods for each row
- The current distance between the rods is about 10 centimeters. The distance from the rods to the edges of the base should be at least 5 centimeters.
- The belts are connected with clamps or sections of rods in increments of 5-30 centimeters.
So, if you need to build a building with an area of 150 square meters, the perimeter of the external walls is 50 meters. To calculate the amount of reinforcement, you need to take everything into account: 2 belts of a longitudinal row of 3 rods each equals 6 rods, multiplied by 50 meters, that gives 300 meters of main rods. If the lintels are laid in increments of 30 centimeters, the result is 167 pieces per 50 meters. The length of the transverse lintels is 30 centimeters (167x0.3=100.2 meters), vertical - 60 (167x0.6=200.4 meters).
It turns out that to the question of how much reinforcement is needed to strengthen a house with an area of 150 square meters with a wall perimeter of 50 meters, the answer is: 300 meters of thick corrugated rods and 300.6 thinner rods. Plus 10-15% for stock and docking.
Tools used to connect reinforcing bars
Welding is not as practical as tying reinforcement for a strip foundation. High strength is created in the connecting nodes when knitting. In addition, there is no need to invite a welder, and this reduces the cost of constructing the foundation.
The reinforcement frame is assembled either in the formwork or nearby. Knitting can be done manually (with gloves), or you can use special tools:
- A knitting gun is the best option in terms of speed. But the gun is very inconvenient in hard-to-reach places. Its second drawback is the huge consumption of wire. And the third one is a big price. A good pistol will cost 30 thousand rubles, the Chinese version, although it will be cheaper, will not last long, it will be enough for one foundation.
- Crochet hook. Outwardly, it resembles a bent and sharpened nail, the head of which has been replaced with a handle. Quite often used in a screwdriver, clamping it in a chuck. The industry produces screw hooks. They are easy to use, but the knitting is too slow and long tails are formed.
- Folk devices for knitting. If there are no suitable tools, then use pliers or a hook, which can be easily made from an ordinary nail. Unfortunately, these tools will not lead to high-quality results, and the knitting method will worsen the strength of the entire structure.
Rules for reinforcing strip foundations
- Working rods must comply with at least class A400.
- Welding is not used to connect rods due to the likelihood of weakening the cross-section of the element.
- The frame is tied at the corners, not welded.
- It is better not to use smooth reinforcement even for clamps.
- The layer of external protective concrete should be at least 4 centimeters, which will guarantee effective protection against rust.
- In the longitudinal direction, the rods in the frame are connected with an overlap equal to at least 25 centimeters and at least 20 diameters of the rods.
- The standards require that when metal rods are frequently placed, the aggregate in the concrete solution is not very large and does not get stuck between the rods.
- How to properly lay reinforcement in a trench - this can be done in two ways: create a frame outside the foundation or directly in the trench. The reinforcement methods are almost equivalent, but you will have to hire someone to work in the trench, while constructing the frame separately on site can be done independently.
- Knitting is carried out with a special crochet hook or knitting machine.
- Many people wonder what kind of wire is used for knitting - the answer is simple: soft thin wire of not a very high level of strength. It needs to be pulled well; a strong knot is obtained in 2-3 turns of the hook.
- The overlap (the distance from the edge of the rod to the knitting point) should be at least 5 centimeters.
- All wire connections should be as tight as possible, with no free space between the clamps and the frame, and no element should move.
What reinforcement is needed for the foundation
To reinforce the foundation of a private house, garage, or small store, a strip monolith is usually sufficient. This design is quite sufficient for a light building, it costs much less than a slab monolith, and it can be filled by one person who does not have much experience or help.
Fiberglass reinforcement is currently gaining popularity. However, engineers and foremen are somewhat alarmed by the lack of technical standards for this material. In addition, plastic has a much higher longitudinal elongation than metal, which means that when deformed it will bend rather than remain elastic, holding back the pressure exerted.
And as you know, the main function of foundation reinforcement is protection from destruction under linear influence, and the main compression is on the concrete.
For a strip monolith, two types of reinforcement are used:
- with a notch for the main rods. The thickness is chosen depending on the area and mass of the building - usually from 10 to 24 mm;
- for jumpers - class AI, with a smooth surface, diameter 6-8 mm.
How to knit reinforcement mesh yourself
The following step-by-step instructions will give you the opportunity to learn how to properly make a frame and provide the foundation with the necessary properties. The easiest way is to knit ready-made reinforcement for a strip foundation on the ground. Straight sections of the mesh are created outside the structure, but the corners are knitted after the frame is lowered into the trench.
- First you need to cut pieces of rods. It is better to start knitting with the shortest section of the foundation in order to gain a little experience. You need to cut to a minimum, trying to use the entire length of the working rods. If we take as an example a strip foundation 40 centimeters wide and 120 centimeters high, then the indicators are as follows.
- The metal is poured on all sides with a layer of concrete at least 5 centimeters thick. The net dimensions of the frame in height are a maximum of 110 centimeters, width – 30. For knitting, add 2 centimeters on both sides for an overlap. It turns out that the blanks for horizontal jumpers should be about 34 centimeters long, and vertical ones - about 144 centimeters. This is for high foundations, but usually a base with a height of about 80 centimeters is used.
- 2 rods are placed on a flat surface, horizontal spacers are knitted at a distance of 20 cm from the ends on both extreme sides: the wire is folded in half, pushed under the fastening point and tightened by twisting the hook.
- At a distance of about 50 centimeters, all the horizontal struts are fastened in turn, the structure is put aside, another one of the same is made - these are the lower and upper frames that need to be tied together: adapt stops for both meshes between the rods and 2 struts vertically at the ends, attach the remaining pieces. The same should be done with all straight sections of the structure.
- Then, pads with a height of at least 5 centimeters are laid at the bottom of the trench, side supports and a mesh are installed correctly. Now you need to knit every corner and joint, creating a single frame. The overlap of the ends of the rods must be equal to at least 50 times the diameter of the rods.
- Next, the lower turn is tied, the vertical posts are attached, and the upper frame is attached to them. Then, on all surfaces of the formwork, you need to check the distances, indentations, and overlaps at the joints so that everything is done correctly and clearly.
- Connecting rods along the length usually does not cause problems, but fastening the frame parts in the corners must be done in accordance with established standards. There are two ways: between two perpendicular structures or at the point where a wall adjoins another.
Corner knitting technologies:
1) Rigid with a foot - at the end of each rod, knit a foot at a right angle with a length of at least 35 diameters of the rod, connect the bent part to the perpendicular section. This is how the outer rods of the wall frame are attached to the outer rods of the other, while the inner ones are also welded to the outer ones.
2) G-clamps - instead of a clamp, take a clamp with a length of at least 50 reinforcement diameters, one side is attached to the frame of one wall, the other is attached perpendicular. The outer rods are connected to the inner ones, the pitch of the clamps is ¾ of the height of the wall.
3) U-clamps - for one corner you need to install two U-shaped clamps with a length of at least 50 reinforcement diameters, each welded to one perpendicular rod and two parallel ones.
Junctions are created using similar fastening methods.
Foundation tape reinforcement
If a specialist is designing a strip foundation, then the finished drawing will, of course, include not only the linear parameters of the concrete belt itself, but also the characteristics of the reinforcement - the diameter of the reinforcing bars, their number and spatial location. But in the case when a decision is made to independently erect a foundation for a building, when planning the structure it is necessary to take into account certain rules established by the current SNiP.
Cement prices
cement
What fittings are suitable for these purposes?
For proper planning, you need to have at least a little understanding of the range of reinforcement.
There are several criteria for classifying reinforcement. These include:
- Production technology. Thus, the reinforcement can be wire (cold-rolled) and rod (hot-rolled).
- According to the type of surface, reinforcing bars are divided into smooth and having a periodic profile (corrugation). The profiled surface of the reinforcement ensures maximum contact with the poured concrete.
Reinforcing bars with a periodic profile (from top to bottom): ring, crescent, mixed
- The reinforcement can be designed for conventional or prestressed concrete structures.
To create a reinforcing structure for a strip foundation, as a rule, reinforcement is used that is produced in accordance with GOST 5781. This standard includes hot-rolled products intended for reinforcing conventional and preloaded structures.
In turn, these fittings are divided into classes, from AI to A-VI. The difference mainly lies in the types of steel used for production and, therefore, in the physical and mechanical properties of the products. If low-carbon steel is used in elementary-class fittings, then in high-class products the metal parameters are close to alloy steels.
It is not necessary to know all the characteristics of reinforcement classes when building independently. And the most important indicators that will influence the creation of the reinforcement frame are given in the table. The first column shows the classes of reinforcement according to the two designation standards. Thus, in brackets there is a designation of classes, the digital designation of which shows the yield strength of the steel used for the production of reinforcement - when purchasing the material, such indicators may appear in the price list.
| Valve class according to GOST 5781 | steel grade | Rod diameters, mm | Allowable bending angle in a cold state and the minimum radius of curvature when bending (d – diameter of the rod, D – diameter of the mandrel for bending) |
| AI (A240) | St3kp, St3sp, St3ps | 6÷40 | 180º; D=d |
| A-II (A300) | St5sp, St5ps | 10÷40 | 180º; D=3d |
| -«- | 18G2S | 40÷80 | 180º; D=3d |
| AC-II (AC300) | 10GT | 10÷32 | 180º; D=d |
| A-III (A400) | 35GS, 25G2S | 6÷40 | 90º; D=3d |
| -«- | 32G2Rps | 6÷22 | 90º; D=3d |
| A-IV (A600) | 80C | 10÷18 | 45º; D=5d |
| -«- | 20ХГ2Ц, 20ХГ2Т | 10÷32 | 45º; D=5d |
| AV (A800) | 23Х2Г2Т, 23Х2Г2Ц | 10÷32 | 45º; D=5d |
| A-VI (A1000) | 22Kh2G2AYu, 20Kh2G2SR, 22Kh2G2R | 10÷22 | 45º; D=5d |
Pay attention to the last column, which indicates the permissible bending angles and curvature diameters. This is important from the point of view that when creating a reinforcing structure, you come to make bent elements - clamps, inserts, legs, etc. When manufacturing jigs, mandrels or other devices for bending, it is necessary to focus on these values, since reducing the bending radius or exceeding the angle can lead to the reinforcement losing its strength properties.
AI class rods are available in a smooth design. All other classes (with some exceptions, which, however, depend more on the individual requirements of the customer) are with a periodic profile.
For a strip foundation in private construction, the best choice would be reinforcement of class A-III, in extreme cases - A-II, with a diameter of 10 mm and above.
Smooth AI class rods are perfect for making clamps necessary to add volume to the reinforcement structure being created.
For the structural elements of the armored belt (clamps, jumpers), it is convenient to use a smooth AI class rod with a diameter of 6 or 8 mm. The use of reinforcement of higher classes is unprofitable due to its high cost and the obvious lack of demand for such high physical and technical indicators.
“Classical” scheme for reinforcing the foundation strip. Number of longitudinal rods
To begin with, let’s look at a typical reinforcement scheme for straight sections of a foundation strip.
The most commonly used reinforcement scheme for straight sections of shallow strip foundations
It is based on a rectangle, with mandatory levels of reinforcement at the top and bottom, made of longitudinal reinforcement (item 1), which are interconnected by horizontal transverse (item 2) and vertical reinforcement, thereby creating a kind of “box-shaped” structure. This arrangement of the belts allows for maximum compensation of two main multidirectional forces: from the total load created by the building and from frost heaving of the soil. In this case, the central part of the belt is loaded the least, and if the foundation has a total height of up to 800 mm, then two belts are most often sufficient.
For higher belts, an arrangement of longitudinal belts in three or more tiers is used. But, as already mentioned, calculating such foundations on your own is a rather risky endeavor.
The illustration shows the tying of longitudinal rods into a three-dimensional structure using pieces of reinforcement. This approach is quite acceptable, however, it is not convenient. The work will go much faster and better if you prepare clamps according to the dimensions of the armored belt at the conductor in advance, and then link all the parts into the overall structure.
The use of pre-prepared clamps of approximately this type will significantly simplify the assembly of a volumetric reinforcement frame
Pay attention to the illustration, which shows two dimensions with arrows: H is the height of the reinforcement belt and K is its width. You should correctly imagine that this is not the height and width of the tape at all. Metal parts of the foundation must be protected from oxygen corrosion by a layer of concrete. According to SNiP, the minimum layer is 10 mm, but for a strip foundation, 50 mm to the edge of the concrete structure will be optimal. This must be taken into account when planning, and during installation, simple devices will help to maintain the necessary clearances between the reinforcement and the formwork. So, you can set the required distance from the bottom of the formwork by placing fragments of bricks or installing special plastic stands under the lower bars.
Such plastic racks set the required clearance from the bottom of the formwork to the reinforcement belt
And the required clearance from the side walls of the formwork can be maintained if you use special “star” fasteners that are simply put on the reinforcing bars.
A star latch that specifies the position of the reinforcing bar relative to the formwork walls
Now let’s take a closer look at the question of how many longitudinal reinforcement rods will be required, and what diameter they should be.
Some recommendations for the use of reinforcement of a particular diameter are given in the table:
| Area of application of fittings | Minimum diameter of reinforcement |
| Longitudinal working reinforcement in straight sections no more than 3 meters long | 10 mm |
| The same, but with a section length exceeding 3 meters | 12 mm |
| Transverse reinforcement and clamps of compressed structural elements. | Not less than 0.25 of the diameter of the working reinforcement, and at the same time - not less than 6 mm |
| Transverse reinforcement and clamps in the area of bending knitted frames | 6 mm |
| Clamps for tape knitted frame with a height of no more than 800 mm | 6 mm |
| The same, but with a knitted frame height of more than 800 mm | 8 mm |
Well, the number of longitudinal rods required to ensure the design strength of the foundation strip directly depends on its size and on the diameter of the reinforcement used. In accordance with the current SNiP requirements, the total cross-sectional area of the longitudinal reinforcement rods must be at least 0.1% of the cross-sectional area of the tape. Based on this, it is easy to make the necessary calculations. To make this even easier for the reader, the corresponding calculator is located below.
Calculator for calculating the minimum required number of rods for longitudinal reinforcement of a foundation strip
Go to calculations
After carrying out the calculations, it may turn out that even two or three rods are sufficient for reinforcement. However, if the width of the foundation strip is more than 150 mm and the height is more than 300 mm, it is still recommended to place two belts of longitudinal reinforcement with two rods each - as shown in the diagram. In this case, the calculator will help you determine the minimum diameter value - perhaps by increasing the number of rods to 4 pieces, you can use thinner reinforcement in order to save money. However, do not forget the recommendations of the table above.
If the result is an even value exceeding 4 rods, then it is recommended to distribute the reinforcement into three belts, placing the middle one in the center between the upper and lower ones. If an odd number is obtained, five or more pieces, then it makes sense to strengthen the lower tier of reinforcement with an unpaired rod - it is there that the highest bending loads are applied to the foundation strip.
Another rule: SNiP requirements establish that the distance between adjacent elements of longitudinal reinforcement should not exceed 400 mm.
The binding of longitudinal reinforcement rods into a three-dimensional structure is carried out using prepared clamps. For their manufacture, a special device is usually built - it is easy to assemble on a workbench or on a separate stand.
It will not be difficult for a good craftsman to assemble such or a similar device for bending reinforcement
The installation step of the clamps also follows certain rules. So, it should not be more than ¾ of the height of the foundation strip, and at the same time, it should not exceed 500 mm. In areas of reinforcement - at the corners and junctions of walls, clamps are installed even more often - this will be discussed below.
If on a straight section there is a need to connect two reinforcement bars located along the same line, then an overlap of at least 50d is made between them (d is the diameter of the reinforcing bar). When applied to the most commonly used diameters, 10 and 12 mm, this overlap will be from 500 to 600 mm. In addition, it is advisable to install an additional clamp in this area.
The connection of reinforcement and clamps into a single structure is made by tying using galvanized steel wire.
Installation of the reinforcement cage is carried out by tying with twisted wires
Even if he has a welding machine at his personal disposal, and the owner considers himself a fairly experienced welder, the reinforcing structure must still be made by twisting wire. A poorly welded connection, or even worse, overheating of the reinforcement will lead to a sharp decrease in the strength characteristics of the structure being created. It is not without reason that only highly qualified specialists are allowed to weld reinforcing structures in industrial construction. And in addition, it is also necessary to use specialized fittings, the class designation of which includes the index “C” - welding.
We will not dwell on issues of practical tying of reinforcement cages in this publication - this topic deserves separate consideration.
Reinforcement of complex sections of frame structures
If everything is quite clear with the installation of the frame on straight sections of the reinforcing belt of a strip foundation, then in difficult sections many people often make mistakes. Evidence of this is numerous photographs published on the Internet, which clearly show that two frames converging in a corner or adjacent to each other are simply connected by wire twists at the points of intersection of the reinforcement.
Unfortunately, such demonstrations of clearly erroneously reinforced corners and junctions “walk” on the Internet, and are perceived by many inexperienced builders as a role model
Incorrectly installed connection points or abutments of reinforcing belts lead to the fact that the uniformity of distribution along the axes of the load falling on the foundation is disrupted, which in the future may well result in the appearance of cracks or even destruction of the tape in these areas. There are certain reinforcement schemes for such nodes - they will be discussed below in the table.
Basic schemes for reinforcement of corners and abutment areas
(In the diagrams, the border of the foundation strip is shown in burgundy, the longitudinal reinforcement bars are shown in dark gray, and the clamps of the frame structure are blue. In addition, individual specific elements of the reinforcement unit will be highlighted in different colors, which is specified in the text part. All illustrations are given in miniature, which can be enlarged mouse click).
| Scheme of reinforcement of corners and junctions | Brief description of the scheme |
| REINFORCEMENT IN AREAS OF OBTUDE ANGULAR CHANGE IN THE DIRECTION OF THE FOUNDATION TAPE | |
| If it is necessary to perform an obtuse angle change in the direction of the foundation strip, provided that the angle exceeds 160 degrees, no special reinforcement may be provided. Longitudinal reinforcement is bent at the desired angle. The installation pitch of the clamps (S) remains virtually unchanged. The only peculiarity is that two clamps are placed side by side at the bending point of the reinforcement, located on the inner contour of the belt. | |
| It would seem that the situation is similar, but the angle of change in direction, although obtuse, is less than 160 degrees. The amplification circuit is already different. The reinforcing rod running along the outer contour of the frame is simply bent in accordance with the desired direction. The rods converging along the inner contour towards the corner are made longer, so that they intersect each other, reach the opposite side of the reinforcement belt, and end on it with paws bent at the desired angle (highlighted in red). The length of this curved paw part is at least 50d (d is the diameter of the longitudinal reinforcing rod). The paws are tied to the external reinforcement rod, and the installation step of the clamps in this area is halved. At the top of the corner on the outer contour, a vertical segment of reinforcement is additionally installed (shown by an orange arrow). | |
| REINFORCEMENT AT RIGHT ANGLES OF THE REINFORCEMENT FRAME | |
| Scheme with one large overlap and two “legs”. The longitudinal reinforcements converging along the internal contour of the frame intersect with each other, reach the opposite walls of the formwork, where they bend to form “legs” (shown in red), located in diverging directions. The minimum length of the “legs” is from 35 to 50d. One reinforcement on the outer contour is cut off in the corner, and the second, perpendicular to it, is bent to form a large overlap (shown in purple), which must be of such a length as to at least completely cover the “foot.” The entire structure is tied using clamps, the pitch of which should not exceed half the calculated one - 1/2S. The apex of the bending angle is further strengthened by vertical reinforcement. | |
| The scheme is similar to the previous one. Longitudinal reinforcement is also inserted and bent with “legs”, and instead of an overlap along the outer contour of the reinforcement, an L-shaped insert is installed (shown in green). The length of each side of this insert is at least 50d. The knot is tied using clamps installed with a pitch halved. The rest is clear from the diagram. | |
| The scheme is convenient when the frames on each side are knitted separately and then laid in the formwork. In this case, the intersection and linking of the frames into the overall structure is done using U-shaped inserts (shown in dark blue). The length of the “horns” of each of these overlays is at least 50d. Traditionally, in the reinforcement section, the clamp installation step is reduced by half the calculated value. Please note the additional reinforcement of the area where the U-shaped inserts intersect with vertical reinforcement. | |
| REINFORCEMENT IN THE LATERAL CONNECTION AREAS OF THE FOUNDATION TAPE | |
| The longitudinal reinforcement of the main foundation strip in the abutment area is not interrupted. The longitudinal reinforcement of the adjacent tape intersect with the internal reinforcement contour, reach the outer side of the formwork and bend with “legs” (red), which are located in converging directions. Linking with clamps with a pitch reduced by half, and plus, the intersection of the converging “legs” with the external longitudinal reinforcement of the main tape is additionally linked. The length of the “legs” is at least 50d. | |
| A diagram that is convenient for the separate assembly of adjacent reinforcement cages. The frame of the main tape is not interrupted, and the frame of the adjacent one ends along the intersection line. Tying into a single structure is carried out using L-inserts (green), which connect the longitudinal reinforcement of the adjacent tape with the outer contours of the main one. The length of the side of such an insert is at least 50d. All clamp connections are installed and linked with a pitch reduced by half. | |
| Scheme of strengthening the junction area using a U-shaped insert. As in other cases, the frame of the main foundation strip is not interrupted. The longitudinal reinforcements of the adjacent frame are brought to the outer contour and are curved with “legs” (red), which are located in diverging directions. The side length of such a foot is from 30 to 50d. The main reinforcement is performed by a U-shaped insert (dark blue) with the length of each of the “horns” at least 50d. Linking - with a traditionally halved clamp installation step. Additional connection with the installation of vertical reinforcements - in the area where the lower part of the U-shaped insert adjoins the outer contour of the main tape reinforcement. |
One more nuance should be correctly understood. The diagrams proposed in the table show the tying of the upper tier of the reinforcing belt. But exactly the same reinforcement should be provided in the lower belt, especially since the lower part of the foundation strip usually bears the maximum loads.
Knitting reinforcement using a special device - a knitting machine
To create this tool, you need to take several boards 20 millimeters thick, cut 4 boards along the length of the reinforcement, connect two at a distance equal to the pitch of the vertical posts, creating 2 identical templates. Next, two vertical supports are made with a height equal to the height of the reinforcement mesh. The supports are constructed with side corner stops; it is better to choose a flat area for work.
The device is used as follows: the legs of the stops are installed on two knocked down boards, the two upper boards are placed on the top shelf of the stops and fixed. That's it, the reinforcement mesh layout is ready, now you can quickly knit it. It is enough to place the vertical reinforcement struts in the marked places, fixing them with nails, install the rods on each steel lintel, doing this on all sides of the frame. Next, take a hook and wire - that’s it, you can knit. Such a device is relevant where it is planned to create many similar mesh sections.
Video on how to knit reinforcement using a device
What are clamps and why are they needed?
Rebar clamps are a staple-bending product made from corrugated or smooth steel rods of various diameters. These are transverse tension elements of the reinforcement frame installed in rod structures. In the slabs, other products are used as transverse screeds - steel mesh.
Reinforcing clamps simultaneously perform several important functions:
- preventing the formation of diagonal cracks;
- resistance to torsion and deflection of reinforcement;
- preventing deformation and displacement of the rods when pouring concrete;
- formation of support when installing a frame for working reinforcement.
The purpose of installing clamps in metal structures is to achieve optimal connection of the elements of the reinforcing frame, as well as uniform distribution of loads, thereby eliminating the appearance of weak zones.
How to knit reinforced mesh in a trench
Working in a trench is more difficult, so you need to plan everything ahead of time. Special devices or ordinary stones are placed at the bottom of the trench at a height of at least 5 centimeters in increments of the width of the mesh. The stones are laid out with longitudinal rods, and horizontal struts are tied. Until the rods are in the desired position, a second person holds their ends.
The reinforcement is knitted with a step between spacers of 50 cm wide. We install the pegs and begin to knit the monolithic structure. This is done on all straight sections. Parts of the frame should not touch the formwork; they should be at a distance of several centimeters from the formwork.
Then the corners are knitted using one of several existing methods. It is imperative to maintain the length of the overlaps, with the installation of vertical rods. Rods are often used here with a larger diameter, increasing the strength of the material. Upon completion of the binding, the concrete solution is poured in one go, covered with polyethylene, and during the drying process, it is periodically watered with water by spraying.
Required materials and tools
Before starting reinforcement and installation of the strip foundation, prepare the necessary materials and tools:
- corrugated reinforcement for longitudinal rods;
- smooth reinforcement for crossbars;
- knitting wire;
- shovel;
- hammer;
- nails;
- screwdriver;
- self-tapping screws;
- roulette;
- level;
- Bulgarian;
- crochet hook or gun;
- device for bending reinforcement;
- formwork material (wood, plywood, etc.);
- sand;
- vibrator for compaction.
Welding fittings for reinforcement
In most joints, it is better to use knitting instead of welding - the finished structure will be more durable. Welding is possible only if you have a machine and extensive experience, exclusively on straight sections.
In order for the foundation to be truly reliable, it is also necessary to take care of the correct execution of the excavation work under the tape, arranging several layers of materials (not only for the base and top of the foundation, but also for filling).
Fixation methods and strapping patterns
The binding options for metal and composite reinforcement are slightly different. There is another way to install the fittings, which uses additional plastic clamps. Let's take a closer look at different knitting techniques.
Metal fittings
Procedure:
cut the wire for knitting into pieces of 25-30 cm;- Make a hook from the folded section by folding the edge with a loop;
- use the resulting hook to clasp the intersection of the rods that need to be fixed;
- the loop is stretched with a crochet hook;
- The opposite free edges of the wire are pulled to the loop;
- the loose ends are wrapped around the loop;
- turn the hook threaded into the loop until the wire is pulled close to the reinforcement;
- at the end of the process, the hook is released from the loop, the free ends are folded to the knot.
You can use another option:
- buy special fasteners with two loops on the edges;
- place the element at the junction of the rods;
- clasping the crossing of the rods to connect the loops;
- insert the hook into two loops at once;
- turn the hook until the wire is completely adjacent to the knot.
When constructing a massive building, it makes sense to use not wire, but plastic connecting elements in the form of ready-made clamps.
Their advantages:
- increased ligament strength;
- simplicity and high speed of knitting;
- fixation can be performed without additional tools.
Plastic clamps also have their disadvantages:
- You cannot knit with plastic fastenings at sub-zero temperatures, since under these conditions the plastic loses its elasticity;
- the strength of plastic fasteners becomes high only after pouring and hardening with concrete; until this moment they are unreliable;
- The cost of plastic knitting is an order of magnitude higher than traditional wire knitting.
Sometimes the elements are connected using ready-made elastic steel staples. They are shaped like a paperclip, easy to install, and provide a secure fit. But they are quite expensive.
Fiberglass
Fiberglass rods can be tied with metal wire. But plastic fasteners are more often used. These can be snap fasteners or tightening clamps.
The use of composite material for reinforcement significantly increases the construction budget. If the developer does not strive to reduce costs as much as possible, he can also purchase plastic fasteners.
Application of fasteners
Plastic clamps for holding the rods in a certain position relative to the entire structure are called bosses. They are used as calibrators for side bars , as temporary fixing elements or as supports for lower longitudinal bars.
When pouring a strip foundation, a distance of 50 mm must be maintained between the formwork walls and the reinforcement bars. In most cases, bosses are used to maintain this distance.
Below is a diagram of various methods of tying reinforcement:
Practical advice
In places where there is no heavy load, you can select reinforcement in favor of bars of smaller diameter. If strength does not suffer from this, but it is possible to reduce the cost of work, this option is allowed. Deciding what diameter of reinforcement to use in your work should take into account two parameters: ensuring sufficient strength and the cost of work, choosing the optimal price-quality ratio. In some places, the use of thick reinforcement is simply not relevant, but purchasing more expensive material will significantly increase the cost of the entire construction.
The layout of the frame in the formwork must be level. Before laying the structure, it is necessary to carefully check all dimensions to exclude distortions, deformations, and non-compliance with parameters.
Video reinforcement of shallow monolithic strip foundations
And another video:
How to knit the frame?
The rules for reinforcing strip foundations force one to abandon the use of welding in favor of knitting, since when welding is used, in the places of welded joints, metal rods lose strength up to 2-2.5 times . In addition, this is where corrosion most often appears, which can damage the reinforcement within a few years, significantly reducing the reliability and durability of the foundation. Only connection by knitting is permissible. This is a rather complicated stage, which will take a lot of time for an inexperienced user. However, a lot here depends on what tool you use.
Reliable knot for tying reinforcement with wire
The classic tool for tying reinforcement in strip foundations is a special crochet hook. Using it, experienced craftsmen can produce up to 12-15 knots per minute (of course, if the knitting wire is prepared and cut in advance). The main advantage of this option is its affordability - a hook can be bought in many stores for a hundred rubles or even cheaper. The downside is that the speed of working with it is not great even for experts. Please note that you will have to make many hundreds of ties even if you have to reinforce small foundations.
Wire and hook for knitting the frame
If you want to finish the job quickly, you can use a special knitting gun. Working with it, even an inexperienced user can easily produce 25-30 knots per minute. That is, productivity will increase at least 2 times. Alas, the cost of such equipment is not low - from 50 thousand and above. In addition, to work with it you need a special wire - a regular one may not be suitable. This further increases the cost. But if you have the opportunity to rent a knitting gun for a few hours or a day, feel free to agree to such an offer, just don’t forget to find out the maximum diameter of the reinforcement that it can tie. Working with high-quality tools, you will spend a maximum of a day assembling the frame - correct reinforcement of the strip foundation becomes much easier and faster. When working manually, this process can take a week or more.
How to lay reinforcement correctly
The assembly of straight sections of the frame is carried out in the immediate vicinity of the trench. This is important, since the weight of the structure is quite large, and most often it has to be moved manually. Assembly is carried out using one of the methods (welding or knitting), of which knitting is preferred.
The reasons for this are simplicity, no need to connect to the power supply network and no welding machine.
There is another reason - the weld on the reinforcement is brittle and does not always withstand loads when moving or pouring, and the wire connection has a certain degree of freedom and due to this has a certain elasticity.
The assembled straight parts of the frame are laid in the prepared trench, the corners are tied, after which the frame is ready for pouring concrete.
Tape: calculation algorithm
This issue is given great importance at FORUMHOUSE.
al185MODERATOR FORUMHOUSE
I beg you not to prescribe a foundation design based on “people’s experience” and the advice of various advisors who “have always built this way.”
A member of our portal with the nickname MaximGvozdev created the LentaOnline v calculator. 1.0, which will help with the construction of this type of foundation. The tool can calculate the resistance of the foundation soil, the width and length of the designed tape, reinforcement and concrete, concrete composition, and the number of concrete batches in a concrete mixer.
For beginners, the FORUMHOUSE moderator with the nickname al185 recommends first deciding on the soil conditions (soil composition, groundwater level, topography) to design a strip foundation and resort to the following methods:
- Ideally, order a project from an adequate designer who can get good recommendations on FORUMHOUSE.
- You can borrow an already calculated analogue foundation design for similar soil conditions and a similar building.
- Master design for amateurs: an algorithm for designing a strip foundation for dummies.
Next, you need to compare the cost of the options received and choose the appropriate one.
Methods for fastening rods
Correctly executed reinforcement determines the strength of fixation of frame elements. Remember this when reinforcing the strip base slab. Developers are interested in: how to reinforce a strip foundation with your own hands, ensuring reliable fastening of the rods? The following types of fixation exist:
- The use of knitting wire, which allows connecting rods using a special device. This ensures a rigid arrangement of the reinforcement in the frame.
- The use of welding equipment, the use of which allows you to connect steel rods. But such a reinforced structure will not have the necessary rigidity. This is due to the disruption of the metal structure that occurs during welding at the connection points.
How to fix steel bars correctly? After all, there are several ways to attach elements. Don’t hesitate, use tying wire – an effective tool, the reliability of which has been proven by professional builders. The use of welding is undesirable, since under loads the integrity of the frame is damaged with the subsequent appearance of cracks on the surface of the concrete mass.
Basic rules of reinforcement
From a strength point of view, the optimal way would be to place the reinforcement cage externally.
But in practice this is impossible for a number of reasons, the main ones being:
- The metal's tendency to corrode.
- It is impossible to install the frame on long or submerged blocks.
- The surface must be flat and ready for the attachment of other building elements.
For these and other reasons, internal reinforcement is used, which protects the metal from corrosion and solves a number of other issues. The disadvantage is the need to perform many actions necessary only to fix the reinforcement in a stationary state until the solution hardens.
This means excessive consumption of material, irrational labor investments, and waste of time. But there are no other reinforcement options; the technique used has been tested for many decades and has shown its reliability and effectiveness.
Basic methods of reinforcement
There are the following methods:
- Rod reinforcement using reinforcing bars made of metal or composite materials.
- Dispersed - reinforcement of screeds using fibrous materials or metal shavings.
- Layer reinforcement is a layer-by-layer application of a solution with intermediate installation of reinforcing mesh.
To strengthen the strip foundation, it is possible to use only the rod method. Two options are used - with two and with three working rods in horizontal grids. The choice of the desired option is determined by the width of the tape.
Since SNiP requirements limit the distance between the outer rods in a lattice to 40 cm, the use of three rods is required for a base wider than 50 cm. In this case, three or even more rods can be used on a narrow strip.
SNiP standards limit the minimum distance between adjacent rods to two diameters, which allows you to assemble a fairly dense lattice. However, this is never done, since it is impractical and creates unproductive consumption of reinforcement.
How to choose concrete
SNiP requirements for concrete are quite strict.
All operating parameters of the material are regulated:
- Degree of compressive and axial tensile strength.
- Frost resistance.
- Waterproof.
For residential buildings with low-rise brick or similar buildings, the best option is concrete grade M300. When using lightweight cellular or porous materials (foam concrete, expanded clay concrete), it is allowed to use less durable and dense concrete - grades M200 and even M150.
More durable varieties are used for critical or multi-story buildings. For example, M400 concrete can be used for casting foundations for residential buildings up to 20 floors high.