Any building is built for many years only on the foundation. The bathhouse is no exception. Strip foundation is a popular base option. Let's consider its features, pros and cons. We will also tell you in detail how craftsmen create a strip foundation for a 6x4 or other size bathhouse. Read to the end and learn the sequence of work and the features of each stage. The information will allow you not to flounder on this topic when communicating with specialists.
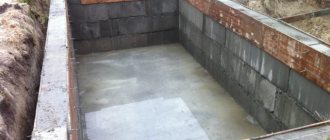
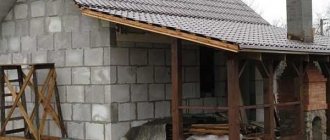
Poured strip foundation along with a concrete base for a sauna stove Source mononline.ru
Choosing a foundation for a bath
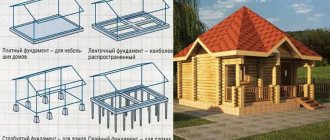
There are several common types of bathhouse foundations.
Tape - is a solid monolithic strip of reinforced concrete. This universal option is the most common and is valued for its strength, reliability, simplicity, and efficiency. A strip foundation can also be built from bricks and blocks.
Types of foundations for a bathhouse
Slab - a solid layer of concrete on a drainage pad. This technology is rarely used for baths due to its high cost. Selected for heavy structures made of wall blocks.
Pile or pile-screw is also rarely used due to the high cost and high labor costs using special equipment. Indispensable in difficult areas where other foundation options cannot be built.
Columnar - a base made of pillars with different levels of depth. It is built from brick, asbestos pipes and other materials. The most economical option, but applicable only for light one-story buildings. Such a foundation for a 4x6 bathhouse can be made with your own hands for a frame building or from a log house.
Installation of formwork
To create formwork with your own hands, edged boards with a thickness of 25-40 mm are used.
There are other materials, but wood is more accessible, cheaper and easier to work with. In addition, after completion of the work, the boards can be used for other purposes.
The thickness of the boards directly depends on the height of the tape.
The formwork is assembled in stages:
- Assembly of shields. The height is 5-10 cm greater than the height of the tape; the length of the boards is determined by the length of the walls or the size of the boards.
- Installation of shields in the trench. They are fastened together by support strips that determine the thickness of the future tape. On the outside, the shields are reinforced with supports that prevent the mass of concrete from pushing the walls of the formwork outward.
- If the boards are low (up to 20 cm), supports can be omitted, securing the walls from the outside with pegs.
NOTE! When assembling the boards, gaps between the boards should not be larger than 3 mm (ideally, there should be no gaps at all). If gaps appear, they are filled with tow or slats. The installed formwork is a structure whose internal space is the exact shape of a concrete strip
After assembly, all dimensions should be checked to eliminate the possibility of errors.
The installed formwork is a structure whose interior is the exact shape of a concrete strip. After assembly, all dimensions should be checked to eliminate the possibility of errors.
Nothing can be corrected subsequently, so the assembly process must be monitored with the utmost care.
Options for the type of basic structure
The main criteria that are taken into account when choosing a foundation for a bathhouse floor:
Layout of a strip foundation for a bathhouse
- Weight and dimensions of the building.
- Geological conditions: soil type and depth of freezing, presence of slopes on the site, groundwater level.
- Affordable budget.
In most cases, the best option would be a strip foundation. The difference is determined by its depth. On stable soils, a shallow foundation will be optimal and economical, and in heaving soils, a deeply laid foundation (30 cm below the freezing depth).
If a bathhouse is built on a site of rock or silt, located at an angle, then a pile or pile-screw foundation is indispensable. Additional costs for floor insulation are added to its cost (this also applies to a columnar foundation). A slab base is suitable for silty, moving soils.
For sandy soils, it is better to choose a strip base for the floor, which is resistant to soil movement. On stable soils, you can make a columnar foundation for a bathhouse of medium or deep depth. For clayey rocks, a ribbon type or columnar type with a large depth is suitable.
Key Features
The columnar foundation, made for modern lightweight frame-type baths weighing up to 1000 kg/cubic m, is characterized by simplicity, accessibility and low cost of arrangement.
The support-column foundation has significant advantages that distinguish it favorably from other types of foundations:
- The design and calculation of a columnar foundation can be done on your own, without the use of additional equipment or the involvement of third parties;
- A foundation of this type can be installed on any soil with a low level of heaving and deep groundwater;
- Laying the foundation is possible in areas with significant differences at different points;
- The construction of a columnar foundation is carried out in a short time. Minimum period – 14 days;
- High strength and durability of the finished structure is ensured (the minimum service life of such a base is 50 years);
- Low cost of consumables and construction work.
Among the significant disadvantages are the following factors:
- The base is not suitable for the construction of heavy structures made of brick, concrete, cinder block;
- This type of foundation is not recommended for bathhouses equipped with basements;
- To protect against increased moisture, additional installation of a waterproofing layer is required.
Preparatory work at the construction site
When the project for the future bathhouse is ready, the initial marking of the site is done before construction begins. All debris is removed from the designated area, then the turf is removed (usually a layer of 10–15 cm). If there are roots of trees or shrubs left in this place, they must be completely removed.
An example of the layout of small baths
The uneven area must be leveled - the holes must be filled in, the protrusions must be cut off. The site is cleared with a size slightly larger than the design size - 1 meter on all sides. Then markings are made for the foundation for the bathhouse using pegs (rods) and a cord.
To mark the future bathhouse, you need to drive pegs or metal rods into the four corners, then stretch the cord around the perimeter. From it you need to measure the planned width of the foundation and drive 4 more rods into the inner corners and pull the cord. The correctness of the markings can be checked by stretching the cords diagonally. If they are the same length, then the angles are exactly 90 degrees. If their length differs by more than 3 cm, then such a distortion may be noticeable later during the construction of walls and installation of the roof.
How to markup
How to markup
They mark out the area for the foundation of the bathhouse after preparing this area. To do this, you need to remove the turf and level the area. To prevent flooding, the site is leveled with a slope in any direction except north.
Marking angle
Now you can start marking the foundation.
Step 1. First, prepare half-meter pegs, for example, from reinforcement. You will also need a rope that does not stretch, and a square.
Marking angle
Step 2. Drive the first peg into one of the corners.
Marking scheme
Step 3. The square is applied at a right angle to the peg, and, focusing on the legs, measure the sides and mark the adjacent corners of the foundation. The procedure is repeated until all 4 corners are marked. A rope is pulled between all the pegs. This is internal markup.
Step 4. Check the correctness of the markings by measuring the diagonals, the difference between the lengths of which should not exceed 20 mm.
Step 5. Place the cast-off at a distance of about one and a half meters from the pegs. It consists of vertically placed wooden blocks, to which a board is nailed on top at the height of the future floor. The boards must be parallel to the walls of the future bathhouse.
Step 6. The markings from the pegs are transferred to the cast-off. To do this, nails are driven into the board in places corresponding to the corners of the foundation and a rope is tied to them, which marks the internal walls.
Marking scheme
Step 7. On the cast-off, mark the outer surfaces of the foundation in the same way. The width of the base of the bathhouse can be 25 cm for wooden and 35 cm for brick buildings.
Marking scheme
Step 8. Measure the diagonals of the outer rectangle to check whether the outer sides of the foundation are laid evenly.
Marking
Now you can proceed directly to the construction of the foundation.
Preparation before pouring the strip base for the floor of a 4×6 bath
Having made markings for the strip foundation, you can proceed to the next stage - preparing a trench for pouring concrete mortar. You need to dig it, focusing on the cord. For a buried foundation, another 20–30 cm is added to the depth of soil freezing. For a shallow foundation, a trench up to 60 cm deep is made. The bottom is leveled using a level.
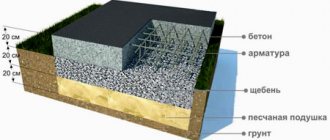
Scheme for building a foundation for a bathhouse
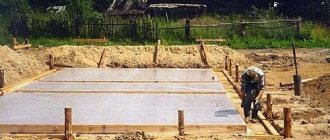
When the trench is ready, you need to lay a cushion on its bottom - sand and crushed stone. First, wet sand 15–20 cm thick is laid, leveled, and compacted with a vibrating rammer. Since sand retains and releases moisture well, in order to avoid rotting and destruction of the reinforcement frame, you need to lay a layer of crushed stone on top of the sand cushion to protect the foundation reinforcement.
Then formwork made of wooden panels is installed. Its height should be 45 cm higher than the level of the trench. This is a temporary frame for laying concrete, so it is mounted so that it can be easily removed later without damaging the base of the floor.
The next stage is reinforcing the formwork. The structure is assembled from metal rods, which are connected to each other with wire. Welding should not be used because such areas are more vulnerable to corrosion. To strengthen the foundation and save on concrete, add any scrap metal to the frame. Do not use lead, non-ferrous metals, or radioactive products.
Reinforcement of a strip foundation for a bathhouse
Step-by-step instructions for making your own from different types of materials
First of all, you need to prepare for construction:
Make clearing and plan the area for the upcoming construction. Then remove the turf (about 0.3 meters). At this stage, it is necessary to smooth out the depressions and differences as best as possible. If there is an admixture of clay in the soil, the pits are filled with gravel and sand.- The pre-prepared bathhouse layout is transferred to a plot of land. To do this, use a measuring tape, a building level, or a special thread for marking the axes. It is also necessary to prepare pegs; they can be made of metal or wood.
Reference! To determine the size of foundation pillars for a plot of land with large differences in elevation, it is necessary to level the surface. This will guarantee that there are no distortions in the bathhouse.
Before starting excavation work, it is important to determine the type of soil, the depth of water in the soil and freezing. The depth of the support pillars depends on these indicators. You can find out the type of soil and the water level in the soil by digging a hole of about 1.5 meters.
If water is found in the trench, it is necessary to dig to a dense layer of soil - approximately 0.4 meters. The more clay there is in the ground, the higher the degree of soil freezing.
If there is no liquid at such a depth, you can safely install the future sole for the bath.
If you ignore these conditions, then the base of the bathhouse may become askew or even become unusable, under the yoke of negative temperatures and the influence of groundwater.
It is best to excavate pits manually , this will increase the accuracy of the manipulations, simplify the construction of formwork and save the top layer of earth from destruction under the wheels of special equipment.
The size of the pits for the construction of a columnar foundation depends on the materials that will be used during construction:
- for pillars made of stone and brick, the optimal hole diameter is 0.5x0.5 meters;
- for cement pipes - 200 mm;
- for reinforced concrete supports 0.3 - 0.4 meters.
Inside the pits you need to pour sand, about 0.2 meters, add water and compact it well . As soon as the sand cushion is ready, you can move on to the next stage of construction - the construction of a columnar base from a suitable material.
Important! All pillar-type bases are installed according to a single scheme, the only exception being the option with a grillage.
From pipes
Metal or asbestos-cement pipes are well suited for constructing a bathhouse base.
They are cut with a grinder into pieces of the required size. It is worth paying attention that the support made of pipe should rise above the ground no more than 0.5 meters.
Tubular supports are sensitive to moisture , so they must be protected from provoking factors - wrap roofing material with bitumen on the pipes, cover them with a hydrophobic film, or apply a special resin.
After processing, the pipes are carefully laid in pits. The gap between the pipe and the soil is filled with sand and gravel mixture and compacted.
Reinforcing stakes are stuck in the middle of the laid pipes at a short distance from each other, providing the function of a reinforcing frame. The length of the fittings must exceed the size of the pipe.
Now you need to fill the foundation pillars with concrete mixture. Within a week, the prepared piles will harden and gain strength and strength. Now you can begin further construction of the bathhouse.
Interesting! Pipe foundations are characterized by a relatively low budget, reliability, and speed of construction.
Made of brick
The preparatory and excavation work before the construction of brick pillars is the same as in the case of pipes.
Hand-dug pits must be filled with sand and compacted. Pour the concrete mixture onto the sand cushion and reinforce it with reinforcement mesh.
To make it, it is necessary to cut the metal rods to the size of the pit and lay them, fastening the intersections with a small-diameter binding wire. The thickness of the concrete base together with the reinforcement mesh should be within 20 centimeters.
A columnar base made of bricks is often used in the construction of a bath structure, but one must also remember about the problems that may be encountered during the operation of the construction site. Under the influence of climatic factors, the seams between bricks may become deformed , which will lead to the destruction of the foundation.
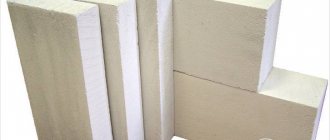
From blocks
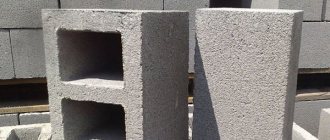
When constructing a columnar base, industrial concrete blocks with a standard size of 20x20x40 centimeters are used.
They are distinguished by strength and resistance to stress. The block base is built according to the same scheme as a brick support, with the exception of a number of points.
Taking into account the greater mass of the blocks, the thickness of the concrete base on top of the sand cushion ranges from 0.5 to 0.7 meters.
For the manufacture of construction cushions, not sand is used, but medium and large crushed stone, which ensures the exclusion of moisture.
The first row of blocks is installed in a bed of cement mortar. Subsequent rows of blocks are secured with cement perpendicular to the previous ones.
The final blocks are installed with an elevation above the ground of 0.2 - 0.3 meters. To protect against humidity and low temperatures, their surfaces are treated with waterproofing protection.
When installing blocks on the ground, it is necessary to monitor their location relative to the intended axes of the bathhouse under construction. The voids around the installed block supports are filled with earth and compacted.
Attention! On a sloping piece of land, installing blocks requires special care. It is prohibited to mount them at the same depth, as this can warp the bathhouse and deform the sole.
Made from concrete
Preparatory and excavation work on this foundation is carried out according to the general scheme. Round or square frames are made from three to four reinforcing bars. When calculating the length, a protrusion of 0.2 meters above the base is taken into account.
The rods are connected with thin wire. A formwork is built and installed in the pit, into which the reinforced frame is inserted. The support is poured with concrete mixture in stages and simultaneously compacted with a vibrating machine or an iron rod.
This type of foundation is considered reliable and durable, but quite expensive and labor-intensive.
Made of wood
Wooden logs are treated with a layer of bitumen and an antiseptic, which allows you to quickly install a budget base for a light frame bathhouse or log building. A significant disadvantage of such a sole will be rapid wear.
Wooden piles are installed in pre-dug pits, secured in the ground with gravel, small stones or crushed stone, followed by compaction.
Pouring the base
To fill the foundation with concrete, prepare a mixture of cement, sand, gravel with the addition of water. The grade of cement should be no lower than M200, and if work is carried out in the cold season, then no less than M400. The mixture is poured into the frame, distributed evenly, and air bubbles are removed using special vibrators. Containing organic waste in concrete is not allowed.
Table of composition and proportions of concrete mixture made from different grades of cement
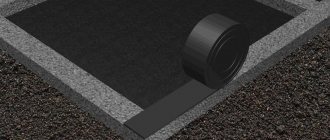
After the concrete has hardened (after 3–7 days), the box is dismantled. The cavities remaining from the shields are filled with crushed stone and soil. Along the perimeter of the foundation, drainage is installed from perforated asbestos or ceramic pipes to drain groundwater. Complete shrinkage of concrete lasts from 3 to 12 months. The base surface must be protected with a waterproofing coating. The easiest way is to apply bitumen mastic.
Detailed foundation pouring diagram
An experienced builder, having made a reliable foundation for a 4x6 bathhouse with his own hands, can then deliver the finished project on a turnkey basis within a month. Because the next stages of building a bathhouse (building walls, flooring, roofing, stove, etc.) occur faster than preparing the foundation.
Pile-screw base
It is much easier and faster to install a pile-screw foundation for a bathhouse. The cost of such a design will be more expensive; 2-3 more assistants will be required. There is no need to use specialized equipment. This type of foundation is suitable for most types of soil and is quite strong. Here additional costs will be required to insulate the floor.
Diagram of a pile-screw foundation
Such supports are screwed into holes prepared in advance, first to a primary depth (30 cm), and then each of them is screwed to a depth of 1.5 m, until the rock is stable. Load-bearing piles are mounted at the corners of the building, at the joining points of the walls. Additional supports are installed between them at a distance of at least 2 m.
The heads are welded to the finished pile-screw supports. For strength, a grillage made of metal channels or wooden beams is mounted. The floor is made by laying logs on a grillage. Edged boards are then placed on them at intervals of 7 mm, so that water flows freely through such a floor when using the bathhouse, even if the boards are swollen.
Additional recommendations
When building a foundation for a 4x6 sauna with your own hands, you often encounter common mistakes. This mainly concerns the incorrectly chosen type of foundation and its depth. Therefore, to assess the quality of the soil, it is better to contact specialists.
The most dangerous violations of technology:
- Welding reinforcement produces an unreliable connection. Only wire or clamps can be used.
- Use of cement below M150.
- Wintering an unloaded strip base. Without insulation or conservation, deformation will occur due to soil heaving in frosty weather.
Which foundation to choose
To avoid distortion of the building on heaving soil, it is recommended to make a thicker layer of sand cushion - 50 cm instead of 20. Thermal insulation of the base will reduce heating costs for both the structure and the floor, and will also increase the service life of the bathhouse.
Related video: Foundation for a bathhouse - where to start
Publications on the topic
How to build a strip monolithic foundation
Self-construction of a bathhouse from aerated blocks
Construction of a monolithic frame for a private house