The first thing to do before starting construction of any structure, including bathhouses, is to choose a location and start pouring the foundation. There are several types of foundation structures, so the question arises by itself - how to choose a foundation for a bathhouse: which is better, and from what materials it is more profitable to build it.
Types of foundations for a bathhouse Source rusdom66.com
Types of soil and their properties
The type of soil is determined during geodetic research, but for the construction of a bathhouse, surveys can be carried out independently. To do this, it is enough to dig a hole up to 2 m deep and study the granulometric composition of the soil section. In some regions, detailed soil maps have been compiled, so it is enough to talk with local residents or old-timers.
The depth of freezing in winter depends on the type of soil. This characteristic determines what kind of foundation is made for the bathhouse, and is a fundamental factor when choosing its type.
- Stone or rocky soil is a massive rock, does not absorb moisture, and does not heave in the cold.
- Peat soil is saturated with moisture, soft, loose, and requires an additional drainage system during work.
- Loams contain up to 30% clay, they have stable levels of freezing and humidity, the most common type
- Clay soil does not absorb water well; when filled with moisture, it becomes runny and liquid. It is better to build a foundation on it from waterproof materials and the structure should prevent soil deformation
- Sandy and sandy loam - dries quickly, does not accumulate moisture, but due to its high looseness, it sags and freezes deeply in winter. When choosing a foundation on fine dusty sand, you have to take into account its saturation with water, the height of groundwater and the depth of freezing.
- Clastic is a mixture of sand, small stone, clay, ideal for construction, it allows moisture to pass through well and freezes shallowly in winter
The design of any foundation must prevent soil deformation, be located below the freezing depth, take into account the groundwater level, the height of soil moisture, and the drying rate.
The choice of base for a bathhouse is influenced by the proximity of bodies of water and the topography of the site. It is appropriate to build a columnar foundation on the bank of a river, pond or on a slope.
How to select the components of a concrete mixture?
We have already found out that the active components in the solution formula are cement and water, which makes it work. Only the grade of cement should not be confused with the grades of concrete, since these are completely different parameters. M of Portland cement means a value indicating the strength of the cement mortar. Therefore, regardless of what kind of concrete is needed for the construction of the future foundation, cement is taken with the marking M400 or M500.
Most often, Portland cement is used to independently mix concrete for the foundation. A pozzolanic analogue can be used if there is no base, as it shrinks greatly in the open air. The slag version perfectly resists ground moisture, but is pleased with frost resistance.
Since the foundation is a predominantly reinforced structure, crushed stone with a fraction of up to 40 mm is needed to mix concrete according to construction requirements. The optimal choice is crushed granite gravel, its rough edges optimize traction. Crushed limestone is not suitable for aggressive groundwater. You need river or sea sand, but in the absence of it on sale nearby, quarry sand will do. The sand must be sifted and washed. The inclusion of clay and organic inclusions of more than 5% is unacceptable.
You don’t need distilled water for mixing, but you don’t need to scoop it out of a stagnant lake of mud either. There should be no biological impurities, oils, or salts in it at all. Typically, concrete producers use potable water. The amount of water is approximately equal to half the mass of cement.
Types of foundations for a bathhouse
The type of foundation determines the service life of the structure, the absence of deformation of walls, distortions of doors and windows, the development of mold, microorganisms and even small rodents.
Let's look at how to make a foundation for a bathhouse and the stages of its construction in more detail.
In practice, when constructing small structures, it is customary to use columnar, pile, screw, strip and monolithic foundations.
At the stage of preparatory work and delivery of materials, the site is cleared, the surface is leveled, pegs or beacons are driven in around the perimeter of the future building and a strong rope is pulled between them. This is how the bath plan is transferred to the site. In this case, the location of the walls and the stove is taken into account.
Preparation
Where to build a bathhouse
Expert opinion: Masalsky A.V.
Editor of the “construction” category on the Stroyday.ru portal. Specialist in engineering systems and drainage.
Where to build a bathhouse? First of all, pay attention to the landscape of your site and the type of sewage system that will be equipped. For example, a cesspool and a septic tank should be located away from water intake points, reservoirs, and neighboring areas. If the bathhouse drain is connected to the central sewerage system, then the structure can be erected in any convenient location on the site, for example, at a short distance (from 30 meters) from a river, pond, or swimming pool.
Bathhouse project
Advice! Even at the preparation stage, think about hiding the area in front of the bathhouse from the eyes of strangers. Make markings for the fence or determine places for planting trees and shrubs.
Also, preparation comes down to removing the top layer of soil and leveling the area. To do this, you should use the services of special equipment.
Site preparation
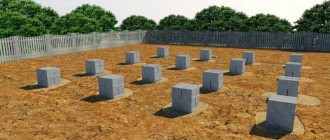
Columnar foundation
This is an affordable and easy-to-make foundation for a bathhouse with your own hands; it is economical and quickly erected. Doesn't require much time to shrink. Wood logs, stone, and brick are used to make piles.
Pile and screw foundations are a type of columnar foundation, only the load-bearing elements are manufactured in factories and are reinforced concrete, metal screw-in or asbestos-cement piles.
It is advisable to build it on quicksand, dusty soils, swampy areas that are flooded in spring or during heavy rains, peat bogs and shifting sands. The depth of the pile should be 15–20 cm below the soil freezing level and can reach a depth of 3 meters.
Formwork
Formwork diagram
Formwork for a strip foundation can be assembled from panels, slate, fiberboard and other similar materials. By the way, shields made of plastic or metal can be rented, which will significantly simplify the construction process. It is advisable to wrap the formwork materials with film, then they can be reused in the construction of other objects.
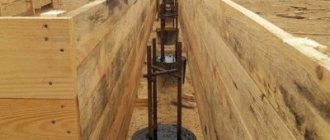
Board formwork
The formwork is installed in trenches, supported from the outside with lumber and stakes. Between the walls of the formwork, wooden transverse struts and metal pins with a pitch of 50 cm are installed so that the panels do not move apart under the mass of poured concrete. The panels are fastened to the ground with long nails (20 cm), and to each other with self-tapping screws or a stapler.
Formwork, diagram
The panels must immediately have openings for the outlet of sewer pipes and other communications. Otherwise, after pouring you will have to drill through the concrete, which will negatively affect the strength of the foundation.
Formwork
Advice! If you do not use film to protect wooden formwork, then staple glassine. It will prevent the tree from quickly absorbing moisture from the concrete solution and, as a result, cracking the foundation.
Video - Do-it-yourself wood formwork
Prices for various types of construction boards
Construction boards
Video - Non-removable formwork for strip foundations made of EPS
Stages of foundation construction
Markings are carried out on the site and the places where piles will be installed are marked with markers. Separately, the corners of the intersection of walls, additional partitions, and the place for installing the stove are distinguished. The piles are placed at a distance of 1.5-2 m from each other.
Wells are dug for concrete and columnar piles. The screw metal rod is screwed in using a special adjustable wrench and does not require preparation of recesses.
A pillar or pile is installed, the bottom of the well can be additionally reinforced.
After installation in the hole, the pile is cemented with a concrete solution. For hollow piles, additional reinforcement is used; a metal rod is inserted into the middle of the concrete structure and filled with mortar.
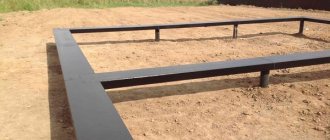
On soft soils and on slopes, the foundation needs additional grillage (top frame). It also levels and smoothes out any unevenness of the pillars that may occur during installation.
The concrete is given time to dry, and after 7-10 days work can continue.
This is the best foundation for a bathhouse, which is suitable for most soils, eliminates their imperfections, protects walls from ground moisture, helps avoid damage to the structure during flooding, and even protects against rodents.
Marking
Marking scheme for a strip foundation
We will make markings based on the large-scale project of the future bathhouse. It will be necessary to mark the outer and inner lines of the walls.
To mark the outer perimeter, you need to take a construction angle, a cord, a tape measure, pegs and a plumb line. Checking the verticality with a plumb line, we drive in the first peg in the place where one of the corners of the building will be located.
Foundation markings: corners and diagonals
Next, we install 4 more pegs in the same way, checking the angles for accuracy. We carry out control measurements of the diagonals of the bathhouse perimeter. If they are equal, then you can start marking the internal perimeter; if not, then we correct the position of the stakes, repeatedly checking the lengths of the sides, the accuracy of the angles and diagonals. We stretch the cord between the stakes. The horizontal position of the cord will mark the height of the foundation. We check the tensioned cord with a level and begin marking the internal partitions and perimeter.
Foundation marking
We retreat from the outer perimeter to a distance equal to the thickness of the strip base. We drive in the stakes and tighten the cord using a plumb line, a square and a tape measure. We mark the location of future partitions with a cord.
Strip foundation for a bath
The most common and affordable type for construction on stable soils that do not change their properties and composition under the influence of moisture. Its construction requires formwork, which can be rented. It takes time to shrink, so it is better to continue construction after 28 days.
The strip foundation for a bathhouse can be: buried (the trench is dug below 1.5 meters) and shallow (up to 1.5 meters). It is made from concrete (a mixture of sand, cement, gravel, expanded clay, crushed stone) or blocks (reinforced concrete, gas silicate, foam silicate).
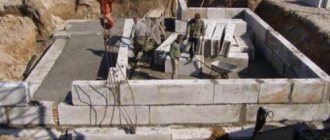
Block base
These blocks can easily withstand the structure of a wooden bathhouse or one made of other materials.
Original bathhouse design using a monolithic foundation
The fundamental blocks are characterized by:
- strength;
- water resistance;
- frost resistance;
- protection against deformation;
- ability to withstand loads well;
- do not collapse under the influence of moisture and chemicals.
The foundation for a bathhouse made of blocks can be laid in a short time; to this advantage we can add ease of installation and reasonable cost in comparison, for example, with a monolithic concrete base. The downside is the use of construction equipment for its construction.
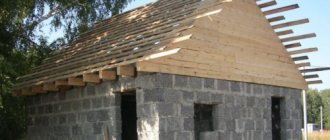
Foam block foundation
Of course, this is not a classic version of the foundation, but it is also quite acceptable. Before laying the foam blocks, it is necessary to fill the boards along the perimeter markings and form a sand cushion. Wet the sand generously with water until it hardens.
An example of a foundation for a bathhouse made of blocks
And then put a layer of roofing felt or glassine on it and lay foam blocks on top.
The blocks can be fastened together either with adhesive mixtures or filled with a thin layer of concrete. There is another layer of waterproofing on top. The foundation for a bathhouse made of foam blocks is ready. Economical and fast.
For a wooden bathhouse structure, 3x4 or 4x4 is quite a sufficient base.
Although, you can continue to build walls from the same foam blocks.
Stages of construction of a strip foundation
- A trench is dug under the concrete strip. It should be wider and deeper than the base of the foundation by at least 20 cm.
- A cushion is placed at the bottom of the trench - this is a layer of sand and gravel that is well compacted. If the walls of the bathhouse are made of lightweight materials and on strong soils with high load-bearing capacity, the pillow does not need to be laid. Its role is to avoid deformation of the base during soil heaving in winter.
- Install the formwork. The removable formwork is dismantled after the concrete has hardened. If the foundation requires additional insulation, block formwork made of cement bonded particle board and foam plastic is used.
- To further strengthen the walls of the strip base, reinforcement is carried out with a metal rod. For better adhesion to the concrete surface, the reinforcement must have a notch in the form of a spiral.
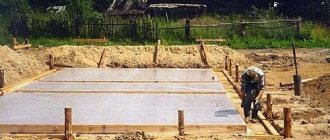
- Prepare the concrete mixture yourself, in small portions.
- Pour the mixture into the formwork, using vibration to distribute it evenly so that there is no accumulation of air left in the monolith.
- The base serves to form an air gap between the ground and the floor of the bathhouse, which protects against dampness and cold. It should protrude at least 30 cm above the ground surface.
- Remove the formwork and allow the concrete structure to stand until completely dry.
The width of the foundation should be at least 30 cm larger than the wall of the bathhouse and protrude on both sides.
Meters, per ton of reinforcement
- 8
- 10
- 12
- 14
- 16
- 18
- 20
After you calculate the number of tons you need and decide on the type of material, you can go shopping. When purchasing parts for foundation work, do not forget about the strapping; it can be metal or plastic, depending on your choice. You will need a lot of strapping; you must buy it with a reserve, as it can deteriorate and become unusable during operation. It is quite cheap, so it is not practical to carry out calculations separately; it is enough to simply buy it in large quantities.
Construction stages (step-by-step instructions)
- A pit is dug manually or using an excavator, which should be at least 10 cm wider than the foundation.
- A drainage layer of sand and gravel is poured onto the bottom of the hole and compacted. If groundwater is close, an insulating layer is made.
- Reinforcement is carried out over the entire area of the future foundation with metal or composite reinforcement. The rods are laid perpendicular to each other with a cell size of at least 15 cm. The reinforcement is tied at the fastening corners with metal wire or welded.
- Formwork is installed on the surface for the future base.
- Fill with concrete mortar, which is periodically compacted with vibrators. Instead of mortar, you can use concrete blocks.
- Cover with film and allow to dry, periodically sprinkling with water to prevent the appearance of small cracks on the surface.
Important! Filling is carried out in one day over the entire base area.
The most reliable type of foundation that can withstand heavy loads, but it is the most expensive and labor-intensive.
With a properly selected foundation, the bathhouse will serve for a long time and will delight you with low heat conductivity.
If groundwater does not reach the freezing depth and reaches a height of no more than 2 meters, a shallow foundation is chosen on shallow, dusty, and sandy soils. In other cases, the depth of the foundation should be 50 cm below the freezing level. This will avoid swelling of the soil and cracking of the base.
At the final stage of construction, work is carried out to insulate and insulate the basement of the future bathhouse.
Reinforcement
To strengthen the foundation, reinforcement is used, which is placed longitudinally, transversely and vertically into the trench. In places where individual rods come into contact, the connection is made with wire rather than welding, since the solidifying solution can damage the integrity of such a connection.
Photo of the foundation for a bathhouse
Methods of tying and bending reinforcing bars
The most common method of tying reinforcement in individual construction is hand tying. There is no need to buy a special tool. There are several knitting techniques. In all cases, the first loop should be placed along the spiral grooves, since with such a connection the reinforcing bars hold better and do not dangle. The main knitting methods are given below:
- Wire knitting.
This is a simple method that does not require special explanations or skills. For reinforcement ø12 mm, cut wire 180-200 mm long and bend it in half. The wire is wrapped around the fastened elements so that both free ends are 30-50 mm long. Holding the loose ends with one hand, insert the crochet hook into the loop with the other and twist the wire with rotational movements of both hands.
- Connection with reinforcement clips
(can be bought in a store). This method is good for connecting reinforcement in hard-to-reach places. As can be seen from the picture, a paper clip made of spring steel is fixed in diameter on one rod, and with its other end it presses another reinforcement. Fast and convenient!
- Overlapping connection.
It is used to lengthen the reinforcement frame and at the nodal points of the foundation walls. The recommended overlap length should be about 30 reinforcement diameters. For example, with a rod diameter of 10 mm, its length should be 300 mm. - To bend the rods we will use the simplest device. It can be made from two steel pipes with an internal diameter of 20-30 mm, a length of 500 mm and 800-1000 mm.
In a short pipe, starting from its end, use a grinder to cut off two symmetrical flats 80-100 mm long so that the height of the cut part of the pipe is within 18-20 mm. The result should be two cylindrical surfaces. We will bend them outward at an angle of 90˚ relative to the longitudinal axis of the pipe. It is important to ensure that the transition from the pipe to the bent ends is made within the radius. If you preheat them with a blowtorch or gas torch, this can be done easily.
Inserting one end of the reinforcement into a short pipe, and a long pipe into the other end, bend the reinforcement at the desired angle. In this case, the bent part of the short pipe will act as a radius stop. If we bend the second cut part in a short pipe, and process the second end of the pipe in the same way, then we will get a device with four stops. When bending reinforcement, you can use any of them.
Finally, you should think about securely securing the device to some stable base. To give additional strength to the stops, you can insert a wooden spacer between them.
To the begining
Interior work
Before you begin interior work, you need to decide exactly how you want it to look. Some people do it in a certain restrained style, while others prefer a simpler solution, trying to save a little money on it.
We assemble the floor and ceiling from a board that is about forty millimeters wide. One should also take into account the fact that floors must be made independently of the walls of the building.
Recommended video to watch:
When choosing a stove, give preference to a product made of chrome steel. Such options are considered durable and quickly heat the room. The disadvantages are its rapid cooling. As for brick walls, they will take longer to heat, but they hold steam longer.