The bathhouse is built not only from wood. Today, bricks, cinder concrete or foam concrete blocks are often used. Another type of cellular concrete – gas silicate – is also in great demand. The lightweight and durable artificial stone works so well that anyone can build a sauna from gas silicate. Before starting work, we recommend that you read this article.
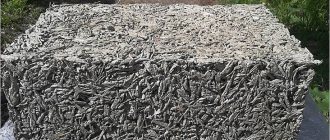
Gas silicate blocks
Gas silicate building blocks are made from a mixture of gypsum, lime, aluminum powder and cement with water. All this hardens at a temperature of 180°C and high pressure.
The result is a material that can simultaneously be used to construct buildings up to three floors and as insulation. Its purpose depends on the density of the finished product. The D500 grades are considered universal, that is, with a density of 500 kg/m3, suitable for both thermal insulation and the construction of walls.
Gas silicate for baths is good because it is fireproof, does not rot and does not create an environment for the development of mold and mildew.
Design and drawing
Without a project for a bathhouse, it is impossible to obtain construction permits, if necessary.
It makes it easier to build a building because you can calculate the amount of consumables in advance. Builders do not recommend building a large bathhouse from gas silicate blocks, since the walls will have to be reinforced with reinforcing belts. It is better to limit yourself to a small building.
Standard project types:
- Classic bath - 6x4 meters. With the correct layout, you can allocate space in the building for a steam room, shower, dressing room, hallway, terrace. Suitable for 4–6 visitors.
- Steam room for a summer cottage - 10x6 meters. Its main difference from a classic bathhouse is the presence of a full-fledged relaxation area. The main rooms are a steam room, a washing room, a dressing room, a large glazed terrace with space for a barbecue oven. You can arrange a small corridor.
You can also build a bathhouse with an area of 8x6 meters. Suitable for 6–8 visitors. To save space on a private plot and create an additional recreation area, you can create an attic floor.
For small areas, you can make a bathhouse from a construction trailer. It is enough to refurbish it from the inside and bring up communications.
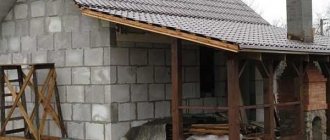
Bathhouse with terrace (Photo: Instagram / lopatinstroy)
Results of the work
The cladding I completed does not indicate the presence of gas silicate walls. Entering the bathhouse, it seems that you are in a wooden log house. And what aromas come from the aspen lining when the steam room is heated!
This is what the wall by the front door in the recreation room looks like!
In general, gas silicate blocks are an excellent material for building a bathhouse. Besides, it's inexpensive. The construction of a gas silicate bath, compared to a wooden log house, will cost much less.
Ivan K.
Features of the material
Aerated concrete blocks have a huge number of advantages: they are light, durable, cheap and easy to process. Using them as the main construction raw materials, you don’t have to worry about fire safety. This material is non-flammable, completely environmentally friendly, that is, when heated, it does not emit chemicals hazardous to human health, and due to its cellular structure, it retains heat well indoors.
Aerated concrete is one of the types of concrete that is subsequently obtained by mixing cement, quartz sand and gas-forming substances. Sometimes you can find gas silicate with the addition of gypsum or lime for a stronger solution, which then hardens and is cut into blocks of the required size.
A bathhouse built from this material, with proper insulation, can be used for many years (up to 100 years). Thanks to its features, you can save a lot of money when building a foundation, since the load on it is several times lower than when using conventional brick or wood.
The attractive thing about using this material is that all work is carried out in a short period of time. You can build a bathhouse of any complexity from gas silicate, without hiring a team of professional builders. There is no doubt that the room heats up quickly and is able to maintain a high temperature for a long time even in the coldest time of the year.
One of the disadvantages is the high coefficient of hydrophobicity, that is, the level of moisture absorption
Therefore, when cladding a building internally, it is important to pay attention to the quality and quantity of waterproofing. Experts suggest treating external walls with a special water-repellent primer. Therefore, it is recommended to install a dry steam room (sauna) inside the bathhouse, rather than an ordinary Russian steam room.
But, despite this, gas blocks do not mold and do not suffer from rodents, small insects and fungus
Therefore, it is recommended to install a dry steam room (sauna) inside the bathhouse, rather than an ordinary Russian steam room. But, despite this, gas blocks do not mold and do not suffer from rodents, small insects and fungus.
Gas silicate is a warm, reliable and strong material
Without additional reinforcement with reinforced belts, a bathhouse made of an aerated block has a low load-bearing capacity, and with the slightest mistake or unevenness during the construction of the foundation, cracks may form in the walls, just like due to the use of ordinary mortar for fastening the blocks, instead of special glue. Be careful!
We build with our own hands
Having answered the question whether it is possible to build a bathhouse from aerated concrete, you should move on to the process of constructing the building.
It consists of the following steps:
- Design.
- Calculation of material requirements.
- Purchasing everything necessary, preparing tools.
- Marking, digging a pit, laying out the foundation.
- Waterproofing the base.
- Wall masonry
- Installation of partitions.
- Reinforcement of masonry.
- Reinforcement under window openings.
- Pouring armored belt between floors
- Installation of interfloor slabs
- Insulation from the inside
- Finish lining.
In addition, the stages of installation of communications should be foreseen in advance.
Methods for laying blocks
A do-it-yourself aerated concrete bathhouse can be laid out in various ways. The choice to lay blocks flat or on edge is determined by the climatic conditions of the area where construction is taking place.
In the middle zone and in the southern regions of the country, it is advisable to lay stones in a vertical orientation, creating surfaces 20 cm thick. In this case, additional insulation is not required, since this design has the insulating qualities of 100 cm of brick.
Another solution is to lay the products on the wide side. This allows you to make single-layer walls with a width of 40 cm and 60 cm. This approach is used in areas with long and cold winters, where good thermal insulation is necessary.
Another method is the construction of parallel walls, between which vapor-permeable insulation is laid. The surfaces themselves are connected by ties, anchors or reinforcement. A continuous strapping is made on top.
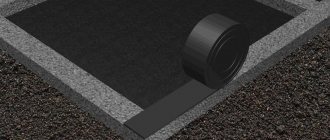
Waterproofing the base for masonry walls
Thermal conductivity, durability and strength of load-bearing walls depend on the quality of this stage.
Perform waterproofing in the following sequence:
- Cleaning the foundation surface from dust and dirt.
- Applying a layer of mastic.
- Laying 3 layers of roofing felt.
After the first row of stones has been laid, the roofing felt should be turned upward and glued to their surface. This will protect the material from snow, rain and melt water.
Technology and features of wall masonry
To make your own aerated block bathhouse durable and beautiful, you must follow the rules for laying the blocks.
There are few of them:
- The beginning of laying is from the corners, after preliminary measuring the evenness of the base.
- Bandaging each row with an offset of half a stone.
- Reinforcement of walls every 2 rows.
- Using hollow lintels to make openings.
The products have smooth edges. When laying, a special polymer adhesive is used, which has low thermal conductivity. Apply it in a layer 3 mm thick.
First row
The quality of laying the first row directly affects the progress of further work, solution consumption and the final result.
This stage is performed in the following sequence:
- The highest base angle is determined.
- Cement mortar is produced. Its task is to link blocks and align them.
- On the upper corner of the base, 2 stones are placed to form an angle. They are aligned vertically and horizontally.
- The remaining corners are made.
- A cord is stretched between them.
- Laying is carried out from top to bottom.
If there are gaps between the stones, they are filled with sawed-off fragments smeared with glue at the joints.
Second and subsequent row
You can return to continue work no earlier than 2 hours after arranging the first row, so that the cement has time to harden. Laying should begin from one of the corners, overlapping the stones each time. Before applying the glue, the surfaces are sanded with a float and cleaned of dust with a wet brush. The verticality of the walls is constantly checked by level and plumb. Correction of the position of the fragments is carried out with a rubber mallet.
Partitions
The partitions are installed after the walls are completely erected. The floors are pre-installed. In the wall blocks, cuts are made through 1 row to place the partition blocks perpendicularly. The dressing is done on half the stone. They are first sawed into blanks so as not to be distracted during laying, since the mortar’s lifespan is limited.
Based on the specifics of the project, a steam room, shower room, locker room and rest room can be fenced off with partitions. To make the room comfortable, it is advisable to make a vestibule to compensate for the temperature difference in the sauna and outside.
Masonry reinforcement
Every 2 rows, reinforcement is made of the raised wall from aerated blocks. For this, 10-16 mm reinforcement is used. The metal is placed in grooves, which are made with a grinder or a special tool. The groove cross-section is selected rectangular or triangular.
In the second case, much less work will be required, since only 2 oblique cuts are made, connecting in the middle of the walls. Radius bends are made at the corners, made by hand or with a pipe bender. After placement in the grooves, the reinforcement is filled with cement mortar flush with the surface of the stones.
Reinforcement under window openings
Reinforcement under window openings is carried out to strengthen the area that will be subject to the pressure of a massive double-glazed window. First, the width of the window is marked on the wall, 2 grooves are made on it, which exceed the frame by 20-30 cm on each side.
Then the grooves are cleaned of dust and crumbs, cement mortar is poured into them, and steel pins are immersed. Excess material is removed and the surface is leveled.
Lintels over window and door openings
The jumpers take on the load from the blocks on top. These parts are made in the form of U-shaped profiles. The cavity inside is intended for the installation of a reinforced concrete core, which has high strength and low flexibility.
Installation is carried out as follows:
- The part is cut so that its edges rest on the wall 40 cm on each side.
- The fragment is glued to the stones along the edges of the opening.
- A T-shaped support is installed under the jumper, supporting it along its entire length.
- A three-dimensional frame of square cross-section is made from reinforcement.
- The metal part is placed into the cavity and rigidly fixed in it. For this, staples or screws are used.
- Solid blocks are glued to the sides of the lintel.
- Concrete is mixed. The solution is poured into the groove and distributed evenly throughout the entire volume.
- Air bubbles are removed using a steel rod.
- Excess concrete is removed with a spatula and the surface is leveled.
The support can be removed no earlier than after 14 days, when the mixture has completely hardened. It is allowed to continue laying after 3-4 hours.
Pouring armored belt between floors - methods
To install floor slabs on the walls, their surface is reinforced with a reinforced concrete reinforced belt.
There are the following methods for making this design:
- Using U-shaped profiles. A technology similar to the installation of window lintels. The strength of such a perimeter is sufficient for a lightweight reinforced concrete slab.
- Making a box from thin blocks 5 cm thick and 20 cm high. They are glued to the edges of the wall, after which reinforcement is laid between them and cement mortar is poured.
- Monolithic reinforced concrete. Formwork is used into which concrete is poured. It scrolls to the wall or is installed on pins driven into it.
To achieve the required structural strength, reinforcement should be carried out with 16 mm rods.
Interfloor ceiling
After the first level of the building is completed, the interfloor ceiling is erected. For its construction, solid wood beams, hollow concrete slabs or reinforced concrete products in the form of columns are used. Considering the specifics of the building (high temperatures and risk of fire), it is recommended to use non-combustible materials followed by decorative finishing.
If a decision is made in favor of timber, then before laying it must be treated with an antiseptic, fire retardant and hydrophobic compound. Installation is carried out on a layer of waterproofing, which is roofing felt.
Beautiful examples
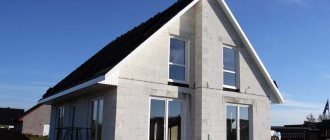
Many consumers are skeptical about block baths, explaining this by their unsightly design. In fact, such buildings can be made very stylish and attractive not only inside, but also outside.
For example, a small building with a triangular roof and steps leading to a dressing room can be finished with light-colored siding panels. The lower part of the building should be lined with decorative brown bricks around the perimeter. In such a bathhouse, blue or purple tiles will stand out effectively.
At the entrance to the building, place brick columns and install a red tile roof on top, which would cover the entire structure as a whole (along with the terrace). Green plants and flowers should be planted around. As a result, you will get a very impressive bathhouse.
A bathhouse made of blocks can be made laconic, but no less attractive, by playing on the contrast of the walls and roof. For example, the external finishing of block ceilings should be done with snow-white or beige plaster/paint, and brown coverings should be chosen for the roof. Install high plastic windows and doors in such a structure. This will make the bathhouse more stylish and modern.
Gas blocks: dimensions and characteristics
- Dimensions - the height and length of the blocks are usually standard (625x250), the width differs (100 - 600 mm). The choice of thickness affects the load-bearing capacity and depends on the load on the walls. Also, the choice of thickness affects the height of the walls. The thinner the wall, the less stable it is.
The stability of the wall can be checked by the permissible ratio of floor height to thickness (H/h). As a result, we get a coefficient, which we check using the table below (in it we are interested in column II - masonry group). If our result does not exceed the data from the table, then the condition is satisfied. If there are openings in the wall, then we additionally multiply our parameter by the coefficient k from another table. The permissible table values can be increased in the presence of longitudinal reinforcement.
- Density – indicated by the letter D and a number. The thermal conductivity and strength of the material depend on the density. For a bathhouse, it is optimal to use aerated concrete with a density of D400 and a strength of B2.5 .
- Thermal conductivity is the ability to transfer thermal energy. For aerated concrete D400 the parameter is 0.17 - 0.12 W/m*C.
- Heat capacity is the amount of heat that a material can absorb per unit mass, i.e. how quickly can we heat the bathhouse? For aerated concrete this parameter is 0.84 kJ/kg*C, for coniferous wood it is 2.4. This suggests that in the case of a wooden bath we heat the walls for a long time and only then does the heating of the air inside the room begin.
- Tolerances on block geometry - according to tolerances, aerated concrete is divided into several categories. Blocks of the first category are suitable for laying with a thin joint.
Also, gas blocks may differ in their format.
With flat ends - the standard configuration of aerated concrete blocks. No trimming required at corners.
Groove-ridge - have handles for transportation, glue is applied along the edges of the end plane. Trimming or plastering at corners is required to hide protruding grooves.
Groove-groove - when joined, two grooves form a hole, which is filled with a liquid solution or adhesive foam. Requires trimming or caulking at corners.
Groove-to-flat - fill like a tongue-and-groove, but do not require caulking or trimming at corners.
Tray block (U-block) – serves as permanent formwork when forming reinforcing belts and installing lintels.
Foundation
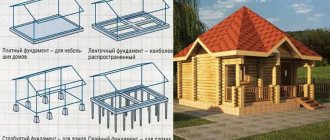
Various types of foundations can be used as the foundation of a future bathhouse:
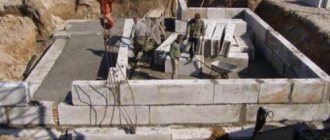
Tape, repeating the perimeter of the building. The foundation is formed into a wooden formwork with a reinforcement frame by pouring it with concrete mortar. The finished foundation of the bathhouse is immersed 0.5 m in the ground and is located on a compacted sand and gravel backfill.
Columnar, representing concrete supports installed at the corner points of the building and in areas where walls adjoin
Pay attention to the horizontal surfaces of the supporting elements, which should be located at the same level. Concrete is poured into pits with pre-installed reinforcement.
Features of the interior decoration of aerated concrete baths
The bath should not only be warm, but also attractive in appearance. The appearance and performance of the premises depends on the choice of cladding. Aerated concrete has good thermal insulation properties, but as it absorbs moisture, it will gradually deteriorate. Therefore, the finishing of walls is approached with special care.
To create the effect of a thermos, the inside of the bathhouse is covered with foil. This material is able to reflect heat inside the steam room and also reliably seals the walls. Self-adhesive film is laid overlapping, ordinary foil is mounted end-to-end. The seams are taped with metal tape. A ventilation gap is created between the reflective material and the clapboard sheathing using sheathing.
Wiring
Before finishing with clapboard, it is necessary to install electricity. Aerated concrete can be easily sawed, so there will be no difficulties with gating. The wires are laid according to the diagram made at the design stage. This plan will be useful for wiring repairs. You need to take care of grounding.
Clapboard finishing
Traditionally, the bathhouse is lined with clapboard - a suitable type of wood is selected for each room. A steam room with high temperature and humidity requires the use of lining with low thermal conductivity and increased moisture resistance. These are aspen, linden, alder. The rest room can be lined with conifers; they have a beautiful structure, and the resinous aroma is good for health.
Aerated concrete allows you to build smooth walls, so the sheathing is placed directly on them. The boards in the steam room are fastened with clamps, in other rooms they are nailed. The clapboard is not attached near the stove; for fire safety purposes, this area is trimmed with stone or brick. In the shower room, if desired, the walls and floor are tiled.
Floor options
A bathhouse made of aerated concrete blocks is equipped with a wooden or concrete floor. The wooden flooring consists of a rough and finished floor. The slope of the structure ensures water drainage. Concrete flooring is a more practical option; it will not rot from moisture. Laying ceramic tiles can make the coating look attractive.
The finishing touches remain:
- collect sunbeds
- nail the baseboards
- install sockets and switches
Finishing
Finishing is necessary both externally and internally.
Insulation from outside
If you do not do external finishing, the walls will simply be blown through. So you need to at least prime (with Ceresit ST-17 primer), and then plaster (ST-24) with a layer a little more than half a centimeter thick. You can continue finishing after installing doors and windows. Since aerated concrete is a fragile structure, the frames should be wide and attached to the concrete with anchor bolts as large an area as possible, and caulked with jute or tow. More complex external insulation consists of many elements that are attached on top of the sheathing made. The prepared facade can be covered with plastic siding or decorative plaster.
Insulation of aerated concrete from the outside
Insulation inside
Craftsmen advise covering the steam room and the bathhouse as a whole with foam glass tiles - simply placing them on glue. It is heat-resistant and has low thermal conductivity.
Foam glass is laid like tiles
Then the walls can simply be covered with clapboard.
Covering a block bathhouse with clapboard
A “warm floor” is laid on the floors, and tiles are placed on it.
Warm floor under tiles
Important! Before interior finishing work, you need to install all electrical cables and install taps for the water supply system and drains for the sewerage system.
After laying the tiles, ladders are installed.
Tile with ladder
Let's assume that we have overcome all the difficulties and our bathhouse is ready.
Features of bathhouse construction
Gas silicate is a product of the latest technologies, which has a number of advantages, thanks to which it has gained recognition from most developers. Among them:
- versatility;
- reliability and durability in operation;
- environmental Safety;
- fire resistance;
- does not rot;
- high thermal insulation properties;
- easy installation;
- affordable price.
Taking into account the feedback and experience of users, we can summarize how it is advisable to use the pros and cons of cellular concrete when building baths.
1. The stone is light, so there is a temptation to skimp on the base. Not worth it. Any subsidence of the soil can lead to cracks in the walls and compromise the strength of the structure. As a foundation for a bathhouse, it is better to choose a monolithic slab, strip or columnar options with mandatory tying with a reinforced concrete belt.
2. The first layer is laid at a height of 50 cm from the ground. To do this, the base is raised or a brick plinth is built. Waterproofing in 2-3 layers of roofing material is laid on it. The advantages of this technology are high stability of load-bearing structures.
3
The most important thing in building walls made of gas silicate is to lay the first row correctly. You should start from the corners and install them horizontally
The blocks must be leveled; differences can lead to cracks. It is better to entrust the construction of a bathhouse to a professional.
4. Gas silicate is laid on glue. Cement mortar is not used due to the possibility of damaging the thermal insulation of the facade. The value of the adhesive method is that the walls of the bathhouse are smooth and do not require plastering.
5. Disadvantages of the material - fragility and porosity
When building a bathhouse box, it is important to correctly select the minimum density of gas silicate. For a one-story building, blocks with D500 (500 kg/m3) are suitable.
Installation should not be carried out in wet, rainy or snowy weather.
6. It is unacceptable to use gas silicate with chips or irregular geometric shape. The monolith should be divided into halves and quarters only with special cutting tools.
7. The structure of cellular concrete requires mandatory finishing with materials with low vapor permeability.
The main advantage of using gas silicate blocks is the speed and cost-effectiveness of construction. The main requirement is the correct arrangement of all structures. Each owner must weigh the advantages and disadvantages of the source materials himself, and then choose the one that is acceptable to himself.
Approximate construction cost
Let's consider the project of a 6x6 bathhouse made of gas silicate, with mineral wool insulation, finished with siding on the outside, and linden lining on the inside.
| Name | Quantity | Cost, rubles |
| Walls | ||
| Gas silicate blocks Ytong 600x250x400 | 34 m3 | 150960 |
| Glue | 28 packages of 25 kg | 8120 |
| Ytong U-formwork blocks 500x375x250 | 14 pieces | 5600 |
| Masonry fittings Ø10 AIII | 0.08 t | 2124 |
| Concrete mixture B15-20 | 0.2 m3 | 700 |
| Mineral wool insulation (Rockwool) | 0.1 m3 | 370 |
| Siding profile 3660x230 | 94 pieces | 41078 |
| Bioprotective composition | 8 l | 600 |
| Foundation | ||
| Crushed stone bedding | 4.4 m3 | 8360 |
| Concrete mixture B7.5-10 | 3.3 m3 | 9900 |
| Concrete mixture B15-20 | 29.3 m3 | 102550 |
| Gidrostekloizol TPP 3.5 | 9 rolls | 6210 |
| Edged boards for formwork | 0.7 m3 | 4550 |
| Rolled waterproofing RKK-350 | 2 rolls | 630 |
| Floors | ||
| Purlin beams Ytong 200 | 76.4 lm | 73268 |
| Ytong D500 insert blocks | 9.5 m3 | 52915 |
| Steel mesh 100x100x5.0 | 59.1 m2 | 6501 |
| Reinforcing bars Ø12 AIII | 0.2 t | 5310 |
| Mineral wool insulation (Rockwool) | 0.2 m3 | 740 |
| Roof | ||
| Pine posts (150x50mm) | 1.2 m3 | 7800 |
| Bioprotective composition | 18 l | 1350 |
| Waterproofing (Tyvek Soft) | 73 m2 | 4964 |
| Profiled sheets SINS 35–1000 | 69 m | 23943 |
| Figured ridge (2000 mm) | 3 pieces | 1689 |
| Edged boards for lathing 100x25 mm | 0.4 m3 | 2600 |
| Window | ||
| Pine windows, 2k. glass unit 1450x580 | 2 pieces | 15600 |
| Finishing | ||
| Edged board 50 mm thick for flooring | 1.7 m3 | 7310 |
| Linden lining for ceiling 120 mm | 0.9 m3 | 5850 |
| Linden lining for interior wall decoration 22 mm | 4 m3 | 36000 |
| Vapor barrier film installation | 70 m2 | 1890 |
| Total | 657 111 |
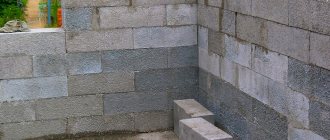
Construction of building walls
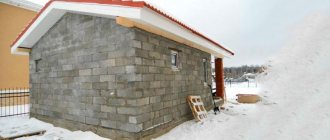
The blocks were laid on a ready-made strip foundation, protected by two layers of roofing felt waterproofing. Blocks with dimensions of 200x300x600 mm were used. I laid them on edge, that is, the thickness of the walls turned out to be 200 mm.
The construction of gas silicate walls will be carried out on a strip foundation
For masonry, cement mortar was used, mixed in a 3:1 ratio (ratio of sand to cement).
The work was carried out according to the following plan.
Stage #1 - laying the first row of blocks on the foundation
I started laying from the angle that (according to the laser level) was the highest. I applied the solution (about 5 mm) onto the roofing material with a trowel, and pressed the block on top. For better fastening, I tapped the blocks with the handle of a trowel.
The first row is the most important; the remaining rows of blocks will be aligned with it. Therefore, the accuracy of laying the blocks of the first row must be constantly monitored by the building level in 3 directions.
If it was necessary to cut blocks, I used a grinder with diamond discs for concrete. By the way, I once saw workers from a construction crew cutting blocks with a chainsaw. It worked out very quickly. So, whichever of these tools you have, use it.
The first rows of gas silicate blocks
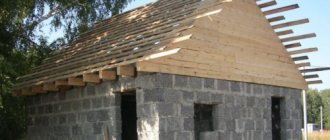
Stage #2 - erection of walls
Subsequent rows of blocks were laid with an offset of 15 cm. That is, the seams of the overlying blocks were shifted by 15 cm in relation to the underlying ones. Gradually the walls were built to a height of 2.25 m.
The walls of the bathhouse are made of gas silicate blocks and lined to the ceiling
Stage #3 - construction of gables
The gables were built according to the same principle as the walls, to a height of 1.9 m at the ridge. Except there was more hassle with cutting the blocks!
The gables of the bathhouse were also lined with gas silicate
Ventilation
When building baths from any material, the main task is to ensure good drying of all rooms after the bath. Then there will be no problems with fungi and mold.
When building a bathhouse from gas silicate blocks with your own hands, do not forget to leave ventilation holes at the top and bottom of the wall in each room. They can probably be cut out later, but why complicate your life. To prevent suction from them while vaping, they are closed with doors. And they don’t go into the room - they end up under the insulation. Their task is to remove all steam from under the casing after visiting the steam room.
One of the options for external insulation of walls made of foam blocks with subsequent finishing
Why were gas silicate blocks chosen?
When I just started construction, many neighbors in the dacha community asked me a question about why I chose gas silicate blocks. Somehow everyone got used to either wood or brick. And my arguments are:
- Quick installation. Gas silicate blocks are larger in size than bricks, so the construction of walls from them is much faster.
- High thermal insulation. Gas silicate belongs to cellular concrete, that is, it has many air cells inside. They play the role of heat insulators. Therefore, a bathhouse made of gas silicate blocks, in comparison with a brick one, warms up faster and retains heat longer. In terms of thermal insulation qualities, gas silicate is not inferior to wood.
- Fire resistance. Gas silicate blocks do not burn, unlike wooden structures.
- Impossibility of rotting.
- Low cost compared to brick, timber or logs.
In addition, I have good bricklaying skills, so I decided that I could handle gas silicate blocks.
I'll start in order.
Types of material for block baths
You can build a bathhouse from blocks with your own hands using various types of building materials:
gas-filled concrete. It is the basis for the manufacture of blocks obtained as a result of a chemical reaction with the release of gas. It features a uniform distribution of air cells. Due to the varying degrees of pore concentration, it differs in density, ranging from 500 to 1000 kg/cm3. The thickness of the building material allows the construction of walls 20 cm thick, which is enough to maintain a comfortable temperature in the room; Types of building block material
ceramic blocks. In appearance they resemble traditional brick. They have increased moisture-resistant characteristics and provide a high level of thermal insulation. They are distinguished by the presence of air channels parallel to the height of the product. Mainly used for exterior decoration, rarely used for the construction of bathhouse walls due to the increased price. Inferior to brick in most characteristics; gas silicate products. The building material is produced by autoclave processing and contains lime. Gas silicate is externally easy to distinguish from other types of concrete products by its snow-white hue and regular geometric shape. The material intensively absorbs moisture, which negatively affects its integrity and strength characteristics. Its properties are inferior to aerated concrete and requires reliable waterproofing; foam concrete. It is a type of aerated concrete product. The manufacturing process involves the introduction of a foaming agent, which provides a porous structure. Available technology allows private production
When purchasing foam blocks made at home, pay attention to quality. For construction, it is convenient to use a foam block with dimensions of 60x20x30 cm; cinder blocks
Building materials, along with concrete, contain various types of slag, which are industrial waste. Cinder blocks are inexpensive compared to other varieties. They have an uneven surface, as well as significant dimensional deviations. You should not immediately use them for a block bath due to the release of harmful substances when heated. Before construction begins, the material must sit for a year; expanded clay concrete. Expanded clay granules made from baked clay are used as filler. Expanded clay concrete is characterized by reduced hygroscopicity and low weight. In terms of performance characteristics, it surpasses foamed concrete, as well as aerated blocks. Expanded clay concrete products have reduced dimensions compared to foam blocks and cinder blocks. Dimensions are 40x20x20 cm.
Types of building blocks blocks
Insulation and vapor barrier
External insulation is performed only for a heated bath. At the dacha this is not financially feasible. The block building is insulated using a special technology. Use mineral wool and polystyrene foam of a certain thickness. The first is sold in rolls or in the form of mats, and the second - in sheets. Decorative cladding is made on top of the insulation.
Vapor barrier is not waterproofing. Each type has its own purpose. A budget vapor barrier can cope with the task, while using waterproofing for other purposes reduces all the work to zero.
The procedure for internal insulation:
- Cover the walls with waterproofing film.
- Make a wooden sheathing.
- Lay a vapor barrier (foil) and insulation.
- Organize finishing work.
Requirements for structures
When building a bathhouse, a number of requirements must be taken into account:
The building must be located at least 1 m from the fence and 8 m from the residential building. A sewer drain for water and a ventilation system (forced or natural) must be installed inside. The material used for the construction and decorative finishing of the bath should not emit harmful substances when heated. The cladding must withstand changing environmental conditions, be resistant to temperature changes, and frequent exposure to moisture. Surfaces around furnace equipment must be covered with non-flammable materials
It is important to equip a high-quality chimney so that smoke does not enter the bath rooms. For a sauna in a house made of aerated concrete, the requirements change
For a sauna in a house made of aerated concrete, the requirements change.
Materials
There are several types of building blocks from which reliable and durable baths are made. Each raw material has special characteristics:
Aerated concrete
Baths are quite often built from aerated blocks. This material is very popular and accessible.
It has many advantages:
Light weight. A block with dimensions of 30x25x60 cm weighs only 30 kg. If you decide to lay brick in a similar volume, then you will need 22 elements, the total weight of which will be 80 kg.
High heat conductivity. Aerated concrete has a cellular structure that provides an excellent heat-conducting effect. This material perfectly retains heat in a room and creates pleasant coolness in hot summers.
Fire safety. Aerated concrete blocks are made from mineral components that are not flammable or combustible. For this reason, such building materials can easily withstand exposure to open fire for 3 hours.
The thickness of aerated blocks can be:
Such materials are large in size, so their installation does not take much time. This material is autoclave. It is distinguished by earthquake resistance and increased strength.
cinder block
Cinder blocks are a building stone that contains the following components:
There are several types of cinder blocks:
Gas silicate
A bathhouse can also be built from gas silicate blocks. A distinctive characteristic of these building materials is that there are voids in their structure, occupying from 50%. Thanks to this characteristic, the blocks are light in weight and do not exert an impressive load on the foundation.
It is also worth noting that gas silicate blocks have good sound insulation and thermal properties, which are provided by their structure with cells.
Gas silicate blocks are often used in the construction of baths due to the following qualities:
However, it is worth considering that this material absorbs moisture, which leads to an increase in its density and strength, and this negatively affects the thermal and sound insulating properties of the blocks.
Sand block
Sand blocks (sand-cement blocks) are made by mixing a combination of cement, sand and water. This composition is standard.
Sand blocks are very popular not only because of their efficiency, but also due to their positive characteristics:
Such blocks have excellent strength characteristics. They are not afraid of negative external factors.
Sand block baths are not susceptible to rust and rotting.
These building materials are produced from environmentally friendly and safe components.
These blocks also contain voids, so they have sound and heat insulation properties.
They almost do not absorb dampness and moisture.
They have an affordable price.
Experts recommend additional insulation of these materials, especially if you use them in the construction of residential premises and baths.
It is worth considering that solid sand blocks have more impressive weight than hollow elements. That is why it is necessary to prepare an appropriate foundation for such building materials.
Arbolite block
Arbolite blocks are quite often used in the construction of baths. These materials are distinguished by increased strength, which is ensured by the appropriate structure and composition. In addition, wood concrete elements are not afraid of unfavorable climatic conditions and various precipitation. They do not absorb dampness and moisture, and also do not deform upon contact with them.
Arbolite blocks can be safely used in the construction of baths, since they are not flammable - they contain not only cement, but also special chemical impurities that provide these properties.
Many consumers prefer wood concrete blocks because they have an affordable price, especially when compared with bricks.
There are only two types of wood concrete blocks:
- structural;
- heat insulating.
Twinblock
Twinblock is another type of cellular blocks. It is high-tech and autoclave. Like other types of similar materials, it is light in weight and does not exert strong loads on the foundation.
The twin block contains the following components:
Tools and masonry mortar
You can use the usual mason's tools: a hammer-pick, a trowel, a level, a spirit level. It is good to cut blocks using a grinder using a concrete cutting wheel. But some even cut with an ordinary hacksaw or chainsaw. But the latter is still not worth recommending - it’s a pity for the tool. You also need to be aware that gas silicate is a terrible abrasive. Therefore, you should not be surprised at the rapid disappearance of saw teeth.
It is better not to use the usual cement-sand mortar for masonry - gas silicate blocks will instantly remove moisture from the mortar, and it will not gain strength. In addition to insufficient strength, the cement joint will act as a cold bridge. Therefore, the heat-insulating properties of the block will simply be unnecessary.
So for laying blocks you can and should use special glue. It will be a little more expensive, but ultimately much more practical. For those who have doubts and those who like to introduce savings on matches into construction, we can recommend additionally finding and reading reviews from practitioners - everything will fall into place.
Bathhouse project
At the first stage of work, it is necessary to choose a layout that is ideal for the owner. In this case, not only the quadrature is calculated, but the need to construct an attic is also taken into account. As a rule, the building will consist of two parts - a dressing room and a steam room. It is also convenient to combine a bathhouse with a common house.
The project with an attic can be expanded by adding an entrance to the second floor. If there is free space, a billiard room or guest room can be placed on it.
Laying aerated concrete blocks can only be done by experienced builders. It is prohibited to implement the project on soft ground. The structure cannot be heavy. In a bathhouse made of aerated concrete, a strip-type foundation should be used. Thanks to this, you can save up to 20% of the total amount.
At the first stage of creating a project, you should choose a location for the stove. It can be located on a common foundation or located separately. Only the brick version is placed separately due to its heavy weight. Any floor can withstand a metal stove.
Waterproofing a bathhouse made of aerated concrete will be expensive. You can reduce the cost if you use gas silicate or plaster. However, the finishing of the steam room can be made of lining. It is allowed to use linden or aspen.
At the first stage of creating a project, you should choose a location for the stove.
Installation of a “pie” of insulation in a steam room
I would like to see the interior surfaces of the bathhouse finished in wood. For almost nothing, I managed to buy a machine for cutting aspen boards 20 mm thick and 125 mm wide. I used it for finishing, having previously smoothed the surfaces with a plane and sander. It turned out to be a good lining!
Despite the good thermal insulation qualities of gas silicate, additional insulation will never hurt. Especially in a steam room, where there are temperature changes and high humidity. Without insulation, streams of condensate will flow through the gas silicate. This is not very good for blocks, but generally disastrous for lining. First it will twist, then it will rot.
Therefore, I decided to equip the steam room with the traditional insulation “pie”: insulation - vapor barrier - lining.
The plan was carried out according to the following scheme.
Stage #1 - stuffing slats on the walls and laying insulation
Paroc mineral wool must be laid over gas silicate, inserting mats between the padded slats.
I attached 50x50 mm slats to the walls vertically using wood screws. It turned out that they are easily screwed into gas silicate and are firmly held in it. A 50 mm thick insulation was laid between the slats. I tried to lay it tightly, squeezing the cotton a little before installing it in the slatted “window”
It is important here to prevent gaps, otherwise cold bridges will negate all thermal insulation
Laying insulation between slats packed on the wall
Stage #2 - installation of a vapor barrier layer
For vapor barrier, two materials were used - Metaspan film and foil. First, I shot Metaspan onto the slats with an overlap of about 15-20 cm. Then - foil, with the same overlap. The joints of both layers were taped with foil tape. Such a vapor barrier will not only prevent moisture and steam from accessing the Paroc insulation, but will also serve as a kind of continuation of the insulating layer. The foil vapor barrier Metaspan + aluminum foil will serve as a reflective mirror for thermal infrared rays coming from the steam room. The rays will be sent back, and accordingly the quality of thermal insulation will increase.
Fastening the Metaspan foil vapor barrier on top of the insulation
Stage #3 - making lathing for clapboard cladding
To ensure that condensate flows freely over the foil and is not absorbed into the lining, a ventilation gap was made. To do this, the sheathing had to be “pushed away” from the foil using small, 2cm thick bars nailed in advance.
Bar between foil and sheathing
Thus, first I nailed the bars through the foil (to the slats), and then horizontally fixed the sheathing of boards onto them.
The horizontal lathing for fastening the lining is made of boards
Cladding the rest room and attic
For the cladding I used the same aspen paneling as in the steam room. I just sewed it onto the slats horizontally. I did not use any vapor or thermal insulation.
First of all, I attached vertical slats (made of boards) to the gas silicate walls. I nailed the clapboard to them with nails.
Vertical slats are mounted on gas silicate blocks using wood screws
The walls of the rest room were covered with aspen paneling horizontally
Upon completion of the work, I covered the lining with antiseptic impregnation “Drevnokhron oak” (Polifarb) in 2 layers. The second layer was applied after the first had dried, that is, the next day.