Articles
All photos from the article
In the process of performing various construction works, sometimes it becomes necessary to attach a wooden pole to concrete. As a rule, this operation raises many questions among novice masters. In this article we will look at how to attach wooden poles to a concrete base in several ways.
Wooden pole mounted on concrete
How to fix a wooden pole on concrete: concreting the pole and mounting it on the base
In the process of performing various construction works, sometimes it becomes necessary to attach a wooden pole to concrete. As a rule, this operation raises many questions among novice masters. In this article we will look at how to attach wooden poles to a concrete base in several ways.
Wooden pole mounted on concrete
Installation methods
The base is a box for installing supports.
After completing the preparatory work, we proceed to installation. We mark and prepare the place for the supports. Options for installing poles are determined by the design features and the nature of the work. Installation means concreting a support or fixing it to concrete. There are main methods:
- universal concreting of the base;
- use of concrete stepson;
- installation on concrete;
- use of frame;
- special connection;
- platform with a box.
Return to contents
General information
The need to install wooden poles on concrete can arise in a variety of situations, for example, when installing fences, building gazebos and other wooden structures on a strip foundation.
At first glance, it may seem that installing a wooden pole on concrete is very difficult, but in reality, professionals have some tricks that allow them to cope with this operation without any difficulties. Below you can see for yourself.
Installing a wooden post on concrete
First of all, it should be said that installing pillars on concrete often means different operations:
| Type of transaction | Peculiarities |
| Concreting | The post is installed in a hole that is filled with concrete |
| Fixing on a concrete base | The pillar is fixed on a flat concrete surface using special devices. |
Below we will take a closer look at each of them.
Pillar concreting
Many novice home craftsmen doubt whether it is possible to concrete wooden poles, since wood in concrete can quickly rot. In fact, if you follow a certain technology, the wooden support can stand for quite a long time.
Article on the topic: Do you need interior decoration of a house made of profiled timber?
Instructions for performing this operation look like this:
- The first step is to make a hole to the depth of soil freezing. In different areas, this depth may be different, but on average in our country it is 1.2 m. If you make the hole shallower, then there is a possibility of the pillar being pushed out as a result of soil heaving. The easiest way to dig a hole is with a garden drill, but if you don’t have one, you can use a regular shovel.
- Next, you need to fill the bottom of the hole with crushed stone or gravel, and compact it well. The layer thickness should be about 15 cm.
Treatment of timber with impregnation
- Before concreting a wooden post, it is necessary to treat the wood with a protective compound. Currently, specialized stores sell special impregnations that protect wood from moisture penetration, exposure to microorganisms and other negative factors.
- After processing, the post must be installed in the hole and secured with spacers. In this case, its position should be checked with a building level to prevent deviation from the horizontal.
- Next, the space in the hole is filled with concrete.
- Protruding concrete must be smoothed down with a slope away from the post so that water does not accumulate near the wood.
- The concrete must then be covered with damp burlap. It must be moistened periodically throughout the week. This procedure prevents concrete from cracking during the drying process.
In the photo - treating the joint with sealant
- After the concrete has completely hardened, you need to treat the area where it meets the wood with sealant. This will prevent moisture from entering the joint space, which will form during the freezing/thawing process.
Advice! The durability of a wooden structure largely depends on the type of wood. For example, pine and larch have good moisture resistance. Moreover, the price of pine is the lowest among other species.
This completes the process of concreting the pillar. It should be noted that there is another way to install a wooden pole in the ground. Its meaning lies in the fact that a small column (concrete stepson) is concreted, to which a wooden beam or log is attached on the surface using wire tying.
Securing the support with a concrete stepson
Advice! Before concreting, it is advisable to perform waterproofing. To do this, place roofing felt rolled into a tube into the hole.
In addition, you can securely fix the support directly into the ground without concreting it.
According to this technology, the work is performed as follows:
- After treating the support with an antiseptic composition, its area that will be in the ground is covered with bitumen mastic for wood and wrapped with a layer of roofing felt.
- Then the bottom of the hole is covered in the same way with a layer of crushed stone and gravel.
- Next, the support is fixed with spacers in a vertical position.
- After this, the pit is backfilled and compacted. To do this, the space needs to be filled with stones, broken bricks or large crushed stone. Every 30 centimeters, the stones must be compacted with a crowbar, sprinkled with a layer of sand and then spilled with water, which will improve the quality of compaction.
- When about 15-20 cm remains to the top of the pit, the space needs to be filled with concrete. In this case, the concrete ring will provide stability to the support and prevent it from warping.
Article on the topic: Why a house made of laminated veneer lumber turned out to be cold
Fastening for wooden support
Installation on concrete base
Installing wooden posts on a concrete base can be done in several ways.
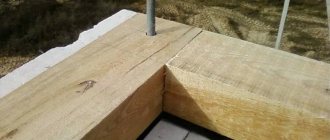
- Using a special fastener mounted into concrete - in this case, during the pouring process, a device is inserted into the concrete, which is a pin with a U-shaped fastener at the end. During installation, the beam is inserted between the two “tails” of the device and secured with bolts or screws. It should be noted that the U-shaped fastening must correspond to the cross-section of the beam so that it fits tightly into the space. The disadvantage of this method is that it can only be used when pouring concrete, and only timber can be installed as a support.
Example of timber fixation
Using reinforcement - if there is no special fastening at hand, you can use reinforcement, which is inserted into the concrete so that the pin rises about 20 cm above the surface. When installing the support, a hole is made at its end with a diameter corresponding to the pin. Before installing the support, a waterproofing layer must be laid on the concrete.
As a rule, with this installation method, lower and upper trim are used, combining all the supports into a single structure. Therefore, this option is usually used when constructing gazebos and other structures on a strip foundation with your own hands.
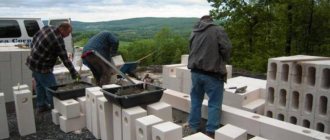
Base box for installing supports
- Using a box with a platform - this method is used in cases where you have to deal with hardened concrete. The principle is based on the fact that a beam or log is inserted into a special box, to which a platform with holes is welded on the bottom side. As a result, the box with the post is fixed to the concrete surface using dowels.
This is, perhaps, all the information about how to attach a wooden pole to concrete.
Why pour mortar into fence posts - Handyman
Concreting pillars must be approached responsibly, because the reliability and service life of the entire fence depends on it.
How to install fence supports, what materials are best to choose? Let's look at the main points of building a fence.
Why concrete fence supports?
Advantages:
- The pillars will not loosen in the ground. If the pillars are not concreted, when the groundwater level rises, they simply may not withstand the load and fall.
- Protection against corrosion processes is provided.
- You can extend the operating time.
The downside is that if the pillars are concreted, over time they begin to stick out of the ground due to precipitation.
This situation will arise when there is close-lying groundwater, which pushes supports with a concrete base out of the earthen cover.
There is also a possibility of cracks in the concrete.
The strip base is one of the most reliable
How to prepare a construction site?
Take these materials:
- shovel, crowbar, concrete mixer;
- fittings;
- drill;
- cement, crushed stone, sand;
- roofing felt;
- level, plumb line, tape measure;
- theodolite, cord;
- timber for formwork;
- wheelbarrow;
- plastic bags.
First you need to prepare the surface and only then install the supports for the fence. Use a shovel to cut off the rhizomes and turf so that there are no obstacles during drilling.
The size of the hole may vary depending on the diameter of the drill. Install it as deep as possible. Remove the soil from the pits immediately so that it does not interfere with construction work.
Drill the soil to the freezing depth (about 1.5 m), then install the expander on the plow and begin arranging the anchor expansion at the bottom of the hole. Thanks to this, winter frosts will not affect the position of the pillars; they will remain in place.
Which fence posts to choose?
The main criteria for selection are not only external characteristics, but also technical ones, as well as installation methods, which include additional elements.
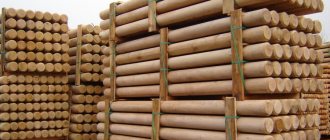
Types of pillars:
- Made of wood - short-lived. They will last an average of 10 years. If you choose this option, treat the supports with antiseptic preparations or copper sulfate solution. This will extend the service life.
- Asbestos cement pillars are characterized by practicality, ease of installation, and affordable price. Suitable for summer cottages or commercial areas. The disadvantage is that the pipe is empty. When it rains, water accumulates inside, and during frost the pipe may burst. The logs are difficult to attach to the base.
- Metal poles are the most practical and popular. Pros: easy to install, reliable, can be used for all types of fences, have a long service life.
- Made from concrete . Finished products are expensive; they are often made independently, since this does not require large investments. They are used often, but require skills to pour the design efficiently the first time.
- Brick pillars are the best decorative material. They are expensive and difficult to work with. Laying of the foundation is required, mutual bandaging, decorative treatment and preventive methods are needed, but the appearance is attractive.
What are the types and how to install screw piles for a fence - read in this article.
Whether it is necessary to concrete posts for a fence made of corrugated board is described in detail here.
If you are interested in how to make wooden fence posts with your own hands, read this article.
Choosing the right pole type
Follow these tips when choosing supports:
- For fences made of corrugated sheets, those supports that are able to stand reliably in the ground and support the structure without any problems are suitable. The weight of such a fence is light, so you can even use wooden posts. Although the best option is concrete types, as well as metal and brick. To make the structure more durable, use iron corners as a frame along the fence.
- Are you planning to install a chain-link mesh ? Buy small-diameter iron poles. This option will not be expensive. Bury deeply so that the mesh, when stretched, does not bend the supports. Place a reinforced concrete pillar in the corner area.
- For a brick fence, take pillars made of brick, concrete with the correct dressing and with a high-quality foundation. Other options will not be able to withstand heavy loads and will spoil the overall appearance.
- For concrete structures - pillars made of concrete, metal (wide in diameter).
Metal supports are the most practical option
What type of concreting to choose
A wooden post does not need to be filled with concrete, since if the wood is damaged, it will simply be impossible to replace the post.
You will have to break the concrete and start the process again. It is better to install a steel or asbestos glass, this will allow you to replace the timber in the future.
But for metal supports, use cement compounds.
Pouring supports can be of the following types:
- spot concreting is inexpensive .
- partial concreting option is used to fill the top layer of earth. The disadvantage is deformation of the support due to the influence of low temperatures on the soil. The structure is weakened.
- Mounting a strip base is an expensive method, but reliable.
- With the dry type, there is a possibility of the pillars swaying during the wind, this weakens them.
Concreting scheme for corrugated board fencing
Preparatory stage of concreting pillars
Measure the future fence. Based on its length, calculate the number of supports.
When using slate (flat, wave) as a fence, a distance of less than 2 m must be maintained between the posts. If it is corrugated sheeting, 2 m is sufficient.
With lightweight structures (chain-link mesh), the gap will be 3 m or even more.
The next step is to complete the markup. Measure the area where the fence will be installed. Its length is divided by the length of the fence sections and 1 is added - this will be the number of columns.
Did you get a non-integer number? Reduce the flight distance. For example, the width is 10 m, the material is corrugated sheeting, between sections is 2.5 m. The calculation is as follows: 10/2.5+1=5 pillars .
Take measurements and mark where the structure will be installed. Take this into account if a gate or wicket will be installed.
Their length usually does not correspond to the section markings, so the number of supports will fluctuate. A standard entrance gate is about 3 m, and a wicket is 1 m.
Now start drilling or digging holes to install the column.
If your site is located in a humid area, which is characterized by severe frosts, refuse this type of partial concreting. Replace with tape mounting.
Fastening timber to concrete - advice from professionals
Fastening timber to concrete is a fairly common question that arises in the process of building a country house with your own hands.
The sequence of performing such work is not particularly difficult, but choosing the technologically correct fasteners for timber to concrete is a task that requires detailed consideration.
Article on the topic: Which type of lumber is called timber
Wall lathing device
Special metal profiles are provided for lathing installation of ventilated facades or lining internal walls with plasterboard or plastic panels.
Article on the topic: How to save money when building a house from timber
But in some cases, if the temperature conditions of the region and the permissible humidity of the premises in use allow, wooden blocks can be used as guides.
Therefore, we will consider below how to attach a block to a concrete wall.
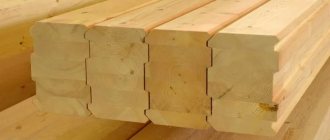
Depending on the weight of the cladding and the coverage area, timber with dimensions of 20x40 mm, 40x40 mm, 50x50 mm is used under the sheathing.
To fasten such a beam, metal anchors or a dowel-nail with plastic plugs are used (see photo).
It is better to install the sheathing with a partner. Depending on the material, beams on walls can be mounted either horizontally (plastic panel) or vertically (plasterboard boards).
The installation principle is the same as when laying joists:
- We attach the rail to the wall.
- We drill a hole with a hammer drill.
- Insert an anchor or dowel-nail.
- Using a rack level and fiberboard spacers, we adjust the correct installation.
- Tighten the anchor or hammer in a dowel-nail until the block stops at the base.
- We install the panels.
This article discussed in detail the topic of how to attach timber to concrete. We hope that this publication was useful for you, watch the video and leave comments.
Installation of vertical posts and horizontal jumpers
After installing the corner posts, it is necessary to install other vertical posts of the frame. The step between the posts should be 60-100 cm.
Beams of 150/150 mm or 150/200 mm are used as racks. This size is optimal for laying insulation.
House frame elements
In order to choose the pitch between the posts, you need to correlate the distance between the vertical posts of the frame house with the dimensions of the finishing slabs and panels that are provided for in the design of your building.
Most finishing slabs have a width of 1200 mm, so it is best to make a rack pitch of 60 cm. It will make construction easier by multiplying the size of the finishing panels with the size of the window openings.
Frame elements of a frame house with a window opening
You will have to install additional studs at the joints of the cladding boards if the width of the panels differs from the size between the axes of the studs.
Important: lubricate all iron elements with oil before use, which will protect them from rust. It is known that wood begins to deteriorate faster in places of contact with untreated metal.
To secure the frame in the desired position and increase its rigidity, install temporary braces during assembly.
It is better to place 2 or more jibs on each vertical post.
Installation of temporary jibs to each rack
After the construction of corner and row racks, it is necessary to further strengthen them with horizontal jumpers.
Jumpers perform several functions at once:
- secure the frame, increasing its rigidity
- minimize bending of posts
- separate the mineral wool type insulation, supporting the top sheet
- are the basis for fastening the internal and external cladding of a frame house
Horizontal jumpers in the frame
Sometimes it is recommended to fasten horizontal jumpers with nails driven in at an angle.
However, this method is fraught with cracks in the timber and distortion of the racks during nailing. Use corners.
Scheme of strapping and timber frame
After the frame is erected, the upper trim is assembled. It connects all the walls into one structure.
Proper fastening of timber to concrete with your own hands: to the wall, to the ceiling, to the floor
The need to fasten timber to concrete may arise in a variety of cases - when installing floors, finishing walls, or implementing other tasks during the repair and construction process. Wood can be attached to a concrete surface using several methods; the choice depends on operating conditions, the condition of the materials, planned loads and a host of other factors.
In floor construction, wooden beams are also called joists. They are installed if it is necessary to lay the finishing touches. Different technologies are chosen for mounting to the floor and wall. Before starting work, it is important to carefully study everything, perform calculations, draw up a project, prepare surfaces, and then clearly and correctly install a structure that will be reliable, strong and durable.
The main methods of fastening a beam to a concrete monolith are the use of various types of fastening elements (dowels, anchor bolts, self-tapping screws, screws, nails made of plastic, metal), as well as mounting the elements with glue and polyurethane foam. U-shaped brackets, metal corners, and wooden cotter pins can be used.
- The size of the cross-section of a wooden beam.
- Concrete surface thickness.
- Finishing the surface to which the timber is attached.
- Size and weight of the structure being held.
- Operating conditions and taking into account all factors that will affect the wooden beam.
Number of supports and calculation of their strength
Each building must withstand a certain load; in order to build a canopy with your own hands, you need to calculate the number of supports. In total, the supports must withstand the weight of the frame, roofing material and the weight of the snow mass that can form on the canopy roof in winter.
In order for the canopy to withstand such loads, it is necessary to correctly calculate the number of supports. Also, their number will directly depend on the size of the canopy.
If we take a carport for one car as an example, the number of racks will be eight, which means it is necessary to build two rows of four racks each.
Installing joists on a concrete base: to fasten or not?
Typically, logs are placed on a concrete base for further laying of plywood or boards. Depending on the situation and the structure that will be assembled in the future, the beam may require rigid fastening or assume the absence of a rigid connection. A lot here also depends on what is located under the concrete base.
Article on the topic: Who built a house from profiled timber
If there are neighbors below, it is better to exclude rigid fasteners, as this will negatively affect sound insulation. In multi-storey buildings, vibration-damping rubber pads are installed under the joists, which level the floor and allow the joists to be installed at a certain level. The same gaskets are mounted between the walls and the ends of the timber. This way you will be able to achieve maximum sound insulation, and your neighbors will not complain about loud stomping.
If there is no rigid fastening of the joist, the floor will still be reliable - fixing it with rubber gaskets is quite enough. And the material laid on top (plywood, boards, OSB and any other sheets) will qualitatively tighten the structure. Additional rigidity will be provided by the installation of furniture.
If you want to eliminate such a risk, you can make the fastening of the wooden beam composite - take 2-3 boards, which in total will give the required cross-section, combine them into a beam with self-tapping screws or nails hammered in a checkerboard pattern on both sides. When laying out the boards, make sure that the annual rings of the tree are directed one towards the other. A spliced beam will not lead exactly, and the savings will be noticeable - three boards of 5x2.5 centimeters each will cost less than a beam with a cross-section of 5-7.5 centimeters.
It is necessary to attach the timber to a concrete wall in a private house where the floor is made in the form of a concrete screed. If this is a rough screed, then it is designed to cut off groundwater. If their level is normal, they do not make a screed on the ground as a base for the logs - in this case it is easier to lay down columns of brick or stone and support the logs on them.
Residents of the first floors can attach the logs to the concrete floor - in their case, it is not necessary to achieve a high level of sound insulation, here the main tasks are insulation and waterproofing. In addition, the timber must be attached to the walls (where it acts as a lath for installing various materials) and to the ceiling. In these cases, there are no exceptions, and the task here is to choose the optimal fastening method and perform all the work correctly.
Video description
Installation of timber to piles in this video:
See also: Catalog of companies that specialize in foundations and decorative forms.
Screw
Installing timber on a screw foundation is considered the fastest and not very difficult. Before installing the first crown, some preparatory work is required:
- You need to measure the width of the entire foundation and check it for unevenness using a building level.
- Before installation, it is recommended to treat wooden surfaces with an antiseptic and let it dry.
- Next you need to drill holes in the beam and foundation. Logs should be drilled with a drill whose diameter is 2 mm larger than that of the fastener. This is done so that the timber does not burst after drying.
After all the work, you need to lay the frame on the base and secure it with bolts or other fasteners. Before installing the first crown, it is recommended to let the wood dry thoroughly to avoid damage during further use.
Installing timber on a screw foundation Source stroykarecept.ru
How to fix a joist to a concrete wall
Before fixing the beam to the wall, you should take into account the expected loads on the structure and choose one of the appropriate methods. There are two most popular methods - installation on an alabaster/plaster solution or using glue and screws/anchors. For structures designed to withstand light weight and loads, choose the option with gypsum; for greater reliability, anchors are used.
- Select a screw of the required size, wrap it with copper wire along the entire length and tightly enough.
- Make a hole on the concrete surface, fill it with gypsum solution, insert a screw with wire - all this must be done quickly, before the solution has time to set.
- Unscrew the screw after 7-10 minutes - by this time the plaster will dry out a little, but will not harden completely.
- By the time the solution has dried completely, the timber must be placed against the wall and carefully secured with a screw.
Article on the topic: Which wooden house is better to build from timber or logs
- First you need to select plugs of the required diameter, soak them with any glue, except water-based (it can cause the wood to swell).
- Drill holes in the concrete with a diameter of 0.5-1 centimeter using drill bits made of pobedit or diamond-coated. During the process, the work must be stopped periodically to cool the drill in cold water (lower for 3-5 seconds).
- The plugs are driven into the holes with a hammer.
- After the glue has dried, the timber is applied to the concrete base and secured with screws inserted into wood plugs. If you use anchor bolts, the fasteners will be of better quality.
Corners of a frame house
When assembling a wooden frame, special attention must be paid to the corners, which are assembled using frame technology.
The reliability of future construction depends on the quality of fastening of corners. That is why traditionally the construction of a frame building begins with the construction of corner posts.
Corner post for house frame
If the corner beam was fastened in the lower frame using anchors and nails, then when constructing the frame, the corner elements should be connected using metal corners and wood screws.
It is best to opt for reinforced galvanized corners that are rust-resistant. The installation of the frame further depends on what the strapping beam was used to attach.
Location of racks in a frame house
If a dowel was used, then it is necessary to drill a hole of the required diameter in the end of the rack so that the dowel is tightly fixed in it.
Make the depth of the drilled hole greater than the length of the dowel by about 1-1.5 cm.
We install the vertical posts of the frame, which must be jibed. These jibs are often temporary; they are removed after installing other parts.
Without jibs, work cannot continue, as there will be a risk of the timber or double boards slanting if they were used.
The jibs will prevent the bevel in one direction or another, while the angle will become stable.
Corner elements of a frame house
If you did not use timber as corner posts, but double or triple boards, they are tied in different ways.
Important: pay attention to the quality of the timber, it should be smooth and not twisted. It is better to take an edged board from the central part.
Options for connecting the frame
The option for tying the corner three boards, which is used most often, is as follows: the first board is placed vertically. It should form one of the sides of the angle.
The remaining two boards are placed perpendicular to the first. Wood screws are used to fasten the boards; nails can also be used.
Option for corner posts made of boards
Do not forget to take measurements while working and check that the angles are set correctly.
Fastening timber to concrete
When thinking about how to attach wood to concrete, it is worth considering the types of fasteners. Even regular studs or dowels will do. For dense and durable concrete, dowels or studs are chosen; for not very reliable concrete, it is better to use dowels. Pins are a good choice, but to work with their hex head you will need a special tool with the right size heads.
You cannot skimp on fasteners - you need to ensure that the threads are clearly cut, the metal is not overheated, and is durable. It is also possible to use a quick-fixing nail anchor - a steel fastener that is fixed into a drilled hole, but there is no need for a plug (it is already there, since a metal shell is created around the rod; it expands when the nail is driven in, which holds the beam due to the expanding force) .
Attaching adjustable joists
- Drilling holes in concrete in 2 stages: the diameter of the drill should be larger than the cross-section of the head, drill 5-10 centimeters or to the middle of the thickness of the block, then with a diameter less than the size of the screw by 1-2 millimeters, drill through.
- The logs are put in place and leveled with gaskets. Spacers from one stack must be fastened to one another with screws/screws or glue. Stacks of shims are placed in place, checking the evenness of the exposed joists.
- Next, the beam is secured on one side, and through the holes and spacers made in it, places on the concrete are marked.
- Fasteners are inserted into the holes without hammering, but simply allowing the bolts to hold the spacers.
- Move the beam aside and drill a hole in the concrete to a certain depth. When installing on dowels, the diameter is chosen to match the dowel/plugs; if using anchors or studs, the drill should have a cross-section that is 1-2 millimeters smaller than the stud.
- Installing timber, tightening fasteners.
Fastening timber without drilling and fastening
Fastening a beam without fastening and drilling involves simply installing it on spacers. If this method does not seem reliable enough, you can use concrete fixation. Mix a semi-dry mortar of cement and sand of grade M250 or higher (take 2.5-3 parts of sand per part of cement), lay out in heaps along the walls where the logs will be mounted.
Article on the topic: What kind of wood is timber made from?
The pitch is chosen in accordance with the thickness of the timber. The larger its cross-section, the less support is required. For timber 5x5 centimeters, the step should be 40-50 centimeters, for 10x5 - step 60 centimeters, for 15 centimeters make 80 steps. The height of the cement should be higher than the level of the lower edge of the beam. Next, the timber is laid on the mixture, pressed down, leveled, and allowed to set. The beam is fixed and the logs are reliable.
Fastening with corners
This method is not very correct, but it works quite well and makes it possible not to sacrifice the height of the room. The timber is secured to the concrete with mounting angles made of high-quality steel with pre-drilled holes. The corners are placed on both sides of the beam (permitted in a checkerboard pattern or one opposite the other).
The corners are attached along the line to the floor, then the timber is level along the edges, then the middle is leveled. Here you will have to tinker: most likely, you will have to press down or lift the beam. After securing in the middle, it is easier to position the intermediate ones (if the beam is not twisted, but even). Having been placed on one side, the corners are mounted on the other, making the structure stable.
Application of specialized adhesives
Specialized adhesives are suitable for cases when you need to attach a thin block to a concrete wall or other surface - the weight of the parts should be small, and so should the load on the structure. Properly selected glue will fix any structure well.
Polyurethane foam
Only a composition of increased strength is suitable and is used in the installation of window sills, wall panels, and floor coverings.
- Reasonable cost.
- High level of strength after complete drying of the substance.
- Low level of thermal conductivity, which is especially important when finishing walls and floors.
- Hydrophobicity.
- Excellent soundproofing properties.
- Biological resistance.
- Easy to use.
The disadvantages of this installation option include the long drying time of the foam. For 5 minutes you need to hold the part in the desired position so that it does not move away from the concrete surface. To ensure optimal contact of the surfaces that are bonded to the foam, they need to be slightly wetted with water.
Surface preparation is the key to success
Before starting work, it is very important to properly prepare the wood and especially the concrete surface. Preparation is mandatory when fixing timber to concrete using adhesives and polyurethane foam. To ensure proper adhesion quality, the timber and concrete must be dust-free, smooth, and grease-free.
In this case, the adhesives are strongly absorbed until the adhesion becomes sufficiently strong and reliable. To reduce the number of pores in concrete, the surface is coated with deep penetration primers: they are absorbed into the porous structure, solidifying there and closing the micropores. Next, the wood is glued to the concrete in strict accordance with the instructions.
Article on the topic: How to build a house from 200x200 timber
If you plan to use the connection on fasteners, you do not need to impregnate the concrete with a primer.
Conclusion
There are many methods for attaching timber to concrete, and to ensure high-quality, reliable, durable adhesion, a lot of factors must be taken into account. Polyurethane foam and adhesives and different types of fasteners are used. It is also possible not to fasten the timber at all in some cases, using rubber gaskets in the structure.
Before using adhesives and foam, it is very important to properly prepare the concrete surface; for mechanical fasteners, nothing needs to be prepared - just clean it of debris and dust.
How to Attach a Wooden Post to a Concrete Base: An Overview of Methods
Private house construction involves the use of a variety of technologies for pouring foundations, walls and building fences. Most of them are much simpler and cheaper than those used in the construction of multi-story buildings. For example, it is often necessary to fix wooden posts on a concrete base when building fences for dachas, country houses, cottages, when constructing sheds, and outbuildings. Wood has a short service life, so in order to avoid premature destruction it must be properly connected to a more durable and reliable material - concrete.
Wood selection
When installing posts, pay attention to the type of wood used in construction. Soft rocks react poorly to moisture, which is abundant in the soil: they quickly rot, become moldy, and collapse.
Important! Solid wood (oak, beech) is best suited for this purpose, but it has a significant drawback - its high price.
To reduce costs, choose a more affordable material, for example, pine wood. It is quite dense, not subject to putrefactive processes, does not crack after drying, and does not suffer from deformation.
Methods for constructing a wooden base
The construction of the frame can occur in different ways. Some people assemble the walls one by one on the ground, and only then install them vertically.
Others immediately install a wall frame, then insulate it, insulate it and sheath it. Still others make the frame of the entire building, including the roof, and only after that they begin to make layers of walls.
You can choose any method convenient for you, but for now we will focus only on the construction of the frame.
House frame with roof
The basis of any frame building is wood. Her choice must be approached with full responsibility.
This can be a board, technically dried timber, natural moisture timber or laminated veneer lumber.
Glued laminated timber is the most preferable - it does not dry out, does not lose its shape, and is resistant to deformation. In second place is technical drying timber.
And a natural board or timber with natural moisture during the construction of a frame can change its shape and crack when it dries, which will affect the quality of housing.
Do not forget to treat all wooden elements of the frame with impregnations - fire and bioprotection. This will protect your frame from bugs and make your home safer.
Complex frame elements
Various types of wood are suitable for a frame house, but it is better to stick to coniferous wood.
The resin secreted by pine creates additional protection against insects and fills the house itself with a pleasant pine aroma.
In addition, oak, ash and other hard varieties are excellent for installing frames. The section of the timber should be 150/150 mm or 150/200 mm.
Tree protection
To extend the service life of the finished wooden structure, it is necessary to use additional protective equipment. This applies to any type of wood, even the most durable.
In order to reduce the rate of destruction under the influence of the sun, wind, precipitation, and temperature changes, the following measures are carried out:
- For the aboveground part of the pillars. The surface is sanded until smooth and allowed to dry thoroughly. Afterwards, a wood varnish with moisture-proof properties and frost resistance is applied.
- For the underground part of the pillars. Impregnate the wood with bitumen mastic or another bitumen-based composition, twice (with a difference of a day). Instead, you can use rolled waterproofing, wrapping the posts at the bottom, or walk over them with open fire (brushing).
Impregnation of pillars with bitumen mastic
How to install poles
Before pouring the concrete solution, prepare holes for the posts. Typically, each of them is buried in the ground by a third of its total length.
Important! The depth of the holes will depend on both the level of groundwater and the freezing of the soil. In any case, it should be greater than these indicators.
Rubble cushions are placed at the bottom of the pits. It will serve as drainage and prevent water from accumulating in one place. The thickness of the crushed stone layer is 15-20 cm.
Article on the topic: Which type of lumber is called timber
Pole installation diagram
Separately, prepare a mixture from soil extracted from pits, crushed stone, and broken bricks. A post is inserted into each hole, covered with soil and fillers, and compacted well. There should be about 20 cm left to the top soil level - concrete is poured here.
Reinforcement
To ensure that the posts are securely held inside the pits, they are additionally reinforced with metal rods. The latter are installed directly into the cushion, onto which the concrete solution is then poured.
The reinforcement bar is placed so that it rises 20-25 cm. A hole is drilled in the bottom of the wooden post according to the diameter of the bar, which is wrapped with waterproofing material. This reinforcement method can be used not only when constructing fences, but also when installing any structures with a strip foundation.
Special method of fastening poles
There is an interesting method of fixing wooden posts on a concrete base - using so-called monolith stepsons. Small posts (stepchildren) are made from concrete mortar in advance, to which wooden posts are then tied.
The stages of work will be as follows:
- applying bitumen waterproofing to wooden supports;
- treating excavations in the ground with bitumen (or laying a membrane);
- backfilling of small crushed stone, installation of stepsons and compaction;
- fixing the stepsons with small spacers;
- backfilling pits with soil mixed with sand, crushed stone, broken bricks, tamping (there should be holes 15-20 cm deep);
- pouring concrete mortar;
- keeping the concrete until completely hardened;
- fastening wooden posts to concrete steps with wire.
Installation on concrete steps
How else can you secure the pillars?
Another effective method of fixing a wooden support in concrete is installation in a box. It is suitable if there is already a poured concrete surface on top of which you need to install pillars. A box is attached to the concrete on top - a metal product with holes for fasteners. A post is placed inside the box, and then screwed to the concrete with dowels.
In addition, you can attach wooden supports to concrete with specially made fasteners. It is bent from reinforcement with an attached U-shaped retainer with holes.
Before pouring concrete, the structure is placed on the site, and after hardening, the pillar is fixed using bolts and self-tapping screws. Any of the presented methods of attaching wooden supports to a concrete surface is reliable and makes it possible to build a durable structure with your own hands.
Materials for the construction of supports
You can build a canopy from any materials, but supports for construction are made mainly from the following:
- Wooden beam. Very easy to install material. If you subject the wood to pre-treatment, which will protect the wood from rotting and damage by insects, then the canopy on wooden supports will last quite a long time. In addition, wooden supports can be decorated with hand-made carvings. When choosing wooden supports for a canopy, they are usually guided by the fact that the canopy should be in harmony with the general appearance of the outbuildings. Houses made of wooden beams and a canopy made of wood will form a harmonious duet. You can fasten wooden elements with ordinary self-tapping screws.
- Metal supports. The most versatile type. A metal frame can be used in combination with any roofing material and it will look quite appropriate. The metal undergoes preliminary anti-corrosion treatment, then painting, and then your canopy will acquire an aesthetic appearance. The metal must be fastened using a welding inverter.
- Brick pillars. They can be built using a metal profile, lined with facing bricks.
- Concrete supports. They also have a right to exist, but using them as supports for the construction of a light canopy is not a very rational solution.
- The supports can be made of decorative stone. It is very beautiful, and in combination with a fence or the base of a house, decorated with decorative stone, it looks simply gorgeous.