In the construction of a small house made of aerated concrete blocks with a simple sloping roof, there is no particular need to cast reinforcing tape; it is much cheaper and faster to fasten the Mauerlat to aerated concrete without an armor belt. The technology reduces time costs, construction goes faster, but does not make the work easier, since this method of attaching Mauerlat beams directly to the walls requires care and precision.
Is it possible to do without an armored belt?
Mauerlat is one of the important elements of the structure of the building. It performs a load-bearing function, so the operating principle can be compared to the foundation of a building. This part supports the entire roof structure - the rafter system, the roof covering, the insulating “sandwich”. In addition, do not forget about the wind and snow loads that this structure “fights” with.
To do without a reinforcing belt between aerated concrete walls, you need to meet the following conditions:
- Evenly distribute the weight and load of the building's roof onto the walls.
- Securely fix the rafter system.
- Prevent point loading on lightweight monolithic material.
This problem can easily be solved by a wooden beam, which is attached along the entire length to blocks at the ends of the wall. Fastening the Mauerlat to aerated concrete without an armored belt facilitates the installation of the rafter system, because such elements are difficult to connect individually directly without an adapter to the wall. For this purpose, special fasteners are used - blind and movable with a variety of connecting materials.
In most cases, the Mauerlat is made of wood, which reduces the weight of the structure and simplifies its installation.
The Mauerlat is made of the same material as the rafter system - it can be wooden or metal. Hardwood is usually used because the steel structure will be too heavy, difficult to install, and expensive. A part made of natural material is treated with antibacterial substances, they are evenly covered with aerated concrete walls, and fastened together using a locking connection reinforced with nails.
The minimum cross-section of a wooden beam that needs to be fixed to aerated concrete should be 100 * 100 mm. For greater structural strength, it is possible to use larger sizes of material.
This is interesting: Do-it-yourself sloping roof - step-by-step instructions
Options for manufacturing armored belts
When calculating a reinforced belt, it is necessary to correctly select the most suitable option, of which there are several. Depending on whether the foundation for the house, walls, and ceilings are reinforced, the ideal option is selected that provides the required strength, durability, and cost.
Using ready-made blocks
The simplest, but far from budget option, is to use ready-made U-shaped blocks in a tray format. The sizes of trays vary, and their price increases proportionally. In this way, the armored belt of the outer wall made of aerated concrete is strengthened, but inside the partitions you will still have to construct formwork.
Most often they do this: along the edge of the outer wall they install ready-made blocks with a thickness of 100 millimeters, then a layer of insulation of 50 millimeters, a frame made of reinforcement and formwork on the inside.
In this way, it is possible to create a durable structure: the size of the reinforced belt for aerated concrete is sufficient (the thickness of the reinforced belt is 150 millimeters greater than the thickness of the wall, the height is equal to the height of the block itself).
Using additional blocks
Additional blocks are also often used in the construction of reinforced belts for aerated concrete. They have special cutouts (recesses) into which the reinforcement is placed, and then the mortar is produced. Concrete blocks have uneven wall thicknesses, which is necessary to ensure structural strength. One wall has 10 millimeters, the second – 5.
The blocks are mounted in a standard way using glue, placing them strictly on one plane. This is the fastest and easiest way to make an armored belt for aerated concrete.
Option with one-sided additional block
The reinforced belt is constructed from one-sided additional blocks, which are similar to the previous ones in length and height, but they are less thick.
In this case, installation is carried out from block materials of different thicknesses from the inside and outside of the wall using ordinary glue. A groove appears between the blocks, and reinforcement is laid there, followed by pouring concrete.
Application of double-sided formwork
Before making formwork for an armored belt on aerated concrete, you need to decide whether it will be one-sided or two-sided. The one-sided method is also called combined, since along with the formwork they use additional 10-centimeter thick blocks, which are mounted along the outer edge in a standard manner, with insulation laid, and the formwork is fixed along the inside. The main advantage of this method is hidden installation, which is not visible from the outside, which facilitates external finishing.
Double-sided formwork for armored belts on aerated concrete does not require the use of additional blocks. Formwork panels are mounted along the internal and external parts of the structure. Extruded polystyrene foam is laid close to the formwork structure in a layer 50 millimeters thick. Next, the reinforcement is installed and the reinforced belt is poured.
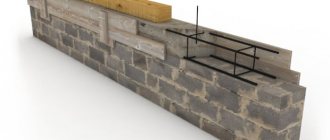
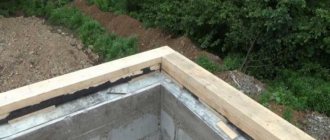
Reinforcing belt under the Mauerlat
The installation of an armored belt in a house made of aerated concrete can be done under the Mauerlat.
Mauerlat is a wooden log or beam that can be used as a support for rafters; it connects the load-bearing wall with the entire rafter system.
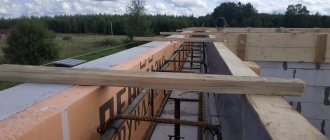
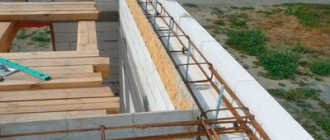
Before pouring concrete, lay a U-shaped wire with a cross-section of 6 millimeters and insert it under a layer of reinforcing bars in 1-meter increments.
The free ends are left of sufficient length for tying the Mauerlat, fasten it with threaded rods with a cross-section of 12-14 millimeters (for installation, holes are drilled along the top row of blocks with a step of fastening the studs). The washers are screwed onto the studs, then they are installed in the prepared holes. The thread located above the armored belt is wrapped with tape or paper so that it does not become clogged with mortar during the pouring process. It is desirable that the length of the studs be 50 millimeters greater than the thickness of the armored belt and Mauerlat.
Often an armored belt is made of brick on walls made of aerated concrete, which is ordinary masonry, additionally reinforced with reinforcing mesh. Typically used to strengthen outbuildings and one-story houses with a pitched roof. In this case, reinforcement is carried out between the rows of brickwork, using a masonry mesh with a cell size of 50x50 millimeters from a rod with a cross-section of 4-5 millimeters.
The mesh is laid in each row, solid backfill bricks of at least M100 grade are used. This type of armored belt is also relevant for gable roofs, since thanks to it it is possible to change the height of the wall, cover rafters, fillets and support boards.
Selection of building materials
In the manufacture of wooden mauerlat, beams are used. At the same time, experts advise making fastenings from deciduous trees treated with special antiseptic agents. The beams should be laid around the perimeter of the wall. To connect them together, specialists install a lock, which must be secured with nails. This will help make a strong, solid wood structure. It is important that its size be smaller than the width of the aerated concrete walls. The timber must be secured to the inner surface in such a way that there is a gap of five centimeters between the outer cut and the fastening. Sometimes builders use brick for a protective belt on the outside of the wall. Before starting installation work, waterproofing should be provided between the walls and beams.
Functional purpose of the Mauerlat
Heavy rain, gusts of wind, a layer of snow - all this creates additional loads on the building frame.
The presence of a Mauerlat in the roof structure makes it possible to simplify the installation work on arranging the roof and protect the load-bearing elements of the structure from additional loads.
The beams, laid along the entire perimeter of the building in conjunction with the rafters, provide a stable and durable structure that serves as the basis for any roofing.
The Mauerlat keeps the rafter system from moving.
Mauerlat is made of coniferous wood, except in cases where the roof sheathing is made of metal structures. Then steel profiles (angle, channel, etc.) are used to frame the external walls.
In addition to its main purpose - fastening the roof and distributing the load on the building frame - the strapping can serve as a monolithic belt. When building a one-story house, it is allowed to install timber along the inner edge of the wall directly on aerated concrete blocks, without installing an armored belt. In this situation, the Mauerlat also serves as the main connecting element for external enclosing structures.
Mauerlat - definition
Mauerlat is a structural element of a building that connects together all the elements of the roof truss system with each other and with the walls of the building. Main functions of the Mauerlat:
- keeps the roof from moving in relation to the wall;
- evenly distributes and transfers to the walls the load concentrated at the support points of the rafters.
The Mauerlat is laid and secured along the entire perimeter of the upper part of the outer wall of the building with a slight indentation from the outer edge. Each element of the Mauerlat is firmly connected to two neighboring ones.
Together with the rafter system, it creates a reliable, stable spatial structure of the roofing system. Provides a strong connection between the roofing system and the walls of the building, evenly distributing the load from the roof along the entire perimeter of the wall.
Selection of material and calculation of parameters
When choosing a material, you need to pay attention to the structure of the wood, the absence of curvature and the integrity of the surface. Products must be free from knots, cracks and traces of biological influence. The moisture content of purchased wood should not exceed 8%.
The Mauerlat is made from a wooden rectangular profile with dimensions:
- 80 x 180 mm;
- 100 x 150 mm;
- 100 x 100 mm;
- 150 x 150 mm;
- 200 x 200 mm.
The choice of beam section is influenced by the following factors:
- number of floors and external dimensions of the building;
- design features (number of slopes, presence of an attic, etc.);
- roofing material;
- climatic conditions of the region.
Dimensions of wooden beams.
The weight of the timber used is calculated as follows:
- Determine the cross-sectional area - multiply the width by the height.
- We multiply the resulting value by the perimeter to obtain the volume of the material.
- We multiply the result by the specific density of wood - in this way we calculate the weight, or the amount of load that the Mauerlat will exert on the external walls.
The length of the profile should be such that the number of connections on one side of the building is minimal. The standard size of the produced material is 3-6 m, so for a distance of 8 m you need to purchase 2 segments of 6 m each.
When choosing the height of the profile, it is necessary to take into account that the connection of the rafters to the Mauerlat is made by cutting, and 50% of its actual size is used.
Method of fastening a structure with an armored belt
When choosing aerated concrete for building walls, you need to understand that the frame of a house made from it will not cope with the weight of the roof placed on it. The construction of a reinforced belt will help her cope with this problem.
Dimensions of the armored belt and its purpose
An armored belt is a reinforced concrete closed structure that envelops the building perimetrically (that is, around the entire building). Tasks put forward to him:
- protection against wall deformation;
- additional rigidity for aerated concrete buildings;
- adjusting the load on all wall surfaces evenly.
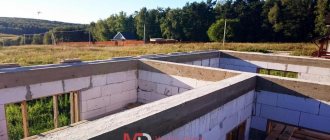
An armored belt is a kind of foundation intended for the roof of a building. Its dimensions are selected in accordance with the width of the walls and are approximately 25 cm. The outermost row should be laid out in blocks like the English letter U. They will subsequently perform the task of formwork when pouring concrete.
It is extremely important that the Armopoyas is produced in a continuous monolithic structure.
Installation of armored belt
The step-by-step technology for producing armored belts is as follows:
- First, formwork should be built around the perimeter of the house.
- Next, an armored belt is made from monolithic blocks.
- Then the frame is assembled from reinforcing bars.
- Studs are installed for fastening.
- Now everything needs to be filled with concrete mortar.
- When it hardens, the formwork must be removed.
After completing the construction of the armored belt and removing the formwork, it will be possible to begin installing the Mauerlat.
How to properly install and secure the Mauerlat
This element and the rafter system must consist of the same materials.
Before installing the Mauerlat on aerated concrete, you must remember to treat it with antiseptic substances. Then wrap it in a layer of waterproofing material such as: hydroisol, steklomastelastoizol.
The Mauerlat is fixed to the wall structure with studs, iron wire or anchors. If it is made of wood, then it can be secured with special metal brackets.
After this, it will be necessary to fasten the Mauerlat to the rafters. The connection is made by tapping, tapping or sawing down to no more than 25% of the thickness. It is fixed with bolts, self-tapping screws, special angles, and steel plates.
The construction of a reinforced concrete armored belt will be able to prevent unwanted punching in aerated concrete blocks. It will contribute to the uniform distribution of gravity on the house box and the influence of dynamic and static forces pressing on the walls.
Installation technology without armored belt
The SNiP requirements state that installing a Mauerlat on an aerated concrete house without a reinforced belt is in principle unacceptable. This is allowed to be done only in rare cases. This can be explained by the fact that an aerated concrete structure is not able to cope with the thrust snow load, dynamic and wind. The armored belt provides significant protection against deformation. As an exception, the Mauerlat is allowed to be mounted on a building without an armored belt.
This construction option will speed up and reduce the cost of the construction process. But in this case, you should adhere to the following requirements:
- for the base, a light but larger beam is selected, having a cross-section of at least 20 cm;
- it should be reinforced with steel elements: metal profile, nails or locks;
- The climate where construction is taking place is not harsh and there are snow or wind loads, but they are of insignificant force.
- The Mauerlat should be positioned in relation to the outer edge in the load-bearing walls at a distance of 0.5 - 1 cm. The Mauerlat is fixed with chemical anchors, steel wire or special pins.
It is very important before installing the Mauerlat on aerated concrete to accurately calculate the number of fasteners, as well as the distance between two adjacent fasteners.
You need to understand that the service life of the roof directly and largely depends on the strength and correct installation of the Mauerlat. And for this reason, errors, even seemingly insignificant ones, should not be allowed. This is the only way the roof will not cause deformation of the house, but will serve as reliable protection from external and weather factors. This work should be entrusted to experienced developers and roofers.
This is interesting: Heating cable for drains and roofing: installation and connection diagram
Interfloor reinforced belt
This type of construction is made for slab or beam floors. The main purposes of floors include the perception and transfer of the load of its own weight, the interior, people onto the walls, the division of the internal space of buildings into floors, and the overlap of spans. This is a load-bearing structure supported by external and internal walls along the entire perimeter.
The basis for pouring the armored belt is the supporting surface of the load-bearing walls, which absorbs the entire mass of the building. General requirements:
- installation is carried out along the entire perimeter of the future building, taking into account the internal walls;
- for external load-bearing walls, blocks with a density of at least D-500 are used;
- height, made according to the height of aerated concrete, or less is allowed (200-400 mm);
- belt width – 500 mm (possibly reduced by 100-150 mm);
- It is recommended to make the armored belt square (in cross-section), this shape is more resistant and holds mechanical loads well;
- the reinforcement frame is placed on supports (brick, pieces of blocks, plastic fasteners) 3 cm high so that it does not touch the walls, thus creating a so-called protective concrete layer;
- For pouring, concrete of at least grade B-15 is used.
Formwork for pouring concrete mortar with reinforcing mesh Source parki48.ru
Reinforced belt for aerated concrete under floor beams, poured into pre-prepared formwork. This frame is made from:
- Plastic.
- Aluminum.
- Gland.
- Plywood.
- Tree.
- Aerated concrete blocks.
Wood formwork
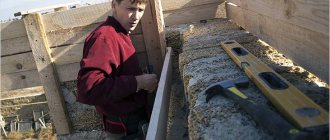
This type of formwork is used most often. This is the cheapest and most popular option. When installing a double-sided removable wooden frame (wood panels), it is secured with self-tapping screws on both sides of the wall (to aerated concrete blocks). The upper part is tightened with wooden jumpers (step 800-1000mm). This is necessary so that when pouring concrete the structure does not move apart.
Wood formwork is the most common option due to its availability Source two-room.ru
The reinforcement frame (reinforcement diameter 8-14 mm), made in the form of a “ladder” (connected by jumpers in increments of 5-7 cm), is placed in the prepared space. The rods are knitted together using knitting wire (every half a meter), forming a square shape. It is not recommended to use welding, due to rusting of the welds in the concrete. For beam floors (with not a high load), a frame of two rods, with a monolith height of 30 cm, is sufficient. For covering with slabs, an armored belt with increased reliability is used (4 rods and a monolith - 40 cm).
After removing the formwork, the outer wall is insulated along with an armored belt. If, during finishing, the outer walls are only plastered, then to remove the “cold bridge”, the formwork is moved deeper into the wall. And then insulation is installed in the resulting niche.
You can use one-sided removable formwork. In this case, the external function is performed by aerated concrete blocks (10 cm thick). They are laid on the bottom row using glue. A wooden frame is attached to the inside. After that, insulation (5 cm) and fittings are laid. The top is also tightened with jumpers.
Nuances of installation work
The base is made from timber measuring from 10x10 to 15x15 cm.
Experts believe that it is preferable to install a solid wooden structure around the perimeter of the wall surface. In this case, you need to fasten the wooden blocks into a single Mauerlat using a lock. Its dimensions will depend on the characteristics of the bar. After you decide on the type of fastening of the structure to aerated concrete, calculate the location and number of elements, you can begin installation. First of all, workers need to prepare the workplace by ensuring that the space between the Mauerlat and the concrete masonry is insulated. It is important to remember that the area of contact between the wooden beams and the concrete surface is where the wood rots. Waterproofing building materials laid under the Mauerlat structure will help to avoid the destructive effects of moisture. For good waterproofing, two dense layers of material are used. You can use roofing felt or more expensive means.
In addition, it should be taken into account that when using studs or anchors, you need to make holes in the surface of the aerated concrete in advance. But this problem is more difficult to solve than it might seem at first glance. The difficulty lies in the fact that using a building level it is impossible to install the fasteners exactly in a vertical position, especially in a liquid concrete mixture. Therefore, the first step is to determine where the bolts will be located and how much they will deviate from the concrete. For this purpose, experts use a flat wooden board. The exact location of the bolts is marked on it. To do this, apply the board to the outer bolts and mark where the others should be. After this, the builders transfer the points directly to the block and drill holes according to the marked points. Then you should place the holes on the fixed bolts and tighten the wooden block with nuts. With metal wire the work is much easier. To do this, 2 holes are drilled in the block, the distance between which should be about thirty centimeters.
Workers thread metal wire into the prepared holes, twisting the ends.
Why do you need a Mauerlat and its structure?
Laying the Mauerlat on aerated concrete blocks without pouring an armored belt
The Mauerlat is an integral part of the roof structure when a rafter system is used. Inclined beams need support, and walls are not suitable for this, since they do not have the necessary strength to hold fastening devices under high pressure. In addition, the timber installed along the perimeter of the building ensures uniform pressure along its entire length. This prevents individual masonry stones from breaking out or being destroyed. A well-designed and correctly executed laying of the Mauerlat on aerated concrete blocks ensures a stable position of the walls, preventing them from moving apart under the pressure of the rafters.
In the case of constructing a frame from wood, the mauerlat is made of timber with a cross-section from 100x100 mm to 200x300 mm, depending on the thickness of the walls and the structure of the roof frame. Docking is carried out using a locking connection with the nodes secured with nails, studs or self-tapping screws. The wood is laid on roofing felt after treatment with an antiseptic and a hydrophobic agent.
If the rafters are made of metal, a channel, rail or I-beam is installed under them. The joints are connected by welding with subsequent laying of shaped parts with through fixation with bolts.
Fastening timber to anchors and dowels
One of the easiest ways to fix a beam to a wall without an armored belt is to install it on dowels or anchors. However, it is of little use for gas silicate. Considering that the material is highly brittle, you should be prepared for the appearance of a crack or chip when tightening the fastener. This indicates the need for proper selection of connecting parts.
Today, consumers are provided with a large selection of fasteners that are designed for aerated concrete. However, the difference in fastening furniture and Mauerlat to the walls using an armored belt is obvious. Since the timber is the load-bearing element of the rafter system, it is important to approach its installation thoroughly.
The holding properties of gas silicate blocks are insignificant, so you should choose long-length anchors - from 30 to 50 cm. This will allow, taking into account the thickness of the Mauerlat, to securely fasten it to the wall. However, such anchors are relatively expensive. This should also be taken into account.
Install the Mauerlat on the wall without an armored belt in the following sequence:
- Reliably waterproof the timber. To do this, the selected material is laid on gas silicate. This eliminates the possibility of the formation of a pocket of dampness between the top row of the wall and the wooden beam. It is better to choose high-quality roofing felt. It should cover the entire end of the wall.
- Laying the Mauerlat. The timber is installed in accordance with the design data. Then it needs to be leveled.
- Marking the timber. In the process, the installation points of the rafter legs are marked. The anchors can be placed in any order, repeating the gap between the rafters.
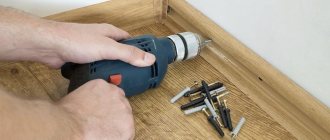
- Then a feather drill is inserted into the drill, and through holes are made in the Mauerlat. It is better to sweep away sawdust immediately, during the formation process. This way they will not clog the channel.
- Then use a hammer drill equipped with a 12 mm drill. Channels for anchors are drilled through the holes in the wall plate.
- After drilling the holes, you need to place fasteners in them. Then they are driven in with a hammer until the washer stops in the mauerlat.
- Finally, tighten the anchors with a wrench, pressing the Mauerlat to the wall without an armored belt.
This connection is ideal for concrete walls. In the case of gas silicate, even with long anchors, this method of fastening the Mauerlat without an armored belt remains questionable.
Often the beam is not long enough to lay it on the entire wall without an armored belt in one element. In this case, they resort to splicing several segments. Carpenters with extensive experience can create reliable lock-type connections. However, for a professional it is enough to make a “half-tree” connecting knot. Be sure to install fasteners. Typically, anchors or studs are chosen.
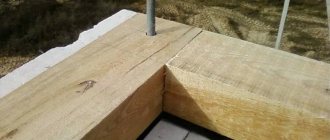
The fastening at the corners where the beams of adjacent walls without an armored belt are joined is similar. For them, a locking connection is chosen with a tightening of a certain type of fastener. In addition, it is possible to connect all the elements of the Mauerlat into a rigid base for the rafter system using staples.
Arrangement of a reinforcing belt
The monolithic reinforced belt serves not only to fasten the Mauerlat and distribute the roof load, but also to tighten the structure of the external walls into a single fixed system.
For aerated concrete walls, the reinforcement belt can be made in two ways:
- The classic option with the production and installation of formwork panels.
- Using U-shaped standard blocks.
To construct an armored belt you will need the following set of materials:
- edged board;
- bars 40 x 40 mm;
- nails 70-100 mm long;
- self-tapping screws 3.5 x 70 mm;
- U-shaped blocks;
- adhesive for aerated concrete;
- rod reinforcement AIII, diameter 10-12 mm;
- smooth reinforcement V-1, Vr-1, Ø 3-6 mm;
- knitting wire - 0.5-2.2 mm;
- concrete class B15-B20.
Tools:
Fastening beams to armored belt.
- hacksaw;
- hammer;
- screwdriver;
- hook for knitting reinforcement;
- bending machine;
- vibrator for concrete compaction;
- construction tape.
Formwork is installed along the entire perimeter of the load-bearing walls, the panels of which are attached to the outer and inner surfaces of the enclosing structures and connected together using bars, steel pins and annealed wire.
A reinforcement cage is placed in the formwork, concrete mixture is poured inside and compacted with vibrators. In this sequence, the construction of a monolithic belt is performed.
Manufacturing of formwork
Formwork panels are made of 25 mm thick boards on a wooden frame made of 40 x 40 mm bars.
The height of the products is assumed to be equal to the dimensions of the aerated concrete block and can be 250-350 mm, taking into account the overlap on the walls of the building. The length of the sections depends on the installation conditions of the structures (2-2.5 m).
Execution sequence:
- Cutting boards to specified sizes.
- Marking and sawing timber for frames and lintels.
- Making shields.
- Preparation of tie clamps and studs.
- Pre-assembly of boxes on a level area.
- Lifting the sections and installing them on the top cut of the masonry.
- Fastening shields with jumpers.
- Joining of individual segments along the entire perimeter of the building.
If the project provides for the construction of a monolithic belt made of standard aerated concrete products, then the last row of masonry is performed using U-shaped blocks.
Belt reinforcement
The reinforcement frame for the monolithic belt is made of hot-rolled steel rods of class A-III with a diameter of 8-12 mm. The joining of the segments is carried out using a tying wire Ø 0.5-2.2 mm. Clamps for assembling the frame are made from wire B-I and Bp-I.
The assembly of structures is carried out on special tables or on a level area using stops.
Metal frame production:
- Using a bending machine, clamps for metal longitudinal rods are prepared from smooth reinforcement. The ends of the parts are tied together with knitting wire.
- Rotary connecting elements are made from sections 0.8-1.2 m long for joining rods at the corners of the building.
- Then take 4 rods and thread them into vertically installed clamps. They are distributed over the corners of the frame and tied with wire.
- Assembly of the structure begins from the center of the segment, gradually moving towards the ends of the section.
Reinforcement of the armored belt under the Mauerlat.
The finished elements are lifted onto the walls and placed in formwork. The reinforcement frame must be attached to the base in such a way that there is a distance of 25-50 mm between the wooden panel and the steel rod. A displacement from the central axis of the outer wall is allowed no more than 10 mm.
After reinforcement, the formwork panels are strengthened, the vertical and horizontal levels of the structure are checked and preparations are made to receive the concrete mixture.
Attaching the Mauerlat to the wire
One of the popular options, due to its simplicity, is to install a Mauerlat, which is secured with wire. It is often used to create brickwork. When choosing this option, 4/5 before the end of the masonry, steel wire should be laid between the rows. It should have a diameter of 3-4 mm. For each bundle, 4 cores are selected.
As a result of laying the wire, bundles peek out from the outside and inside of the wall. They are produced to such a length that the coverage of the Mauerlat installed on the timber is ensured. This will allow the wire to be tightened securely.
When the wall is ready, waterproofing material should be laid on it. Afterwards, the Mauerlat is mounted on top, it is leveled, a wire knot is created and tightened. Tightening is carried out with a crowbar in order to press the Mauerlat more tightly to the wall.
Typically this method is used for brick walls. However, it is also applicable to houses made of gas silicate. Only in this case the bookmark is mounted two blocks before the final row. However, many builders question this option for installing the Mauerlat, citing its unreliability. It is possible that under strong wind loads and vibration the wire will begin to cut gas silicate blocks. After all, they are easy to process with a simple hacksaw.
Fastening with metal studs
A metal stud is a steel rod with a metric thread, having a diameter of 10-16 mm.
Installation of embedded parts can be carried out in two ways:
- in the process of assembling the frame by welding;
- connection to reinforcing bars using tie wire.
Fastening with metal pins.
If you plan to lay the Mauerlat without a monolithic belt, then a metal plate with a thickness of 1.8-3.0 mm and a size of 100 x 100 mm is welded to the bottom of the part. The devices are embedded into the masonry to a depth of 40-60 mm. Upon completion of installation, the upper part of the rod should rise 3-5 cm above the surface of the beam.
Installation of studs into a finished monolithic base or solid masonry of solid gas blocks occurs as follows: every 1.2-1.5 m, holes are drilled with a depth of at least 20-30 cm and fastening parts are installed.
The Mauerlat is lowered onto the prepared structure and pressed in order to make marks for the holes with pins. They drill the beam, and when all the samples are ready, they string the profile onto the rods, throw on washers and nuts. Check the level of the bearing and tighten the connections.
The number of studs under the Mauerlat must correspond to the number of rafter legs in the roof structure.
Types of fastening
Installation of the support beam into the roof structure is carried out using anchor bolts, steel dowels, and wire clamps. In the corners of the building, the structure is secured with corners, metal plates or forged brackets.
The profiles are joined with an oblique or straight cut (lock). The second method is more productive - it provides good stability under vertical and lateral loads. The bars are fastened using bolted connections or self-tapping screws through a perforated metal profile. The installation of joining seams is not allowed in the places where the rafter legs are supported.
The Mauerlat is placed in the center of the wall and 100-150 mm above the attic floor. Several layers of waterproofing material (roofing felt, insulation, etc.) are laid under the timber. Each base section must be connected to two adjacent sections by plates or forged brackets.
Mauerlat for aerated concrete without armored belt
Attaching the Mauerlat to the gas block without an armored belt can be done with all available devices:
- anchors (chemical and steel);
- wire clamps;
- metal pins;
- forged brackets.
Fastening diagram without armored belt.
Installation of timber using anchors, mechanical or chemical, is possible only when constructing walls made of solid blocks.
To fasten the Mauerlat using staples, wooden plugs must be inserted into the masonry just above the ceiling. The staples are driven into the bars on the walls with one end, and hammered into the middle of the supporting profile with the other.
Fastening with steel wire
Fastening the roof base using wire clamps can be done to the edges of the wall both with and without an armored belt. In the first case, the workpieces cling to the longitudinal reinforcement bars, in the second, they are inserted into the masonry. For the manufacture of connecting elements, annealed steel wire with a diameter of 4-6 mm is used.
Use of wire for fastening.
The parts are installed along the entire perimeter of the building with an interval of 50-70 cm. The sections protruding above the beam must be at least 30-50 cm. After laying the Mauerlat, the ends of the loops are tied together and are pressed tightly against the profile using rotational movements using a pry bar or crowbar.
Fastening with anchor bolts
Anchor bolts provide a strong connection between the structure and the base. They prevent horizontal displacement of the profile, which contributes to the uniform transfer of thrust forces of the rafters to the enclosing structures.
To fasten the Mauerlat in the indicated manner, holes with a diameter slightly larger than the dimensions of the spacer element are drilled in the masonry or armored belt. Threaded couplings are inserted into them.
Samples are made in the body of the beam, coaxial with the holes in the belt. A profile is placed on top and the anchor bolts are passed through it. Use a wrench to tighten the connection. In this way, the Mauerlat is attached to the base of the supporting structures.
Fastening with anchors to aerated concrete.
Chemical anchor
An alternative to mechanical fastening is an adhesive mounting system. The anchor consists of a composite chemical composition, a threaded metal rod, a washer and a nut.
Installation of fasteners begins with drilling conical or cylindrical holes in the body of the armored belt. Then, using a special tool for containers with injection mixtures, the solution is squeezed into the prepared samples.
Fastening with chemical anchor.
The mauerlat is laid. Steel pins are inserted through the timber.
After the adhesive composition has hardened (30-40 minutes), the unit is ready for use: washers are put on the rods, nuts are screwed on and the Mauerlat is sealed around the entire perimeter of the building.
In order to increase the strength of the connection, metal or polymer threaded couplings can be used in combination with steel studs.
Properties of aerated concrete
Tying the Mauerlat to aerated concrete blocks with cables
Foam concrete blocks have a wide range of applications in residential and industrial construction. This is due to the unique properties of the material, which combines the positive properties of brick and wood. Aerated concrete has its advantages and disadvantages, which must be taken into account both when constructing walls and when arranging the roof.
The blocks have the following features:
- large sizes, thanks to which the laying is carried out accurately and quickly;
- perfectly smooth edges and planes, which makes it possible to save on glue;
- low thermal conductivity, close to coniferous wood;
- lightness of the material, which does not exert a significant load on the foundation;
- hygroscopicity - high-quality waterproofing is necessary;
- fragility, instability to vertical and horizontal loads.
Considering these properties, many craftsmen prefer to lay the Mauerlat on a gas block with an armored belt, thereby eliminating any complications. However, there are precedents when deadlines are running out or there are not enough funds to manufacture a reinforced concrete contour. In such cases, you can use one of the proven methods that allow you to attach the Mauerlat to a brick wall without an armored belt.
Final stage
After installing the Mauerlat on the aerated concrete, the installation of the rafter structure begins. There are two ways.
First option
- the boards are cut to 1/3 of the board depth;
- nails and metal corners will allow you to securely fasten the rafters;
- nails (2 pcs.) are hammered crosswise from the sides;
- an additional nail is driven in from above;
- The fastening angles finally secure the joint.
Second option
- cutting is not done in the rafters;
- a special support block is hemmed from below, resting on the Mauerlat;
- nails are driven in as in the first option.
The support beam has a length of 1 m. The second option is suitable for rafters that have a low height.
Fastening the connecting beam can only be done after accurate calculations and procurement of high-quality materials. Purchasing timber of poor quality with high humidity can lead to damage to the strength of the structure.
To attach the Mauerlat to an aerated concrete wall, use anchors with special dowels or a chemical installation method. Be sure to thermally insulate the reinforcing belt made of extruded polystyrene foam.
Compliance with the requirements will allow you to securely fasten the Mauerlat and create a strong rafter structure.
Design features of the armored belt
Mounting the Mauerlat on studs without an armored belt
Armopoyas is a kind of reinforced concrete foundation for the roofing system. This structure is heavy and experiences strong wind, snow and tensile loads. Based on this, the roof needs a strong, powerful and stable support that can withstand the influence of external factors for decades.
The armored belt has the following device:
- Formwork. It can be made removable or non-removable. The first option involves arranging a cold attic, while the second option uses insulation (foam plastic, basalt wool) as formwork.
- Steel frame. Provides contour integrity and flexibility. Consists of fittings, square frames and corner parts. The parts are fastened using binding wire.
- Concrete. Gives the structure strength and shape constancy. It is made from crushed stone, sand and cement in a ratio of 3:3:1.
- Embedded parts. Serve for fastening the Mauerlat. Pins or studs are used.
The width of the armored belt corresponds to the parameters of the wall or is taken 5 cm narrower. The minimum height is 15 cm.
What is aerated concrete?
But first of all, let us note that the construction of houses from aerated concrete is at the peak of popularity, and the demand for this building material is growing. This means that many people encounter it when building their own houses. What you need to know about aerated concrete:
- belongs to the category of porous materials;
- good thermal insulation qualities;
- not the lowest moisture absorption;
- good load-bearing capacity;
- low strength.
It is the latter characteristic that determines the possibility or impossibility of laying the Mauerlat on aerated concrete. Because the porous structure of the material does not allow it to be heavily loaded, especially pointwise.
As for the Mauerlat itself, it is a structure that is laid on the upper surfaces of the walls. In fact, it performs the functions of a strip foundation, evenly distributing the loads from the roof onto the walls of the house. They are made mainly from wooden beams with a minimum cross-section of 100x100 mm. It should be added that this roofing element simplifies the fastening of the rafter system to the walls.
The importance of waterproofing during installation
Regardless of the chosen method of fastening, the Mauerlat and the wall surface must be securely separated from each other by a layer of waterproofing. Condensation formed when temperatures drop at the junction of different materials leads to wetting and destruction of the wooden beam of the mauerlat.
There is a large selection of materials for waterproofing during installation. Usually two layers of roofing material or one layer of waterproofing are laid. It will not be unnecessary to treat the wooden beams with an antiseptic composition.
Building a house is a long and difficult journey. Regardless of whether you are building a house with your own hands or have entrusted the work to third-party specialists, you need to clearly understand how to correctly take EVERY step along this path. Only personal control of the correctness of the chosen decisions and the quality of the work will allow the house to serve for a long time and bring joy to you and your children.
Do-it-yourself technology
A protective film from moisture is laid between the gas blocks and the Mauerlat
Installation of the support beam on the foam blocks is carried out in the following sequence:
- Carrying out measurements, drawing up a project, estimates, purchasing materials.
- Manufacturing a fastening system between the wall and the Mauerlat.
- Arrangement of waterproofing.
- Installing a support beam and treating it from dampness.
When laying the Mauerlat, you need to pay attention to the joints; they must coincide with the fasteners in the wall.
Strong arguments against the armored belt
Most craftsmen involved in the construction of buildings made of aerated concrete are confident that installing an armored belt can solve all problems with installing the mauerlat and roof. In fact, this is not entirely true, for one simple reason - the future house is being built from extremely weak aerated concrete. Therefore, it is impossible to transfer the techniques and technologies of the armored belt, which successfully work on brick, block and concrete buildings, to aerated concrete walls.
There are only two fundamental objections to the armored belt:
- First of all, with any manufacturing scheme, the reinforced belt can be secured only to the top row of aerated concrete, so the roof has to be made with the same restrictions, as in the case when this belt is not present. The concrete frame redistributes the thrust load well, but all the forces from the reinforced belt fall only on the top row of aerated concrete, hence the appearance of cracks along the upper edge of the walls;
- Attaching the Mauerlat to an armored belt means creating huge problems with a cold bridge in that part of the roof where aerated concrete is least ventilated. Even laying a layer of EPS insulation helps little; you have to look for ways to install vents to remove condensation from the reinforced belt.
The third argument against concreting is related to costs. The installation of reinforcing tape will cost an amount approximately equal to a third of the estimate for the construction of the foundation. For a house 4x8 m this is approximately 60-100 thousand rubles. It is clear that it is much easier to fasten the Mauerlat and roof frame to a Mauerlat rigidly connected to a concrete reinforced belt. Sometimes master roofers even refuse to install a roof on aerated concrete without an armored belt, but technologically this is quite possible.
Fastening with chemical anchors
A relatively new method allows you to fasten a beam or board almost anywhere on an aerated concrete wall. To hold the Mauerlat, threaded anchors are used, but they are not wrapped in the body of aerated concrete, but in a special cavity filled with quick-hardening resin.
First, markings are carried out on the walls of the points where it is planned to fix the timber. Next, the Mauerlat boards are dismantled, and holes are drilled in the aerated concrete for installing chemical plugs. In order for the anchor bolt to hold firmly in the thickness of the aerated concrete, it is necessary that the diameter of the plug cavity be at least 35 mm.
The cavity for filling the self-hardening resin is cut out using a special device. An oblique cutter is a drill bent at an angle of 15
O
cutting edge. The nozzle is installed on a drill and sequentially, in several passes, a cavity is drilled in the aerated concrete for a conical plug.
Before fixing the anchor, the hole is purged with air. You can use a hand tire pump or any similar device. Next, you need to attach a plastic nozzle to the hole, through which the resin mixed with the hardener is pressed with a syringe.
After 10 minutes, it is necessary to tighten the anchor bolt, align it vertically and temporarily secure it until the plastic is completely cured. Before installation, the anchor must be thoroughly cleaned of dust and degreased with a solvent. After another hour, the Mauerlat can be fixed to aerated concrete. The advantage of chemical anchors is simple technology and high reliability of fastening, without the use of an armored belt. The downside is the high cost of self-hardening resin and the inability to fix the Mauerlat at temperatures below 15
O
WITH.