Upon completion of the main stages of building the house, they begin finishing the base of the pile-screw foundation. Decorative cladding for such a base is important, as it gives the appearance of the house an aesthetic completeness, and also performs a protective function. The screw foundation is exposed to the weather, the wind blows under the house and water flows in. This affects both the comfort and durability of the structure if the base is not covered with finishing.
There are 2 common cladding methods:
- installation of a suspended plinth;
- construction of brick foundation walls.
The first method is much simpler - you just need to install decorative panels on a wooden or metal sheathing attached to the stilts or walls of the house. In the second case, you will have to make a small concrete base. What both methods have in common is that even an inexperienced person can handle the job.
Basement siding
The easiest and cheapest way to cover a building on screw piles is with this material. Cladding has the following advantages:
- low cost (even taking into account components);
- ease of installation with your own hands;
- durability;
- wear resistance;
- resistance to rotting and mold;
- wide range of colors;
- ease of operation.
Basement siding
But along with its advantages, siding also has a number of disadvantages. For example, it will not be suitable if it is necessary to insulate the basement of a house on screw piles.
Installation technology
It is quite simple to do house cladding; you just need to know the order of work and the nuances of their implementation. The construction of the plinth is carried out in the following order:
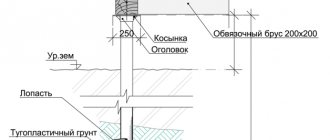
- Installation of sheathing under siding. First of all, fix the bottom bar. It is located parallel to the ground. The distance from the soil surface is set to 150-200 mm. This gap is necessary to raise the skin above the ground. The distance from the panels to the ground after installation should be 50-70 mm. This layer compensates for soil heaving in winter. In warm regions or on coarse foundations, the gap can be made smaller.
- Wooden boards are attached to the piles. To do this, special brackets must be welded to the heads in advance. You can also use a metal profile as a frame, which is welded to the foundations without additional elements.
- Similarly to the first, a plank is attached to the upper part of the base of the house on a screw foundation.
- A vertical sheathing is sometimes made between the longitudinal guides. The need for it depends on the height of the base. When the building is raised high from the ground, it is worthwhile to provide additional elements as reinforcement.
- Siding begins to be installed from the bottom starting strip. Base panels are installed on it. The elements are fastened to the sheathing using self-tapping screws. To install corners, special profiles will be required.
- To remove precipitation from the basement part, flashings are installed on the siding.
- The finishing of the lower part of the house is completed after completing the gap between the ground. The space must be closed so that air can enter, but small debris, insects and other living creatures do not have access.
All wooden elements are treated with antiseptic compounds before starting work. This is necessary to prevent damage by fungus, mold and rot. As an additional measure, fire-fighting treatment with fire retardants can be performed.
Siding is the most common option. In this case, finishing the building is easy and quick. The installation should begin after the construction of the house is completed, when all communications have already been completed. To prevent pipes from freezing in a ventilated underground, they are wrapped in heat-insulating material. Most often, mineral wool is used for these purposes. You can use ready-made thermal insulation elements for pipes, or you can make insulation using mineral wool mats (wrapped in rolls).
Pay attention to the soft waterproofing of the blind area
Siding will be an excellent option to cover the space under the house. To attach the panels to the sheathing, you need to prepare self-tapping screws.
Installation technology for suspended plinth finishing
Installation begins with assembling the sheathing. For its manufacture, either wooden slats or a metal profile are used. In the first case, the frame elements are screwed to steel brackets, which are welded to the piles in advance. The profile is welded directly to parts of the screw foundation.
As a rule, the sheathing consists of two parallel boards, one of which is attached directly under the wall of the house, and the second at a height of 150–200 mm from the ground. This distance may vary depending on the climate conditions in the region. It is necessary to ensure that 50–70 mm remains from the edge of the decorative slabs to the ground surface - this is necessary to compensate for the thermal expansion of the soil.
After installing the parallel elements of the sheathing, vertical slats or a metal profile are mounted. This is done to ensure greater structural strength if the base is too high. In this case, the installation step is 400–450 mm.
A shallow trench 30 cm wide is dug along the perimeter of the house and filled with sand. Then insulating material is installed on the sheathing. A roll of waterproofing is fixed on top of it, the end of which is lined with sand. The edge of the roll is compacted into sand. Paving slabs are laid on top. This design is called a blind area and plays the role of a drainage system that protects the base from excess moisture.
If siding is chosen as the finishing material, a starting profile is installed at the bottom of the base on top of the insulation. Decorative panels are inserted into it, which are then mounted to the sheathing through the thermal insulation using self-tapping screws. The corners of the structure are reinforced with special profiles that come with the siding. To protect the base from precipitation flowing down the walls, metal flashings are installed on top of the finish.
Mount the hinged panels following several rules:
- the wooden elements of the sheathing are carefully treated with antiseptic and antifungal impregnations;
- The drainage area is constructed at a slight slope from the building (no more than 5°).
slabs of decorative material are installed with small gaps to ensure ventilation of the space under the house;
If plastic panels or corrugated sheets are used instead of siding to finish the foundation, the technology for installing the material is even simpler. A starting profile is not needed; the trim is attached directly to the sheathing, maintaining a gap between the lower edge of the sheathing and the ground surface.
How to sheathe the base of a pile-screw foundation with your own hands
To cover a pile-screw foundation with your own hands, you need:
- Attach the starting strip of siding to the bottom rail of the frame with a self-tapping screw pitch of 30 cm.
- The corner strip is attached with a gap of 10 mm, observing a screw pitch of 30 cm.
- Secure the third panel into the groove of the starting strip and slide it into the corner strip, leaving a small space for possible expansion of the material.
- Secure the bar using self-tapping screws.
- Insert the next strip into the corner strip and slide it towards the bottom rail and secure it.
- Install the remaining panels. The height of the last panel can be trimmed if necessary.
- Install a second corner strip, which will act as a starting corner for the next wall.
- Secure the finishing strip.
All panels must be installed with small gaps of 20-30 mm and secured with 5 self-tapping screws. Installation of the cladding should be carried out without tension, since under the influence of temperature the material can change its dimensions by 6-7 mm.
What is a plinth
?
The base is the upper part of the foundation, which protrudes 30-70 cm above the ground surface. It can be made of the same building material as the underground part or built from other materials: brick, wood, stone. It can play an auxiliary role - if the foundation is strip, or decorative if the house is on stilts. If the house stands on a high pile-screw foundation, then with the help of basement panels you can turn the space between the ground and the floor of the house into another room - the ground floor.
Why is it profitable to veneer with corrugated sheets?
Construction experts recommend covering the foundation with a profiled sheet, based on its many advantages. First of all this:
- Strength. Profiled sheets are made by cold rolling, as a result of which they acquire increased rigidity.
- Durability. Galvanized steel does not corrode for a long time and performs its function flawlessly for up to 30 years.
- Variety of colors. The line of modern designs includes many colors and patterns: stone, brick. A facade with a beautiful plinth becomes more decorative.
- Ease of installation. Finishing the basement of a house with corrugated sheets is easy to do yourself. The material is easy to cut and attach to the building.
- Budgeting. The cost of finishing is much cheaper when compared with other facing materials (stone, tiles).
Characteristics and dimensions of the material
Corrugated sheets are widely used in construction as roofing, permanent formwork for floors, and material for self-supporting and enclosing structures. Its parameters are regulated according to GOST 24045-2016. Material classification is based on different criteria.
According to their shape, there are wavy and trapezoidal corrugated sheets. The thickness variability falls within the range from 0.3 to 1.5 mm. Based on wave height, the material is divided into three categories:
- For walls (corrugation height 8-21 mm);
- For roofing (wave height more than 44 mm);
- For formwork (corrugation wave height more than 57 mm).
In order to protect against rust and destruction, the metal is coated with a special anti-corrosion compound. It could be:
- acrylic;
- polyvinyl chloride;
- polyester;
- polyvinylidene fluoride;
- polyurethane.
Cladding care
The ease of operation of a base made of corrugated sheets is another compelling argument in favor of choosing this material. The finished finish does not require any special care measures. It is enough to periodically clean the surface of the lower part of the façade from dust and dirt using a soap solution. Every 4-5 years, the home owner should check the quality of the base coating for cracks or peeling of the decorative layer.
Types of finishing of screw pile foundations
There are quite a lot of finishing options, but there are only two types:
- hinged screen;
- shallow strip foundation.
Screw pile foundations form a basement or ground floor. With the help of piles, a small space is created between the soil and the lower supports of the structure.
During the construction process, the foundation is covered with a suspended or strip structure. With the help of this, a semi-basement space is obtained, which is subsequently used for its intended purpose.
Closing the plinth is necessary. Screw piles are used in three options:
- screw compartment on the tip;
- all-screw design;
- paddle tip.
With all these options, the hinged type is most often used, which is the most popular. This is due to the fact that the hanging screen is more practical and easier to install. Sometimes mixed options are used, when a secondary foundation is laid between the casing. This is especially true when insulation is necessary.
Also, regardless of what types of piles or cladding method were chosen, a lathing made of a profile pipe should be used to strengthen the base. The profile can be selected in accordance with the parameters and lower elements of the house, including pile areas. This must be done for durability.
In this video you will learn how to close the base:
The finishing largely depends on the type of building and the requirements for the basement
Availability of materials is also important. Each type has its own characteristics due to different installation work. The mounted option is aligned with the walls of the house and is not buried in the ground
Fastening occurs using self-tapping screws and other additional elements
The mounted version is aligned along the walls of the house and is not buried in the ground. Fastening occurs using self-tapping screws and other additional elements.
The standard installation time is one day; installation is simple and economical. The finish can be of any material, including stone or wood.
A strip foundation will require a certain set of materials. Typically, such a foundation is constructed using stone or brick masonry in combination with concrete elements.
This type of finishing is buried in the ground; for this reason, certain properties of the soil under the house are required, as well as a flat surface in the area where the load-bearing piles are installed.
Methods
A screw pile is a metal pipe with a thread at one end and a flat head at the other, somewhat reminiscent of a huge nail. Piles can be up to 2.5m long and have a blade at the end rather than threads or threads throughout the body. To prevent corrosion, the products are coated with black ship primer.
Empty space under a building not only looks unsightly, but also poses a threat to the structure. Evaporation of wet soil, snow and rain getting under the building, grass sprouting - all this does little to preserve the building, and small animals - from lizards to cats - willingly use this space.
But how the foundation base is insulated from the outside, and how to do the work yourself, can be seen here.
Video showing the finishing of the base of a pile-screw foundation:
Finishing allows you to solve the listed problems. The general principle of cladding is very simple and does not require costs.
- First of all, install the sheathing. It is allowed to use a wooden beam pre-impregnated with an antiseptic and a metal profile. The latter option is much more durable, since the tree will not withstand constant contact with wet soil. But how the sheathing for siding occurs is described in more detail in this article.
- The dimensions of the frame are determined by the dimensions of the finishing sheets.
- Insulation is attached to the frame, if necessary, and then the selected finishing material is installed.
But how the foundation is insulated from the outside with penoplex, and what you should pay attention to during the work, is indicated here. Brick, basement siding, and even simple plaster are used as cladding.
Brick, basement siding, and even simple plaster are used as cladding.
Brick finish
This is the most expensive method, and also requires certain knowledge and skills. If they exist and the costs do not scare the building owner, then this option is easy to implement. It has a lot of advantages:
The disadvantages include the cost of such a solution and the duration of installation: masonry takes time.
Basement siding
This option successfully imitates brick and stone masonry, but is much lighter in weight and costs noticeably less.
Basement siding consists of vinyl panels of increased strength and rigidity. It is also distinguished by a more reliable joining method and high resistance to wind loads.
2ac0b7b8ccbe91c4947b2945c29c698e.jpe 63bafb50010f04108c5a606f1f83b400.jpe
Their advantages are:
- ease of installation - finishing can be completed in one day, and on your own;
- relatively affordable cost;
- excellent choice of colors and textures, you can choose the best option for any type of building;
- strength and good durability: plastic does not rot, does not corrode, is resistant to ultraviolet radiation and is designed for 50–60 years of service;
- The base can be washed with plain water or detergents.
It will also be interesting to learn about how the foundation of a house is insulated from the outside with polystyrene foam.
The only drawback is that in terms of durability, plinth panels are still inferior to brick.
Corrugated sheet
This is a metal profiled sheet with a zinc coating that protects the steel from corrosion. Available in a variety of colors, thicknesses range from 9.5 to 0.7 mm, and are more than affordable.
Advantages of the material:
- these are lightweight materials, so there are no difficulties with installation;
- the finishing process itself takes several hours, no more;
- low cost;
- complete fire safety;
- rich color range.
Disadvantages of the product:
- corrugated sheeting is afraid of damage: a deep scratch damages the polymer coating and the zinc layer. As a result, moisture can reach the steel and in this area the metal begins to rust;
- leaf shape varies within very small limits;
- the paint loses intensity and shine over time;
- in fairness, such cladding is only suitable for buildings finished with plastic or metal slats.
But what a canopy made of corrugated sheets adjacent to a house looks like, and how it can be made, you can read and see the video in this article.
In the video, finishing the base of a pile-screw foundation with corrugated sheeting:
Decorative plaster
This option can only be implemented in conjunction with insulation of the base. Its essence boils down to attaching heat insulating slabs made of dense material to the frame and applying a plaster layer to them.
The slabs are pre-primed. It is better to use silicone or fiberglass as a plaster mixture, since they are most resistant to moisture. You can see how façade plaster on polystyrene foam is used here.
Base insulation
Before covering the foundation of the house with siding from the outside, you need to take care of its insulation
This is especially important if you are making a warm basement. All insulation work is carried out externally with extruded polystyrene foam
If you have to attach the insulation to the piles, without a monolithic base, first sew up the base. It is most convenient to use glass-magnesium sheets - they can withstand being in water, are frost-resistant and quite durable. They are attached to the piles, then covered with a vapor barrier and foam is attached. After this, the siding bars are installed, pulled through with self-tapping screws through the foam to the piles, and the siding is installed.
For a monolithic base and foundation, you can simply attach polystyrene foam from the outside, covering it with waterproofing below the ground level. Through it, siding guides are attached to the concrete.
We recommend watching a video on how to properly insulate a basement with your own hands.
Thermal insulation of a screw foundation
One of the main negative characteristics of this technology for creating a foundation for a house is that the foundation design on screw piles has an underground space, and this, in turn, allows cold air to penetrate from below, which will certainly affect the comfort and microclimate in the entire building.
Thermal insulation of the foundation on screw piles has its own characteristics. The first step is to create a structure similar to the missing base, which is subsequently insulated. Insulation must be carried out in a complex - inside and outside.
Scheme of thermal insulation of the foundation with polystyrene foam.
So, the entire thermal insulation procedure is divided into the following stages:
- treating piles with a waterproofing agent;
- erection of a structure that will replace the permanent base;
- covering the constructed base with decorative panels;
- installation of insulating material slabs from inside the base;
- foaming of insulation joints.
Experts recommend two methods for constructing an imitation plinth:
- lightweight brickwork;
- the use of support bars or slats.
The first method involves digging a small depression (150-200 mm) between the support posts, then pouring a reinforced foundation into it. After it has set, it is necessary to lay half a brick and glue the insulating material to this wall.
The second method is to fix wooden beams on piles in a horizontal position using bolts or metal guides, but then you will need a welding machine. After this, insulation sheets are attached to the constructed structure. According to experts, the insulation can also be fixed directly to the cladding material. It is best to use penoplex or polystyrene foam as insulation material. In addition to excellent thermal insulation properties, these materials have good sound insulation.
Types of plinth panels
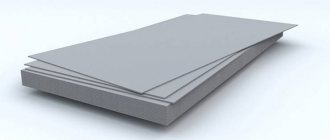
Base panels are made of metal, plastic, stone and composite materials (artificial stone). The panels differ in size, pattern, color, locking system, and installation method. Such panels are also called siding, but unlike conventional wall panels, they are thicker and stronger.
Sometimes, instead of base panels, corrugated sheets are used. Sheathing with corrugated sheets has its advantages and disadvantages. It is cheap and easy to install, but aesthetically it is inferior to other finishing materials. If the appearance of the building is not so important, then it can be used as panels.
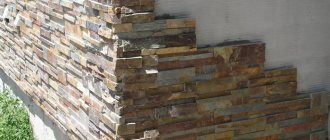
Under the stone
Stone-look plastic panels are sheet material measuring 70-120 cm (the size depends on the manufacturer), on the front surface of which there is a relief pattern imitating stone. However, panels can be made not only from PVC. The material can be artificial or natural stone, which is small in thickness and looks like tiles. On the back side it is flat, and on the front side it is convex.
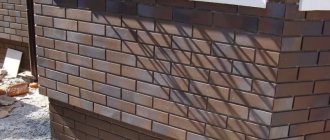
Under the brick
This is another common pattern for finishing a base. If the base is brick, then it seems that the brick finish is pointless, but this is not the case. The purpose of covering the base with panels is not decorative, but practical - to increase the service life of a private house, to protect the premises from dampness and cold. Brick siding can be made of metal, plastic or baked clay.
Never buy panels made from foam material. Despite its greater thickness, it is the least durable, sensitive to scratches and solar radiation.
Options for finishing the base of a pile-screw foundation
Korovin Sergey Dmitrievich
Master of Architecture, graduated from Samara State University of Architecture and Civil Engineering. 11 years of experience in design and construction.
Pile foundations have become quite widespread. This is due to the low cost of the device and the possibility of use even on soft soils. But during construction a problem arises: how to cover the base of a house built on screw piles?
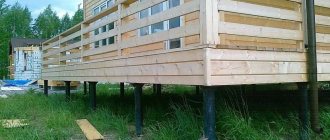
The buildings located on the supports in question have a ventilated underground. A grillage is provided for tying the piles. It connects separate elements into one system. The grillage can be made of concrete or metal. When constructing wooden or frame houses, the frame is made of wood.
The plinth cladding will be attached to the piles or walls of the house. To complete this you will need to make a frame or sheathing. It is most convenient to make and attach wooden boards. Their cross sections will depend on the pitch of the piles and the mass of the cladding material used.
There are several options for solving the issue of how to cover the pile foundation from the outside. The finishing of the basement of the house can be made of the following materials:
- siding;
- brick;
- plastic panels;
- metal profiled sheet.
The choice of material depends on aesthetic and economic considerations.
They are necessary for normal ventilation of the space under the building. Lack of ventilation can lead to direct danger to human life. You can often hear about the dangers of gases such as radon. It lies in the ground, but often rises and accumulates in the basements of buildings and underground areas. Constant ventilation will help avoid the accumulation of hazardous substances. It is highly not recommended to close vents for the winter.
How to cut corrugated sheets
Due to the fact that the corrugated sheet has a protective anti-corrosion and decorative coating, not all cutting tools are suitable for cutting it. Some of them can be used, but only if certain conditions are met.
Bulgarian
It is often used for cutting metal products, but it is of little use for profiled sheets. The explanation lies in the fact that when working with an angle grinder, a lot of sparks are generated and the surface heats up. This negatively affects the condition of the galvanized and polymer layers.
If, after all, a grinder is chosen for cutting sheets, then it is recommended to use only thin disks with a thickness of 1-1.16 mm with carbide teeth. The second way out of the situation may be to wet the cutting line and then stick masking tape on it.
A circular saw
This hand-held woodworking tool is suitable for this material if it is equipped with a special metal cutting disc with fine teeth with carbide inserts
In this case, it is important to adjust the depth of the disk so that it reaches the lowest layers of the sheet. To maintain the integrity of the polymer film, experienced carvers use a specially made device - a jig
It is a plate of plywood or OSB 1-2 meters long and 30-40 cm wide. A cut is made in the jig along the central axis, not reaching 10 cm from the edge. Align the slot with the cut line. The saw blade is placed on the jig and the metal is cut.
To maintain the integrity of the polymer film, experienced carvers use a specially made device - a jig. It is a plate of plywood or OSB 1-2 meters long and 30-40 cm wide. A cut is made in the jig along the central axis, not reaching 10 cm from the edge. Align the slot with the cut line. The saw blade is placed on the jig and the metal is cut.
Jigsaw
In some cases, this tool is quite suitable for cutting profiled sheets. Moreover, with its help it is possible to make curved cuts, which are not possible when using an angle grinder or a circular saw. To get a high-quality result and quickly sheathe the plinth, it is recommended to take a professional-grade jigsaw with a fine-toothed file and set high speeds when cutting. For long straight cuts it is also worth using a jig.
Electric scissors
The most convenient way to cut a profiled sheet is with electric scissors. With any trajectory of movement, a very clean and even cut is obtained. Another advantage of this tool is that working with it does not require an assistant. According to the principle of operation and design, there are three types of electric shears, which are used in finishing the base:
- Leafy. They provide excellent cutting quality without waste, but they are difficult to work along a curved line.
- Splined. When cutting, chips are formed, and a curved cut is possible only with a large radius.
- Nibblers. They produce a lot of waste, but allow you to cut elements of any shape, regardless of thickness and relief.
Prices for materials and installation work
The average price for plinth panels ranges from 250 to 750 rubles per square meter. The price depends on the popularity of the brand, the type of material from which they are made and the complexity of the pattern. The cheapest panels are made of plastic, the most expensive ones are made of natural stone. A galvanized profile of standard length will cost 100 rubles per piece.
Installation costs per square meter vary by region. The cost may also be affected by the qualifications of the workers. On average, the price can vary from several to several hundred to several thousand rubles. High-quality work by a team of workers will cost at least 5 thousand rubles per square meter. The team carries out all the necessary work, from measuring to installing the canopy and drainage system. After the measurements, the foreman calculates the full amount for the entire work. You can do the installation of basement panels yourself, or you can hire a team of workers. The first option is suitable for those who have enough free time and skills in working with basic construction and installation tools: grinder, drill, level, etc. The second is suitable for those who want to get a high-quality result quickly, effortlessly and for those who can afford it financially.
How to close the base in a house with a pile-screw foundation (installation technology)
Depending on the structure erected, you have to decide how to cover the base of the structure
Here you need to pay attention to a number of points:
First of all, you need to figure out for what purpose the free space under the base will be used. It is necessary to have a general idea of the financial investments that will be required for the arrangement. It is important to take into account the characteristics of the soil, as well as the position of the building on the site. You should also take into account the presence and abundance of groundwater that is present on the site. Depending on the chosen finishing option, it may be necessary to use or install auxiliary elements.
There are several installation technologies
Taking into account all these points, you should decide in advance on the materials used for arranging the basement in your house, which is built on a pile-screw foundation. Technologically, installation includes the following processes:
- Competent selection of the necessary materials for arranging the foundation of the structure.
- Taking exact dimensions, as well as the subsequent purchase of material for facing work.
- Afterwards, the space for the structure is prepared, as well as the tools are prepared.
- After this, a corresponding frame is constructed to which the facing material will be attached.
- If a brick is used, then a foundation must be laid underneath it on the ground so that the entire foundation does not fall through.
- After constructing the frame, the entire perimeter of the building is lined on a pile-screw foundation.
- Subsequently, if necessary, work is carried out to arrange external waterproofing and blind area.
After these activities, the interior decoration of the structure begins.
Currently, there are also other options for cladding the base on a pile-screw base, but not so often. It should be understood that such a foundation arrangement is a rather complex structure that must be performed by a specialist using the appropriate equipment. The same applies to subsequent arrangement. If the owner of the building does not have the necessary skills and experience, then it is recommended to entrust the work to specialists so that there are no difficulties and no mistakes.
How to make a plinth on a pile foundation
The cladding of such a structure is difficult because it most often does not provide for the presence of a solid bond. The support pillars are placed at an equal distance from each other, and the upper deck made of timber or metal elements serves as the basis for the house, but is located at a distance from the ground. The exception is piles with a grillage, which look like a strip foundation. Therefore, the cladding technology requires the creation of a frame; its installation is carried out using two methods.
Use of metal profiles
The first option involves the use of square pipes, which are welded to the supports at the same distance. This method is suitable when you need to decide how easier it is to close the base in a pile-screw foundation. If desired, the welded frame is installed on concrete supports into which strips of sheet metal are pre-embedded, but this is a very complex procedure.
A metal profile pipe is a quick solution to the problem of a frame for basement finishing, but it must be carefully treated with an anti-corrosion compound, because the thickness of the metal there is small
The second method largely repeats the standard facade type of lathing, in which U-shaped profiles are used. They are laid tied to the wooden part of the building. The guides are attached to the piles using a rigid tie made of various materials. Such a design must have high reliability, so all elements must have excellent adhesion.
Application of wooden beams
- In the first case, welding is used to connect the corners that are located on metal poles. They are installed between two elements at the edges so that the fixed beam is flush with the base plane.
- Wooden cladding is created directly in relation to the house, then vertical posts are installed first, immersed in the ground. They are pre-treated with special compounds to prevent premature rotting.
When arranging a solid wooden sheathing, it is extremely undesirable to allow direct contact of the timber with the ground
Main manufacturing companies
Below is a list of manufacturers of siding panels for finishing the facade of private houses.
- Grand Line. Siding for finishing the base produced by the Grand Line company is one of the most common building materials for covering the protruding part of the foundation. The wealth of colors and textures, as well as an affordable price, made it one of the market leaders.
- Canadaridge basement siding. The effectiveness of the technologies used in the production of Canadaridge basement siding has been successfully tested in the Canadian and Russian climate. The panels are cast under high pressure and painted during the casting process. This ensures uniformity of the structure and color of the products. There are about seven color options. The surface of the panels is resistant to fading in the sun. The company provides a 30-year quality guarantee for its products.
- Basement siding Fineber. Facade panels Fainbir has a large assortment of panels, different colors and textures. It includes 6 types of stone panels and 2 types of brick siding. The relief pattern, its color and texture exactly reproduce the pattern of brick and some types of natural stone (granite, marble). FineBer panels are resistant to mechanical stress, precipitation, and do not fade in the sun.
- Facade panels Tecos (ImaBeL). The facing panels for finishing the plinth, manufactured by Tecos, are also of high quality. The durability of the products makes it possible to use them not only as a decorative element, but also to protect the most vulnerable areas of the facade of the house.
- Zodiac facade panels. Zodiac is a domestically produced facing material with a multilayer structure. Zodiac products are environmentally friendly and meet international quality standards. This company has appeared on the building materials market recently, but has already won high praise from builders and designers.
These are the most popular brands of plinth panels. However, we should not forget about local manufacturers of various building materials. They are less known, but their products can be no less high quality. It should be taken into account that the quality of the plinth cladding is affected not only by the quality of the panels, but also by other building materials that are used during installation. The strength of the sheathing and fastenings depends on their quality. If they are of low quality, the casing may fall off.
Requirements for plinth cladding
The following requirements apply to the cladding of the base:
- Strength and durability of facing materials;
- Maximum permissible load on the foundation;
- Aesthetic appearance;
- Installation technology.
Not only the quality of the material matters, but also how the installation of the plinth panels was carried out. If gross mistakes were made when working with siding, then no matter how high-quality the material is, the base will soon begin to collapse.
All building materials that will be used for finishing must be of high quality. Chips, scratches or cracks are not allowed on their surface. The work was carried out in accordance with the technology and according to the instructions. It is important to pay attention to the quality of preparation of the base surface for finishing.
Mounting surface
Impregnation of wood with oil
Depending on the base: wood, concrete or metal, you choose how to cover the foundation. If everything is clear with concrete, then metal, due to its technical characteristics, must be ventilated. This also applies to wood; in a damp place, their service life is noticeably reduced.
Particular attention is paid to preparing this kind of foundation. For example, wood is impregnated with a special composition that protects it from rotting and fire
GF-021 – anti-corrosion primer
Bioprotective measures are also carried out, since untreated pillars are an excellent breeding ground for insects, which will render the entire wooden structure unusable in a couple of years.
Metal is treated with red lead compounds and special anti-corrosion primers. For such purposes, you can use a regular compressor with a spray gun. It’s not difficult to do this with your own hands. By diluting the soil, for example GF-021, to the desired consistency, you can carry out all the preparatory work on metal in one day.
Stages of work on finishing the basement of a frame house on screw piles
We had sheets measuring 1200 mm by 1800 mm (you can take 2000 mm), the clearance between the ground and the house is standard for dry areas of 500 mm. Therefore, it was very convenient to cut one sheet across the stiffeners into 4 equal parts of 1200 mm by 450 mm (just the ventilation gap remains), using metal scissors. Cost 475 rub. per sheet, thus, a linear meter of our plinth costs only 99 rubles, while the cheapest plinth siding will cost 480 rubles. per linear meter, not counting the cost of the necessary sheathing.
This is what the gap between the frame house on screw piles and the ground looked like before the homemade basement panels were installed.
The cut parts of the profiled sheet were screwed with self-tapping screws directly to the wooden frame of our foundation.
Fastening corrugated sheets.
In order to avoid the need to do ebbing from the base, it was decided to place the corrugated sheeting under the level of the main siding, i.e. It was necessary for the corrugated sheeting to be located on the same level as the still unfinished wall. In some places, it was necessary to put “liners” on the OSB sheets so that it was flush with the wall.
The lower edge of the sheets was tied with a bar using self-tapping screws. The result was a fairly stable structure that did not require attachment to the piles themselves.
Theoretically, it can be secured to piles in the future.
The sheets were bent at the corners, this gives additional rigidity. You need to bend in certain places so that the corner profile fits, not on the stiffener.
The starting strips of the main façade siding are already attached on top of the sheets.
In the end it turned out like this:
How to cover the pile foundation from the outside - photo.
In our opinion it is beautiful. All that remains is to make a blind area.
Materials
The suspended plinth is lightweight and does not require excavation work
Let's consider how to cover a pile foundation from the outside
It is important that the material used for finishing is durable and frost-resistant, and does not lose its qualities under the influence of temperature changes and ultraviolet radiation.
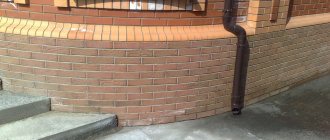
More reliable is finishing the base of a pile foundation with stone, brick, cinder block, or concrete. This will require excavation work similar to the construction of a shallow foundation.
The suspended structure is lightweight and does not require excavation work. Polymer, wood and composite materials are used, which are quickly and easily installed.
Basement siding
Basement siding is most often used for finishing screw foundations.
It is produced in the form of decorative panels with a thickness of 1 to 2.5 mm.
Advantages:
- Possibility of use in any climate zone, including the north;
- resistance to mechanical stress;
- light weight, ease of installation;
- has low thermal conductivity, retains heat;
- durability 40-50 years;
- does not collapse under the influence of moisture or ultraviolet radiation.
It is possible to cover the foundation of a house with semicircular shapes. For this purpose, a technology was launched into production, thanks to which the material bends easily. Panels of small thickness (1.1 mm) with the addition of synthetic threads are produced.
Profile flooring
One sheet of corrugated board will cover a significant space
Sometimes the question arises of how to cover screw piles so that work can be completed during the day.
In 4-7 hours you can cover the pile foundation with profile sheets.
The width is available from 1 to 4 m, due to this one sheet can cover a significant space.
Advantages:
- sheets with a polymer coating have a service life of 30-50 years, galvanized sheets last 10-15 years;
- Available in various shades and sizes;
- a light weight.
Disadvantages include:
- in places where the coating is damaged, the sheet is susceptible to corrosion;
- The zinc coating gradually evaporates.
Flat slate
Asbestos boards are not an environmentally friendly material
Every year this material is losing its popularity; it is being replaced by modern, environmentally friendly materials.
Advantages:
- resistant to atmospheric influences;
- durable.
Flaws:
- asbestos is dangerous to human health and pollutes the environment;
- fragile;
- unattractive appearance.
Frame system
Is a budget option. To install the sheathing, we use vertical posts made of timber (metal) with horizontal slats and metal profiles attached between them. We attach acrylic and vinyl siding to a pre-fabricated frame. For more information on how to close the basement space in a house on screw piles, watch this video:
Leaf system
You can lay tiles on the mounted profile
It is economically beneficial to use a sheet system.
Device stages:
- We fix a metal profile (corner, pipe) or wooden beam vertically;
- we fasten cement-bonded or asbestos-cement slabs;
- We lay tiles, porcelain tiles, and bituminous shingles on the slab.
Composite materials
As a composite material we use:
- lightweight polymer-sand panels reinforced with cellulose threads;
- fiber cement sheets have great strength and reliability;
Facing brick
Facing brick
Brickwork is a reliable, but expensive and labor-intensive method of finishing a foundation on screw piles. To lay the cladding correctly and evenly, you need to have construction skills.
Advantages:
- durability, strength, reliability;
- high thermal insulation qualities;
- additional support for house construction;
- aesthetic appearance.
Flaws:
- high price;
- labor intensity.
How to cover a basement space with a brick:
- remove the fertile layer by 30-40 cm;
- we fill in a cushion of sand, crushed stone, and tamp it;
- insulate the sole;
- we lay a brick.
The masonry must be connected using metal pins to the piles. The metal is welded to the sheathing and bonded to the brick using cement mortar.
Finishing technology
Sheathing a pile foundation with basement siding can be done independently, since the work process does not require special skills.
Initially, a sheathing of wooden slats or metal profiles is attached, after which the pile foundation is sheathed with siding panels.
To cover a pile foundation with basement siding, you will need the following materials and tools:
- slats or profiles for lathing;
- siding panels;
- fastening material;
- if necessary, it is recommended to lay an insulating layer;
- film for installing a waterproofing layer;
- sand, fine crushed stone;
- screwdriver
Basement siding: practical, fast, aesthetically pleasing
If the design should serve only the function of decoration without additional insulation, then siding panels are quite suitable. A variety of textures and colors of the material can transform an unfinished open area of work into a neat pedestal on which the building rises. It can be brickwork, tiles or ceramic tiles, decorative stone.
Siding will be the ideal solution to the problem:
- It is very easy to solve a problem like: how to cover the base of a house on stilts, using this simple and understandable material. For independent work you will need the following tools and devices: a cord, a building meter or tape measure, a set of wooden pegs, a plumb line, a building level, boards, a shovel, roll-type waterproofing.
- Before starting work, the area between and around the piles is cleared of vegetation and debris.
- Soil is selected along the outer perimeter of the house near the walls. A trench is formed up to half a meter deep and 0.3-0.4 m wide. In this case, its internal border should be located, slightly extending under the walls, and the excavation itself should be carried out with the formation of a slight slope in the direction from the walls: 1-5 cm for every 2 m.
- The entire excavated pit, including the walls, is covered with a layer of rolled waterproofing.
- A drainage perforated polyvinyl chloride pipe is laid around the perimeter on a small layer of poured crushed stone.
- In several places, drainage wells are brought to the surface - an “ambulance” when the system becomes silted for flushing it.
- The pipes are covered with a layer of 0.1 m of fine gravel. The trench is completely filled with sand along the upper boundary, which is compacted well, sloping away from the walls.
- A blind area is formed. Alternatively, it could be paving slabs, paving stones or concrete screed.
- Holders are welded onto the piles, onto which guides will be attached through holes.
- The frame is made of wooden (40x100 mm) or metal elements. To prevent wood from rotting, it is pre-treated with an antiseptic substance.
- Using the J-profile, external and internal corners with fasteners, siding panels are installed. In this case, a compensation gap of 3-5 cm is maintained for possible expansion when the temperature changes between the panels and the blind area.
- An ebb is installed on top of the finished structure, through which precipitation is removed from the base.
Creating a shallow strip plinth
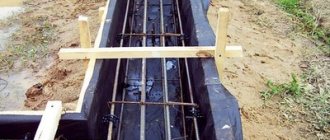
Stage 1. Preparatory work.
05d315fee2378252e7589ead343feb11.jpe
Before starting work, a trench is dug around the perimeter of the house, the depth depends on the type of soil, usually 30-60 cm, after which a sand cushion with a thickness of 10 cm is poured into the bottom of the trench.
2. Stage. Creation of formwork.
This stage is typical for any type of monolithic foundation. To create formwork, boards are most often used.
3. Stage. Reinforcement
For reinforcement, metal rods with a diameter of 10-16 mm are usually used, which are laid along the entire trench
4. Stage. Filling.
The formwork is filled with concrete mixture. You should be careful to prevent the formation of voids in the concrete by compacting the poured mortar every 20-30 cm. After 2-3 days, the formwork is removed, the top and side are waterproofed using mastic or roofing felt.
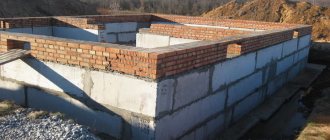
5. Stage. Masonry.
Brick or cinder block masonry is laid on the finished shallow strip foundation, vents are created, and brickwork is placed under the log.
6. Stage. Finishing work.
After the entire structure is ready, the façade of the plinth is finished (plaster, cladding with decorative stone or panels).
When covering the base with siding, you should use a metal sheathing, and place a heat insulator in the formed cavity, between the base and the siding. This will allow the basement of the building to be highly insulated.
Conclusion
In conclusion, I can say that there are many options for covering the base of a screw pile foundation. It all depends on the financial component, the type of soil and the terrain. In most cases, the hinged type of plinth wins, as it gives a wide choice in the use of materials, is suitable for any terrain, self-assembly is possible, and most importantly, you will save the family budget. I hope this article will help you make the right choice in such a difficult issue as closing the base of a foundation made of screw piles.