From the distant past, the time-tested technology of building walls is returning, previously supplanted by technical progress, according to which construction is accessible if you have a good tidy sum in your pocket. I personally met buildings whose walls were more than one meter thick and were made using formwork from ordinary earth, without any admixture.
An ordinary box, resembling any geometric figure, without a lid or bottom, can serve as formwork for placing a mortar mixture in it and making a decorated product. This is a collapsible or removable formwork form. They also use non-removable ones, which are used mainly in the construction of monolithic structures (installed inside future structures).
At the very beginning of construction, everyone mentally imagines the process itself, makes markings, checks the drawings, prepares materials and tools, and, if necessary, installs additional equipment and fixtures.
Nowadays, large costs are incurred when purchasing ready-made building blocks and finishing mixtures. But construction will cost much less if you use self-made building blocks or build walls directly in the formwork.
How to make TISE type formwork yourself.
Depending on the selected material for the construction of walls, it is necessary to select the calculated wall thickness for the safety margin. For example: a clay wall is inferior to a wall made of concrete mixture with the same transverse dimensions.
What material can be used to make formwork?
The material for formwork can be wood, plastic, metal, textolite and even polystyrene and paper. The larger the product being manufactured, the thicker the walls of the formwork (form). A mold with thin walls is deformed (it will swell).
For our purposes, a removable formwork for the selected size of the future block (10cm*25cm*14cm). The dimensions are not exact in microns, because it was not made for space.
According to these data, sheet steel about two millimeters thick was used. The drawings were made in a simple way and not professionally, but I think they will be understandable to anyone. These are fragments. Any sizes - upon your request. The main thing is not to forget about the strength of the walls of the mold, that is, their thickness.
Metal formwork type TISE.
- From the prepared material, we cut out the side walls of the future shape to size.
- Drill holes for the support pins.
- We bend the end walls to accommodate the handles.
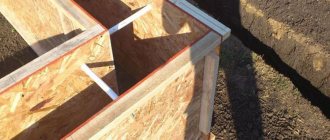
- We assemble the structure using a right angle template (wooden beam or ready-made building block). There must be strictly right angles.
- We connect the walls of the mold from the outside with a weld so as not to overheat the metal, which can deform when heated.
- In the same way, we assemble the forms (inserts) that will form a cavity inside the block.
- Support pins were made from d/5mm electrodes.
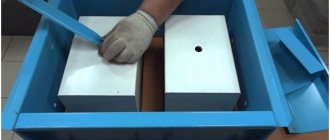
- The sealing cover is cut in such a way that when removing the formwork it does not touch the internal walls and freely squeezes out (like a piston) the finished block from the mold. There are protrusions on the edges to support and push it out of the mold with your fingers while removing the formwork.
- Side guide petals are welded to one of the end sides, which serve for centering and even laying of the row.
How to work with TISE type formwork.
- Place an empty mold on the prepared surface.
- We thread four support pins through the side holes.
- We install internal forms (inserts) on them.
- Through the hole in the end wall we thread a longitudinal support pin, which passes through the holes in the established forms and comes out of the hole on the opposite side of the formwork by a few millimeters.
- We place a mortar mixture (clay, cement, earthen...) inside the assembled structure.
- Align along the top edge with a rule (trowel, ruler, board...).
- We compact the filled mixture with a tamper (specially made, a block...) with moderate force.
- We fill the form with the mortar mixture and compact it again.
- When the laid mixture reaches a level corresponding to the height of the future block, we place a lid on top and compact the mixture through moderate blows on the lid, which will level the upper surface of the future block.
- Remove the longitudinal support pin from the mold.
- We take out the four supporting side pins.
- Using a metal hook made of hard wire inserted into the holes of the inserts, or as you prefer, grasping the top part, carefully remove the inserts.
- Trying not to move it to the sides, holding it by the side handles and resting your thumbs on the protrusions of the lid, remove the mold with a smooth upward movement.
- We evaluate the result obtained with an expert eye.
The next block will lie flat if the formwork form is placed adjacent to the last block, which will be located between the guide petals.
We repeat the whole process and enjoy the work.
One of the end sides of the form, which is in contact with the previous laid block, can be made removable, but this complicates the formwork design a little. The wooden form does not have one side, since the thickness of the board will affect the distance between the blocks and there will be gaps between them. Separate elements can be produced using a one-piece mold.
In warm and dry weather, you can lay out two to four rows. The next top layer can be laid four to five hours after the previous installation, that is, when the laid block has become stronger.
The voids inside the blocks can be used to fill with insulation or to install reinforcement. Thus, you can raise the walls of your future home in a week.
Download a free drawing of the formwork form.
Share with others. Perhaps they are looking too.
TISE formwork allows you to do all the work yourself.
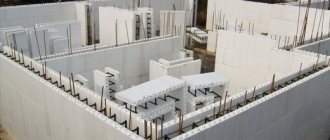
TISE block-based adjustable formwork is a common solution for building walls and foundations. Its difference is the ability to fill formwork blocks with rigid concrete mortar, which is made with minimal addition of water. After filling the block, the concrete is compacted and the formwork is dismantled. This allows you to quickly create a structural element; usually these procedures take no more than 5 minutes. This article will examine in more detail the types and characteristics of TISE formworks.
Step by step guide
Since the technology is primarily intended for a wide range of developers who want to independently perform this operation, attention should be paid to the order of work and the requirements for each stage. The main difference from the usual method of foundation installation is the configuration that the TISE pile has
While focusing on the method of obtaining the desired shape, one should not forget about general construction requirements. The order of operations is as follows:
- Soil analysis.
- Marking the territory.
- Installation of beacons horizontally above each pile location point.
- Drilling a well to the required depth.
- Expansion of the hole in the base.
- Removal of soil and control of the completed operation.
- Installation of fittings.
- Filling the hole for the pile with concrete.
- Making the foundation, grillage.
The technology allows you to install piles on any landscape. The construction of a conventional foundation always involves serious excavation work. Leveling the site, removing vegetation. It is not necessary to do this when using TISE technology
When drilling, it is important to maintain a vertical direction. To control the position, you can use a regular plumb line
The smaller the deviation, the more reliable the pile will be. The blade, which carries out the expansion, is brought into its working position using a cord (cable). The auger mechanism of the soil lifter must be periodically cleaned by lifting the device. The container fills quickly. The rock unloading time is calculated empirically. When the lift is full, the drill does not work. The work will be done in vain.
Working with a drillSource stroimmaster.ru
Features of filling wells with concrete
The structures must be strengthened. The fittings are prepared in advance. The length is calculated in such a way that it is possible to make a high-quality connection with the grillage. In some cases, it is reasonable to produce metal rods with a reserve. This will make it easier to make horizontal level marks, after which the excess is cut off with a grinder. It is not recommended to use cement grades below 400. The proportions of sand and crushed stone are standard, used when mixing mortar for power structures. 1 part cement to 3-4 parts filling.
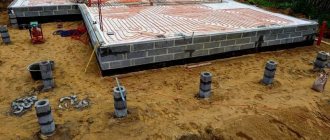
Making the foundation
Next, they begin to form the binding around the perimeter. There are two options based on the principle of the device.
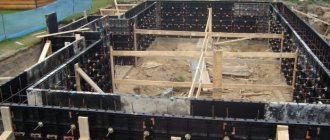
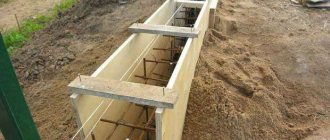
- Strip foundation - made of ready-made slabs, poured concrete supported on the ground. To do this, a trench is made along the perimeter. A cushion of crushed stone and sand is prepared. Then the formwork is installed into which the concrete mixture is poured.
- The second option is to install an independent load-bearing system mounted on piles. This support structure is called a grillage. With correct calculation and high-quality execution, the load on the piles is distributed evenly. The structure is mounted on a framework along a grillage and has weight restrictions. An excellent option for frame houses and buildings made of SIP panels.
TISE pile-strip foundationSource stone-dream.ru
Advantages and disadvantages of TISE technology
TISE stands for technology of individual construction and ecology. It is used mainly for the construction of small-sized residential buildings. Technology makes it possible to reduce the cost of the construction procedure and simplify the process to make it accessible to anyone.
The technology has a number of advantages, which include:
- Reduced construction costs, significant reduction in energy costs when living in a building.
- Environmental safety due to the use of natural materials that do not affect the environment.
- Increasing the comfort of living in a stone house.
- Increased fire safety, as well as increased service life of the building to 100 years or more.
- Reducing the labor intensity of the process, creating conditions for building a base on your own.
- The ability to start building a house with little financial capital, take breaks during work and complete the construction process in a short time.
- Reducing the consumption of building materials, using simple tools.
This technology also has a number of disadvantages. These include:
- The construction process requires a lot of time and effort.
- The formation of openings in the walls of a building due to the lack of block connections using polyurethane foam.
- High heat losses in the building, requiring the installation of additional heating systems.
TISE technology is used to construct a building and create a base using blocks. All work processes are carried out in formwork purchased or created on our own. It can be built from metal plates and corners.
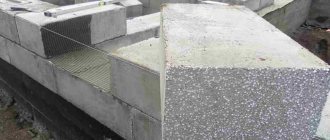
Concrete structure care
Caring for a concrete structure is necessary to minimize plastic shrinkage of the material, provide protection against premature drying and destruction of structural bonds due to sudden changes in temperature.
To do this, create a moistened compress of sawdust on the surface of the concrete solution and cover it with a film on top. Once every three days, the protective layer is watered with water from a watering can (drip irrigation) and re-covered with polyethylene.
Winter maintenance of concrete involves forced heating using mineral wool or polystyrene foam. Sometimes, for this purpose, antifreeze modifiers are added to the solution when mixing.
After the concrete has gained the necessary strength, construction of the grillage begins using standard technology for a pile foundation with reinforced concrete strip.
Types of formwork
TISE 1 allows you to speed up and simplify the construction process.
Today, TISE formwork is produced in three varieties. Products differ in weight, size, materials of manufacture and installation method. The following options exist:
- TISE 1. The lightest design option, weighing 13 kg. This formwork allows you to build walls no more than 19 cm thick.
- TISE 2 is a universal solution. The formwork is suitable for the construction of a light strip base, internal and external walls. The weight of the formwork is 14 kg, the thickness of the erected structure can reach 25 cm.
- Using TISE 3, you can build walls or a base with a thickness of 38 cm. The weight of the structure is quite large - 18 kg.
TISE 1 is the optimal solution for quick and high-quality construction of internal partitions of buildings, garages or utility rooms.
Different types of formwork have standard sizes, regardless of the method of their production. Equipping product blocks helps to create continuous monolithic sections of the base or external surfaces, half or empty parts of partitions or fences installed inside the building. You can also use TISE formwork to form sidewalk tiles.
TISE formwork is sold complete with all the necessary tools that will be needed in the work, so that all procedures can be easily performed with your own hands. You can learn more about the design of such a product by studying the drawings of formwork blocks.
Metal formwork has a greater safety margin.
Simple TISE device diagrams allow you to carry out all the work without the help of specialists, thanks to which you can save a lot of money. The stages of building a room when using this technology are unchanged. The first step is to lay the foundation, then the walls are raised, procedures for their insulation are carried out, etc.
Metal based formwork
TISE metal formwork is produced on the basis of steel sheets up to 2 mm thick. The product has high strength and long service life. Steel sheets are flexible, which allows you to create the desired shape or bend them at the required angle.
To make such formwork you will need the following equipment:
- Welding;
- Bulgarian;
- metal scissors.
To begin with, calculations are performed. Pouring concrete can begin after assembling the formwork using TISE technology. You will need to check the evenness using a level. The procedure for producing steel formwork consists of the following steps:
- The steel sheet is attached to the frame using profile angles or pipes.
- The sheets are attached to the pipe using spot welding or metal screws. During assembly you will need to create a sheathing.
- The creation of the structure is carried out in the area where the base is located. After pouring and drying the concrete, there is no need to dismantle the formwork, as it will become part of the building.
Foam formwork
Polystyrene foam is a fairly common material for TISE
This type of construction is created on the basis of ready-made blocks produced by the manufacturer. They have standard sizes and installed reinforcement bars that help form the base correctly. The advantages of using this type include the heat and sound insulation characteristics of polystyrene foam. Also, the blocks do not reduce the width of the walls, which allows you to save more free space in the room.
You can create a solid structure using metal brackets or polyurethane foam. The blocks are placed on the reinforcement and connected to each other with foam or staples. Polystyrene foam greatly simplifies the installation of utilities. The blocks have pre-drilled holes for wiring and all pipes pass through them. This nuance allows you to speed up the foundation pouring procedure.
Carrying out marking
Use geodesic thread for marking
Before building the foundation of the tise, it is necessary to carry out high-quality markings. To easily complete this stage of work, you will need tools such as:
- medium-sized boards or slats;
- stakes;
- geodesic thread;
- long tape measure;
- aluminum level;
In order to correctly mark the foundation using Tise technology, you should follow the step-by-step instructions, example
- First of all, 2 slats are fixed into the ground at a distance greater than the size of the future wall of the building. A geodesic thread is attached to these slats, and the cord must be tightly stretched. You should not use fishing line that can stretch. At a short distance from the fixed rail, the first peg is driven into the soil structure. In order to install the second marking element, the length of the wall, which is indicated in the building design data, is measured from the first peg. The guide rails are fixed in order to carry out the zero marking required by the foundation. These levels will be level with the top of the concrete grillage type. Using a water level, the top side of the boards is checked with the initial mark.
- To mark the second side of the future foundation of the house, you need to calculate a right angle based on the first wall. To do this, you will need the technology of the Pythagorean theorem. After the two sides of the base are determined, the diagonal is calculated. This calculation technology is quite simple. The action is performed using a long cord; it should be attached to one of the stakes, then, pulling, the second edge should be fixed to the second. Next, another cord is pulled at the same distance from the right angle. The third peg is placed at the required distance. Then, using a construction cord, the remaining sides are connected to the 4th peg.
- The inner perimeter of the cast-off is carried out in the same way as the technology for installing the outer side.
- The next stage of marking is determining the locations of wells. They should be distributed so that the middle of the well is exactly in the center of the line that is located between the two castoffs.
Each pile must be placed at a certain distance from each other. The required step is in the project documentation. It should be remembered that an individual calculation is drawn up for each residential building project.
Features of TISE technology
TISE technology has a number of differences that must be taken into account when using it.
TISE technology has its own nuances that make it possible to simplify the construction procedure. For example, when constructing load-bearing surfaces, it is necessary to increase the level of adhesion in the rows. To do this you need to do the following:
- Laying the concrete mortar and compacting it with grinding the top part.
- Creating depressions in the concrete mixture. To do this you will need to use a cross pin.
- In some cases, the structure is reinforced if it was provided for in the calculations. To do this, install reinforcing rods or metal mesh.
It must be taken into account that when creating a base and forming openings for windows and doors, you will also need to carry out vertical reinforcement. For this purpose, reinforcing rods are also installed according to calculations.
When creating window or door openings, special quarters are used - blocks of incomplete size. For their manufacture, special staples are used, which come complete with TISE formwork. This part of the work is done as follows:
- Before starting procedures with a quarter, you must wait at least 2 hours after working with the adjacent block. This time is needed for the concrete solution to set.
- If the block adjacent to the quarter was built a long time ago and has already dried well, then you will need to moisten it a little.
- An incomplete block is created using staples, a scraper and a tamper. All these devices are sold together with TISE formwork. But if the design is made by hand, the tools will have to be purchased separately.
When erecting walls, you will need to calculate in advance the possibility of installing a ceiling. To do this, you will need to create an opening for mounting the beam. You will need to prepare an insert of the required size made of wood. Installation of the liner is carried out between the void formers.
If the formwork is dismantled, the void formers are removed, and small recesses of up to 1 cm are created in the upper part of the block. Special liners will be installed in them to hold the vault. These liners will also need to be removed after the top row of blocks is completely formed.
You can learn more about the design of TISE formwork and how to create them yourself using the following video. TISE technology has a number of undeniable advantages. Even a beginner in the construction trade can do the work, which allows you to save a lot of money. The main thing is to take into account all the nuances of such work in advance so that unforeseen circumstances do not arise during the process.
Chise adjustable block formwork is a universal technology used for the construction of walls and foundations. A special feature of the technology is that a “hard” concrete mixture prepared with a small amount of water is used to fill the formwork blocks. After placing the mixture into the block, it is compacted and the formwork is immediately dismantled. Thus, it takes about 5 minutes to form one structural element.
Thanks to the maximum simplicity of the technology, you can work with Tise formwork without the involvement of professionals, doing the work yourself. The chise technology, popular today, allows you to build reliable and durable buildings using cheap building materials and doing the work yourself, without the involvement of professionals.
The scheme for building a house using this technology remains the same. First, the foundation is laid, then the walls are raised, work is done to insulate them, etc. Let's look at what is good about this technology and how formwork is used in practice.
General information
If you have a device that can drill through even the most challenging soil types, you will have a huge advantage. For those soils that have high water content, a hand auger has been modified and can be used to effectively pour the foundation.
For this reason, if you are planning to make a columnar or pile foundation, you should familiarize yourself with how to make a TISE drill with your own hands.
Design Features
The design of the TISE device for manual use, which makes it possible to form wells, is actually simple. This includes:
- A rod that has two connecting parts. The main one makes it possible to carry out drilling work at shallow depths, and the additional one will help to enlarge the wells for the pile. The section is 1.1 meters long. Fixation is carried out using special clamps. Thanks to the design features of each part of the rod, you can connect a rotation mechanism.
- A handle that helps rotate the TISE drill.
- A soil accumulator with a diameter of 25 cm, which ensures loosening and collection of soil. The storage tank has a cylindrical configuration, which ensures vertical formation of the shaft. Thanks to the design features, deviations from the vertical that may be caused by the presence of obstacles are eliminated. The intake of soil that has been loosened is carried out using a screw mechanism located at the bottom of the receivers.
- A tilting device that makes it possible to enlarge the lower part of the foundation recess. You will be able to create an expansion of 50-60 cm. The process is carried out when installing the device according to all design requirements. After the rod is put on, the folding blade should be attached to the soil storage tank with a special pin. The upward movement will be carried out manually, and the downward movement will be carried out under the influence of gravity. For the manufacture of TISE ura, suitable drawings are used.
Types of soil receivers
At the base of the construction site there is a lot of soil of different types (heavy, with the presence of stones, or light with a lot of loose rocks). Because of this, there was a need to manufacture a soil receiver, which makes it possible to increase the productivity of soil drilling.
There are the following types of storage tanks that make it possible to develop:
Heavy ground. A distinctive feature of such a device is that there are four evenly distributed vertical elements having a cone shape.
Companies that make the TISE drill with their own hands, at the request of customers, equip the drill for creating wells with a couple of soil receivers. Piles installed using this drill have a load-bearing capacity that is several times greater than conventional cylindrical elements.
Types of formwork
Today, Tise brand formwork is available in three versions; the blocks differ in weight and size and allow the installation of structures of different thicknesses:
- Chise 1 is the lightest type of block weighing 13 kilograms. Using this formwork you can build walls 19 cm thick.
Advice! The use of Tise-1 formwork allows you to quickly and efficiently construct the internal partitions of a building; it can be used for the construction of garages or other outbuildings.
- Tise 2 is considered a universal formwork. Such blocks are suitable for the construction of light strip foundations, internal or external walls. The block weighs 14 kilograms, with its help you can build structures 25 cm thick.
- Tise 3 allows you to build permanent walls or foundation slabs with a thickness of 38 cm. One block weighs 18 kilograms.
The overall dimensions of all blocks are the same, their height is 15 cm and length 51 cm. The equipment of the formwork blocks allows you to form solid monolithic foundation blocks or external walls, half or hollow blocks of internal partitions or fences. In addition, Tise brand formwork allows you to form paving slabs.
Advice! Construction formwork of the Tise brand is sold complete with all the fixtures and tools that will be required in the process, so it will be easy to do all the necessary work with your own hands. You can get acquainted with the complete set of blocks by studying the drawings of formwork blocks.
Pages
Questions can only be asked after registration. Please login or register.
I would like, as they say, to “throw in 5 kopecks” about TISE, which is discussed from time to time. There is no advertising here, only personal knowledge and experience. Maybe it will be useful for someone. Since there is a debate going on here about whether it is possible to build a house for 300 thousand. This is in contrast to (in my opinion) the nonsense that was written here about huts covered with iron and brick. With TISE, it seems like you can meet this notorious 300 thousand. Well, according to rough but realistic estimates.
Features of the technology
Tise technology has a number of features that greatly facilitate the process of building a foundation, walls and installing the necessary engineering equipment.
How to increase adhesion between rows of blocks?
When constructing load-bearing structures (for example, foundation slabs, external walls, etc.), it is necessary to increase the adhesive forces in the rows. The technology involves performing the following actions:
- Laying the concrete mixture and compacting it with leveling the top surface;
- Making “dowels” - depressions in the concrete mixture. They are performed using a transverse pin.
- When forming the next row of blocks, the depressions made will be filled with the solution of the upper block being formed.
If provided for by the project, it will be possible to reinforce the structure. Using design drawings, reinforcing rods or metal mesh are laid.
Advice! When constructing the foundation and when forming door and window openings in the walls, it is necessary to perform vertical reinforcement by installing reinforcing rods, according to the diagram.
How to make a block that does not have a central jumper?
Blocks without a central lintel are used to increase the thermal insulation properties of walls. In this case, the insulation is placed in the voids of the blocks. The main point of the formation of such blocks is that the voids located in the bottom row of blocks must be tightly filled with insulating material, otherwise when creating the top row of blocks the solution will fall down without having any frills underneath it.
To form voids in the block being created, special inserts are used, which are removed after the formation of the block is completed and the formwork is removed.
How to make “quarters” adjacent to openings in the walls?
To form openings for windows and doors, so-called “quarters” are formed - not full-size blocks. To create them, a special bracket is used, which is included in the chise formwork kit. This part of the design is performed like this:
- Before you start forming a “quarter”, you should wait until at least 2 hours have passed after the block adjacent to it has been formed. This is necessary so that the concrete mixture has time to “set.”
- If the block adjacent to the “quarter” was made a long time ago and has already dried out well, then it will be necessary to moisten it well.
- Form a “quarter” using a staple, scraper and tamper. All these parts are included in the package of the Tise formwork module.
How to prepare walls for the construction of a ceiling?
When raising walls, it is necessary to provide in advance the possibility of installing a ceiling. So, it is necessary to form an opening for installing the beam. To do this, you will need to make an insert of the appropriate size from wood. Install the liner between the void formers.
When dismantling the formwork, void formers are removed, and shallow grooves (up to 1 cm deep) are made in the upper part of the block to install a T-shaped liner to hold the arch. This liner is removed after the top row of blocks has been formed.
Walls built using the chise technology are able to easily withstand the loads exerted by the installed concrete floors. To create a level platform, it is recommended to install the outermost row of blocks on a pre-laid reinforcement mesh. Reinforcement is installed in the outer row of blocks to form an armored belt.
How to form mounting openings in walls?
To avoid problems later with the laying of utilities, it is necessary to provide installation windows during the construction of walls. Even before starting work, you should carefully study the design drawings and mark the locations for the formation of installation openings.
For their manufacture, wooden inserts are used, equal in width to the installation opening. If the height of the opening is less than 15 cm, then it is enough to make one insert. If the height of the opening is greater, two inserts are used, and the height of the first should be 15 cm.
The block that falls on the bottom of the opening is formed by installing a smaller insert. When forming the upper block, an insert 15 cm high is used. Before removing the upper insert, samples of mortar are taken on the sides of it; this is necessary to install a T-shaped spacer that holds the mortar.
So, using chise technology, you can build buildings according to a variety of projects. For the construction of the foundation, Tise 3 formwork is used, which allows the formation of slabs with a thickness of 38 cm. To create structures of smaller width, Tise 2 or Tise 1 modules can be used.
Notes on construction: TISE walls - technology of the poor
In our region, the main wall material is expanded clay (or with other filler) low-cement blocks measuring 0.2 x 0.4 x 0.2 m. They make everything from barns to cottages. Actually, the design of my house was designed for construction from these very blocks.
But, fate... When we were still pouring the foundation, my father gave me this name - “TISE”. One of his work colleagues built himself either a garage or a shed, and even corresponded with the author of this technology.
The Internet was at hand, Google immediately returned the necessary links. I read it, downloaded the book, read it, became interested.
I must say that at that time I took a lot of information from the Internet; construction is a vast area. I remember the phrase, I apologize, I don’t remember the author, “You can look, but you don’t have to buy...”. I looked here too, but didn’t buy it.
For several reasons I didn't buy it. The first, of course, is money. We practically carry out construction, as they say, “for one salary.” Financial injections are barely enough only for materials; there is no talk of hired labor at all. I’m not a businessman by nature - I can’t earn enough money to hire people and build a house in a short time. At the same time, sitting idly by, accumulating little by little wages, which, by the way, for hired labor in our region is much higher than the average, is not in character. Constantly an internal kick pushes you towards some kind of activity, which is not always useful. Therefore, after studying the main advantages of TISE, I realized that this technology was for me. As in the famous joke: “...and I’m in business, and my profit is mine.”
Well, and the second... At that time, there were many articles on the topic of TISE on the Internet, including “TISE technology - a skeptic’s point of view.” A non-standard solution is always fraught with the danger of the unknown. And I played it safe. Moreover, the project was designed for blocks of a different size; buying ready-made TISE formwork for 3.5 thousand rubles. didn't.
Instead, I bought a hot-rolled sheet 2mm thick for 750 rubles. By that time, I already had a welding inverter; at the very least, I learned how to cook - the wing on the Niva was successfully replaced. I sketched out the formwork drawings for the TISE block with dimensions of 0.39x0.39x0.2, and within a few weeks, during lunch break, the formwork was ready in the garage.
In August 2009, we poured the last part of the ceiling. I began to prepare for the production of blocks. There were no problems with cement - there are plenty of cement factories nearby. But there was a problem with coarse sand. In the surrounding area there is neither coarse nor fine sand, there is no sand - it is a mountainous area. They bring sand to Novorossiysk from afar - and its price was steep - 1 m3 was sold for 750 rubles. However, I bought it without much regret - this sand could be useful for other concrete work - stairs, columns, lintels...
The first block was manufactured at the end of August. I did the kneading in an old trough, by hand with a trowel. I liked the result. And black everyday life began...
On weekends, I kneaded sand-cement mortar in a trough, my father and occasionally my brother helped. The result was not bad, but the productivity left much to be desired - 6-12 blocks were produced per day, despite the fact that 1,600 units were needed for the first floor. Father, in addition, was nervous that a lot of cement was needed for the block. He suggested laying the broken rubble stone purchased for the foundation. Cement consumption decreased slightly - but productivity dropped - it took time to collect the appropriate size stones, and laying the mixture slowed down.
The compaction of the sand-cement mixture was done with a wooden stick. However, with the introduction of rubble stone, the wooden rammer quickly failed. Instead of wood, iron came - a massive metal rammer was welded, the operation of which became much more convenient.
While the construction took place on weekends, even then mixing the mixture in a trough with a trowel was very annoying. There was a vacation ahead - and something had to be improved in the mixing technology. A sheet was purchased from a metal warehouse on which it was supposed to mix the mixture with a shovel. Test batches showed a high speed - if earlier kneading took longer compared to laying, now it’s the other way around - the process began to slow down when putting the mixture into the mold.
Vacation. The start was promising - he managed to lay 12 blocks a day alone. However, after a week, the strength dried up, and productivity dropped to 8-10 blocks.
By the end of 2009, 256 blocks had been produced. This year another improvement has been made to make it easier to lay the mixture. To pour the mixture into the mold, a removable funnel was welded from strips of metal, which made it possible to pour the mixture “without looking” even when the mold was almost full.
In winter, of course, work was stopped. The blocks were covered with roofing felt to prevent rainwater from entering the internal voids.
It became possible to resume work at the end of March 2010. The productivity was as follows: on weekends alone - 8-10 blocks, with the help of my father and brother - 12-16 blocks, plus with increasing daylight hours it was possible to lay another 2-4 blocks on weekdays after work.
We worked in this mode until September.
During this time, the following nuances of the technology emerged. The weekend work schedule turned out to be favorable for me. The main income-generating work involves mental work. Having worked hard on the weekend, I spent a week sitting in a chair and managed to regain my strength by the next weekend. Thus, a certain balance was established between mental and physical labor.
The rubble stone had run out, there was no desire to buy a new one - too much fuss. We decided to add crushed stone to the mixture when mixing. Crushed hard rock was purchased (the availability and cost of which, it must be said, is also a problem) also without regret, since the window lintels were soon to be poured. The result was pleasing - with the same mixing time, the mixture yielded 1.5-2 blocks versus 1.25 blocks previously. I added two parts of crushed stone to the mix, theoretically more was possible (and later I increased it to 4 parts, and even 4.5), but then such a hard mixture cannot be tamped by hand. However, there was also a fly in the ointment, or rather clay. With the next delivery of crushed stone I went wrong - it turned out to be unwashed, mixed with clay - I had to wash the crushed stone by hand first. Subsequently, crushed stone, and sand, was ordered only after a visual inspection.
Expanded clay was considered as a filler instead of crushed stone. But expanded clay was more expensive. In addition, at that time I studied in detail the issue of insulation. I read a lot of articles, made calculations... and I became inspired by the idea of a heat-intensive house.
Problems were added with the onset of heat of 28-35 degrees. Fresh blocks could quickly dry out without gaining the required strength - they had to be watered and covered. They were covered with wet cement bags, with plastic film on top. In calm weather, this design worked perfectly - the blocks remained wet for 1-2 days at a temperature of 30-40 degrees. But there weren’t enough windless days, and when our famous “north-east” blew... We had to moisten the blocks and bags twice a day. To prevent the wind from lifting the film, boards were used. My father suggested an interesting design for this. Two long boards were tied at the ends with ropes of sufficient length so that the boards thrown over the top of the wall on both sides pressed the film against the wall with their own weight.
As the height of the wall increased, it was necessary to make first the trestles, then the scaffolding, which also took away 1-2 blocks from the productivity.
September was approaching, and with it another vacation. By this time, we had practically erected walls along the perimeter 10x13 meters high, 14 rows, which amounted to about 1000 blocks. Persistent thoughts appeared in my head about how to automate the process of making blocks.
On the Internet on the Okolotok forum, I came across a message from Dmitry Kostylev, who reported on the use of a hammer drill to compact a sand-cement mixture. I quote: “I tried (for the sake of experiment) to compact the mixture with a hammer drill. Of course, a good seal is achieved, but it’s terribly inconvenient.” The idea worked in this direction. The main difficulty is the lack of electricity. However, the issue with electricity also had to be resolved - there was concrete work ahead - lintels, columns, stairs, and mixing by hand would have been madness. Of course, my back is wide, but not that wide. There were two options, or rather three. The first is to connect legally from the power grid of JSC NESK-Electrical Grids, the second is a gas generator, the third is to throw a carrier to a neighbor who has just connected. According to the first option, people “close” to the power grid (and not to say complete strangers) told me the amount of 26 thousand rubles/kW only for the permit, plus the construction of the line at my expense. Now I’m “literate” in this matter, but then I took people’s word for it (since everyone connected like that) and... sent them through the forest - I didn’t have that kind of money. And with electricity, the issue was resolved in a different way.
The conceived idea with a hammer drill required testing before making expensive purchases: a hammer drill, a gas generator... The hammer drill was borrowed from my mother-in-law. Tamping... the first option was primitive. I bought a pick for a hammer drill and welded a plate to it. The hammer drill is switched to impact mode, and... the result pleased me. The block is filled with hard concrete mixture without noticeable effort in less time.
What it is?
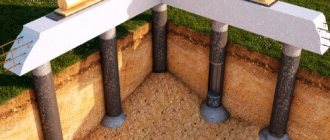
Laying a pile-tape foundation is a new technology that appeared in the late 90s of the last century and today is widely used throughout the world. The difference from a traditional foundation lies in the design of such a foundation - a reinforced concrete grillage is erected on bored pillars with an expanded heel.
Load bearing capacity
The load-bearing capacity of the foundation is related to the diameter of the base of the piles, the resistance and composition of the soil:
| Soil type | Soil resistance, kg/m2 | Load-bearing capacity of the load-bearing structure depending on the diameter of the heel, t | |
| 50 cm | 60 cm | ||
| clay, coarse sand | 6 | 12 | 17 |
| loam, sandy loam | 3 | 6 | 8 |
| dusty sand | 2 | 4 | 5,5 |
| medium sand | 5 | 10 | 14 |
In practice, the load-bearing capacity of the TISE foundation can be 2 times higher due to the fact that cement laitance penetrates into the soil and hardens there, forming a layer of soil concrete 5–7 cm thick.
How is a pile foundation made?
Design begins with the collection of initial data obtained as a result of geological surveys of the soil. Then the foundation is calculated - the parameters of the structural elements are determined, including the pitch between the supports, and the need for building materials is calculated.
Field work begins with marking the pile field in the traditional way. Afterwards, wells are drilled to the designed depth. The widening is done one by one: first, a recess of Ø500 mm is formed, then the blades are straightened to the final position and the widening is brought to the maximum value.
A reinforced frame is inserted into the finished fresh material, after which the structure is filled with concrete mortar. After hardening, the supports proceed to the construction of a reinforced concrete grillage in the form of a monolithic strip in the traditional way. In this case, a gap of 30–45 cm should remain between the lower plane of the grillage and the ground surface.
Work on the installation of the TISE foundation can be carried out with your own hands without the use of special equipment, which leads to additional savings.
Turnkey bookmark price
In the absence of construction skills and understanding of technology, it is advisable for the owner to turn to professionals. Average market prices for services are shown in the table:
| Parameters of the load-bearing structure with grillage parameters: width 40 cm, height 60 cm | Cost of one pile, rub. | Price, rub./m linear | The cost of a foundation with an area of 6x6 m | ||
| Ø support, mm | Heel Ø, mm | Depth, m | |||
| 250 | 600 | 1,5 | 3–4 thousand | 4–5.5 thousand | 150–200 thousand |
| 200 | 500 | 1,5 | 2.8–3.5 thousand | 4–5.5 thousand | 120–170 thousand |
Scope of application and service life
TISE piles are widely used in construction because they are universal load-bearing structures.
The technology is especially effective in such situations:
- during the construction of concrete and brick fences;
- for low-rise construction made of heavy materials;
- during the construction of two- and three-story residential buildings made of timber, foam concrete and frame panels;
- during the construction of baths and other heavy structures.
TISE piles can be built on almost any soil, except for rocks, namely in clay and sandy soil, sandy loam, loess and loam. The listed soil types account for 90% of the total area of Russian regions, which determines the popularity of this technology.
Due to the design features, the piles do not transmit vibrations and dynamic loads that occur near highways and railways to the structure they support.
Landing rules
You should consider several rules for planting yew if you want it to grow strong and have a thick, wide crown.
Priming
As noted earlier, the tree develops well in nutritious and fertile soils. It is also recommended to install a drainage system for active growth. To do this, you will need to create a special mixture of soil, peat and sand in a ratio of 3:2:2.
The shrub is not picky about soil acidity: yew can grow and develop in both acidic and alkaline soils.
It is better not to plant yew berries in sandy soil.
After planting, during watering, you should monitor the moisture content. High water levels will adversely affect the condition of the tree.
Planting pit
Before planting the yew tree, you need to dig a hole. The depth of the pit is from 0.6 to 0.7 meters. If we are talking about a hedge, then for yews they dig a whole trench with a maximum depth of 0.5-0.7 meters.
Yew must be planted in a hole at least 0.6 meters deep
Care requirements
Fertilizer should be applied for the first time when planting the yew. In this case, it is recommended to use a universal mixture in the amount of 100 g per 1 sq.m. A year later, another feeding of the tree is carried out, and the amount of the mixture must be reduced to 70 g per 1 sq.m.
In spring, it is recommended to feed the tree with compost or humus. In this case, before using the fertilizer, you should loosen the soil to allow additional oxygen to the roots of the plant.
It is recommended to feed the plant in the spring for better growth.
Watering
Regular watering is required for the tree during the first two years of its life in the garden, when the seedling is actively growing and consuming all the liquid reaching its roots. However, it is worth noting that in the case of rainy seasons, it is better to refuse watering.
Loosening
For the first 2-3 years from the moment the seedling is planted, the soil around it should not be dense. To avoid this, you need to loosen it regularly. At the same time, the soil is loosened to a depth exceeding 15 cm. After loosening, a layer of peat is laid on the soil.
While the tree is young, you need to loosen the soil around it without touching the roots
Trimming
Yew trees and shrubs need regular pruning of the crown, since throughout their life they produce new shoots, which as a result almost intertwine with each other.
Crown formation begins in late March-early April. At the same time, you can start pruning already in the first years from the moment the tree is planted, but at first you should not be too zealous. You can remove dried or damaged branches every spring for the first 2-3 years, gradually starting to shape the tree.
More thorough pruning is only allowed 5-7 years after planting, when the growth rate of the yew has normalized.
The crown needs to be formed in the spring
We make widening in the holes.
Then the scheme was like this. After work, I made widening and knitted frames from reinforcement, and poured concrete on the weekends.
Widening took a lot of time, especially at the beginning. At first I widened it by 50, then increased it to 60.
I did this until I found sandy loam in the lower part of the holes, and when there were holes with loam containing pieces of clay, the drill refused to do the last part of the widening. The shovel simply slid across the surface and did not remove a drop of soil.
I tried to press on the shoulder blade from above with a reinforcement bar. It is very inconvenient and it is advisable to have a third hand :) The effect was also weak. Then I remembered one tiseshnik from the forum and did as he advised, namely, I bent the edge of the shoulder blade just a little.
Without particularly hoping for an effect, I sent the drill into the hole and, lo and behold, the shovel powerfully bit into the soil, breaking it in whole pieces. Now the speed of production of widening has increased greatly and I began to drill at 60 at once. True, now it is more like chopping the soil into pieces than removing chips, but the storage tank is filled in half a turn. One widening now takes an hour to an hour and a half.
In general, the blade needs to be adapted to your soil. If you have sand, you don't have to do anything, otherwise I recommend bending it slightly. The main thing is not to overdo it, otherwise the blade will cut too deeply and you will not turn the drill. Now it happens with jerks and other jerks, but I like it better this way.
It is also useful to periodically sharpen the blade. But there is a trick here. While drilling the main part of the flare, the blade is sharpened on the ground at the “wrong” angle and when it comes to the final part, the cutting edge turns out to be slightly bent upward, as a result of which the blade begins to slide.
To eliminate this effect, the blade must be sharpened by changing the angle of attack of the cutting edge (it is better to make it parallel to the horizon).
In order not to constantly sharpen the blade, it is better to develop several holes. First, bring the extensions to the final stage (until the blade begins to slip), and then sharpen the blade and finish the entire batch of extensions.
Erecting cast-offs
Marking the foundation for Tise piles is perhaps the most difficult and important stage. For these purposes, you can use a hydraulic level or, in extreme cases, a hose with water.
Recommended instructions for marking:
- determine the zero level. It should be at a distance of 35-45 cm from the ground;
- after determining the zero level, it is necessary to file the pegs and place them at the outer corners of the nails, pulling the ropes;
- distribute axial pegs for internal load-bearing walls;
- install cast-off frame. To do this, it is better to use wooden panels whose thickness is 50 mm and a garden drill. It is better if the cast-off is semi-solid - this is both practical and economical;
- secure the formwork with thick boards;
- nail smooth bars. Their upper part will form the zero level;
- on the bars, mark the location of the cord for the internal and external walls and the central axis for the pillars;
- drive in nails and tighten cords.
This stage is very important, because The overall stability of the building will depend on it.