To install formwork for a strip foundation, you do not need to rent complex special equipment.
If you follow construction standards and follow the sequence of technological processes, then the work can be done on your own and with minimal costs for building materials.
We will tell you in the article how and from what materials to make formwork for a strip foundation with your own hands.
What role does design play?
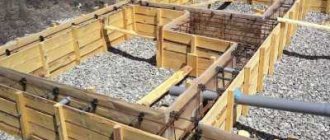
This is a special structure installed around the perimeter of the trench , which serves as a form for the concrete base and helps to achieve the exact dimensions of the foundation.
When pouring the solution, its walls are subjected to significant loads, so special requirements are placed on their strength. The geometric shape of the formwork must fully correspond to the dimensions of the monolithic base and have precise angles.
It is important for the builder to ensure that there are no cracks or gaps in the walls being erected. Even small holes will expand under intense load and the mixture will begin to flow out. Thus, voids are formed in the foundation mass, which reduce its performance characteristics.
Kinds
Traditionally, two types of construction are used - non-removable and collapsible .
In the first case, the formwork remains with the foundation after the mortar hardens. Builders save time and labor by eliminating the need for dismantling.
Collapsible formwork is more economical . Its design consists of individual elements that can be reused after the concrete has hardened.
This construction option takes more time and requires special attention from the craftsman to the tightness of the seams. Collapsible devices are convenient when working with complex foundations, as well as when constructing individual elements of structures.
Choice
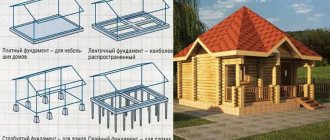
Formwork for strip foundations is divided into two types:
Removable
This structure is disassembled after the concrete solution has hardened. It can be used repeatedly.
Fixed
It becomes an integral part of the foundation structure. At the same time, this type performs several additional functions: hydro and thermal insulation, decorative finishing and protection from mechanical stress.
It should be added that if the soil at the construction site is quite hard, for example, clay, then the formwork is installed only on top of the trench in order to form the base part with its help. This option makes it possible to save on the manufacture of the structure itself.
What can it be made from?
It is easier for a builder to use ready-made collapsible formwork, but it is much cheaper to make it yourself from scrap materials. Racks can be made of the following materials:
- Tree. The most affordable option for self-construction. Wooden panels have such advantages as aesthetics and reliability. They are well processed and fastened using ordinary tools.
- Metal. Sheets made of carbide metal are characterized by strength, help to achieve an equal concrete surface and further strengthen the foundation.
- Plastic. Panels made of polypropylene are used as collapsible formwork elements. This material is lightweight and easy to use.
- Available materials . You can use slate or corrugated sheets that were left over from previous construction projects. But it will be difficult for the worker to achieve accurate geometry and there remains a risk of the solution leaking through the cracks.
For non-removable you can use:
- metal;
- reinforced concrete blocks;
- plywood;
- wood concrete;
- DSP;
- profiled sheet;
- expanded polystyrene;
- glass magnesite.
Which board should I use?
Experts recommend using cheap boards as the main material for formwork for work without the involvement of a construction team. This is an affordable building material that is not difficult to work with without having special equipment at hand.
However, the builder needs to take into account the requirements for wooden panels:
the type of wood is selected taking into account the humidity, which should be at least 22% (for example, conifers);- recommended board sizes: width – 15 cm, thickness – from 4 to 5 cm;
- the permissible size of the cracks is up to 2 mm (it is permissible to moisten the boards before pouring to swell and reduce the cracks);
- the wood surface must be free of any defects (knots, breaks);
- At least one side of the board should be smooth and have clean edges.
Compliance of the characteristics of the source material with the given recommendations guarantees that the boards will be able to withstand at least 15 pouring cycles if the technology is followed. Collapsible formwork elements made of chipboard, fiberboard and plywood can be used up to 30 times.
Requirements for formwork
Since this entire system is created in order to give shape to concrete and reinforced concrete products, it must be strong and elastic enough to withstand the pressure of the mass of liquid concrete. Therefore, quite serious demands are placed on formwork materials in terms of strength. In addition, the assembled panels must have a smooth and even inner surface: it forms the foundation walls, and then hydro- and/or heat-insulating materials are fixed to them. It is easier to attach them to flat (at least relatively) surfaces.
Materials for removable structure
Construction organizations have metal structures assembled with studs and bolts. In private construction, formwork panels are made from boards, moisture-resistant plywood and OSB. Wooden blocks are used as stops and spacers. No one bothers to make a structure from metal, but it is very expensive and unprofitable for one-time use.
What does the formwork for a strip foundation look like in section?
With a foundation height of up to 1.5 meters, the formwork board must have a thickness of at least 40 mm. The panels are fastened using bars with a section of 60*40 mm or 80*40 mm. If the height of the foundation is large - it is deep - such bars will not be enough to hold the mass of concrete. If the height is more than a meter, you need to use a block of 50*100 mm or more. For assembly use nails or screws. Their length is 3/4 of the total thickness of the board and bar (for the above sizes 60-70 mm).
Formwork is also made from plywood. There is even a special formwork, laminated with paper with synthetic impregnations. The coating has increased resistance to aggressive environments, which is liquid concrete. This material is labeled FSF (using formaldehyde glue).
The thickness of plywood for formwork is 18-21 mm. The panels are assembled on a metal or wooden frame. The wooden frame is made from a 40*40 mm block; you need to use shorter fasteners - 50-55 mm. When using plywood, it will be easier to work with self-tapping screws: nails are difficult to hammer in.
Construction of formwork panels made of plywood and OS
OSB is not often used for this purpose, but this option also exists. The thickness is about the same: 18-21 mm. Structurally, it is no different from plywood panels.
Select the dimensions of the sheets of these sheet materials based on the dimensions of the required formwork panels - so that there is as little waste as possible. No special surface quality is required, so you can use low-grade materials, which are usually called “construction materials”.
Decide for yourself what to make the formwork for the foundation from: it depends on the prices for these materials in your region. The usual approach is economic: whatever is cheaper is used.
Advance paynemt
It is not difficult to independently calculate the required number of boards . It is more convenient to have a prepared drawing with exact dimensions. Calculations are carried out for each side of the formwork separately, and then added together.
To calculate the number of units of building material on one side horizontally, you need to divide the length of the tape by the length of the board. To calculate the amount of material in height, you need to divide the depth of the foundation by the width of the board.
At this stage, the builder needs to take into account that the panels should be slightly higher than the depth of the foundation, so the resulting value is rounded up.
The results of the two calculations are multiplied and the answer reflects the required amount of building material on one side of the foundation. Experts recommend having a supply of boards equal to approximately 10% of the calculated data.
To simplify calculations, you can use online calculators at construction services.
Soil condition and groundwater level
It is best to entrust this part of the work to professionals , but it is quite possible to conduct the necessary research yourself. For this purpose, pits or wells are used , along which the structure, type of soil, groundwater level should be probed and, taking into account the data obtained, use the recommendations specified in SNiP to carry out calculations of the future foundation.
Based on climate maps, it is necessary to obtain data on the depth of soil freezing in the region where construction is planned. This parameter affects the depth of the foundation , which should exceed it by 15-30 cm. But at the same time, the level of groundwater , which should remain below the point of laying the foundation. In cases where compromise is not possible, multi-layer waterproofing of the base will be required.
Auxiliary materials and working tools
To build formwork with your own hands, the builder will need:
- fasteners (nails, screws);
- beams for assembly and selections;
- waterproofing film;
- working tools (level, saw, axe, hammer, chisel and others).
The purchase of auxiliary materials for the builder will cost approximately 40-50% of the cost of the boards.
Manufacturing and installation
The whole process can be divided into several key stages:
- Preparatory – calculations and purchase of building materials.
- Transition to field work - marking the site and digging a trench according to the specified parameters.
- Production of blanks for panels (if it is not stamped material for formwork).
- Driving support beams into the ground.
- Installation of dampers.
- Strengthening.
Shield assembly
The size of the dampers is chosen taking into account the geometric shape of the base so that their height is greater than the depth of the concrete pad. The length of the elements is chosen arbitrarily, but the optimal value is considered to be no more than 3 m. The total length of the dampers must correspond to the length of the tape.
Shields can be a prefabricated structure made of boards. Fixing bars are attached across the boards in increments of 50-80 cm. The central and outer bars can be longer than the height of the formwork and have pointed ends that will go into the ground.
Installation Features
The finished dampers are installed according to the markings strictly in a vertical plane.
For convenience, you can drive in vertical beams along the perimeter of the base in advance and align the walls of the formwork closely to them. The worker must ensure that the elements fit tightly so that concrete does not flow out through the cracks . Armed with a level and a hammer, he needs to align all the shields exactly in the same plane and at the same height.
If the shields do not have long bars that could go into the ground and hold the structure, then vertical bars are first placed along the perimeter of the trench. These elements will serve as support for the shields, which must be tightly attached to them using spacers and slopes.
Strengthening
The walls of the formwork are subjected to heavy loads during concrete pouring and may fall apart. To prevent this from happening, additional elements are installed to strengthen the structure.
From the outside, the walls are supported by braces and supports . They are placed in increments of no less than 1 m. Particular attention is paid to the corners of the formwork, where support is needed on both sides at once. If the height of the shields is more than 2 m, then the supports are placed around the perimeter in two rows: upper and lower.
Reviews
Before starting construction of the house, I considered different options for foundations - I really didn’t want to incur large expenses, so the strip foundation was not taken into account at all. But in the end I built just like this and I don’t regret it, although I had to tinker with it, since I did everything myself. But now I have a large basement under the house, an underground garage and absolutely dry, thanks to waterproofing. And if I decided to save money, I would lose so much usable space. Peter, Uvarovo
We bought the plot on clay soils, so at first they wanted to put the house on a pile or columnar foundation, but wise people recommended a buried strip foundation. We did just that and have not regretted it for six years now - there are no cracks in either the house or the foundation. Anatoly, Rossosh
I agree that a strip foundation is reliable and will last for centuries, but in winter our ground freezes to 1 m 90 cm - which means we need a foundation with a height of at least 2.10 m. And this is very expensive, so for my house I am now choosing between a pile-screw and slab Alexey, Murmansk
White sand-lime brick: price per piece, sizes and types of bricks. This article will tell you which interior doors are best to choose.
In this article you can find out reviews about PVC interior doors.
How to assemble and install dampers from various materials?
Previously, the general algorithm for installing formwork was considered. The use of different materials for shields requires its own installation features. It is easier for a builder who does not have special equipment to build a structure from boards, plywood or polystyrene foam.
Installation of boards from boards
This option is considered one of the easiest to install and the cheapest in terms of cost . When working with boards, a craftsman can make do with ordinary woodworking tools.
When there are cracks on the surface of the source material, leakage of the solution can be prevented using a plastic film that is attached inside the system.
Ordinary boards are a popular building material for formwork and even a beginner can cope with their installation. The only drawback is the need to strengthen the structure with additional elements (ties, supports, metal pins).
Made from polystyrene foam
Expanded polystyrene is a practical and high-quality material . Ready stamped blocks serve as shields. They quickly assemble into a single structure. The elements fit into grooves and are secured with threaded ties.
Difficulties may arise at the stage of selecting sheets of expanded polystyrene, when arranging the necessary corners and curves. Before pouring the concrete mixture, a reinforced frame can be placed in the formwork. A significant drawback is the high cost of polystyrene foam.
How to install plywood correctly?
Sheets of plywood will serve as reliable walls for the formwork . The assembly of elements is not much different from the standard scheme. The master’s task is to assemble a structure that accurately replicates the geometry of the base.
To maintain the accuracy of the width of the tape along the entire perimeter, identical bars are attached between the sheets of plywood. When working with a massive foundation, experts recommend strengthening the walls with screeds.
Installing permanent formwork
To make permanent formwork for strip foundations, it is recommended to use polystyrene foam blocks. How to do it correctly:
- Clear the area of debris.
- Mark the area.
- Dig a trench according to the completed markings. It is recommended to do this with a margin (for example, if its depth is 0.5 m, the margin should be up to 0.4 m).
- Cover the bottom of the trench with gravel and sand. The thickness of the layer ranges from 0.1 to 0.15 m. This layer will serve as a drainage system for draining groundwater, as well as thermal insulation.
- Insert reinforcement bars into the bottom of the trench. This is necessary to strengthen the structure.
- Pour a thin layer of concrete to serve as the basis for the future foundation.
- When the concrete hardens, place blocks on the reinforcement, securing them with jumpers.
- It is recommended to use corner elements for fastening at corners.
- Fill the cavity between the blocks with concrete, piercing it in several places with reinforcement.
- Compact the concrete and let it harden.
- Now you can begin the process of sealing the outer surface of the blocks.
The process of installing permanent formwork takes less time and is several orders of magnitude cheaper than installing a removable formwork.
How to save money?
Laying the foundation with your own hands, in most cases, is explained by the desire of the master to save money on hiring a construction team. Therefore, it is advisable to consider additional ways to save.
Filling in layers
The use of removable formwork allows builders to reduce the cost of purchasing materials. The method involves the gradual pouring of concrete mixture .
After the solution hardens, the structure is dismantled and reassembled on another section of the tape. During the warm season, approximately 3-4 days pass between filling cycles.
Vertical division
The concreting process can be divided into stages both according to the length of the foundation and its height . When the bottom layer of the mortar has completely hardened, the cement laitance must be removed from its surface and you can begin the next cycle of formwork construction.
To make the building material last longer, the surface of the dampers can be covered with plastic film or treated with an aqueous solution of slaked lime.
Technology: detailed step-by-step instructions for making it yourself
How to properly pour a strip foundation? Let's look at the construction process step by step.
Preparation of the land plot
Construction of a house begins with preparatory work, when the following steps must be taken:
- Engineering-geological research. Their purpose is to determine the composition of the soil and its bearing capacity, as well as the depth of groundwater. Research is being carried out by drilling wells and taking samples. The results obtained are taken into account when calculating the main parameters of the foundation of the building.
- Carrying out calculations and drawing up a plan. The depth of the foundation is determined.
- Installation of fencing. It can be a temporary fence around the entire perimeter of the house or a fence that will remain after construction is completed.
- Preparation of access roads. It must be taken into account that construction can be carried out in any weather, and it may be necessary to use trucks, earth-moving and lifting equipment. One of the simplest options is to fill in a layer of medium-fraction crushed stone.
- Clearing the construction site of debris and vegetation. Tree stumps are uprooted.
- Leveling the site.
Features of construction on an uneven site, slope
Construction in areas with uneven terrain and on slopes causes certain problems.
In order to lay a strip foundation in such areas, it is necessary to ensure the drainage of water flows flowing from above. For this purpose, a temporary drainage system is made.
A transverse, intercepting ditch is being dug in front of the construction site, which will collect wastewater. From it, diversion ditches are made, laid along both edges of the site, diverting water flows from the construction site.
It is important to consider that this drainage is temporary (only for the construction period) , because ditches should not be laid too close to the foundation. The final drainage system is installed after the foundation has been poured.
How to make markup?
The next important preparatory stage is marking the foundation. First of all, it ensures that the house under construction is connected to existing facilities. The minimum permissible distances are determined by SP 30-102-99 and SP 53.13330.2011.
In particular, a residential building should be located no closer than 3 m to the neighboring plot and 5 m from the roadway. The distance between buildings is at least 6 m.
Taking into account the “red lines”, the location of the house is clarified, and direct marking begins:
- The marking is made along the axis (center line) of the foundation tape. A peg is driven into one of the corners, and the direction of the façade wall is drawn from it.
- According to the rule of the “Egyptian triangle”, a regular right angle is constructed (the top is a driven peg, and one of the sides is the drawn line of the facade). The rule is based on the aspect ratio in a right triangle 3:4:5 (legs - 3 and 4 conventional units, hypotenuse - 5). The direction of the adjacent wall is drawn (2nd leg of the triangle).
- The length of the corresponding walls is measured on the marked lines. Pegs are driven in to determine the location of the 2nd and 3rd corners of the house. In these corners, right angles are again constructed according to the “Egyptian triangle” rule. The intersection of 2 new lines (legs) gives the 4th corner of the house.
- The marking of a regular rectangle is checked by comparing the diagonals. Their difference should not exceed 1 cm.
- The contour of the concrete tape is marked by grooves on the surface of the ground along the entire perimeter. This will allow you to efficiently dig a trench.
When digging a trench, the markings of the tape will be damaged, and therefore it will be transferred beyond the boundaries of the trench. To do this, install a fitting made up of vertical posts, removed from the driven corner stakes at a distance of 1-1.5 m diagonally. The transfer distance must be exactly the same in all corners. Typically, wooden slats are used for furnishing.
At the height of the basement of the house, a cord is stretched between the posts along the entire perimeter of the house. It forms a clear rectangular contour of the foundation, and becomes a guideline for subsequent work.
If the house foundation plan does not have the correct shape, then first, anyway, a rectangle is built, and then the necessary adjustments are made. Thus, for example, an L-shaped or trapezoidal shape is provided.
After marking the load-bearing, external walls, internal partitions are marked, under which a foundation strip is also erected . At the junction, right angles are constructed using the above method. The location of the partitions corresponds to the house plan.
The uneven terrain of the site creates certain problems. Here you will have to use a level. With its help, points on the cast-off posts are marked in height so that the stretched cord forms a strictly horizontal plane.
Preparing the trench
Digging a trench can be done with earth-moving equipment or done manually , depending on the size of the house and the depth of the foundation. Its important parameter is depth. It is equal to the sum of the depth of the concrete strip and the thickness of the cushion, waterproofing and insulation.
To construct a deep foundation, the depth is selected 20-30 cm below the freezing level of the soil.
For a shallow strip foundation (MSLF), the depth depends on the properties of the soil.
- for non-heaving soils with a freezing depth of up to 2 m and for slightly heaving, hard soils with freezing up to 1 m - a depth of 0.4-0.5 m;
- for non-heaving soils with a freezing depth of up to 3 m and for slightly heaving, hard soils with freezing up to 1.5 m - a depth of 0.7-0.8 m;
- at large freezing depths, the minimum depth is 0.9-1 m.
The parameters are regulated by SNiP II-B 1-62.
When digging a trench for a strip foundation, the following rules should be observed:
- the width of the trench exceeds the width of the tape by 50-60 cm in each direction;
- in dense soils (clay, loam), vertical trench walls can be formed; in sandstone and sandy loam, a slope of 8-12 degrees is required to prevent crumbling;
- the bottom of the trench is compacted and leveled, which avoids waste of materials;
- Every 50-70 cm of penetration, measurements of the trench depth are taken.
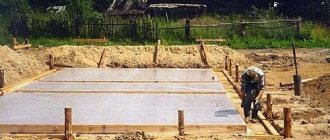
After excavation work is completed, a cushion is poured into the bottom of the trench . It is made up of a layer of sand 30-50 cm thick and crushed stone (pebbles) 10-20 cm thick. Laying begins with backfilling with sand, moistening and compacting. Then, a crushed stone layer is formed, which is carefully compacted and leveled. The total thickness of the pillow is 40-70 cm. Its width should exceed the width of the concrete strip.
Geotextiles and waterproofing are laid on top of the pillow. For it, most often, thick polyethylene film or roofing felt is used. Laying is provided in 2 layers. You can use other bituminous materials (TechnoNIKOL, Bikrost, etc.).
Installation of formwork
The quality of the strip foundation largely depends on the correct installation of the formwork for pouring concrete. It is made from sheet materials (plywood, OSB, metal, plastic) or edged boards at least 20 cm wide and more than 2 cm thick.
Installation work is carried out in the following order:
- Shields are made from the selected material (most often, coniferous boards). Their height should exceed the height of the foundation by 5-7 cm. The gap between the boards is no more than 2-3 mm.
- Along the entire length of the trench, wooden stakes are driven in on both sides at intervals not exceeding the length of the shields.
- The shields are installed in 2 rows, parallel to each other and secured on stakes. The distance between the panels strictly corresponds to the width of the concrete strip (including waterproofing).
- Additional strengthening of the formwork is provided by slopes on the outside and horizontal struts inside the structure.
- The upper edge of the formwork is carefully leveled using a building level.
- Waterproofing is fixed to the inside of the formwork walls, preventing the leakage of moisture from the mortar and the mortar itself through the cracks of the boards. Ruberoid is usually used. You can use geotextiles.
As the formwork is being installed, vents are made in it in the form of fillings made of plastic pipes or boxes. In the future, engineering communications can be introduced into the house through them.
Reinforcement
To impart the required strength to the foundation, it is necessary to reinforce the concrete strip with metal elements . It is ensured using a reinforcing frame continuous around the entire perimeter.
It is mounted from several horizontal layers of steel reinforcement, connected into a single structure by vertical rods.
For MZLF it is enough to lay 2 tiers; for ZLF, depending on the depth, 3 or more layers can be installed at a distance of 50-70 cm from each other.
Horizontal layers are formed from 2 parallel laid reinforcing bars with a diameter of 12-16 mm. Vertical elements are made of steel reinforcement with a diameter of 10-12 mm. When connecting them together, welding is not used. This is achieved using steel binding wire.
Reinforcing tiers must be removed from the edge of the concrete at a distance of at least 3 and no more than 8 reinforcement diameters . Typically the removal is 5 cm. During installation, it is important to observe the principle of continuity of the reinforcing frame along the entire perimeter of the foundation.
Pouring concrete
Pouring concrete into the formwork is carried out taking into account the following nuances:
- Concreting must be done in one step, continuously, but in layers of 20-30 cm with compaction with a vibrator. The previous layer should not “set” (harden) to prevent the appearance of air gaps and boundaries between layers. A monolithic mass should form along the entire height and length of the tape.
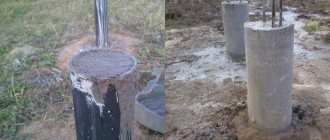
- The solution should not be dropped from a height of more than 120 cm. To meet this requirement, special gutters are installed for supplying concrete.
- After pouring is completed, proper care of the concrete is ensured. To prevent rapid evaporation of moisture, the foundation is covered with a film. Periodic moisturizing is provided for 3-5 days. If necessary, heating is carried out.
It is important to ensure continuity of the concreting process, and this is only possible by using a concrete mixer of the required volume or ordering a ready-made solution and delivering it by concrete truck. The formwork is removed after the concrete has completely hardened, i.e. no earlier than 10-14 days.
Waterproofing
After dismantling the formwork, it is necessary to protect the foundation from moisture. Waterproofing can be applied by coating, gluing, plastering or fixing a volumetric coating. Complex methods are the most effective. It is important that the waterproofing forms a continuous sealed layer over the entire surface of the foundation walls.
One of the most common options is implemented as follows. The entire surface of the walls of the concrete strip (outside and inside the structure) is coated with bitumen or bitumen mastic.
Roofing felt is laid on top, with overlapping strips of 10-15 cm . The top can be plastered with special additives added to the solution.
When backfilling the gap between the foundation and the walls of the trench, it is necessary to use only non-heaving soil. Clay is not suitable in this case. Reduces sand heaving.
Insulation
Thermal insulation of a strip foundation extends its service life and allows you to create a warm basement. If necessary, it is applied to the walls of the concrete strip before installing the waterproofing.
Most often, sheets and slabs from:
- foam plastic,
- expanded polystyrene,
- polyurethane foam,
- polyethylene foam,
- or mineral wool mats.
In the latter case, the requirements for waterproofing increase. You can use modern rolled thermal insulation materials.
Turnkey price
To evaluate the benefits of self-construction, the master should have an idea of the average market cost of the service in Russia:
| City | Cost of laying 1 m3 of formwork |
| Moscow | 1000-1200 |
| Saint Petersburg | 1000-1200 |
| Ekaterinburg | 600-1100 |
| Novosibirsk | 600-900 |
| Nizhny Novgorod | 500-800 |
How to further strengthen it?
When it is necessary to pour a large amount of concrete mixture, the system is reinforced with metal pins.
Sometimes the walls of the formwork can split apart under the weight of the solution. In this case, it is advisable to install screeds along the top of the structure .
To fix the shields, the walls are supported with beams in one or two rows, depending on the depth of the concrete base. The foundation will be stronger if wooden pegs or reinforcing rods are driven into the ground around the entire perimeter at intervals of at least 0.4 m.
What is formwork for a strip foundation
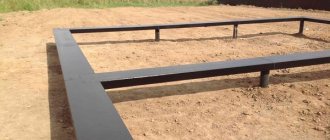
According to the principle of use, formwork can be removable (collapsible) or permanent. As the name implies, the removable one is disassembled after the concrete gains strength above critical (about 50%). Therefore it can be used several times. Depending on the material, the same set can withstand from 3 to 8 pours; industrial options can be used several dozen, and some hundreds of times.
Removable formwork is dismantled after the concrete has gained 50% strength
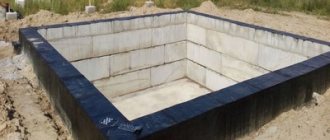
Permanent formwork becomes an inseparable part of the foundation. Such systems began to be used relatively recently. They are made mainly from extruded polystyrene foam. Blocks of different configurations are produced, which are connected to each other using locks and metal pins. From the blocks, like from a construction set, the required shape is assembled.
Fixed formwork becomes part of the foundation - it also doubles as a heat insulator
Fixed polystyrene foam formwork not only gives shape, but also acts as thermal and hydro insulation and also has sound insulating properties. It costs a lot, but it immediately solves many problems, and the time spent on building the foundation is significantly reduced.
There is another type of permanent formwork - hollow concrete blocks. They also come in different configurations - wall, corner, radius, etc. They consist of two or three walls and several jumpers that hold the walls in a certain position. They are connected to each other using locks and reinforced with rods.
When to shoot, after how many days?
Dismantling of the structure is possible only after the solution has completely turned into a solid mass . The duration of the process is determined by the massiveness of the foundation, its depth, the grade of concrete, and the ambient temperature.
Under suitable weather conditions, foundations for heavy structures require up to 4 weeks to fully cure. For private housing construction, demoulding can be done after 20 days.
After dismantling, gaps may remain on the surface of the base. These defects are filled with soil or filled with cement mortar.