Strip foundations are the most common, but are not applicable on all soils. To begin building such a foundation, it is necessary to carefully examine the soil and decide what thickness and height the tape should be.
In this article we will describe in detail all stages of the construction of a strip foundation, from digging a trench, reinforcement, formwork and ending with pouring concrete.
Drafting
Depending on the architectural solution, that is, the initially planned building, the weight of the house is determined, including the weight of the foundation, snow, wind and payload. The type of foundation, in our case strip, can be deep or shallow.
The next step will be to determine the parameters of the foundation itself, namely:
- Foundation width.
- Height of the recessed part.
- Height of the above-ground part.
- Is drainage required?
To determine the width of the foundation, you need to divide the weight of the house by the area of the foundation support, and the resulting value should be 20% less than the calculated soil resistance.
To increase the area of foundation support, a widening (heel) is made, which distributes the load over a larger area.
We described this in more detail in our previous article - how to calculate the weight of a house.
Soil development methods.
The choice of a specific method for carrying out excavation work depends on a number of factors, including the properties of the soil, the volume of work, the type of earthen structure and hydrogeological conditions on a particular land plot.
Excavation work can be carried out in two ways:
- manually using physical labor and hand tools;
- using mechanization means.
As a rule, the method is chosen that, with maximum economic feasibility, allows it to be completed within the given time frame. Practice shows that the more excavation work required at a site, the more profitable its mechanized implementation is, provided that normal and productive operation of special equipment is possible.
Manual soil development.
Excavation work foundation.
This approach is mainly in demand for relatively small volumes of excavation work, as well as where it is not possible to use special equipment. Most often, trenches and holes are dug manually for pile foundations, as well as for laying some types of communications.
The main tools for manual excavation are shovels and spades. You can increase productivity by using small-scale mechanization tools, such as electric and pneumatic shovels, jackhammers, crowbars, etc. These tools are especially relevant when excavating dense soils, which must first be loosened before mining. It is worth noting that loosening approximately triples the speed of soil removal. If it is not possible to use pneumatic tools for loosening, they can be replaced with traditional crowbars, wedges, picks and sledgehammers.
Excavation work for the foundation.
Mechanized soil development.
Mechanized soil development is economically feasible for large volumes of excavation work.
To achieve the highest speed of their implementation, the following types of special equipment are used:
- single-bucket construction excavators;
- continuous excavators (chain or rotary multi-bucket, scraper, etc.);
- bulldozers;
- graders;
- scrapers;
- rippers;
- drilling machines.
Also included in the technique of mechanization of soil development are auxiliary machines designed for its transportation.
Depth of foundation strip
For a deep foundation, the laying depth should be 20 cm below the freezing depth. For a shallow foundation, everything depends on the soil, or rather on the heaving depth, freezing depth and groundwater level.
For an approximate determination of the depth of a shallow foundation, see the table.
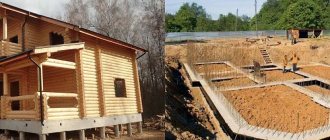
Excavation work for the foundation
At this stage, a trench is being dug, the depth of which should be suitable for the foundation design, taking into account the sand cushion and formwork. There are two ways to dig a trench: with a tractor using a narrow bucket, and manually (with shovels). The tractor will handle it much faster, but with shovels it turns out smoother and more accurately.
Basic requirements for LF for a private home
Events with “ribbon” are carried out taking into account existing SNIP standards. The main provisions for the construction stages of forming a foundation from reinforced concrete slabs are set out in SNiP 2.02.01-83, additional standards in GOST 13580-85. The requirements for the construction of foundations in SNiP 3.02.01-87 and the Document on load-bearing and enclosing buildings SNiP 3.03.01-87 are also important.
Basic requirements for the construction of the ribbon:
Following the technology (do not change anything in the order of work and the rules for their implementation).- Composition of building materials (they must be of high quality).
- Reinforcement procedure (a metal frame is an integral part of the base, giving it basic strength).
- Compliance with the proportions of materials from the calculation part (volumes cannot be used in larger or smaller quantities) of the foundation design.
A strip foundation for a private house must have large safety margins, since it will bear the main loads.
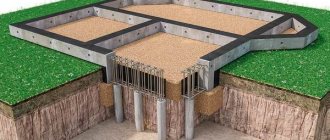
Sand/crushed stone cushion and film
The sand cushion is made about 20 cm thick, moistened with water and compacted well.
Next, a film is placed in the trench, which serves as additional waterproofing, does not allow the concrete to dry out quickly, and prevents soil from getting into the concrete when pouring.
Concrete
To prepare concrete you need cement, sand and stone (gravel, crushed stone). It is most convenient to calculate proportions and measure portions using buckets (-10 l).
Cement is usually grade 400 or 500. A standard bag of cement contains approximately three almost full buckets. If the cement is grade 400, then three buckets of sand are needed per bucket, but if it is grade 500, then four buckets of sand are needed per bucket of cement.
To mix the solution, you need to add about one bucket of water to the mixture of cement and sand. You can safely pour in half a bucket, and then during the mixing process, monitor the consistency of the resulting mixture and add water in small portions as needed. How much stone should I add?
Exactly as much as will fit. Stone is both a saving of cement and the strength of concrete. The point of dosage is to prevent the formation of voids between individual stones: they should literally float in the cement-sand mixture.
Ready foundation pile
Stages of frame reinforcement:
- Stones or bricks 5-6 cm high are laid at the bottom of the trench, the purpose of which is to lift the reinforcement cage in order to create a protective layer of concrete below.
- Next, longitudinal reinforcement rods, pre-bent at the corners, are laid out on the bottom.
- Next, pre-made clamps are put on the bottom row of reinforcement, they are also frames, they are also transverse reinforcement.
- The clamps and a row of lower reinforcement are connected with knitting wire.
- If the height of the tape is more than 80 cm, then structural rows of reinforcement are added, one row or more.
- Next, the upper longitudinal reinforcement bars and L-shaped clamps at the corners are added to the frame and tied with wire.
- To provide a protective layer of concrete on the sides of the foundation, special plastic rings are used that help hold the frame in the desired position.
We highly recommend that you read our article about calculating the reinforcement of a strip foundation, which describes in detail all the nuances of selecting reinforcement and corner reinforcement schemes.
So technology
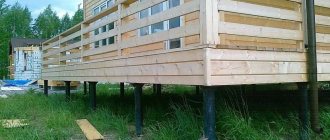
First we mark the site. If it is a frame house, then all the work comes down to marking the installation points of the piles along the axes of the building in increments of 120 cm.
The fact is that when designing a frame house, it is advantageous to make all horizontal dimensions of the structure in the axes multiples of 60 cm.
This is primarily due to both the dimensions of the timber itself, from which the frame is assembled, and the dimensions of the sheathing panels and insulation slabs (mats). Thus, with a pile spacing of 120 cm, every second frame node (the location of the vertical frame post on the bottom frame beam} will rest on one of the piles of our foundation. This is quite enough.
If we are going to build something more “frivolous”, say, a barn or a chicken coop, then the choice of step size can be arbitrary. Of course, you always want to save money by installing as few piles as possible.
This will make the foundation less expensive. But at the same time it will be necessary to increase the cross-section of the bottom trim beam, which in turn will increase the cost of the entire building. In this case, it seems to me that the optimal solution is to increase the installation step of the drilled piles, but not more than 150 cm.
In the nodes of our marking, we use a crowbar to make small notches that allow the drill to go deep exactly at the marked point.
Installation of formwork for the foundation
The formwork is made of wooden boards and reinforced with many bars, which are additionally rested on pegs into the ground. Also, to strengthen the formwork, metal wire ties are used, or pins are tightened in plastic tubes.
The installation of formwork must be approached very responsibly, since liquid concrete has a large bursting force, especially if the height and width of the formwork are large. Quite often, inexperienced builders’ formwork breaks and concrete flows onto the ground. To avoid this situation, strengthen the formwork as much as possible. And remember that more concrete pressure is created in the lower part.
Do not forget about installing sleeves for communications (water, sewerage).