Typical diagram of a monolithic slab foundation
The design of a slab foundation is very simple. Almost anyone can carry out such installation without involving skilled workers. But since the amount of work that needs to be done is large, you need to attract several assistants.
The number of people depends on the size of the base and the availability of equipment. Main stages of work:
- it is necessary to dig a pit under the slab foundation;
- perform waterproofing and insulation;
- tie a large amount of reinforcement;
- fill the entire foundation with concrete in one day.
Typical monolithic foundation diagram:
The entire foundation is laid on a sand and gravel bed. Also, before installing the reinforcing mesh, it is necessary to perform waterproofing and, if desired, insulation. At the end of installation, after removing the formwork, the ends of the slab are treated with waterproofing mastic.
Reinforcing mesh is most often made of two layers. Reinforcement 10-12 mm is used. You can buy welded ready-made mesh. But it is more convenient to purchase reinforcement and make the mesh on site.
To prepare concrete, cement grades from M 250 and higher are used. Includes:
- gravel;
- sand;
- plasticizer
If the foundation area is large, it is recommended to order a ready-made mixture. This will ensure the uniformity of the composition and its strength. In addition, it is very difficult to make such a volume of concrete in a day by hand.
Laying heated floors and wiring communications
Drilling a finished slab for the purpose of laying pipes and other utilities is considered a gross violation of technology; according to the standards, all these elements are laid before the concreting stage. All communications are laid in strict accordance with the design (if necessary, starting from the zero cycle stage), with the edges extending beyond the boundaries of the future structure, and are protected from the ingress of mortar and clods of earth with special plugs. Particular attention is paid to the contour of water floors, which are placed taking into account a number of rules:
• Setback of heating pipes from external walls from 15 cm. • Maintain the length of one loop within 100 m, with a recommended pipe laying interval of 10 to 25. • Protect pipes with metal sleeves no less than 30 cm long when laying over joints of finished slabs or in situ passage under future partitions. • Tying the water floor elements to the top row of reinforcement, eliminating differences of more than ½ of the pipe cross-section and the risk of their displacement. • Accurately follow the building design and lead the ends of the heating circuits to the points where the collectors are connected. • Mandatory check of the tightness of the system and filling of pipes with air or coolant before the concreting stage.
The actual layout of any utility lines is saved and used later, both at the stage of pouring and compacting concrete (pins or vibrators should not displace the pipes), and when connecting intra-house networks.
Advice! When you make mortgages in the foundation for an electrical outlet, for water, for a sewer, for an Internet cable plant, I advise you to make spare mortgages, they will definitely come in handy in the future.
Advice! Make an additional separate sewer outlet not to the septic tank, but directly to the place where the water leaves the septic tank after cleaning; you can send water directly there from the filtration system when it is cleaned, or to the bathroom, then your septic tank will not overflow.
The use of slab foundations: its main advantages and disadvantages
Let us list the positive aspects of using a slab foundation. In what cases is its installation recommended?
The main advantages of a slab foundation
- Excellent for unstable soils. The slab foundation maintains uniform load distribution during seasonal soil changes. Such changes are observed with the onset of frosts, thaws in spring, and heavy rainfall. All this affects the volume and density of the soil. Foundation slabs, unlike strip foundations, behave as a single unit. The foundation rises and falls along with the structure.
- Great load-bearing capacity. Since the base area of the foundation is large, the pressure that the foundation exerts on the ground is small. Therefore, a slab foundation can easily cope with the load from multi-story buildings.
- Long service life. Such a monolithic foundation of a house can last for decades. Of course, this is possible if all technological processes are followed. Waterproofing and insulation have been carried out correctly. The concrete mixture complies with accepted norms and standards.
- Strength. The slab foundation is the strongest of the existing types. This is ensured by uniformity, absence of seams and joints. Good waterproofing prevents moisture from destroying it.
- Minimal excavation work. If the soils are stable, this will allow installation on the surface. To clean and level the site, you may not need special equipment, which will reduce construction costs.
- Not difficult installation. To carry out construction work, no special knowledge or skills are required. You can completely handle the installation of a monolithic foundation on your own.
- Finished floors for the first floor. The slab is a good base for the floor. You can lay flooring on it - linoleum, tile, laminate.
Disadvantages of a slab foundation
To all the listed disadvantages, it is worth adding several negative aspects of using a slab base:
- High price. Of course, the use of such a quantity of reinforcement and concrete cannot but affect the cost of the project. Its price is several times higher than the cost of strip and pile foundations. In the case of using heavy construction equipment, its cost also significantly affects.
- Communication problems. All underground communications - sewerage, water supply must be completed at the beginning of construction. All pipes remain under the slab. Replacing them, if necessary, is very difficult. Therefore, this stage must be approached very responsibly. It is recommended to use the highest quality pipes.
- Not recommended for hilly areas. If there are large differences in elevation on the site for building a house, then costs can increase several times. In addition, there remains the danger of a landslide, which will lead to the mixing of the entire house. For hilly and mountainous areas, it is recommended to use a pile foundation.
- Insulation. Since the concrete slab absorbs moisture well, even when frost sets in, frozen water can damage the base.
- Weak bending strength. Errors during construction that lead to uneven load on the slab lead to the appearance of cracks. A well-made sand and gravel bed and properly tied rebar can prevent this.
What is the foundation?
This foundation device for a house is a reinforced monolithic slab poured on top of a flat compacted bed of sand and crushed stone. The depth of its installation depends on the parameters of the site and purpose; in houses without basements this value varies from 50 to 20 cm, the upper edge of the slab is usually raised above the zero mark.
The features and advantages of this design include:
- Uniform distribution of upper weight loads and withstand ground movements without the risk of wall displacement or base deformation.
- Minimum load on the ground, allowing construction on weak and unstable soils.
- Possibility of eliminating the high base and using the slab as a subfloor.
- High rigidity, strength and durability of the structure.
- Simplicity of technology and design, the ability to lay the slab on your own with minimal use of special equipment.
The thickness of the slab under private residential buildings varies from 20 to 40 cm; as a rule, such a foundation is strengthened with a two-row volumetric frame. All communications and technological holes are laid at the zero cycle stage ; after concreting is completed, the slab should not be drilled.
The base of the slab foundation must be protected from ground moisture; in frequently flooded areas, measures are taken to drain water to the side and down.
Slab foundation construction technology
The slab foundation is a multi-layer structure. Where each layer is very important and performs its function. Each stage of construction must be treated very responsibly.
Let us consider in detail each stage of construction of a slab foundation.
Soil analysis and slab calculation
It doesn’t matter what kind of foundation is used during construction, calculations must be performed. This is especially true for the foundation of a large, full-fledged house. Here, in this case, it is better to turn to professionals. Incorrect calculations of thickness or selected reinforcement diameter can lead to deformation and destruction of the foundation of the house.
What is a crossbar in construction: examples of use in frame construction
The thickness of the slab also depends on the quality of the soil and the occurrence of aquifers. Experts will help answer all these questions. By studying the soil throughout the entire area, they perform more accurate calculations.
If a monolithic slab is being built for the foundation of a small building, such as a garage or a summer kitchen, then the calculations can be done independently.
The minimum thickness of the slab foundation should be 200 mm. This thickness is quite enough for a small one-story house built from aerated concrete. For a two-story building, the thickness should be 220-250 mm.
Preparing the base
After completing all the calculations, proceed to the first stage. The area is cleared of debris and vegetation. The boundaries of the foundation of the house are marked.
To do this, pull the cords around the perimeter; cast-offs are used for convenience. They are installed beyond the base area, and the intersection of the cords will give the position of the corners of the foundation.
It is important that the angles are exactly 90 degrees. If the shape is rectangular, then it is enough to measure the diagonals. They should be even. Or remember the “Egyptian triangle”. If the aspect ratio is 3:4:5, then the rectangle is triangular. For example, 1.2 m: 1.6 m: 2 m is a right triangle.
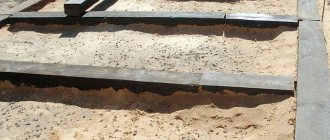
Next, the boundaries of the pit are outlined. The slab foundation must extend beyond the contour of the base of the house by at least the thickness of the base. And the pit is not much larger; usually the linear dimensions are increased by 1 meter. Next, we begin the excavation work. It is necessary to remove the top fertile layer. Its thickness can reach 0.5 meters. The depth is calculated taking into account the sand and gravel cushion and the insulation layer.
At this stage, if the base area is large, then special equipment should be involved. It is very difficult to manually remove and load several tens of cubic meters of soil.
After the work of heavy equipment, it’s time for manual labor. It is necessary to carefully level the bottom of the base.
For accuracy, you can use a hydraulic level and lay wooden slats. The bottom of the pit is carefully leveled and compacted with a vibrating plate.
Drainage and communications
A ring drainage is installed along the edge of the pit, just below the base level. Drainage will ensure moisture removal. The walls and foundation will be dry. This measure will also be useful if it rains during construction, the water will be drained from the construction site faster.
At the same time, the necessary communications are laid - sewerage, water supply, power cables. The pipes are brought out above the level of the slab and closed with plugs.
Sand and gravel cushion
Before you start laying out the sand cushion, it is recommended to lay a layer of geotextile.
Many people don’t do this, considering it a waste of money. But it's still worth doing. Geotextiles will prevent sand from being washed into the ground and silting up. It is laid at the bottom of the pit, extending to the edges.
Then work begins on laying the sand cushion. The thickness of the pillow can be 200-300 mm. Don't try to post it right away. It is also not recommended to pour sand into the pit from a machine. For high-quality installation, it is better to bring it in manually, using wheelbarrows, gradually. To maintain a horizontal plane, use beacons.
Having laid out a layer of sand, compact it using a vibrating plate. To increase density, the sand is wetted. Make sure that the sand is clean, without any admixture of clay or stones. If there are no options, then you will have to sift it further.
After laying the sand cushion comes a layer of crushed stone or gravel. The layer, 100-150 mm thick, is also carefully compacted with a vibrating plate.
Concrete preparation
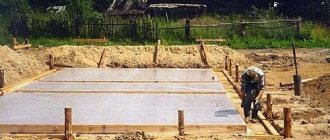
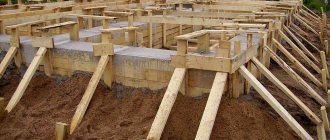
Next, we proceed to installing the formwork. To do this, you can use plywood with a thickness of 18-20 mm or an edged board.
More often, the upper edge of the formwork serves as a beacon for the final thickness of the slab foundation. Therefore, it is displayed with special care. The formwork is strengthened with the help of vertical supports and struts.
Before laying waterproofing, it is recommended to pour a small layer of concrete. Sometimes this stage of building a foundation in the form of a monolithic slab is skipped, starting to lay the waterproofing directly on the gravel bed.
A layer of concrete, about 50-100 mm, is poured onto the crushed stone cushion. This layer of concrete, low-grade concrete can be used, serves as a good basis for a layer of waterproofing and insulation.
Waterproofing
A layer of waterproofing is laid on the prepared concrete base. A profiled polymer membrane can be used as waterproofing.
It is laid with overlap, gluing the layers with bitumen mastic. Or use rolled bitumen polymer and lay it in two layers. You can also use mastic as waterproofing. When prepared, it is very thick; before use, it is better to dilute it with kerosene. The surface and ends of the concrete base are well coated with mastic.
Insulation
To preserve heat and increase the service life of the foundation, the slab must be insulated.
Extruded polystyrene foam is suitable as insulation. The slabs are stacked tightly against each other. The remaining cracks can be sealed with construction foam.
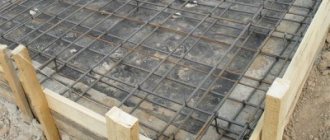
Reinforcement
Next, work begins on installing the reinforcing mesh. To do this, you can use ready-made blocks or assemble a mesh from reinforcement directly on the site.
The reinforcement bars are laid parallel to each other at a certain distance.
The reinforcement should not lie on the insulation; use stands to maintain a gap of 40-50 mm.
The next layer is laid perpendicular to the first with the same step. Both layers are connected using steel wire.
After the tender tier is ready, they begin tying the upper one in the same way. Using racks, the upper level of the reinforcing mesh is set.
Pouring the foundation slab with concrete
Pouring the foundation is the final stage of construction. It is important that the entire process is completed in one day to avoid vertical seams. Since a lot of concrete is required, it is better to order it ready-made.
When ordering, consider the time until the next concrete mixer arrives. During this time, it is necessary to have time to distribute and compact it well. It is better to do this using a deep vibrator. It removes air well, concrete becomes more plastic and flows better. The result is a flat surface and a very strong base.
Insulated Swedish stove.
Just yesterday, when choosing a foundation for a residential building, the priority was strength, reliability and long service life.
With the advent of nanotechnology, the cost and functionality of the design began to be taken into account.
Today, in order to build low-rise housing on a site with insufficiently strong ground cover, USP (insulated Swedish plate) is used.
This simple and at the same time affordable method of insulation will allow you to find a complete heated base and fit within the estimated budget.
The foundation is an insulated Swedish slab on a turnkey basis!
Services at a low price in Moscow and the Moscow region.
Just call us!
The foundation is an insulated Swedish slab (USP) - a foundation base made of reinforced concrete, which is laid on a layer of insulating material. It does not require large depths, which facilitates its use in the following areas:
- Soil characterized by flowability and looseness;
- Increased groundwater level.
The main characteristic feature of the Swedish slab is a rigid, integral structure that copes with soil movement, and the insulation prevents it from freezing.
Curing
After the foundation is poured, it is advisable to protect it from mechanical damage or rain. To do this, just cover it with plastic film.
To prevent the monolithic slab from drying out quickly, this can lead to cracking. The surface is watered for a week. If it’s hot outside, then after wetting it, cover it again with film. If the weather is cloudy, then you don’t have to cover it.
Formwork
Various types of formwork can be used to cast a monolithic slab, including:
• Removable, assembled from plywood, plastic panels or tightly fitted boards, buried in the ground or placed above the zero level with appropriate supports.
• Fixed, assembled from compacted polystyrene foam and successfully performing the functions of a heat-insulating layer.
When constructing on stable and dense soils, the formwork can only be installed at the top, but if there is the slightest risk of crumbling edges, it should be loaded into the ground.
Regardless of the chosen method, the internal walls of the pit or formwork are covered with waterproofing films and, if possible, insulated.
After assembly, the evenness and stability of the structure must be checked; deviations from the planned geometric dimensions of the slab are not allowed.
Advice! To save money when constructing formwork, you can use low-grade unedged boards or be sure to dig in the outer walls of the formwork before pouring.