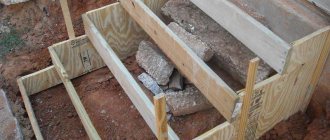
The boards are installed with a slight slope. The bottom edge of the second step should be 1–2 cm lower than the top of the first step, otherwise concrete may leak out.
If you are thinking about communication with the basement and cannot install an internal staircase to the basement with your own hands with an entrance from the house, because there is too little space for such a structure, then make an external staircase from concrete. This is an excellent solution if the ground floor is used as a warehouse or technical room and is not used very often.
Such a project helps reduce heat loss in the house, because there is no direct connection between the living rooms and the unheated basement. The street staircase can be made wider and longer, since there are no strict restrictions on the dimensions present when designing internal models.
If an entrance is provided through a hatch, then it must be made at a slight angle to the wall of the house and must be equipped with doors that will prevent moisture from entering the basement and freezing of the room.
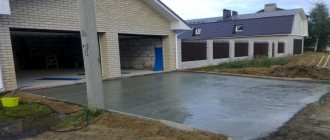
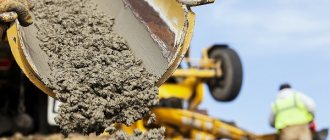
As a rule, concrete is used as a building material for the construction of external stairs to the basement.
An integral step in making a concrete staircase with your own hands is reinforcement. To do this, we insert reinforcement with a diameter of 8 mm into the wall. The longitudinal rods can be secured with thick wire, as shown in the photo, or welded. Thus, we have a rigid sheathing that will serve as a frame for the basement stairs.
Selection of design and material of manufacture
Most often, standard stairs are made of wood, but this is far from the only material. Let's start with the types of material.
What can you use to make a staircase to the basement?
All materials will be listed in the table. Let us note their main advantages and disadvantages.
| Material, photo: | Description: |
Wooden duck step staircase | Wood impresses with its low cost and ease of processing. Stairs made from it are durable and beautiful if the material is processed as expected. There are different breeds on the market with different characteristics and prices. Working with wood is pleasant and simple if you have the right tool - any man with a head and hands can cope with the task. Since the basement (read the article on how to arrange a basement in a private house) is a room with high humidity (not always) and poor ventilation, wood does not feel the best in it. Certain rocks rot quickly, which impairs the load-bearing properties of structures. The material may be damaged by insects and is flammable. Each of these shortcomings is dealt with using appropriate impregnations - natural and chemical. |
Staircase made of steel profile pipe | Metal is also popular, but it is more difficult to work with - skills in handling a welding machine are required, and some parts can be heavy to lift. Such stairs are highly durable and durable. Painted metal will not rust for decades. The cost of a metal staircase is higher than that of a wooden structure. You can save money on the frame construction of steps - the role of treads is played by a wooden board. There are no disadvantages to steel in the basement - if the room is dry and the structure is painted, it will last 50 years or more. Fire escapes are made from steel. |
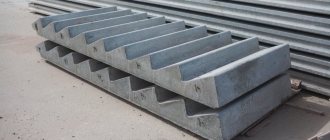
Concrete staircase | This design will be the most expensive - the price includes the main material for the staircase, the base for it, as well as finishing, if required. You can install a concrete staircase only in a house under construction, having included it in the project in advance. A strong foundation is laid under it that can cope with high loads. Concrete has high strength, long service life and the ability to create curved structures. Like other materials, concrete suffers from high humidity. This material is porous and actively absorbs water, which in its pure form is harmless, but saturated with minerals will lead to corrosion of concrete. The main difficulty of installation is the construction of formwork. |
Block materials | Brick, cinder blocks and other pieced materials are also used to build basement stairs. These structures are inferior in strength to concrete ones and have less mass, but installation of a foundation is required. Walls are built from brick that will support the treads. Wood or concrete can be placed on top, as in the photo. Additional storage space is provided inside. |
Materials such as glass and natural stone are not considered, since they are used only for the construction of beautiful interior stairs, which are not needed in the basement.
When choosing a material, much depends on the project (the design of stairs is described in the article), the construction budget and the stage of construction of the building. Wood and metal are universal - we have indicated the reasons. Concrete structures are good for mansions or large basements in which large loads will be stored. They are also actively used in industrial construction, since the material is non-flammable.
Types of stairs
If you have decided on the material, we proceed to comparing the platform for the stairs with its type. There are 3 types of stairs, but only 2 of them are used for basements.
For the basement and cellar you can make an L-shaped or U-shaped staircase
Marching type stairs
The most convenient and safe designs. March is a straight ascent without turns, roundings, changes in the parameters of the steps and the angle of inclination.
Wooden staircase
There are single-flight and multi-flight staircases. The latter have turns of 90, 180, 270 and even 360 degrees. The choice of shape and size is based on the size of the site, the shape of the room, and the presence of adjacent walls.
Turns are realized by installing horizontal platforms between flights or by installing winder steps (see the link for drawings and diagrams of a winder staircase), which continue to rise upward as they turn.
The fewer marches, the more space the structure takes up. This is the most important disadvantage.
Despite the large dimensions, the space under the flight of stairs can be used wisely by installing shelving there or hanging shelves.
Spiral staircases
Such designs are very compact and allow you to climb to any height in just a few square meters of area. We recommend reading: drawings of spiral staircases.
Frame for a spiral staircase
This staircase is reminiscent of an Archimedes screw, the base of which is the central pillar - the main load-bearing part. For structures with a small radius, the pole may not be used. Instead, the structure is held in place by adjacent walls or the material itself.
Compactness is the only advantage of these stairs. They are also chosen as a design solution, which is useless for a basement.
Among the disadvantages, we note the difficulty of lifting and low safety. The climbs are especially difficult for the elderly and children - it’s easy to get confused in the steps. It is difficult to carry large objects that may be stored in the basement along the spiral staircase.
Drawings of the stairs to the basement and calculations
For a staircase to be safe, it must have a gentle rise and correspond to the anthropological characteristics of a person of average height. The optimal parameters are already regulated at the state level, so only adjustments within acceptable limits are required.
Calculation example for the stairs to the basement
Any type of structure must comply with these parameters, but with some amendments.
- The width of the horizontal part of the step (tread) should be 25-30 cm. The width of the winder steps along the path along which a person moves will be the same. The width of the steps of a spiral staircase in the narrow part cannot be less than 10 cm, in the widest part with a length of a meter - 40 cm.
- A height of 16-22 cm will be convenient for every user.
- The width of the flight of stairs for a comfortable ascent of one person should be more than 90 cm.
Ratio of values
The height and depth of the step are tied to each other. A convenient rise will have proportions calculated by the formula 2a + b = 60 (64) cm. a is the depth of the step, and b is its height. At the same time, do not forget about compliance with standard values.
The angle of inclination for stairs in residential premises should be in the range of 20-45 degrees. This often cannot be done within a cellar or basement. Due to an increase in the angle of inclination, the dimensions of the steps also change - the depth decreases, the height increases, although the latter is not necessary.
Interesting to know! To increase the slope and maintain ease of climbing, the stairs are performed in a goose step style. You can move along them only with the correct positioning of your feet. The steps are shaped like blades, so you don't cling to them when climbing.
Duck step staircase
In what sequence should the calculations be performed for the stairs? Let's take the marching option, since it is easier to calculate.
Example of self-calculation
- First, the height of the stairs to the cellar is measured (the distance between the floors) - it is necessary to count from floor to floor.
- From the border of the opening to which the staircase will approach, we lower a vertical straight line down. This is done with a plumb line or laser level. The point is marked with a pencil.
- From the resulting point, set aside the distance that you want to leave for the structure.
- Now you can make a right triangle and calculate the angle of inclination. This requires a table of sines and cosines. If you have forgotten the calculation rules, use online calculators. There is also an approximate calculation formula. Let the ceiling height be 3 meters and the length 5 meters: 90*(3/5)/2=27 degrees
- If it meets the standards, we leave it as is. If we go beyond the limits, it is worth making the stairs divided into flights, setting convenient values.
- We determine the parameters of the steps. To do this, divide the ceiling height by the expected height of the steps. Let's take the most convenient value of 16 cm. 300/16 and get 18.75. We round up - the discrepancy in the multiplicity will be compensated by the changed height of the first winder stage. We get 19 steps. We divide this value by 500 and get 26.3 cm. In principle, we met the standards, but the depth can be increased.
Calculation of the stairs to the basement - angles of inclination of the flight of stairs in the table.
There are other calculation methods, but they all have similar algorithms. The main value that is always taken as a starting point is the span height.
Sequence of work execution
All work must be carried out in strict order:
- installation of formwork;
- frame reinforcement;
- concreting steps.
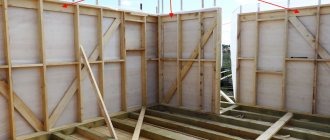
The most difficult thing for beginners is the installation of formwork. The easiest way to do this is when the staircase is planned to be built between two walls, which can serve as supports. You can attach the frame to them.
In the case where the staircase is limited by a wall on only one side, supports are provided for the frame on the other side. If there are no walls, then supports are provided on both sides.
Construction of a wooden staircase to the basement
Let's get down to business. Designing a staircase is a difficult and responsible process that requires attention and precision when cutting parts. It is best to start working when you have a set of good tools.
Tools and materials for working with wood
Invest in a quality metal ruler or square to ensure precise alignment of parts. The tape measure has errors, so we use it to work with stringers - inclined beams that hold the steps. Be sure to use a sharp pencil.
To align the structure, you will need a building level - a laser will simplify the work and will not cause measurement errors.
Two-plane laser axle builder
Other things you will need:
- a circular saw and a hacksaw for cutting out the stringer teeth and trimming other parts;
- For steps, a miter saw is well suited - it will make even and smooth cuts along the edges;
- clamps for clamping parts to be glued and temporary fixation;
- a screwdriver for installing the structure, but it is more convenient to work with a battery model;
- if the ladder will be tied to concrete walls or ceilings, a hammer drill will be required;
- When working with rough wood, it will need to be sanded, for which any convenient type of sander is used.
The following is the material:
- The basis of the structure is edged board. It will serve as posts and beams. In the example under consideration, the master uses a board with a cross-section of 100*50mm. When mounted on racks, it pairs parts to increase strength.
Unsanded boards - For stringers you need wider boards - 300*50mm. You can purchase it either whole or glued. The second option is more reliable, has a clear geometry, is protected from moisture, but costs twice as much.
Wide boards for cutting steps without loss of strength - The steps are purchased ready-made or assembled from edged boards. To support the loads, a thickness of 3 cm is sufficient.
Finished laminated wood step
Fencing material is not considered, as this is a topic for a separate article. Use thick timber - it is best suited for a basement. Carved balusters are of no use here.
You will also need a set of consumables:
- self-tapping screws;
- perforated metal corners and anchors;
- wooden choppers;
- antiseptic impregnation for wood.
Installation of formwork
Formwork is the most important element in the construction of stairs. It is a base in the form of a box with side walls that will determine the shape of future steps. Cross boards are laid on top. It is recommended to use wood more than 3 cm thick.
All formwork parts are attached using self-tapping screws, as they are easier to remove during dismantling. In the corners, wooden elements can be secured using corners.
To prevent the concrete from falling out from under the boards during concreting, each step is shifted 2 cm below the top edge of the previous one. To avoid difficulties when dismantling the formwork, it is moistened with water or protected from moisture penetration with a layer of waterproofing material.
How to make a staircase to the basement with your own hands
We will divide the work into several stages. We present step-by-step instructions.
Installing the top platform
If there is a step immediately behind the door to the basement, a person may become disoriented in space and fall down, receiving serious injury. To prevent this from happening, we will install a small platform. Yes, it will take up space, but safety is more important. It is also necessary to open the door - in the basement passages it opens inward. The platform will simplify the task many times over.
Another situation when a platform is necessary is when the descent goes not from the door, but to the side. As an option, winder steps can be used, but this design will be even more dangerous.
Step-by-step instructions with photos
- Purchased boards are sanded smooth to increase the decorative quality and safety of the stairs. If the lumber has a noticeable curvature, it is better to pass it through a thicknesser first.
- We form pillars from two folded boards. The material is cut to height so that the flooring is level with the floor of the upper floor. For cutting, use a miter saw or a hacksaw with a miter box. It is important to make the cuts even, as the strength and evenness of the final result will depend on this.
Cutting lumber with a crosscut - To accurately align and press two boards together, we clamp them in clamps, after applying wood glue or PVA glue. In fact, you will get a strong glued support. The boards are clamped in different planes and several places. When installing clamps from the sides, wooden spacers are used, as shown in the following photo.
This compression will help align the boards. - For strong fixation, galvanized self-tapping screws that are corrosion-resistant are used. Holes are first drilled into the boards for them, which will prevent the material from cracking. It is better to place them not in the middle, but closer to the edges, taking a snake step. The distance between the fasteners will be 30-35 cm. For screws with a massive head, an additional countersunk hole is drilled.
- Tighten the screws. If they are not long enough to fit 4 cm into the bottom board, it is better to install the fasteners on both sides. The result is a powerful support, even stronger than solid timber, plus reduced financial costs.
Driving the self-tapping screw into the supports - From the upper edge of the support you need to saw off a piece with an indentation of 10 cm (corresponding to the width of the boards). Only half is cut off, that is, one of the boards. This simple technique makes it possible to make a groove for connecting to the horizontal beam of the platform. The work must be done quickly so that the glue does not have time to harden, or it is not necessary to initially apply it to the edge.
We cut off only one of the boards that make up the post - Depending on the type of floor (read the article on how to make floors in a private house), you may need to make two additional supports in the same manner. If it is possible to securely attach it to the ceiling, we use high-quality fasteners and do it.
- Two horizontal beams are cut from the board, the length of which will correspond to the parameters of the site.
- The beam is connected to the support at an angle of 90 degrees, which is adjusted using a square. The work is done on the floor or directly suspended, if there is access. Next, the beam is connected to the ceiling. In our case, the part has a log height (wooden floor), which will make the flooring unbreakable and the connection reliable. If the ceiling is concrete, an additional beam is attached level to it using metal anchors, on which the platform will rest.
The stand is adjacent to the wall, which simplifies installation - If one of the supports is adjacent to a flat wall, it makes sense to tie it rigidly to the base. In this case, there will be no need to pair the boards, since the required rigidity will be obtained from the wall. The beam is attached in the same manner.
- To make it easier to position the free-standing part, we use a horizontal bandage, which will further strengthen the entire structure. The result should be the following.
Ready base for the platform - The posts are then secured to the floor. To do this, you can use metal brackets or a support beam, which is laid on the floor, tied to it with anchors, and then connected to the supports.
Attaching the support beam - An additional log is installed in the center of the site. More is possible - it all depends on the size of the structure.
Installation of a flight of stairs
In order not to have to worry about cutting out stringers, we will replace them with simple bowstrings.
- We cut two beams of the same length - so far more than the elements will be in the end.
- We install the beam at any convenient angle, resting it on the outer corner of the site. If you need to set a specific slope value, place several blocks on the floor and take measurements from them using a protractor or square. We make markings using these same bars.
String markings - I cut the board along the line.
- We now install the string the way it will be mounted later. We attach it to the outer post on the side, as shown in the next photo.
Top corner marking - The string is cut off at this point as well. The resulting blank is used as a stencil for the second bowstring, which will make them identical.
- We make a reliable support for the bowstrings. To do this, bars 10 cm long are applied to the installed bowstring, and markings are made. The beam is cut along the contour, and the block is attached to the support with self-tapping screws. Alternatively, you can use metal brackets, but they will be noticeable on a wooden structure.
Connection point between bowstring and post - From inside the bowstrings, horizontal markings are made along the square. Support bars will be screwed along the lines, on which the steps will lie - each part is set strictly according to the level. The bars are mounted on three self-tapping screws.
Fastening the support bars - The blanks for the steps are cut to length and mounted in place.
Finishing touches
Interesting to know! If the thickness of the string allows, instead of installing bars, you can cut grooves into which the steps will sink. This work requires good tools and high precision.
Pouring concrete
After the formwork has been installed and the frame is sufficiently strengthened, you can begin pouring the mortar.
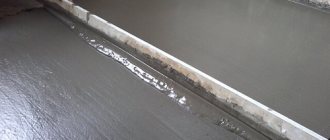
Concreting the stairs leading to the basement or porch begins with the bottom step. During the pouring process, it is recommended to pierce the solution in several places to avoid the appearance of voids in it. The poured concrete is compacted well and any unevenness is carefully smoothed out.
Before concreting each subsequent step, it is recommended to wait 5-10 minutes for the concrete to set. After all the steps have been filled, in order to avoid cracks, it is recommended to cover the steps with oilcloth.
Dismantling of formwork
It is recommended to remove the formwork no earlier than 3-4 weeks after pouring the concrete. During this time, the solution should already be completely dry. If you remove it earlier, the stairs may become deformed.
Dismantling takes place in several stages:
- dismantling the formwork of steps;
- removing side supports;
- dismantling the lower part of the formwork.
If you strictly follow the instructions for concreting, and also prepare high-quality materials, then you can build your own staircase no worse than those built by professionals.
Metal staircase made of channels and corners
First of all, we carry out calculations on paper. Once you cut the metal, you cannot change its dimensions.
Then use a grinder to cut the channel and angle into pieces of the required length. We take a welding machine and weld the frames of all stages. Don’t forget to remove the sagging afterwards using a grinder’s grinding wheel.
Metal frame made of channels and corners.
We weld the steps to the channels and again clean the sagging with a grinder. We treat the resulting structure from rust.
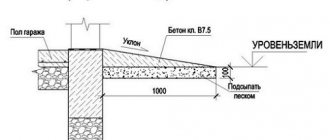
The staircase itself is ready. All that remains is to install and secure it properly. To do this, we try on the structure to the place where it will be located, and mark out a place on the floor for concreting a small foundation. We dig a hole 15–20 centimeters deep and place the ladder there with the bottom edge. We fill the hole with crushed stone and fill it with cement mortar. We wait for the concrete to dry completely - the staircase should stand very firmly.
We cut the sheet metal and weld it onto the frame of the steps. Once again we clean everything, remove burrs. This ladder will serve you for many years.
Frame reinforcement
Reinforcing the frame before pouring the mortar is a necessary step, since concrete is very heavy, and the frame will support it and reduce the risk of destruction of the steps.
The strengthening process can cause certain difficulties for non-professionals who are concreting a porch or basement staircase with their own hands for the first time. If you have any difficulties, before starting work, it is recommended to study the video, which explains all the intricacies of this process.
For reinforcement, ribbed reinforcement with a thickness of 1-1.2 cm is used, which is tied with wire or welded at intersections. To prevent the steps from crumbling during operation, places where a large load is expected are reinforced with transverse reinforcement.
Which option should a novice builder choose?
For a home craftsman who does not have experience in installing stairs, we can recommend installing a combined-type marching structure as the most optimal option for how to make a staircase to the basement. If a large flight of stairs is difficult to place in your cellar, turn your attention to a two-flight staircase with an intermediate flat platform.
Metal requires a significant investment in construction and welding skills. The construction of a concrete monolith is very labor-intensive and it will be very difficult to do it alone.
Laying reinforcement
After we have prepared the lower formwork, it’s time for the reinforcement. Holes are drilled in the walls of the opening. Then pieces of reinforcement are hammered into them. Rods of auxiliary fittings are tied to them with twisted wires.
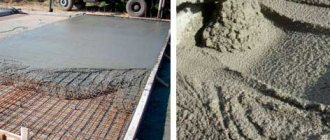
To knit the reinforcement, a convenient tool is used - a crochet hook with a ratchet. Wire twists are also very convenient. But they are expensive and in short supply. Therefore, you can use ordinary knitting wire. We tie the longitudinal bars of the working reinforcement to the transverse bars of the auxiliary reinforcement. It is located parallel to the lower formwork. We lay additional reinforcing mesh 5×100×100 on top. Its pieces need to be cut out in place.
This is what a tightly twisted wire should look like.
The edges of the reinforcing mesh are bent at the edges. This ensures reliable anchoring of the structure. The reinforcement is firmly fixed. In the future you will have to move around a lot along it.