They are also suitable for the construction of domestic premises. And they differ from other options in lower price and installation time.
The installation of such foundations does not require serious construction experience or special skills.
Therefore, the work can be done without turning to professionals - but before that, you should familiarize yourself with the features and stages of installation.
Peculiarities
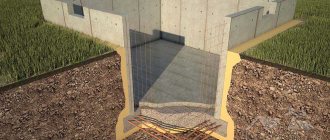
Non-buried strip foundations (NZLF) are a strip of concrete or reinforced concrete, which is laid under all load-bearing structures of the building.
They perform three main functions - load-bearing, protecting against deformation due to heaving soils and protecting the walls from water.
Reference! The peculiarity of such foundations is their location on the surface of the earth or, in extreme cases, 10 cm below the zero level.
Advantages and disadvantages
Non-buried strip foundations have a number of serious advantages:
favorable price - the cost of NZLF is approximately half that of buried foundations;- simple technology that allows even a non-professional to do the job;
- no need to use lifting equipment;
- small amount of excavation work , which simplifies the installation of formwork;
- high speed of installation , allowing you to quickly start using the building.
Non-buried foundations also have several disadvantages. Among them is the ability to withstand only a relatively small load. Therefore, a house on such a foundation should be low and not too heavy - preferably wooden.
Such foundations do not have the ability to be installed on any type of soil, especially wet and loose soils. Due to frost heaving of the soil, the foundation material may deform, which leads to a decrease in the stability of the building.
Application of the base
The scope of application of NZLF is the construction of one- and two-story residential buildings and outbuildings . The low load-bearing capacity of the base makes it a suitable option for buildings made of timber or logs. Such foundations are also suitable for frame construction.
Important! Foundations are used on sandy, clay and sandy loam soils. As a last resort, if the building is not too heavy, a shallow foundation can be installed on soils that are saturated with water and prone to heaving.
Device and characteristics
A non-buried base can be monolithic, prefabricated, consisting of individual elements, or combined.
The type can be selected depending on the soil category , in accordance with SNiP 2.02.01-83.
Most often, preference is given to a monolithic base reinforced with reinforcement.
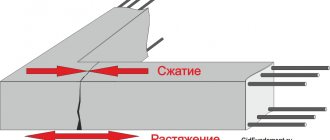
The main parameters of non-buried foundations are the length of the tape, cross-section and grade of concrete. It is not recommended to make any of the structural elements longer than 7 meters - due to uneven shrinkage, it can become deformed and burst. The height and width of the tape are in the range of 50-100 cm.
Attention! The concrete grade suitable for most situations is M200. A sand cushion 30-60 cm thick is placed under the tape.
What is a non-buried strip foundation
NZLF is a non-buried strip foundation, which is installed on the surface of the soil or with a small recess into it (up to 10-20 cm). The technology for constructing this type of foundation can significantly reduce the time of installation work and the consumption of building materials. You can make such a base yourself without the involvement of experienced builders.
A non-buried foundation is intended for small buildings made of aerated concrete blocks, logs and other light building materials. It is most often used in private housing construction for country houses, utility buildings and garages.
It is not recommended to build a country cottage intended for permanent residence on such a basis, because it may not withstand heavy loads if the soil does not have high load-bearing characteristics. For massive brick buildings, non-buried foundations can be built on rocky soils.
Soil bearing capacity
In accordance with the Code of Practice SP 22.13330.2016, the width of all types of strip foundations, including shallow foundations, is selected according to the bearing capacity of the soil.
For different types of soil, the indicator takes the following values:
- dense gravelly sands - from 3.5 for medium-density soil to 4.5 for dense soil;
- sands with medium-sized particles - from 2.5 to 3.5;
- fine sands: low-moisture – from 2.5 to 3, wet – 2.0, saturated with water – from 1 to 1.5;
- dry loams – from 2 to 3;
- sandy loam: dry – 2.5-3, wet – from 2 to 2.5;
- hard clays - from 3 to 4, plastic - from 1 to 2.5;
- pebbles, gravel or crushed stone - 5-6.
You should know! The calculated soil resistance is used in calculations and is measured in kg/cm². If the resulting value of the load from the structure installed on a strip base turns out to be higher than the bearing capacity of the soil on the site, the width of the strip should be increased.
In what cases is it used?
The use of NZLF is advisable if the following conditions exist::
- Dense and durable soil surface.
- Low groundwater level (more than 3 m).
- The composition of the soil does not include clay layers and easily allows moisture to pass through.
- The site is not subject to seasonal flooding, there is no danger of river floods and other natural phenomena associated with the appearance of water.
The best option is the presence of rocks, a solid stone slab or sandy soil with sufficient density and a low level of ground water.
IMPORTANT!
The total share of NZLF among all types of foundation does not exceed 8%, which clearly demonstrates the rarity of the presence of appropriate conditions in most regions of Russia.
Installation: stages and technologies used
The process of installing a shallow strip base consists of several standard steps, none of which should be neglected.
The main stages of installation are calculations, excavation work, creation of formwork and sand and gravel cushion, reinforcement and pouring. The final steps are the installation of hydro- and thermal insulation, blind areas and drainage.
Preparation of materials and tools
To install the foundation, you need to prepare the following tools:
pegs and cord with which markings are made;- concrete mixer for mixing and pouring mortar;
- shovels for earthworks;
- grinder and drill (screwdriver);
- pneumatic rammer for compacting the sand and gravel cushion.
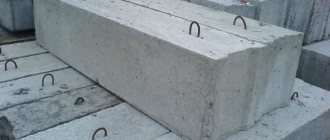
The list of materials for NZLF includes ingredients for creating reinforced concrete and a pillow. First of all, these are sand and gravel, crushed stone and cement. To strengthen the base you will need metal reinforcement, and for formwork - boards.
Calculation of base parameters
The minimum width of the sole of the strip base is calculated using the following formula:
B = 1.3*M/(L*R), where:
- 1.3 is the safety margin,
- M – mass of the house in kg,
- L – total length of the entire tape in cm,
- R – soil resistance.
The value of the last characteristic is taken from SP 22.13330.2016. The minimum width of the tape should not be less than 25 cm. The optimal value is 5-10 cm wider than the wall.
It does not take much time to calculate the amount of materials required for the construction of the foundation. The volume of a reinforced concrete strip can be determined by multiplying the length by the cross-sectional area. The mass of concrete is determined using online calculators.
Similar services can be found for calculating the volume and weight of backfill materials - sand and crushed stone. The amount of reinforcement is calculated by multiplying the number of reinforcement contours by the length of the tape - there are usually 4 of them in the NZLF.
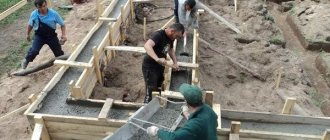
Marking and excavation work
The first stage of work may be leveling the site on which construction will be carried out.
But, if construction is carried out without the involvement of specialists, it is often easier to choose a relatively flat site than to level it manually.
Sometimes, at the construction site, a shallow but wide trench is dug, the bottom of which is the zero level.
The next stage is the installation of markings on the area selected for construction. To do this, use pegs, usually made from scraps of reinforcement, and twine. The contours are marked in accordance with the project, after which they proceed to digging a trench for sand and gravel backfill.
Attention! Inside the recess intended for the pillow, supports are installed to protect it from collapse. The depth of the trench depends on the weight of the structure - for small structures 300 mm is enough, for a relatively heavy building a layer 500-600 mm thick may be needed.
Drainage
Drainage may be needed to remove high groundwater from under the structure . They arrange it before filling the cushion in the same trench, making holes at a distance of 2 meters and filling it with crushed stone. Polymer pipes are installed inside, wrapping them with geotextiles.
The drainage is located under the foundation and blind area with a slope of 5-10 degrees. When concreting the base, another trench is dug to the drainage installation site, geotextiles are laid and the whole thing is covered with crushed stone. Then a pipe is installed to collect and drain water.
Sand and gravel cushion
A cushion of bulk materials is placed in a trench dug under all load-bearing walls.
Instead of a separate laying of sand and gravel, used for other types of foundations, for NZLF they use a mixture of these components, sometimes adding expanded clay or slag to them.
The purpose of the cushion is to avoid contact of concrete with the ground and protect the base from deformation.
Therefore, it is poured into 2-3 layers 20-25 cm thick, carefully compacting each layer using a tamper. To increase density, before compacting the sand and gravel mixture, water it with water.
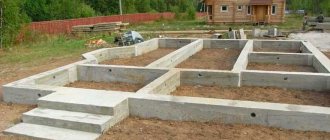
Formwork
Formwork work consists of constructing a frame for pouring concrete mixture. The height of the formwork should be several centimeters higher than the foundation strip. Particular attention is paid to the corners of the frame, which will bear the maximum load during the operation of the building.
Attention! Spacers dug into the ground and secured with wooden stakes will help ensure that the formwork remains stationary during pouring. The quality of the foundation obtained after pouring and hardening of the foundation mixture depends on the reliability of fastening the formwork panels.
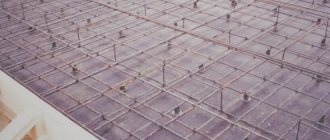
Reinforcement
To create a reinforcement frame inside the formwork, several types of rods are used:
- transverse – diameter 6-8 mm;
- longitudinal – diameter 10-12 mm;
- vertical – diameter 8-10 mm;
- soft knitting wire.
The reinforcement is tied into a common frame. Welding is not used for such structures due to the lack of space and the appearance of additional stresses that can destroy the frame. The reinforcement must be protected from corrosion by concrete with a thickness of at least 50 mm on each side.
The rules for calculating the diameter of reinforcement are here, and a detailed article about reinforcing a strip foundation with your own hands is here.
Fill
Filling is done with concrete with a strength of at least M150 , although it is advisable to use at least grade M200.
You can order the production and delivery of the solution to the site - or prepare it yourself. The proportion is chosen in accordance with the instructions on the packaging.
During the process of pouring NZLF, it is worth using a construction submersible vibrator, which allows you to achieve uniform contact of concrete with reinforcement. The formwork must be filled in one go.
Reference! The upper level of the resulting foundation must coincide with the marks marked on the formwork boards.
Waterproofing and insulation
A waterproofing device helps prevent the pillow from getting wet.
Recommended options:
- processing the tape with epoxy mastic,
- pasting on all sides with rolled materials (such as TechnoNIKOL or Bikrost)
- adding a special substance to concrete - a primer.
Due to the fact that the foundation (or at least most of it) is located above the surface of the earth, it must be insulated. The best option is to sheathe the outside of the structure with sheets of extruded polystyrene foam or penoplex.
Blind area
The purpose of the blind area is to protect the foundation from soil heaving and the effects of precipitation . Its width is chosen depending on the size of the cornice. For a small private house, the optimal parameters are 70 cm from the base with a slope of 8 cm.
To construct a blind area, soil is removed over the entire area of the base below the laying depth of 0.3 m. Formwork is constructed, a layer of sand and crushed stone 0.1 m thick is filled in. Tamping is carried out, heat and waterproofing is done. A reinforcing mesh is installed and the blind area is filled with cement.
Fill
Pouring concrete is an important procedure that must be done in one go, without creating cold joints. Otherwise, the required strength of the concrete strip will not be achieved, which calls into question the possibility of operating the foundation and the entire construction as a whole.
It is recommended to order delivery of ready-mixed concrete or arrange for its production on site so that no interruptions occur.
Filling is done from several points evenly distributed along the length of the tape. To do this, you need to make a movable tray attached to the outlet fitting of the mixer or your own concrete mixer.
The material is supplied so that it spreads evenly over adjacent areas of the formwork, resulting in the formation of a continuous monolithic concrete strip with the same qualities along its entire length. This will allow you to obtain maximum strength and resistance to stress.
After pouring, the tape is covered with plastic wrap and watered every 4 hours. This continues for 3 days, after which watering should be done every 8 hours for 7 days. Then the formwork is carefully removed and the tape is held until it reaches technological strength.
In total, aging takes 28 days.
Any attempts to shorten the curing period of the tape can lead to cracks or poor-quality crystallization of concrete, so curing must be taken as responsibly as possible.
Basic mistakes and recommendations for builders
In the process of installing a foundation , you may encounter the following common errors:
- poor-quality compaction of the pillow, due to which settlement of the building occurs;
- low-quality or insufficiently strong concrete;
- attempts to save on heat or waterproofing.
Attention! During installation, special attention should be paid to the sand-cement cushion. If such a layer is abandoned or done incorrectly, the foundation may simply burst. For formwork, take a board 40-50 mm thick, and for tying the frame - only knitting wire.
Waterproofing
Waterproofing ensures that the tape does not come into contact with rain or melt water. The entire surface should be insulated, horizontal sections are covered with a double layer of roofing material coated with bitumen mastic, and the side surfaces are insulated with either hot tar or bitumen mastic.
There are a lot of waterproofing products that are quite effective and efficient, but builders prefer to use time-tested and practice-tested materials.
Monolithic slab.
A non-buried monolithic slab is used as a foundation for the construction of small buildings on highly heaving and low-subsidence soils. It is more appropriate to use this foundation for light buildings that will not create much pressure on the slabs, or for stone structures, in which case the walls will increase the flexural rigidity of the slab. When planning to lay monolithic slabs with your own hands, you should start from the type of soil. A foundation laid on heaving soil will float (rise, fall) when climatic conditions change.
A non-buried slab foundation on a sand cushion.
To prevent this from happening, the slab must be as rigid as possible in bending, and also have good structural thickness and reinforcement.
- The most common type of non-buried foundation is one in which a layer of insulation (for example, 15 cm thick polystyrene foam) is laid between the slab and the ground. This allows you to reduce heat loss through the floors and eliminate ground failures associated with different temperatures under and around the house.
- When making this type of strip foundation with your own hands, it is worth remembering that the insulation must be laid on a layer of coarse sand, the thickness of which must be at least 30 cm.
Reinforcement
Spatial knitting of the reinforced frame according to the chosen pattern is carried out on a special stand. To create the frame, corrugated reinforcement of class A3 with a diameter of 12-14 mm is used. The rods are arranged longitudinally and are connected to each other with annealed wire 3-6 mm. Vertical reinforcement bars are installed every 40-60 cm along the frame. The reinforced frame can have either a square or round shape. The number of longitudinal rods is 4 or 6.
Sergey Yurievich
Construction of houses, extensions, terraces and verandas.
Ask a Question
The finished reinforcing frame is lowered into the formwork so that the reinforcement frame does not touch the walls of the formwork and the bottom of the trench. To do this, metal fungi are mounted on the gravel-sand bedding - metal structures that raise the reinforced frame 5-7 cm above ground level.
Technical parameters of materials
In the manufacture of columnar foundations, the properties of building materials and components, as well as the correctness of their use, are of no small importance.
Concrete strength table
Crushed stone (waste from quarry stone production, crushed and screened to the required fraction) must have a uniform structure, color and density. This applies to all types. It is allowed to use gravel - sea or river rounded pebbles.
The best quartz sand for concrete is washed sea or river sand.
Metal products - fittings, rolled metal, must not have traces of corrosion, distortion of geometric dimensions and other types of defects. Before use, they must undergo anti-corrosion treatment.
Adding a sand and gravel cushion
A pit is prepared for the future cushion - excavation in the form of a trench 1.5 times wider than the foundation strip and 10-15 cm deep. The bottom of the pit is lined with geotextiles, which prevent siltation of the cushion from groundwater. Backfilling is done in one of two ways:
- Mixed gravel and sand mixture. The gravel/sand proportion is 2/3 respectively. The thickness of the bedding is 20-30 cm.
- Layer by layer: the first layer is 20 cm of coarse sand, the second layer is 20 cm of fine crushed stone or gravel.
Other non-metallic materials can be used as bedding: blast furnace slag, expanded clay, etc.
Drainage
The drainage functions are performed by a layer of sand backfill. If necessary, a specialized drainage system is created, consisting of pipelines laid at the bottom of the trench and discharging water into a drainage well or discharging it into a nearby reservoir.
The need to create this system is determined by the climatic characteristics of the site, the abundance of precipitation in the region and other factors. Work on connecting and laying pipes is carried out at the stage of forming a layer of sand cushion.