Today we will talk about such a necessary room as a basement in a garage. For what purposes it can be used, everyone decides for themselves, and we will outline the main points and nuances of its construction. Having understood the information received, you will understand what the masters do. In addition, you will be able to ask intelligent questions regarding the design of the basement and the technology of its construction.
Cellar in the garage Source advicee.ru
Covering the cellar with your own hands - four proven methods
- What types of cellar ceilings are there?
- Concrete
- Made from reinforced concrete slabs
- Monolithic
- Using load-bearing beams
- Strengthening the floor slab in the garage above the cellar
- Wooden floor
- Insulation and waterproofing of floors
- Ventilation
- Conclusion
Typically, the cellar is installed below ground level and does not take up extra space on the land plot, and its covering must be done in accordance with building codes and regulations.
Therefore, regardless of the chosen construction technology, sufficient strength must be ensured and the required humidity and temperature in the storage facility must be maintained. In this article we will look at how to do this in compliance with all the rules.
Safety precautions when performing installation work
For each technological process of installing floors, mandatory safety rules have been drawn up:
- Finished monolithic slabs are installed using a truck crane. Safety depends on strict compliance with regulatory rules. Installation of floor slabs should be carried out using special metal hinges. Each employee taking part in the process must have personal protective equipment.
- When installing a reinforcement cage, the welding machine should be protected from accidental mechanical influences and precipitation. Movement on the frame is allowed only on organized flooring. When performing welding work, in order to prevent fire, remove all flammable objects.
- To fill the solution with the addition of cement and concrete, pumps and surface vibrators are used. All devices operating from the electrical network must be protected by grounding.
- When laying wooden floors, you need to carefully monitor fire safety. The presence of unauthorized persons in the installation area is prohibited.
By following basic safety rules during construction work, you can prevent possible accidents and protect yourself from injuries and injuries.
Getting ready to build a ceiling for the cellar - preparatory work
Storage for grown crops is often arranged in a garage. When planning to build a basement in the garage with your own hands, it is important to take into account all the nuances:
- make sure that there are no utilities below the soil level at the work site. This requirement is especially relevant in urban areas, where various highways may be located. If it is possible to go deeper into the soil up to three meters, you can proceed to the next task;
- carry out survey activities aimed at determining the depth of aquifers and assessing soil quality. Professional surveyors will carry out research and provide an official conclusion. In case of increased moisture saturation, drainage and reliable protection of walls and floors should be provided;
- develop the optimal layout of the basement, taking into account all the features. You should pay attention to the shape and size of the basement, which should correspond in size to the contour of the garage space. It is important to choose the right material, as well as the technology for building the foundation.
A traditional cellar is designed so that its entire room is located below ground level.
To ensure a comfortable microclimate, it is important to pay attention to the following points:
- ensuring reliable moisture insulation. Under normal humidity conditions, dampness will not develop;
- implementation of effective thermal insulation. One of the main tasks in this case is the correct insulation of the ceiling in the cellar;
- construction of a ventilation system. Thanks to air circulation, comfortable conditions will be maintained.
Having comprehensively solved the listed problems, you can arrange the ceiling of the cellar in the garage.
Basement ceiling insulation
The humidity and temperature indicators of the cellar completely depend on the correct insulation of the ceiling. Only favorable atmosphere and air can create the most comfortable conditions for storing vegetable products and preparations for the winter.
This is interesting: insulating the basement ceiling from the inside.
Various materials are used for thermal insulation. This could be mineral wool, polystyrene foam. A high level of insulation is provided by modern, but expensive polystyrene foam and polyurethane foam coatings. Such insulation has a number of advantages. Laying and installation are completely effortless. The materials practically do not increase the thickness of the surface of the walls and ceiling.
The thermal insulation device can be formed the old fashioned way. To do this, cement mortar is mixed with sawdust. The thickness of such insulation material for the ceiling should be 4 cm.
Each developer chooses what materials to use for insulation independently, based on his own capabilities.
Which cellar to choose for your garage?
First of all, you should evaluate the water saturation of the soil, especially in the spring, after the snow melts. Otherwise, you will have to bail out the water every year, and the basement fencing will not last long, not to mention the constant dampness inside the room. The decision to choose one design or another is best made after determining the groundwater level (GWL). To do this, at the end of summer you need to drill one hole at the site of the future pit. The bottom of the pit should be half a meter below the expected cellar floor level.
In May of the next season it will be clear whether there is water in the well, and if so, at what depth. If the bottom of the hole is dry, consider yourself lucky. Well, if groundwater does appear, you need to measure the depth of its location. And after that, focus on the possible depth of the basement, taking into account that the floor should be located at least half a meter above the ground water level.
Western European experience
If you type the phrase “garage heating” in the search and look at pictures on English-language sites, you will not find any wood-burning or oil-fired stoves in Western European garages. How do local motorists warm themselves:
- electric portable heaters;
- infrared hanging heaters;
- air heating units (heaters).
We have already discussed the first 2 options above. The third method is also far from new: water heated in the boiler passes through a radiator, blown by a powerful axial fan. Ideally, the unit is suspended from the ceiling and distributes hot air throughout the room.
The advantages of this option are compactness, heating speed and the possibility of air conditioning in the summer (cooled water is sent to the radiator instead of heated water).
Heater made from a car radiator
There is one downside - increased costs for equipment, because the coolant must be heated in the boiler and supplied through pipes to the heater. But if the garage is attached to a private house, then the problem is easily solved by connecting the radiator to the building’s water heating system.
Watch this video on YouTube
How to make a floor slab in a garage
How to fill a monolithic base above a basement in a garage:
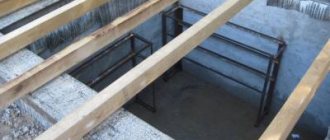
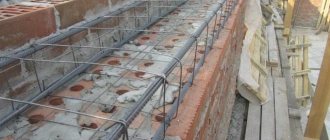
- According to the size of the basement, we make formwork from old boards or plywood. We fasten such formwork from below with vertical posts or from the side with horizontal rails or a channel, in steps of a meter, one and a half;
- the slab of such a floor should be 20 cm wider than the perimeter of the basement on each side;
- We seal the formwork joints so that the concrete sets securely and the laitance does not leak out.
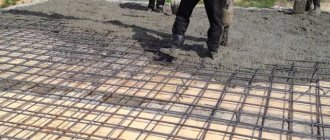
- We place the reinforcement cage on the laid formwork (reinforcement diameter 10-12 mm). Frame mesh pitch – 15 cm;
- All reinforcement connections must be tied with wire;
- along the perimeter of the hatch, you must immediately weld a frame from a corner (45x45 mm);
- for such an overlap it is more reliable to use concrete grade M500;
- concrete layer thickness – not less than 20 cm;
- When installing such a floor over a basement in a garage, when pouring concrete, it is necessary to pour the screed with vibration so that the mixture is distributed as evenly as possible and fills all the voids.
Important. Such a screed can be loaded only after the concrete has completely hardened - no earlier than after 20 days.
If you use ready-made concrete with anti-frost and strengthening additives, you can be confident in the reliability and strength of the floor slab.
Floor slab repair
Most often, deformation of floors occurs due to soil shrinkage. Therefore, it is necessary to determine the location of the soil subsidence and raise the slab using the technology of lifting and repairing reinforced concrete foundations.
Small cracks and chips in the slabs simply need to be cleaned and cemented. If the crack is large, then horizontal reinforcement is performed and a concrete screed is poured over it.
Waterproofing works: algorithm and materials
After the masonry is half completed, the excavation is cleaned and the external walls are waterproofed with a profiled PLANTER membrane, followed by filling the cavities with soil and layer-by-layer compaction. Then the laying continues until it is completely completed.
Dividing masonry work into two stages answers the question of how to build a cellar in a garage without unnecessary effort and risks. It allows waterproofing from slopes on low sections of walls, which is more accessible and safe.
From the outside, the top of the wall is insulated with 50 mm thick polystyrene foam plates, which protect it from freezing. After this, external waterproofing is carried out and the sinuses are finally filled with soil and compacted.
For the installation of the floor, a base is prepared from compacted crushed stone with a layer of 80 mm, and a profiled PLANTER membrane is laid on the surface of the masonry. To strengthen the floor, a reinforcing mesh is installed, and concrete is laid over it in a layer of 80 mm.
Complete waterproofing eliminates direct contact of the outer walls and floor of a buried structure with the ground, ensures their constant dry condition, and does not allow high air humidity in the storage facility.
Roman Neglyadov
Roman Neglyadov
Greetings, friend!
Today I decided to tell you how I made a cellar and laid out the floor in the garage. My garage, attached to the house, is not yet completely finished and decorated, but is already being actively used for various needs. Initially, there were no basements planned; the floor was earthen and awaiting the installation of some kind of flooring.
After living in my own house for several years (before that I lived in apartments all my life), I realized that I really needed a cellar. Where to build it? "In the garage!" – I decided and began to dig. Manually. With a shovel. The pit is 3x3x3 m. Can you imagine? Well, my father came to my rescue. But the process dragged on for a long time. So little by little, on weekends and in our free time, we managed to dig it up. It took all summer.
Cellar creation technology
Since ancient times, people have known that in order to enjoy home-made rolls all winter, eat vegetables and fruits lovingly stored in the fall, you need to take care in advance about the long-term preservation of the harvest.
Stocks will be able to wait for their happy hour and get to the dinner table only under conditions of a certain temperature, humidity and light conditions.
The technology for creating a cellar was developed many years ago and is quite feasible for a person who has decided to undertake construction work for the first time.
Introduction to construction requirements
As you understand, a cellar in a garage should not somehow interfere with the main purpose of the room and therefore you will have to look for ways to reduce this influence to zero. There are two main parameters that are simply impossible to ignore, otherwise the building will lose its value, like a garage and turn into a basement appendage. And these requirements: mechanical strength of the floor and absence of dampness.
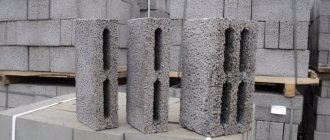
Possible technical characteristics of materials
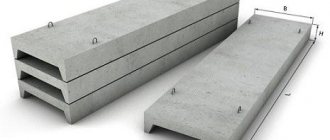
Various floor slabs
If you decide to make a basement while building a garage, then everything is simplified, but if you do this in an existing building, then in 90% of cases the floor will have to be changed to provide the proper conditions for mechanical load. That is, if a car weighing about one and a half tons or more (possibly with cargo in the trunk) drives onto the floor, then there will be a load of about 180-300 kg per square meter.
Therefore, reinforced concrete floor slabs are needed here, where modern standards according to GOST 26434-2015 allow up to 800 kg/m2 - this will be quite enough. But if, during the construction of a garage, reinforced concrete floors are laid on a strip foundation, then in an old building you will most likely have to dismantle the screed, dig a pit and expand the strip inward.
| Material | Strength, kg/cm 2 | Density, kg/m 3 | Water absorption,% |
| Expanded clay concrete* | 32-98 | 500-1400 | 20 |
| Foam concrete* | 32-66 | 450-900 | 23 |
| Aerated concrete* | 32-45 | 400-500 | 34 |
| Polymer concrete* | 14-29 | 400-500 | 19 |
| Gas silicate* | 20-35 | 300-600 | 60 |
| Ceramics* | 25-100 | 600-800 | 21 |
| Ordinary brick | 60-250 | 1000-2000 | 15 |
Table of strength, density and water absorption of building materials
*Explanation for the table. All materials marked with an asterisk refer to blocks.
Now let's talk about the walls. If this is a monolithic foundation strip, then you will have to perceive it according to the principle of “what we have is what we have,” unless you want to additionally line it with some blocks, bricks, or simply plaster it. In this case, it is necessary to take into account hygroscopicity, but if the mechanical load from the reinforced concrete floors and the car standing on them is also implied, then the parameters of strength and density will also have to be taken into account. I would like to note the advantage of building a garage from scratch, where the strip foundation can be poured not into a trench, but into formwork of the required width in the pit so that the box walls and ceilings fit on the strip.
Technical parameters of moisture-proof concrete
For residents of the northern regions of the country, when laying a foundation on their own, it is best to use concrete with reduced moisture permeability - it is better to order the solution at the nearest concrete unit and the required amount of the mixture will be delivered to you in a concrete mixer. This material is suitable both for the foundation strip, which can simultaneously serve as walls, and for the floor or ceiling of the cellar. With this approach to construction, you will save yourself from unnecessary hassle and save your time. If you think that moisture-proof concrete will cost more, do not rush to conclusions, because you will not have to additionally line the walls of the cellar.
Excavation
Before digging a hole, you need to determine at what depth the groundwater is located in this area and this is quite simple to do, and the result will be in 30-40 minutes. For this you will need a garden drill (the smaller the diameter, the better) and a tape measure to measure the depth. As close to the garage as possible, and if there is no screed there, then drill a hole inside the room to the water, or to the estimated height of the basement ceiling. If, for example, you drilled a hole 2 m and after 20-30 minutes no water appeared there, it means that its occurrence is deeper and this parameter is suitable for a pit. But if the water begins to rise, then wait until the static level is established (no more will arrive) and measure the distance from the mirror to the ground surface. There is no point in making a deeper cellar - the cost of waterproofing will be too high.
But the static level of groundwater does not mean that your basement will be the same depth - you still need to make a base for the floor, that is, a sand-crushed stone or sand-expanded clay cushion with a height of at least 5-10 cm plus a reinforced screed for the floor with a thickness of 7-10 cm. In addition, it is better to make the depth of the pit not at the level of the mirror, but 10-15 cm, or even better, 40-50 cm higher, so that there is no dirt there or from prolonged rains or melting snow the water level does not rise above the base underground Now subtract the sum of the resulting numbers from the surface-mirror distance and get the optimal possible depth of the cellar. If you are satisfied with these parameters, then you can start working.
Cushion, waterproofing, reinforcement
It is better to install the reinforcing mesh for the screed above the base of the screed
Since we are considering building a cellar in a garage with our own hands step by step, after digging a pit, the next step will be the floor - this order is most convenient for installing waterproofing. Here I want to draw the attention of readers to one nuance that is often missed when pouring screeds, that is, in most cases, the cut-off film is laid on top of the cushion under a layer of poured mortar, but... Firstly, to install beacons on the floor you need solid or spot cement tracks , but the possibilities for adhesion of cement-sand mortar with polyethylene are 0%. Secondly, the pillow will constantly get wet due to ground moisture getting into it. If you look at the prospects from this angle, then it is better to do this work in a different sequence.
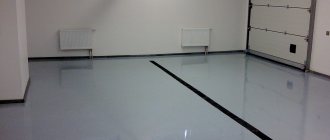
Floor construction
In order for the floor in the garage basement to be warm and dry, its installation must be carefully thought out at the planning stage.
When digging a pit, add approximately 35-40 centimeters to the required depth for the construction of a drainage cushion. The bottom of the finished pit must be well leveled and compacted, after which a layer of sand about 15 centimeters thick is poured.
Next, it is moistened with water and compacted well. Afterwards, a layer of crushed stone of similar thickness is poured.
This is necessary so that groundwater cannot get too close to the laid waterproofing and spoil it. In addition, thanks to the pillow, sedimentary water will quickly drain away, and liquid will not be retained in the basement.
After the crushed stone layer is well compacted, a waterproofing material is spread over it in several layers. Liquid bitumen is suitable as an alternative replacement.
Next, the reinforcement is laid and a screed approximately 30 centimeters thick is poured, after the final hardening of which it will be useful to treat it with a deep-penetrating waterproofing primer. The specified type of floor in the garage will be the most optimal.
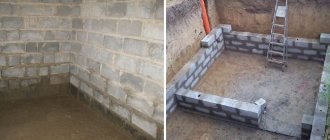
Cellar walls
The walls of any cellar must be built from solid materials. The use of plywood, chipboard and other lightweight building materials is unacceptable here. If the construction of a cellar with your own hands is carried out in an old garage, then certain difficulties will arise with laying the external waterproofing layer. But, in any case, you can handle everything with your own hands. Before installing the walls, you need to think about how the staircase will be located (a monolithic or regular ladder can be used).
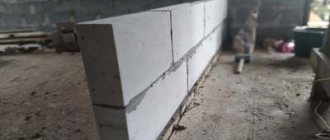
You can lay out the walls from foam blocks or use reinforced concrete.
Experts note that it is best to build walls from foam blocks or make them reinforced concrete.
If everything is extremely simple with foam blocks, then with concrete you will have to tinker:
- The walls in the cellar must be laid with reinforcement mesh. To create a mesh, thick cross-section rods or cuttings of old pipes are used (the first option is preferable). To assemble the reinforcing mesh with your own hands, you should use annealed wire. The use of welding is prohibited because when the temperature changes, the concrete may begin to crack due to this.
- After assembling the reinforcement network, it is the turn of the formwork. It can be made from ordinary boards: slabs, thick slats, and scraps of plywood will do. Formwork can be constructed using any standard technology, so problems usually do not arise at this stage.
- For walls, it is best to use concrete grade M400. If desired, you can add a little crushed stone to the solution you mix yourself. The finished solution is poured into the formwork in layers (each layer is 20-25 cm). In addition, it is imperative to bayonet the layers so that immediately after the construction of the cellar in the garage there is no need to make repairs. The wall is erected up to the future ceiling.
Upon completion of installation, the walls must be thoroughly dried. It is not recommended to use special devices for this - it is better to dry it naturally.
Carrying out work on building a cellar in the garage is a little easier if you use foam concrete blocks (they are relatively cheap, their installation and repair are very simple). It should be taken into account that when using them, you will not have to perform additional waterproofing of the walls (stairs can also be built from foam blocks).
We make good ventilation
A well-made hood (ventilation system) is the key to excellent food storage in the cellar under the garage. It is necessary to plan ventilation before the start of construction work. If this is not done, the amount of oxygen supplied may be too small, which will lead to the active spread of rot and mold.
There are three main types of ventilation:
Natural ventilation
This type of ventilation system is one of the simplest ways to ensure proper air circulation. It uses two pipes, one of which draws in fresh air from outside, the other - vice versa.
The first pipe is installed right under the ceiling. It passes through the entire building and extends above the roof to a height of about half a meter, thanks to which warm air freely leaves the room.
The second pipe, responsible for the flow of air inside, is installed at a height of approximately five centimeters above the floor level of the basement, and is led out onto the street, where it should be located at a height of at least 30 centimeters above ground level.
To prevent various pests from getting inside through the pipe, it must be covered with a dense mesh. To regulate the amount of incoming and outgoing air, small flaps or sliding caps can be made on the pipes.
The big disadvantage of such ventilation is that in winter the pipes can become clogged with a growing layer of frost, and it will begin to malfunction. High-quality thermal insulation and periodic cleaning will help solve this problem. To make pipe maintenance easier, the top part of the pipe can be made removable.