- October 21, 2018
- Country house
- Lyudmila Storozhenko
A cellar is an important building for your own home, especially if it is built outside the city. In this room you can store various products and preparations. The presence of a cellar allows for more efficient use of the interior space of the house, which is why many owners of cottages and summer houses decide to build a brick cellar with their own hands. This work requires certain theoretical knowledge. The process of building a cellar will be discussed further.
Varieties
When deciding to build a brick cellar with your own hands (the photo is presented below), it is worth considering several nuances of carrying out such work.
They are:
- This room must be functional, so it should be designed correctly.
- The internal space must be protected from various external influences. At the same time, it is necessary to equip high-quality ventilation inside.
There are a huge number of types of cellars in the world. They differ in configuration, purpose, material, etc. Cellars are:
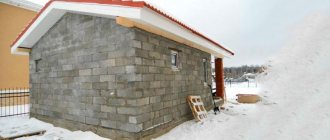
- Ground. The entire structure is on the surface. This is a small house with a roof in which supplies are stored. It can stand separately from the main building or be adjacent to it.
- Underground. Part or all of the cellar will be buried in the ground. It is easy to maintain the required temperature here, since the walls are underground. If such a structure is partially above the surface, it is often additionally sprinkled with soil. This makes it possible to maintain the same temperature inside at almost any time of the year.
Different materials are used for construction. However, one of the best options is brick. In this case, the structure will not only be functional, but also durable. Both above-ground and underground cellars are built from brick. The internal space may have different configurations. The easiest way is to make a square or rectangular cellar.
But there are also quite exotic options. For example, you can make a round brick cellar with your own hands. However, this option is best chosen by a professional. It will be difficult for a beginner to create a circular masonry. Serious mistakes can be made. As a result, the work will have to be redone. Rectangular and square designs are more popular.
Design principles
The problem of ensuring high mechanical strength of basements requires a special solution taking into account the snow load, which sometimes necessitates the construction of a strong vault. For centuries, so-called monastic cellars were made, where an arched vault was used, the strength of which is very high. In free-standing buildings, a domed vault can be installed for this purpose. Naturally, such structures are quite complex to manufacture and have a high cost. The most common option is the installation of slab and concrete. In addition, bulk structures are used.
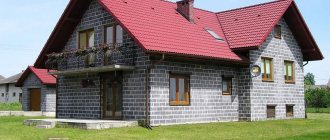
The strength characteristics of basement walls are ensured by the use of appropriate material. The most common construction of walls is concrete and brickwork. Building a basement or cellar made of brick has one important advantage: the brick walls of the cellar provide high thermal insulation, which allows you to maintain optimal temperature indoors at different times of the year. It should, however, be noted that in the presence of shallow groundwater and poor flood conditions, preference should be given to concrete, which provides better protection from ground melt water.
Which brick to choose? If you are building a subfloor, you should remember that a cellar made of sand-lime brick is unacceptable, since sand-lime brick has low resistance to moisture. The most successful option is ceramic material, but ordinary red baked brick is also quite suitable. It is best to use solid material.
Choosing a location on the site
By looking at photos of brick cellars in the ground or on the surface of the site, you can choose the optimal configuration of the building. Regardless of whether the storage facility is underground or surface, you need to choose the right location for its location on the site.
The cellar can be located next to the main building, inside the building, or separately on the site. To make the right decision, you need to consider a number of factors.
First of all, the size of the future building. The storage dimensions must be selected in accordance with the needs of the specific family living in the house. You need to figure out what is supposed to be stored in the cellar, in what quantities. Based on this, its size is planned.
You also need to pay attention to the terrain of the area. For example, there may be an earthen mound on the territory. You can arrange storage directly in it. This will significantly reduce the amount of excavation work.
During the construction planning process, the type of soil on the site must be taken into account. This factor influences the choice of the type of slopes when digging a hole. Also, drainage properties depend on the type of soil. The depth of groundwater is an important factor when choosing a location on a site for construction. The lower boundary of the pit should be 50 cm higher than the possible level of water rise in the area. If it is very high, the cellar can only be above ground.
It is most convenient to make a cellar directly in the house. You don’t have to go outside to grab a jar of rolled cucumbers or salad in winter. Part of the foundation is allocated for such a building. It is more convenient to build such a cellar during the construction of the house itself. Otherwise, you will have to make a hole in the floor by hand.
It is convenient to build a brick cellar with your own hands in the garage. This is especially beneficial if this extension is located next to the house, and not separated from it. A cellar in a garage or in a residential building does not take up additional space on the site, which is especially important if there is limited space.
If the area adjacent to the house is large, you can build a separate surface-type cellar or partially bury it in the soil. If site space is limited, it is better to build the storage completely underground. There will be space above it that can be allocated for other household needs.
It is better to build a cellar on the elevated side of the site. This way, the likelihood of groundwater flooding will be minimized.
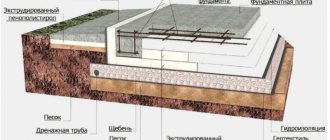
Waterproofing and thermal insulation of a brick cellar
External waterproofing of walls must be done, regardless of the level of groundwater. After rain or snow melts, the structure is exposed to moisture. Perform multi-layer waterproofing in the following sequence:
- Under the first row of bricks we glue a strip of roofing material without powder onto bitumen mastic.
- We plaster the external walls of the room with plaster.
- If you do not plaster, then you need to impregnate the walls with water-repellent impregnation, and then lay one or two layers of roofing material.
- The hatch should also be made airtight so that food does not absorb gasoline and other odors.
If in the cellar - a separate building - the temperature drops to sub-zero in winter, it is necessary to insulate the ceiling. It will also create an appropriate microclimate in the building under the house and protect food from elevated temperatures.
There are many materials for thermal insulation. Their choice depends on the climate of the area in which the summer cottage is located. Lay a layer of expanded clay or fill it with earth, insulate your cellar with mineral wool or fiberglass - the decision is made individually. If the soil of a summer cottage freezes deeply during a harsh winter, it is advisable to insulate the outer surfaces of the walls of the structure (or internal ones), for example, with polystyrene slabs. They can be glued to bitumen mastic and reinforced with dowels. Having completed the main work, build a comfortable staircase and arrange the entrance to the room. It can, for example, be tiled or covered with antique stone. In a cellar built using a hill, the entrance is usually from the side. While pouring the floor, you can mark the steps of the future staircase, make and install wooden formwork to the width of the entrance, and after completing the ceiling, fill the steps, starting from the bottom, with concrete. After the concrete has dried, remove the formwork. A DIY concrete storage staircase covered with tiles will be aesthetically pleasing.
Tools and materials
How to build a brick cellar with your own hands? First you need to create a drawing of the future building. The plan indicates all dimensions and configuration of the internal space. It is recommended to immediately think about where shelves, ventilation, electrical communications, etc. will be located.
Next, you need to purchase or rent the necessary tools. The quantity of building materials is purchased in accordance with a previously developed plan.
Considering the step-by-step construction of a brick cellar with your own hands, it is worth noting that several required tools will be useful during the work process. These include:
- A set of hand tools (nails, hammer, screwdrivers of different sizes, tape measure, screws or self-tapping screws).
- Screwdriver or electric drill.
- Chainsaw.
- Trowel for laying mortar.
- Building level.
- Square.
- Shovels.
- A metal trough in which the cement mortar will be mixed (if prepared manually).
- Concrete mixer (for automatic concrete production).
- Welding machine for connecting reinforced floors.
Having prepared the necessary tools, you need to estimate how much building materials will be required for construction. First of all, calculate the amount of brick (in accordance with the dimensions and shape of the building). Red brick is best suited for a cellar.
Next, you need to purchase cement in accordance with the calculated number of brick blocks. Sand, crushed stone, and fatty clay will be added to it. You can purchase all the components separately and mix them in the required proportions. But it’s easier to buy a ready-made solution, in which all the proportions have been calculated by the manufacturer.
You will also need boards, asbestos pipes (for ventilation), metal fittings and channels.
Choosing a brick type
Sand-lime brick for building a cellar?
Most often, a cellar is built from red brick . This brick is wear-resistant and has good sound insulation. It has increased resistance to almost all climatic influences. It is frost-resistant and durable. Such bricks also contribute to denser masonry and are perfectly held together with cement mortar.
However, red brick for a cellar, the price per piece of which ranges from 30 to 46 rubles per piece, is a rather expensive building material.
From the point of view of economy, silicate brick is much more preferable. It is also made from environmentally friendly sand and lime. It has excellent soundproofing properties and a wide range of colors. A silicate brick cellar will have increased strength and frost tolerance. The rich experience of working with it has been going on for several centuries, and it has proven itself excellent in the construction of lightweight one- and two-story houses with a shallow surface foundation. However, sand-lime brick is absolutely unstable in environments containing water and high temperatures. Thus, it is absolutely not suitable for building cellars in soil with high groundwater levels.
When choosing the type of brick, you should rely on the above information. When purchasing it, it is also worth remembering that sand-lime brick is lighter in weight than red brick - this fact will allow you to correctly calculate the volume of material transported at a time and the load-carrying capacity of the machine.
Digging a pit
Considering the step-by-step construction of a brick cellar with your own hands, it is worth starting with a description of the excavation work. You need to dig a pit at the location chosen on the site. If the dimensions of the site allow, it is better to use special equipment. It is much faster and easier to dig a pit using an excavator.
If this is not possible, the hole is dug manually. This is especially true for building a cellar under a house or other outbuilding. In this case, when creating a brick cellar in the ground, you will first need to use a jackhammer. This will create a depression in the existing foundation.
You should prepare for the fact that digging a pit by hand will take a lot of effort and time. But the result is worth it. The depth of the pit should be greater than the expected height of the cellar, since the floor and foundation will be created in it. According to reviews, digging a pit for a small cellar takes at least a week of continuous physical labor.
Therefore, in order to facilitate the process of creating a pit, it is recommended to hire workers. They will do all the necessary work quickly. They may have to pay for their work, but it's worth it. This is the only acceptable option if using an excavator is not possible.
It is worth noting that the walls of the pit must be perpendicular to the ground. The floor will need to be compacted well. After this, you can move on to the next stage.
Features of arranging a brick plinth
Before starting the construction of brick walls of the basement, it is necessary to take into account some points when planning:
- Brickwork must be done on a layer of waterproofing above the strip foundation - this will protect the material from capillary moisture. You can use roofing felt in two layers for protection or its analogues.
- The brick is laid flat so that each subsequent rad overlaps the seams of the row below it. Moreover, using a level, horizontal evenness is monitored in rows.
Whatever the walls are next, the brick base will differ from them in thickness. Moreover, there are design features of the location of the base that affect the installation of ebb and flow for water drainage and protection from moisture.
The base can be:
- Wider than the thickness of the building, protruding as a step beyond its limits;
- in a single line, flush with the wall;
- The sinking appearance is significantly less than the thickness of the wall.
Foundation
Even if an above-ground storage facility is planned, excavation work is still required. Considering the technology of how to build a brick cellar with your own hands, it is worth noting that the building will in any case stand on a foundation. Otherwise, it will be short-lived and its operation will be unsafe.
For the foundation you will need to create a hole about 70 cm deep. If the cellar is underground, approximately the same height of the internal space in the room is allocated for the construction of the foundation.
First, the bottom of the pit must be carefully leveled with a shovel. There should be no crumbling earth at the joints between the walls and the floor. In order for moisture to be removed from the cellar well, a layer of crushed stone 10 cm thick must be poured onto the bottom of the pit. It is carefully compacted. Pour another 10 cm of fine gravel chips or clean, sifted sand on top. This layer also needs to be compacted well.
To build a brick cellar, you need to create a high-quality waterproofing layer. The entire floor is covered with film. In places where the strips will be connected, they must be overlapped at a distance of at least 15 cm. The waterproofing must extend onto the walls.
If you are planning to make a small cellar in an area where the soil is always dry and groundwater is far from the surface, you can prepare a solution for pouring a foundation from rich clay. It is simply mixed with water. You should get a thick, homogeneous mass. It is poured onto the prepared layer of waterproofing, leveled and left to dry. This option is acceptable if there are also no rodents on the site.
Ventilation equipment for brick vegetable storage
For ventilation of the basement, two plastic (or asbestos-cement) pipes are used. The first pipe is led out of the cellar to the street, starting almost at the very ceiling. The pipe rises a short distance above the ground (up to a meter). Its purpose is to remove moist air from the cellar.
The second pipeline starts almost at the very base of the floor and exits on the street almost at the edge of the ground. Its purpose is to supply fresh air to the underground room. Pipe outlets on the street are protected from rain, insects and dust by caps and nets. To protect against frost, the outlets should be wrapped in felt covering in winter.
Concrete base
How to lay out a brick cellar with your own hands? First you need to make the right foundation. Some owners save money by filling the floor with clay. However, a concrete base will be much more durable and stronger. Therefore, you should initially give preference to this option.
To prepare the solution, you will need to buy cement. It is better to purchase ready-made dry formulations. They include not only cement, sand, but also additional reinforcement and plasticizers. These components make working with concrete easier and make it more resistant to various adverse conditions.
If you want to save money, you can prepare a special solution yourself. To do this, you need to mix dry concrete with clean, sifted sand or crushed stone. You will need one part cement and five parts of the selected filler. The packaging of the material contains the manufacturer's instructions. You need to rely on it when preparing cement. It is best to use a concrete mixer.
The reinforcement needs to be laid down. After this, the bottom is filled with cement mortar about 15-20 cm thick. Next, the concrete should dry well. The floor is covered with film. If necessary, it is periodically watered with water. This avoids cracking of the top layer of the screed. It takes about 3-4 weeks to dry. It will be possible to walk on the surface of the base within 7 days. However, further construction can begin no earlier than in a month.
Such a base will serve as a subfloor and serve as a foundation. This is a mandatory requirement if you want to line the cellar with bricks. Subsequently, it will be possible to make a finishing floor.
Monolithic concrete basement, cellar, shelter, shelter, storage
A dry monolithic concrete basement begins with the possibility of producing waterproof concrete.
How to get waterproof concrete . It’s easy to get waterproof concrete, for example, using the additive Dehydrol Lux brand 10-2 “Liquid waterproofing hyperconcentrate”.
The additive has an economical dosage. Unlike powder additives, it is easily and accurately (without scales) measured by volume and quickly averaged in the concrete mixture, ensuring its homogeneity and waterproofness of the concrete throughout the entire mass.
The dosage of the additive is usually 4 liters per 1 m 3 of concrete mixture.
If necessary, you can select the dosage to match the required water resistance of concrete (with equal workability):
In addition, Dehydrol Lux grade 10-2 additionally provides an increase in the strength of concrete up to 30%, and also accelerates the rate of strength gain (at 20 ° C, the grade strength of concrete is achieved on the 7th day).
The initial concrete mixture can be used either purchased or home-made.
General requirements for the initial concrete mixture . In general, good results are obtained when using a concrete mixture for concrete of grade M300 (class B22.5) and higher. Optimal workability of concrete mixture grade P1-P2.
With increased requirements for the initial concrete mixture . The effectiveness of the additive increases when used in conjunction with additive-free cements. The dosage of cement must be at least 450 kg per 1 m 3 of concrete mixture.
The filler used should not weaken the protective properties and durability of the concrete being produced. Crushed stone must comply with the requirements of GOST 8267-93 with the following clarifications:
It is not allowed to use crushed screenings as coarse or fine aggregate.
Sand must comply with the requirements of GOST 8736-2014 with the following clarifications:
- It is not allowed to use crushing screenings and sands from carbonate rocks, as well as sands containing clay particles and carbonate rocks in an amount of more than 1%;
- At particularly critical sites, it is advisable to use quartz sand.
Mixing water must comply with the requirements of GOST 23732-2011. The water-cement ratio should not exceed 0.4 (i.e. water is no more than 40% by weight of cement).
The use of any additives in concrete, with the exception of inert micro-aggregates and those produced by the company (Dehydrol and Betonopra), must be agreed upon in advance.
Approximate recipe for waterproof concrete:
When making a concrete mixture yourself, at least in the first (trial) operation, it is recommended to first pour water into the concrete mixer, then the additive, and then gradually add cement, sand and crushed stone in the required proportions until the required plasticity. After 5 minutes of mixing, the concrete mixture for hydraulic concrete is ready.
Preparation for work . It is advisable to carry out work on the construction of a basement (in-ground garage, cellar) in the summer, when the likelihood of groundwater appearing in the pit being prepared is minimal. The size of the pit for the basement is strictly individual, depending on your desires and capabilities.
The general technology for the construction and waterproofing of a monolithic basement or cellar includes the following operations:
- Preparing a pit for a basement
- Leveling the bottom of the pit and compacting it, for example, by pouring water.
- Installation of gravel backfill.
- Pouring a concrete foundation slab (floor).
- Pouring concrete walls.
- Waterproofing the junction of the bottom with the walls and technological joints of concreting on the walls and bottom.
Many people neglect such operations as soil compaction (for example, tamping, soaking (spilling with water), vibration compaction). And in vain. This will help to avoid excessive subsidence of the soil after loading and the appearance of deformation cracks in the structure being built in the future.
Preparation for concreting . Before pouring a concrete mixture with an additive, it is necessary to carry out preparation for concreting:
- Strengthen the reinforcing mesh.
- Install the formwork.
- Remove all debris, dust, dirt and foreign objects from the substrate.
- Immediately before concreting, it is recommended to moisten the substrate, including the reinforcement.
- You can additionally lay a polymer film on a highly absorbent substrate.
The minimum thickness of walls and floors must be at least 100 mm. Reinforcement of walls and floors is carried out in the usual way and is not discussed separately here. The depth of reinforcement from the concrete surface is at least 10 mm.
Concreting . The concrete mixture with the additive is mixed for at least 5 minutes, after which it is poured into the formwork using any method (inclined flow, forced feeding using a concrete syringe machine or manually using wheelbarrows).
After pouring, the concrete mixture must be compacted using vibrators.
Concreting should be planned in such a way as to reduce the number of cold joints, at least on the floor and walls. It is optimal to first perform concreting of the floor (base slab) in one step. And then (after 4-7 days, start concreting the walls). The walls should be concreted in layers: the height of each layer is approximately 0.9-1.2 mm.
You can start stripping the formwork one day after finishing concreting (at a temperature not lower than plus 20°C). During the first 3-4 days, the concrete should be periodically moistened, keeping it moist (the concrete should be dark with moisture).
Waterproofing of joints, including “cold” concreting joints . Before the concrete gains excessive strength, the formed joints, including the floor-wall joint and “cold” joints, should be opened in the form of a groove with a cross-section of 30x30 mm using a grinder or grinder.
The resulting groove (groove) should be hermetically filled with repair and waterproofing material Dehydrol Lux grade 5 “Repair and penetrating waterproofing”. The consumption of Dehydrol Lux grade 5 is 1.7 kg per 1 dm 3 (i.e. per 1 l) groove or 1.53 kg per linear meter of grooves with a cross section of 30x30 mm.
The surface of Dehydrol should be kept moist for at least 2 days by covering it with a polymer film or using periodic moistening.
Final waterproofing of concrete . To increase the reliability of waterproofing and eliminate surface porosity, the concrete surface, after removing residual lubricant from the formwork and cement laitance (for example, with metal brushes) and moistening, is treated with a brush or sprayer with Dehydrol Lux grade 3 “Penetrating waterproofing and cementation of voids.” The average consumption of Dehydrol Lux grade 3 is 1.2 kg per 1 m2.
Then the concrete walls and bottom should be kept damp for three days, for example, using a regular garden sprayer. After seven days, you can begin to inhabit the basement.
Typical waterproofing scheme for a waterproof monolithic basement constructed by concreting:
Walls
Let's continue to consider how to lay out a brick cellar with your own hands.
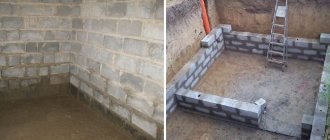
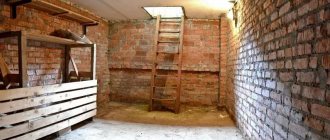
When the foundation has dried well, you can proceed to subsequent steps. It is necessary to thoroughly compact the earthen walls of the room. Plant roots should not stick out from them. All irregularities must be removed. Protruding mounds are cut off with a shovel. Using a trowel, you can qualitatively level the surface of the walls. All crumbled earth must be collected and removed from the cellar. The foundation must be clean.
Red brick is used to decorate the walls. This is an environmentally friendly material. It has high thermal insulation qualities. The material helps maintain an optimal microclimate inside the building. Fresh vegetables and fruits, homemade preparations will retain their quality for a much longer time.
When considering how to make a brick cellar with your own hands, it should be noted that the walls are erected using simple checkerboard masonry. If the first row started with a whole brick, the second will start with half of it.
The optimal width of the masonry in this case is one and a half bricks. This will be enough to create strong walls. If the building is completely underground, you can lay it in one brick, for which you need to prepare a mortar. To do this, sand and M400 cement are mixed in a 4:1 ratio.
You must first prepare a semi-liquid solution from oily clay. It will be needed to fill the space between the brickwork and the earth wall. Builders call this layer a “clay castle.” It is necessary to additionally protect the wall from excess moisture. The clay will be laid in gradually as the brickwork is built.
At this stage you need to create ventilation. Before starting to create the masonry, you need to install one pipe at a level of 15 cm from the floor, and the second – 15 cm from the ceiling on the opposite side. Air will enter the storage through the lower pipe, and out through the upper pipe.
Supply and exhaust ventilation in the cellar
The ventilation system is designed immediately, together with the cellar structure. Without a supply of fresh air, staying in the cellar will be dangerous to human life. When stored, vegetables and plants emit carbon dioxide, which accumulates in the cellar without proper ventilation, making it unsuitable for use. Also, without proper ventilation of the cellar, moisture will accumulate in the air, and condensation will settle on the walls and ceiling.
In order not to encounter all these troubles when using a brick cellar, it is necessary to install a ventilation system. The simplest option is a conventional supply and exhaust system.
Supply and exhaust ventilation system: 1 - supply pipe, 2 - exhaust pipe.
To organize it you will need two plastic pipes. Unlike metal pipes, polyethylene pipes do not rust or collapse under the influence of moisture and temperature changes.
The outlet of the supply pipe should be placed above the cellar floor at a height of no more than half a meter. Fresh air will flow into the cellar through this pipe. An exhaust pipe is used to remove carbon dioxide. Its outlet is located under the ceiling, in the corner of the cellar opposite from the supply pipe. The pipes are brought to the surface through the ceiling.
Control valves are installed on top of the pipes and special caps are made to prevent moisture from entering. During severe frosts, pipes should be covered with felt. The height of their rise above the surface is about a meter.
Masonry
Laying a brick cellar with your own hands is carried out using a certain technology. Each row starts from a corner or from the storage door. You need to scoop up some of the solution with a trowel. It is applied to a clean concrete floor surface. A brick is placed on top and tapped on top with the handle of a trowel. This makes it possible to fit it close to the corner. Next, the procedure is repeated with another brick.
The masonry must be level. This must be constantly monitored using a plumb line. Also the layer should be dense. When the entire row is laid out, clay mortar is poured between it and the wall. It should not fall on the bricks from above. If the gap is large, broken building material is added to the clay.
The next row starts on the same side as the first. But in this case, you need to lay half the brick first. Thanks to the checkerboard sequence, the masonry will be strong and durable. Each row is checked using a building level. If necessary, the bricks are adjusted with a trowel. If done correctly, the top edge of each row will be perfectly straight.
Construction technology of a cellar with embankment
If soil conditions do not allow you to build a buried or semi-buried cellar, you can build an above-ground cellar with a bund and even give it a decorative function by planting ornamental plants on top or arranging an alpine slide.
At the base of the cellar, sand and crushed stone preparation is arranged, on which a waterproofing layer of crumpled clay is placed. The floor is laid out of baked bricks on an edge, which is called a Christmas tree. The consumption of bricks with this method of laying is 64 bricks per 1 m2 of floor.
The walls are erected from wood (logs or thick slabs) with hewn edges. The cracks are caulked with moss to protect against drafts. In addition, moss has the ability to absorb unpleasant odors. For the purpose of waterproofing from ground and capillary moisture, external walls are coated with hot bitumen or bitumen mastic in two steps, then covered with sheets of roofing material. The ceiling of the cellar is made of boards or hewn slabs, covered on top with a layer of about 5 cm of clay straw and sheets of roofing material, or, in extreme cases, with plastic film. Then the entire cellar is covered with earth, which is either sown with grass or covered with turf.
Ground cellar with embankment: 1 - sand and crushed stone preparation; 2 - embankment; 3 - clay-straw; 4 — walls made of wood (slab); 5 - brick floor; 6 - waterproofing layer; 7 - clay castle.
Ventilation is carried out through a ventilation pipe with two channels. The entrance to the cellar is equipped with a double door. Lattice bins and shelves are installed inside the cellar.
Builders' recommendations
If the cellar is large, several concrete columns can be provided to support the ceiling. In a small and medium-sized cellar this is not required. The columns are laid out in three bricks in the center of the vault. Their height corresponds to the walls.
When building a brick cellar with your own hands, you should not rush. It is necessary to allow the solution to dry. This will allow the masonry to firmly grasp and settle. Only in this case will it be durable. Properly built walls will last for several decades. In this case, there is no need to even carry out major repairs. When the walls and columns are completely dry, you can begin subsequent work.
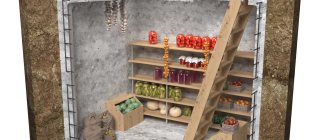
Arrangement of a finished cellar
After completing the construction of a brick cellar, you should start working on its interior decoration and arrangement. Brick walls can be whitewashed with lime from the inside.
Provide in advance the required number of shelves and racks, a compartment for potatoes and root vegetables. Provide electricity and lighting if required. The outside of the building can be decorated in any style, for example, as a medieval building.
A brick cellar built with your own hands and in accordance with all the rules will serve you for many years, without requiring repairs or additional investments.
Completion of construction
When completing the construction of a brick cellar with your own hands, you need to create a ceiling. This is the ceiling for the cellar and the floor in the room above it. For its construction, strong beams made of wood or metal are used. A U-shaped profile or channels will do.
First, the top row of masonry is compacted. To do this, reinforcement is laid on top of the bricks and poured with concrete. Next, when the solution is completely dry, the channels are laid. Each of them is located at a distance of 50 cm from each other. They should be directed perpendicular to the door. The entrance opening is reinforced with reinforcement.
Next, reinforcement is placed perpendicular to the channels at a distance of 20 cm from each other. Using welding, all structural elements are connected to each other. Then the formwork is made and the concrete floor is poured. The top can be insulated after the cement has dried. Next, finishing work is carried out inside the cellar. Shelves are created, doors are installed, electricity is installed.
Knowing how to create a brick cellar with your own hands, you can build a storage facility that meets all building codes.
Formation of the ceiling of the cellar
If the cellar is located in a residential building, then its floor will simultaneously serve as the ceiling of the basement. If the structure for storing vegetables is a separate building, it is necessary to erect a ceiling vault in the following sequence:
- The top row of walls and columns is reinforced with reinforcement and poured with concrete. Stop until the solution dries completely.
- Metal channels are laid on top in increments of 0.5 meters so that they are perpendicular to the doorway, which is also reinforced with reinforcement. Instead of channels, you can use wooden beams or U-shaped metal pipes.
- The first layer of reinforcing rod with a diameter of 1 cm should be placed on the channels in increments of no less than 20 cm. The reinforcement is placed across the channels, forming a grid with cells. The structure is hot welded. Then, in the same perpendicular way, another layer of reinforcement must be laid and welded (or tied together with a rod).
- We cut an opening for a vertical exit (if there is one), for a hatch and two ventilation pipes.
- Then we construct a removable internal formwork-bottom for concrete pouring of the ceiling from chipboard sheets and boards. They will form the lower surface under the reinforcement frame.
- We support it with strong wooden supports. They must support the weight of the concrete with which you will pour the metal frame.
- External strip formwork is made of wooden boards, laid around the perimeter of the metal frame, and the opening of the door and hatch is also enclosed. The height of the formwork should be 10 cm higher than the edge of the metal mesh.
- Then we fill the metal frame with concrete mortar.
- The solution should completely cover the metal mesh. The thickness of the ceiling is about 20 cm.
- Let the ceiling stand for several days until the concrete pouring has completely hardened.
- We remove the supports that supported the bottom, chipboard sheets and formwork.
For some summer residents, such a monolithic concrete ceiling may seem difficult to manufacture. There is another, simpler option. When planning a vegetable storage facility, first select the size and number of ready-made reinforced concrete slabs that can be laid on the walls and columns as a ceiling. Design the dimensions of the entire room for these slabs.
After the walls are erected, all that remains is to lay monolithic concrete structures on the walls and columns, and seal the cracks with concrete or sealant. If you don’t want a concrete floor, you can lay beams made of modern material - composite wood, which is not susceptible to rotting. Equip the top with a brick cellar and a traditional roof, cover it with a roof made of tiles or ondulin.