Laying the floor yourself
This may seem like a difficult point only at first glance, but in reality, we have only three base options for a foam block structure:
Moreover, with all their cardinal differences, in our case they simply slightly change the order of work and how to make floors in a house from foam blocks at the time of installation of the sheathing. However, let's talk about everything in order.
Selection of base and materials
Let's decide on the choice of foundation, which we will take as an example, and since it is for the foam block version of the structure that the tape and monolithic base is most often used, we will talk about the lathing in turn, taking into account the design features of each foundation.
Important! Let us immediately note that we will use wood in the construction of the floor, and the conversation will be strictly about the draft version.
The first step we will have is to select the material for the draft, and since we have agreed on wood, we will need:
Depending on the type of base, a screed may be required, but we'll talk about that later. Now let's start with the strip foundation for a foam block house.
Reinforced concrete floor
Covering the basement floor of a foam block house with hollow core slabs using technology.
This strong and rigid base is installed using technology.
During installation, you must comply with some mandatory requirements:
- The first and most important condition is that the slabs for covering the basement floor in a house made of foam blocks must be lightweight in order to avoid destruction of the cellular concrete under a load exceeding the maximum load.
- When visually inspecting the slabs, you must ensure that there are no cracks, breaks or large chips on the surface, especially at the ends where the slab will rest on the foundation.
- The distance between the slab and the support must be at least 150 mm.
- Installation is carried out using cement mortar.
- The seams between the plates are stamped with the same mortar to ensure adhesion to each other and level the surface.
- When installing slabs around the perimeter of the room, a gap is left for subsequent installation of insulation.
- If the surface of the slabs has flaws that do not allow them to be leveled to fit the floor, then it is recommended to apply a cement screed over the entire area of the room with a thickness of 30 to 50 mm.
Tape base
A foam block structure does not always require a strong foundation, so a strip foundation is ideal for construction technology.
Let's take a step-by-step look at how to make a floor in a house from foam blocks, taking into account the strip base:
Let's make a small digression here.
To attach beams to concrete walls, we need:
Now that we have attached the perimeter beams, we can begin the sheathing.
Advice! Depending on the future floor covering, we determine the level of the first floor covering, that is, if we still have insulation and laminitis, we must reach the zero level at which the door will open normally.
Next, we begin to install the beam on the shelves, and we try to ensure that it lies perpendicular to the short side of the room, if we have a rectangular room. That is, we place them by width, not length. (see also the article Is it necessary to insulate a house made of foam blocks: expert advice)
We keep the step at 60 centimeters, and fasten the beams with wood screws. Naturally we put them on the edge.
Advice! All wood, even though it is dry and we have waterproofing, must be treated several times with an antiseptic to prevent the occurrence of mold and mildew and rot in the future.
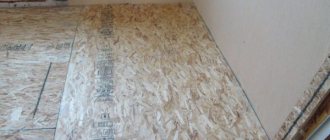
You can cover the beams with either a floorboard or plywood. The main thing is that we get a fairly flat surface on which we place a vapor barrier film and then a coating of our choice. That is, the further instructions refer to another work.
Advice! If the area of the rooms is large, it will be necessary to arrange additional supports for the timber. This can be done using bricks or foam block remains. You will just need to make one more marking, at the very beginning of the work, dig holes for supports, and pour concrete into them. After a few days, use bricks or blocks to bring the support to the required height, waterproof it and lay the timber on the surface. In this way, sagging can be avoided.
Monolith
With a monolithic foundation, installing a floor in a house made of foam blocks is a much simpler process. Here we need to bring the draft to the desired level and make it even.
By the way, if the monolith itself is already flat, then for many specialists this is the floor. And indeed, all we have to do is cover it with waterproofing, and we can already install the covering, for example, laying tiles, and even laminate.
We will consider the option in which the monolith is flat, and we will proceed immediately to the sheathing:
When installing beams we can use two simple methods:
Not to say that this changes the price greatly, however, from the point of view of speed of work, the second option is, of course, more preferable.
Next, we lay insulation, mineral wool, and cover everything with plywood or floorboard. (see also the article Insulating a foam block house - how to keep warm and not spend all the money)
Interesting option
There is another interesting option for constructing a screed in the case of a strip foundation, when instead of a cushion of sand and expanded clay we use a floor made of foam blocks. The material has excellent thermal insulation properties, so the rough version is warm and durable.
Benefits of additional insulation
Cellular concrete (foam block) consists of foam concentrate. Developed and released in 1975 by German scientists. Then it was produced from protein components. What are the advantages of this invention and why is it so popular today? As many studies show, foam concrete is endowed with good vapor permeability. Its properties are very similar to wood.
Simply put, walls made of this material are able to breathe, which prevents the formation of fungus or mold on them. Colonies of microorganisms that contribute to these phenomena cannot live on their surface. Other advantages can be highlighted in the following list:
- Unaffected by weather and temperature phenomena. The foam block tolerates heat and cold equally well.
- It retains heat well in winter, coolness and high humidity in summer.
- In addition to retaining heat, it also holds out outside noise from the street well.
- It is light in weight, so the structure can be constructed on an inexpensive basis of piles.
- The material is considered environmentally friendly - it does not emit harmful fumes and substances.
- Easy to handle when laying.
- Inexpensive in cost.
Advantages and disadvantages of aerated concrete floors in the house
In a house made of aerated concrete, you can make a base for finishing coating using different technologies. But let's start the conversation with the one that involves constructing a floor from aerated concrete blocks. For this purpose, thermal insulation panels AEROC Energy (format 600*200*100 mm) or BONOLIT D200 (format 600*250*100 mm) can be used. Their length is standard and very convenient for installation on joists with a pitch of 600 mm.
The height of the block - also known as the width when it lies flat - differs slightly (200 or 250 mm). The thickness can be selected according to calculation: the minimum size is 100 mm, but if necessary, thicker blocks can be used - 150 or 200 mm. The weight of the 100-thick panel is only 3.09 kg. Physical and mechanical characteristics make the material one of the best for floor insulation.
Let's compare the properties of aerated concrete panels with extruded polystyrene foam slabs, which are most often used for floor insulation:
Note: Floors can be installed either on joists or on a cement screed poured over a heat-insulating layer. If you use ceramic tiles (or porcelain tiles) with proper waterproofing under the adhesive layer as a finishing coating, even water spilled on the floor will not be able to penetrate the floor cake. And its heat transfer in this case will be most effective.
The design of the floor depends on the foundation
The structuring of the floor pie of the first floor depends on the type of foundation of the house, and on the floors - on the design of the floor. The chosen finishing material also matters, but the main thing is a strong and well-waterproofed base.
Plate
The best conditions for constructing a floor are created when the house is built on a slab foundation, since in this case there is a ready-made base for laying insulating blocks. That is, in this case there is no need to make a subfloor in a house made of aerated concrete. A special underfloor heating layer is laid on top of the thermal insulation, heating elements are installed, and a screed is poured.
Insulating the house with foam blocks from the outside
Subfloor in a house made of foam blocks, types of flooring, and step-by-step installation instructions.
Experienced craftsmen strongly recommend insulating the building from the outside. This way you can protect it as much as possible from freezing. Additional insulation can significantly increase the service life of the walls of the house.
Mineral wool
Advantageous characteristics of the material:
- refers to a universal type of insulation;
- has low cost, good thermal insulation properties;
- insulating the building from the outside with mineral wool will provide good ventilation not only for the blocks, but also for the rooms inside the house, since the material has good vapor permeability;
- the material has good fire resistance;
- considered reliable and durable.
There is a list of disadvantages that you should also familiarize yourself with before using mineral wool for insulating facades:
- if waterproofing was not used during installation, the properties of mineral wool will decrease;
- installation must be carried out using safety measures - strictly in a respirator;
- If errors are made during installation, the material will certainly shrink additionally.
Expanded polystyrene
Compared to the previous heat insulator, this one is not affected by moisture. This is a comprehensive answer to the question of how to protect a building constructed from foam blocks from moisture from the outside. Additional benefits include:
- low cost - cheaper than mineral wool;
- good resistance to low temperatures in winter;
- high sound insulation rate;
- thermal performance indicators are an order of magnitude higher.
Insulating a foam block with polystyrene foam is considered the most optimal, affordable and correct solution. The only drawback is the need for additional coverage.
Penofol
Penofol is foamed polyethylene, which is protected by a layer of aluminum foil. Serves as a heat-reflecting screen. Gives walls additional strength. Insulating foam block walls with penofol allows you to retain 97% of the heat in the house. But it is used to insulate the internal surfaces of walls. It can simply be glued to wall surfaces rather than attached to the frame.
Polyurethane foam
They can be used to insulate cellular concrete blocks inside a building. Polyurethane foam is foamed clay made from polymers. Apply to the surface in liquid form. Once hardened, it takes the form of a seamless hardened coating. Well protects the building from heat loss. This insulation for foam block walls has the following advantages:
- resistant to moisture;
- evens out minor unevenness on the walls;
- has a service life of 50 years;
- does not require preventive measures, repairs, or additional processing.
Types of wooden floors
Often the finishing floor of the first floor in a house made of aerated concrete is made of wood or its derivatives: parquet or engineered boards, tongue-and-groove chipboards such as Quick Dec. Solid wood boards are mounted directly on the joists. Coverings with interlocking joints require a flat, continuous base, for the construction of which particle board materials or plywood are installed. This is how the floor pie is structured in certain cases.
Standard beam floors
Beam floors are installed either on a solid concrete base or on a strip one. In the second case, to support the beams in the inner perimeter of the future floor, it is necessary to install columns made of bricks or blocks.
For installation of parquet boards or laminate, the base should not be ribbed, but solid. Therefore, the rough flooring is mounted not at the bottom of the beams, but on top of them. Accordingly, insulation of the floor in a house made of aerated concrete will be carried out not from below (between the joists), but above them.
The layers can be structured like this:
Lightweight floors made of aerated concrete slabs
The lion's share of heat loss in a house made of aerated concrete occurs through the floor of the 1st floor. This happens because it is impossible to introduce insulation into the slab structure, and surface installation can significantly raise the level of the finished floor, which is not always acceptable.
From below, for the purpose of additional insulation, all this is covered with modular foam inserts.
Beam-ribbed floors
It is not at all necessary to use logs to install a floor in a house made of aerated concrete. In houses with a large floor area, the technology of monolithic pouring of beam-ribbed floors is used. The concrete used for this is heavy, but given the presence of caissons, the structure is lightweight.
The protrusion of the ribs that form the voids is obtained due to special convex shapes laid on the formwork, supported from below by load-bearing posts. After the overlap has gained strength, they are simply removed and can be reused. A gap is provided between the void former corresponding to the thickness of the ribs, which are reinforced by three A3 reinforcement bars.
A double row of reinforcement forming the frame is mounted above the plastic forms, on top of which concrete is poured. The pouring is carried out simultaneously with the beams and crossbars, which fastens the entire structure into a single durable monolith.
How to make a floor in a house from aerated concrete with your own hands
As an example, consider the option when the floor in an aerated concrete house is made on the ground, and the ceiling is made on beams. Let's start from the first floor.
Subfloor installation
When installing a floor resting on the ground, the structure is multi-layered and can have up to 8-9 layers. It depends on the insulation material. Expanded clay or expanded polystyrene are often used for it, but when making floors on the ground in a house made of aerated concrete, it is better to use heat-insulating aerated blocks. Due to low thermal conductivity, high strength and reasonable price, they can be considered the best choice.
The second option is shown in the diagram:
Heated floor installation
For heating to be most effective, it is advisable to lay the elements of the heating system in the screed. Before pouring it, a special foam substrate is laid out on the surface of the aerated concrete insulation. On top it is also covered with foil roll material made of foamed polyethylene (Penofol, Tepofol, Isolon).
Note: The selection of materials and tools for laying the floor is carried out based on what kind of decorative covering will be installed. When heating elements are placed in a screed, it is most often tiles. Therefore, in addition to general construction materials: a level, a hammer drill, a set of drills, a hammer, an electric mixer, you will need a set of spatulas, a notched trowel and a tile cutter.
Floor covering
The coating made from aerated concrete slabs using prefabricated monolithic technology has already been discussed above. However, a house made of aerated concrete can have two or even three levels, and you need to think about how to structure the floor covering.
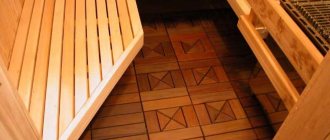
Installation will be carried out according to the following scheme:
The boards are mounted with a gap so that it is possible to lay metal heat-reflecting plates. Heating elements are placed in their grooves and covered with a plank covering.
How to carry out plastering
Do-it-yourself interior decoration of a house made of foam blocks almost always includes such an operation as leveling the wall with plaster. Such an event has its own characteristics that must be taken into account when carrying out work.
Do-it-yourself plastering of a wall made of foam blocks
When plastering, the following sequence of interior finishing of a house made of foam blocks is recommended:
- Applying primer. For this purpose, a special primer composition is used, which creates a protective barrier against moisture; improves adhesion of plaster to the wall surface; covers the seam with adhesive. The most important task: the initial leveling of surface unevenness - eliminating defects and cracks in the masonry.
The primer composition creates a protective barrier against moisture
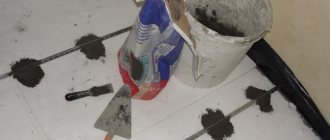
- Installation of the mounting grid. It is applied after the primer has completely dried and secured with dowels. Typically, fiberglass mesh is used. One should take into account the fact that plaster applied without a mesh will not adhere firmly enough to the surface of the blocks, and may peel off over time.
Fiberglass mesh is applied after the primer has dried.
- Plastering the wall. The thickness and technology of this operation depends on further finishing. If various tile coverings are installed on top of the plaster, then applying 1 layer of mortar without finishing is sufficient. When planning painting work or applying soft roll materials (wallpaper), plaster is carried out in 2-3 layers with a final thorough leveling of the wall surface. For plastering, a ready-made mixture based on cement or gypsum for interior work is used, but you can also use a homemade sand-cement mortar (3:1 ratio). The main layer is made 20-25 mm thick, and the surface layer is about 10 mm.
Wall plastering scheme
The floor of the first floor in a house made of aerated concrete: features of flooring on the ground, stages of construction
In private housing construction, aerated concrete is especially popular, as it allows you to quickly build a two-story house with an area of up to 100 m² for little money - this is a budget option. The ceilings of the first and second floors can be monolithic or prefabricated from reinforced concrete or cellular concrete slabs, metal, wood. When choosing a method for arranging floors, many factors are taken into account: load-bearing capacity, level of reliability and weight of the selected structure, financial calculations and the time frame allocated for building a house. The method of constructing the floor depends on the type of foundation chosen. Today’s material is about how to make the first floor floor in a house made of aerated concrete.
First floor floor in aerated concrete house
It all starts with the foundation
Aerated concrete differs from other building materials in that it has too low resistance to bending loads. This leads to the fact that even with slight movement of the foundation, cracks appear in the walls. Therefore, an important step in the construction of a house made of aerated concrete is the choice of the type of foundation, and then, based on the characteristics of the foundation, the optimal design of the first floor floor is selected.
Main types of foundations
Taking into account the characteristics of aerated concrete, the number of suitable types of base is significantly reduced. The foundation for an aerated concrete house must be well reinforced and as stable as possible. These include: monolithic slab, strip and columnar structures.
When groundwater passes close to the surface of the earth, it is necessary to provide a high-quality ring or wall drainage system, which will significantly increase the cost of work, as well as perform high-quality waterproofing of the base, or choose another material for construction.
The best option when constructing a small-sized building would be a monolithic strip foundation. Prefabricated structures are not recommended. It is possible to install a pile foundation. In this case, to prevent cracking of aerated concrete walls, a solid reinforced concrete grillage frame must be constructed.
The best solution for an aerated concrete house is a monolithic reinforced concrete slab as a foundation, despite the fact that the cost of such a foundation is much more expensive. In this case, the slab will serve as a rough foundation.
Installation difficulties
The foam concrete floor screed depends on the quality of the mixture, which, in turn, is determined by a number of factors. The main ones are the durability and compatibility of the foam. Despite the ease of working with the material, there are certain nuances. So, during the pouring process, even professionals sometimes create mixtures of different densities and use them to lay them in one screed. This leads to differences in the density of different areas of the area - to the point that some areas may resemble oil in consistency.
Cellular foam concrete is an excellent building material, but to obtain a good quality mixture at the output, it is necessary to create the right conditions: humidity level of about 65% (early ripening), temperature within + 25-30C, absence of serious loads and drafts.
Such requirements for foam concrete screed can greatly complicate the entire installation process, so builders are looking for ways to simplify installation and achieve the best results with minimal effort and cost.
Features of flooring on the ground
This is the simplest and most economical way to arrange a floor. It can be done in two variations - in the form of a screed or in the form of a wooden flooring.
Ground floor and strip foundation
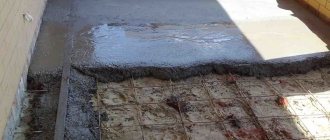
Screed device
The peculiarity of this floor is that there is no air gap between it and the ground. The base does not take on the load from the walls and roof - it is distributed onto the strip foundation, but only bears the load from the finishing coating, furniture, equipment and the weight of people.
Floor construction on the ground
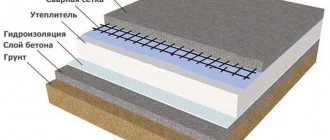
This floor structure is multi-layered and each layer plays a specific role. These include:
Floor pie on the ground
Table 1. Manufacturing the floor of the first floor on the ground by pouring a concrete screed
| Image | Description |
| Mark the room, determining the top point of the masonry. In order to set the required height of the concrete floor structure, it is necessary to determine the zero level. To do this, step 1 m upward from the bottom edge of the doorway and connect similar points transferred to other walls with a line. They step back 1 m from the resulting line, put a mark and draw a parallel top line, which will be the zero level. | |
| When preparing the soil, construction debris is removed. Remove the top layer according to the markings for the thickness of the concrete floor. Then they begin tamping and leveling the surface using a vibrating plate - a special tool for compacting the soil. The result should be a smooth and dense base that leaves no traces from walking on it. | |
| Fill the gravel with a layer of 5 to 10 cm, spill it with water and compact it. Pegs set level can serve as a guide to obtain a uniform layer of bedding. | |
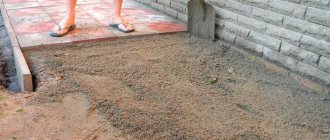
| The next layer is sand, 10 cm thick. It is also compacted thoroughly. After this, we fill in and compact crushed stone and another layer of sand, which is carefully compacted and leveled so that the sharp edges of the crushed stone backfill elements do not stick out on the surface. | |
| Dense polyethylene is laid on top of the sand, forming a waterproofing layer. The edges of the canvases are placed on the walls, the installation is done with an overlap of 15 cm, and the joints are taped. Instead of film, you can use a special waterproofing membrane. | |
| At the next stage, insulation is laid in accordance with the technological features of the material. More often it is slab or bulk material. | |
| The floor structure is laid using the floating method, so a damper cushion (tape) made of cut insulation is laid around the perimeter of the room. | |
| The multilayer floor structure must be reinforced using a metal or PVC mesh with cells of 10 x 10, 15 x 15 or 20 x 20 cm, depending on the upcoming load. The mesh should be located above the insulation at a distance of 2-3 cm; special supports are used for this. When using PVC mesh, it is pulled over fixed pegs. | |
| Prepare the solution and pour the screed using the traditional method along pre-installed beacons, stretching the mixture using the rule. Work begins from the far corner. | |
| The screed is left to dry, covered with film, for 28-30 days. | |
| After the screed has dried, it is necessary to evaluate its evenness and, depending on the finishing material, a decision is made on additional leveling using special compounds or the grinding method. |
Floor on the ground: dry screed
The advantages of dry screed are that the installation process does not require a long drying time. The finishing coating can be laid the very next day.
Dry screed is a rather interesting and affordable option for creating a flat floor in an apartment. It does not place excessive load on the floors, and you can do it yourself. How to make a dry floor screed? More details in a special article.
The first stages of preparation: installation of the cushion and rough screed are carried out as in the previously described case. Further, the technology is different.
A film waterproofing layer is laid over the rough screed and beacons are installed, using metal profiles for working with gypsum boards, fixed with self-tapping screws.
Tools for installing dry floor screed
Expanded clay or other bedding specifically designed for these purposes is poured and compacted between the beacons. A uniform layer is formed using a rule and the material is compacted.
Gypsum fiber boards are laid on top of an even layer of backfill, gluing the joints with adhesive. In this case, the joints of each row should not coincide. Additionally, fixation is performed with self-tapping screws.
Note! Laying dry screed is carried out using the floating method, so a damper tape is fixed around the perimeter of the room.
Laying gypsum fiber boards
Floor installation on joists
Wooden floors on pillars on the ground are another common method of constructing a floor structure with a strip foundation. Installation proceeds as follows.
First, the soil is prepared - leveling and compacting. Then a 5 cm thick layer of crushed stone is poured. The crushed stone must be compacted and covered with bitumen.
By pouring bitumen, the crushed stone backfill becomes monolithic
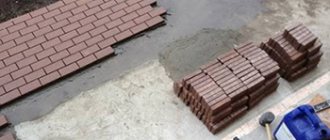
In increments of 80 cm, mark the location of the brick pillars for the logs. Install brick columns of the same height. If necessary, level the top with mortar to bring it into one plane.
Basic floor design elements
Roofing material is placed on top of each column, which acts as a waterproofing material. Then the beams are laid. An independent structure is achieved due to the fact that the beam is not attached to the walls. The bottom of the boards is lined with boards for laying insulation. First lay a layer of vapor barrier, and then mineral wool.
Subfloor with insulation
A layer of vapor barrier and a tongue-and-groove board are laid on the insulation, which can serve as both a base for a decorative coating and an independent finishing layer. You can also use thick moisture-resistant plywood or OSB boards as decorative material.
Wooden floor construction - basic elements
What nuances to consider when installing a floor on the ground?
Regardless of which flooring technology is chosen, the following nuances will need to be taken into account:
Video - Installing a floor in a house made of aerated concrete
Base: monolithic reinforced concrete slab
The main advantages of a monolithic slab foundation include the following:
Slab concrete foundation
Disadvantages include the lack of a basement and the high cost associated with a large volume of concrete solution.
After installing a rough screed on the surface of the monolithic slab, select the material for the floor. There are two options - make a clean insulated screed, install a screed with a “warm floor” system, or choose a wooden floor. It is worth noting that the screed can be not only traditional, but also semi-dry or dry.
How to make a heated floor correctly? This process will largely depend on what type of system has been chosen for installation. Installation is not as complicated as it seems, but it is quite a troublesome task. Read more about how to install heated floors in a special article.
Monolithic foundation slab
Floor by joists
Construction of a wooden floor on a monolithic reinforced concrete slab
To fasten the boardwalk, logs are used, which are fixed at a distance equal to the width of the insulation - usually 60 cm. First, a film layer of waterproofing is laid over the entire surface of the slab or a coating application technique is used. You can also use roofing felt, glassine or membrane.
Coating waterproofing of the slab
To increase heat conservation, cover the top with foil-foamed polyethylene foam.
An important step is the installation of logs - they must be level and securely fixed. This will ensure the quality of the wood flooring and its service life. Joists can be adjusted using wooden or plywood wedges or shims on brick or wooden posts. As experienced craftsmen advise, the joists should be secured to the base through adjustable pads.
You can choose a more modern method of fixation - adjustable logs.
Thermal insulating material is laid between the joists. You can use mineral wool boards or a rolled analogue, polystyrene foam or expanded polystyrene, and bulk heat insulator - expanded clay. The main condition is that the material must fit tightly to the joists without forming gaps. To ensure this, you need to think in advance about the width between the joists; it can be 1-2 mm less than the width of the insulation, so that it is laid as tightly as possible. In addition, at the stage of laying the insulation, if necessary, communications are laid inside the structure.
Communications inside a wooden floor structure
A vapor barrier film or polyethylene is placed on top of the thermal insulation layer. The canvases are overlapped by at least 15 cm, and the joints are taped.
Laying vapor barrier on insulation
If there is a desire for the house to have a wooden floor, then the next step is to install flooring made from tongue-and-groove boards. The advantages of such a coating lie not only in its naturalness and natural beauty, but also in durability and the possibility of repeated renewal of the decorative layer. If desired, the boardwalk can subsequently become the basis for other decorative coverings - laminate, wood, tiles.
Do you want to know what tools will help you lay laminate flooring quickly and with minimal effort? Read the article “Tools for laying laminate flooring.”
If you plan to lay other decorative coverings, then the base for them can be plywood or OSB boards. Moisture-resistant plywood is laid in two layers with the seams staggered, fixed with glue and self-tapping screws. The joints between the sheets are puttied, and the flooring before laying the decorative coating is sanded and cleaned of wood dust and other contaminants using a vacuum cleaner.