Installing concrete floors in a bathhouse is the most optimal option, thanks to which it is possible to create a strong, reliable, resistant to various influences and durable coating in a fairly humid room. Despite the fact that a concrete floor requires quite complex and time-consuming work, it is quite possible to complete the task yourself.
For rooms with high humidity levels, a wooden floor is often chosen, which requires regular maintenance, repair and replacement. At the same time, the concrete floor in the bathhouse is of high quality, warm, and can last as long as possible without any manipulation.
Why is concrete flooring preferable?
Concrete floors in a bathhouse on the ground today are considered the most appropriate option.
For a bathhouse, one of three floor options is usually chosen: adobe, wood and concrete. To understand why the latter option is preferable, it is worth taking a closer look at the features of all materials.
What kind of floors can be made in a bathhouse:
- adobe
- the oldest version, made in the format of a compacted dense layer of clay and acting as a water seal, where a drain was created outside the building. A layer of wood was laid on top of the clay, which had to be dried and ventilated after each visit to the bathhouse. Today, clay is no longer relevant, as it is not very comfortable to use.
- Wooden floors
– from rocks resistant to water. They are easy to install, warm, and make it easy to install a water drainage system. But in any case, wood and water interact poorly - wood is susceptible to the spread of insects, rodents, and microorganisms. It would be possible to protect the material from these influences with special impregnations, but they can be dangerous to human health.
- Concrete floor on the ground in the bathhouse
- the most relevant option today: it demonstrates excellent strength, resistance to moisture, lasts a very long time, provided that a layer of thermal insulation is installed or a floor heating system is installed, it is comfortable to use. You can lay any coverings on concrete or leave the surface in its original form by installing wooden flooring.
Are the same drugs suitable for different rooms?
Before choosing an impregnation, you need to decide on the purpose of its use, since each compartment of the bath has a different level of humidity. It is important to remember that the products used for floors should not emit harmful substances or have a strong odor. Due to the fact that there are high temperatures in the sink and steam room, there is a threat of evaporation from the surface of the treated floor, which can be harmful to health.
To prevent the negative effects of impregnation preparations on the body, it is necessary to remember the following.
- In the rest room and locker room, the air temperature usually does not exceed 28 degrees. Therefore, synthetic impregnations can be used in these rooms.
- The washing room is dominated by high temperature and humidity. The wooden floor there must be impregnated with only organic-based products.
Protective impregnations are presented in a fairly wide range. Modern means make it possible to combat the destructive process - first of all, rotting. To make the right choice, pay attention to the properties of impregnations and correlate them with the characteristics of your bathhouse or sauna - this is the only way you can find the ideal protection option specifically for your case.
Floor Pie Composition
Before pouring the floor in a concrete bathhouse with your own hands, you need to thoroughly study the technology. In order for the floor to be durable and warm, a structure is made of several layers: the compacted soil is covered with a layer of sand, then gravel, a dense polyethylene film is laid, a rough screed is applied, a layer of waterproofing and thermal insulation is installed, and the process is completed with a finishing screed. This option is suitable for arranging a floor on any type of soil.
Today, there are two methods by which a concrete floor in a bathhouse is poured: directly on the ground or on special logs (creating a ventilated subfloor). The choice of technology depends on the budget, requirements and conditions of the work.
Installation of a concrete floor on the ground
You can make a concrete floor in a bathhouse on the ground with your own hands directly on the base, having first removed a layer 40-50 centimeters thick. After compaction, gravel is poured into the hole in a layer of 15 centimeters, compacted, then sand is poured in a layer of up to 50 centimeters and compacted again. A screed is poured onto the sand at a certain slope, in accordance with the design and markings.
Usually two layers of screed are poured - one rough, the second finishing, always laying layers of thermal insulation and waterproofing between them.
Concrete floor with ventilated subfloor
The concrete floor on wooden joists in the bathhouse is made to create a ventilated space under the floor. Thus, there is no need to install additional ventilation systems in the concrete screed. Wooden logs are pre-treated with special antiseptics, and then mounted in a system of beams with a diameter of 10x20 centimeters in the form of a grid.
A plank subfloor made of boards 2-4 centimeters thick is attached to the joists. A layer of waterproofing and thermal insulation is also performed. Only after this is the concrete screed reinforced with steel mesh poured.
A water drainage system is a must!
There is always water in the bathhouse, and in large quantities. Therefore, you need to think over a system that will effectively remove it. Water removal is carried out by arranging drainage and ensuring a certain slope of the floor base.
If the soil in the area where the bathhouse is being built is clayey, you need to dig a small ditch under the foundation of the building, lay pipes in it and drain the latter into the gutter. It is advisable to line the walls of the ditch with tiles or concrete, and cover the ditch on top with a metal grating. Be sure to install a special valve at the end of the last pipe designed to drain water. Then there will be no unpleasant odors in your bathhouse.
Exiting the bathhouse pipe into the gutter
When the soil under the building absorbs water well (for example, sandy soil), it is necessary to dig a special drainage hole under the bathhouse. Its dimensions are 0.5x0.5–1x1 m, and its depth is 0.7–1 m. The pit must be filled with construction sand, broken stone or brick, and large crushed stone. In this case, the backfill is done so that it does not interfere with the water flowing calmly into the drainage structure.
In the base of the pit, make several vents (they are called vents), which will ensure the through passage of air masses. Essentially, you will make a simple ventilation system with your own hands. Believe me, she will cope well with the task assigned to ventilation. But it is better to dig a drainage hole away from the bathhouse. Then you need to run a pipeline to it according to the diagram described above.
Note. The discussed options for arranging a pit for drainage and water collection are used in situations where the concrete floor base is raised above the soil. If you plan to pour the floor directly onto the ground, you should immediately embed the sewer pipes into the concrete screed.
Preparing the base
Before pouring concrete on the bathhouse floor, it is necessary to properly prepare the base. Otherwise, the floor will have low strength and reliability characteristics, will last much less and is unlikely to provide adequate comfort.
Alignment
Before starting work, remove a layer of soil from the base along with any remaining organic matter. Usually 40-50 centimeters is enough. Then the surface is leveled, making sure to make a pit in the center of the room where the water from the bathhouse will go.
Drainage from the pit is carried out beyond the foundation and is realized through a drainage pipe with a cross-section of 10-20 centimeters dug in the corner under a slope. Thanks to this design, it will be possible to ensure maximum comfort in the operation of the bath and avoid the accumulation of large volumes of water.
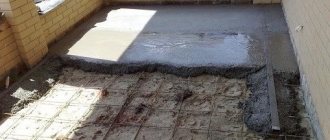
Seal
Before concreting, the surface must be compacted with a vibrating plate or a manual tamper made from scrap timber or logs. Sand is poured onto the compacted soil in a layer of 5-10 centimeters, then a layer of gravel 10 centimeters thick.
Both layers must be thoroughly compacted. They will protect the concrete floor in the bathhouse from rising moisture from the soil and other troubles.
Installation of beacons or guides
In order to make the floor as level as possible, guide rails are used, or, as they are also called, beacons. These are wooden or metal strips that are installed on the base so that their upper part coincides with the found zero mark.
Special beacons can be bought in construction stores
What are lighthouses made of?
As guides, you can use straight pipes or special flat metal with perforated edges. They are sold in specialized stores and are called “beacons”.
It is not recommended to use wooden slats: they absorb moisture from the solution, which negatively affects the strength of concrete. In addition, wood can become deformed from moisture, which can cause height differences when leveling the screed.
How and on what to lay
The guides are laid along the walls perpendicular to the one in which the door is located. The distance between them should not exceed the size of the rule used: it slides along the guides, leveling the laid out solution. When leveling the solution, it will need to be moved from side to side, so leave another 10-20 cm in reserve (with a rule length of 150 cm, place the guides every 110-120 cm).
Place the beacons on the floor at the required distance, prepare materials that will serve to level them. The selected slats must be installed at the same level so that their top coincides with the found zero level. To do this, some materials are placed under the slats.
Some people use broken bricks, others use plastic or metal plates. It is not recommended to use cardboard, plywood, or pieces of wood due to the moisture content in the solution, which leads to deformation of these materials. Once saturated with moisture, they can change thickness, which will cause distortion. The distance between the fasteners should be such that the beacons or guides do not “walk” or sag.
Guides/beacons are laid out along the walls
When using special beacons for screeds, they can be leveled using dowels. They fit perfectly into the existing ledge. In the necessary places, drill holes in the base and insert self-tapping screws. Rotate them to set the required height.
You can use the “old-fashioned” method. “Spots” of solution (thick) are placed at some distance. By pressing or installing additional plates, align the planks to the zero mark (using a building level) and give time for the solution to “set.”
To level the beacons, you can use spots of thick mortar
The floor in the steam room and washing room should have a slope that will direct water to the drain - take this into account when installing beacons. Can be oriented along the top of the water seal.
Rough screed
Before making a concrete floor in a bathhouse, it is necessary to perform a rough screed. Typically, the thickness of such a layer is no more than 10 centimeters (optimally 5-7).
Mixture recipe
To prepare the mixture, you will need sand, cement, gravel, crushed stone. When wondering what kind of concrete is needed for the foundation of a bathhouse (base), it is better to choose M400. Saving on materials can cause poor quality coatings.
Concrete mortar recipe:
- Cement M400 – part
- River sand – 1.2 parts
- Crushed stone, gravel fraction 5-10 millimeters - 2.7 parts
If M500 cement is used for pouring, the volume of gravel and sand can be increased to 3.2 and 1.6 parts.
Mixing
All components must be carefully measured and then mixed. The volume of water is determined during the process: the solution must be of optimal consistency: exceeding the permissible volume of water prolongs the hardening period and leads to cracks, while reducing it makes leveling the surface impossible.
When pouring the floor in a bathhouse with concrete with your own hands, you usually add water in portions and mix the mixture until a thick, plastic, evenly moistened consistency is obtained.
Insulation
Before pouring the rough screed, a polyethylene film with a density of 200 microns is laid on the gravel. It will not allow water and solution to penetrate into the gravel, eliminating the risk of a bridge for capillary moisture and reducing the strength level of the concrete screed.
After the insulation layer has been laid, the floor in the concrete bathhouse can be poured. Filling is carried out layer by layer and quickly, carefully leveling the surface with the desired slope. Then they pause in work, waiting for the screed to harden and gain strength (2-3 days). These days the floor is moistened by spraying water or covered with a damp cloth.
Primer
After the beacons are fixed, the solution on the stains has hardened a little, the base can be primed. This will improve the adhesion of concrete to the base.
The primer is poured onto the base, then spread over the surface with a roller or wide brush.
If the solution will be laid on a waterproofing film, before installing the beacons, carefully seal all joints and check the entire surface for holes and openings. In this case, the use of dowels is impossible - the tightness is broken, and all work on installing beacons and laying the solution will need to be carried out carefully, without damaging the integrity of the film.
Performing hydro- and thermal insulation
When studying the issue and trying to understand how to properly pour a concrete floor in a bathhouse, you cannot ignore the laying of layers of insulation. Without proper protection, the floor will not last long and will not provide comfort. Protection is needed both inside the room itself from moisture and from the ground.
Laying roofing felt
Waterproofing is usually made of roofing felt, which is laid in two layers. The roofing material is rolled out over the entire area of the room, overlapping with a bend on the walls of 3-5 centimeters. Where the sheets adjoin the walls and overlap, they are coated with bitumen mastic.
The second layer of waterproofing is laid in the same way, slightly moving it tangent to the first. The bottom and walls of the pit must also be covered with two layers of waterproofing.
Installation of EPS
Before pouring a concrete floor in a bathhouse, you also need to take care of thermal insulation. It is best to choose extruded polystyrene foam, which comes in slabs 5 centimeters thick. The material is not afraid of moisture and demonstrates good mechanical strength and density. Along the perimeter, the slabs have tongue-and-groove projections, thanks to which you can easily and quickly create a continuous thermal insulation layer.
Work begins from the pit, then the walls are lined flush with the floor, then the slabs are mounted on the floor itself. Any gaps between the material are carefully filled with polyurethane foam to create a monolithic layer of thermal insulation.
Preparatory work
If you have an old concrete base, you first need to decide whether to remove it or not. If you only plan to repair a concrete floor screed, the old base does not have large cracks and fits tightly to the base, you can treat the surface with a primer and begin installing beacons or guides.
If the old base crumbles, has swelling and other obvious defects, it must be removed (to do this, use a hammer drill, jackhammer or chisel with a hammer). After finishing the work, the surface is cleaned (using a construction vacuum cleaner or a regular broom), treated with a primer and allowed to dry. The base is ready.
Preparing a Wooden Floor
Concrete screed on a wooden floor has its own nuances: it is necessary to carefully repair all existing defects (replace rotten boards or at least turn them over, seal the joints with epoxy putty, and if necessary, with polyurethane foam, treat the joints with sealant on top), cover the wooden floor with a primer with moisture protection or moisture-resistant paint, lay a layer of waterproofing and only then proceed with the installation of beacons.
The use of a bonded screed is unacceptable here: the wood deforms during temperature changes, which will lead to the destruction of the screed laid directly on the floor boards.
Setting the zero level
The main stage of the preparatory work is determining the zero level of the floor screed. If you have a laser level, no difficulties are foreseen - just turn it on, install it and use the beam to make marks on the walls.
Marking walls using a water level
The second method is much more labor-intensive. This will require a water level or level. Mark a point on one of the walls at an arbitrary height. For example, 150 cm from the floor. Using a water level, mark the other walls (at least 2 marks on each). Then, using a painting cord (the cord and powder paint for it can be bought at a hardware store), connect all the dots. We got a line at the same level relative to the horizon (not the floor).
How to work with a water level, see this video
Now, by measuring the height from the floor to the line at several points, find the minimum thickness of the screed, which will make it possible to eliminate all unevenness. Usually the measurements will be different. If you take the largest and smallest value and subtract them, you will get the same desired value. Please note that the minimum thickness of the concrete floor screed is 7 mm . With a smaller thickness, cracks will soon appear and the concrete will begin to crumble.
Having found the required thickness of the screed, subtract it from the height of the drawn line. For example, the screed should be 4.5 cm. Subtract 4.5 cm from 150 cm, we get 145.5 cm. We measure this distance from the drawn line and draw another line, which will serve as a guide when laying beacons and leveling the screed. This line is called the zero level. Beacons or guides are then aligned along it.
Finishing screed
To properly fill the floor in a bathhouse with concrete, two screeds are made. After the rough and insulating layers, the finishing coating is poured. The solution is prepared in the same way as for a rough screed; the layer is made up to 10 centimeters, remembering the need for a floor slope towards the water drainage.
Reinforcement
To strengthen the screed, a reinforcing mesh of steel rods with a cross section of 5 millimeters is used. In some cases, it is possible to replace the steel mesh with fiberglass, which is explained by the absence of serious loads on the floor of the bathhouse. The screed is made 7-10 centimeters thick, the reinforcement frame should be located in the middle, and be filled with a layer of concrete of at least 3 centimeters on all sides.
Preparation of the solution
When choosing a brand of concrete for the foundation for a bathhouse (finishing layer of the floor), preference is given to M400 or M500. The proportions are the same as when preparing the mixture for rough filling. It is better to prepare the mixture in a concrete mixer.
You can use a mixture of cement and sand in a ratio of 1:3 for pouring, or ready-made dry mixtures created for use in rooms with high humidity levels.
Work progress
The installation of a concrete floor in a bathhouse (finishing layer) begins with a pit. First, a finishing screed is made on the bottom, then wooden formwork is created and the walls are poured at the level of the thermal insulation layer. Here, be sure to ensure that the mixture does not get inside the drainage pipe (it must be covered with a lid or a rag).
Next, the mixture must be distributed evenly over the entire surface of the floor in a layer up to 7 centimeters thick, lay out the reinforcing frame, and fill it with a solution of the required thickness (at least 3-4 centimeters).
Drying and removing imperfections
The final screed takes 2-3 days to dry, with the layer always being moistened during the process. If cracks begin to appear as the concrete dries, it is most likely due to the rapid evaporation of moisture. In this case, the coating can be repaired - carefully open the cracks, fill with a special repair composition of sand and cement mixed in equal volumes.
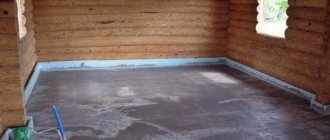
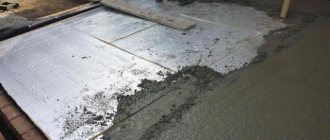
Pouring concrete
The process of pouring a concrete base for a bathhouse.
Laying the cement-sand mortar begins from the far wall from the entrance to the room. The solution is applied to the prepared base, leveled with a trowel and pulled together with a horizontal board or rule towards you. The process of laying the mortar must be continuous; after serving the first portion, the second portion should be served immediately. The screed begins to harden on the first or second day, but the base cannot yet be used. Loads are allowed at least seven days after concreting, but the optimal time will be a month when the concrete reaches its maximum strength. During the hardening process of the screed, it is important to provide it with proper care, which will help avoid drying out and cracking of the concrete surface. To do this, it is irrigated with water throughout the day or wiped with a wet cloth.
If it is necessary to fill the base within a deadline, you can use special additives that speed up the hardening process of the solution. Plasticizers prevent the formation of cracks and increase the strength characteristics of concrete. After the concrete solution has hardened, you should check it for strength; to do this, hit the coating with a hammer and if the marks are insignificant, then the strength characteristics are high. They study the color of the surface, it should be gray and monochromatic, check the quality of the screed by the width of the gaps, which should not exceed half a centimeter.
Return to contents
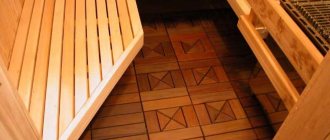
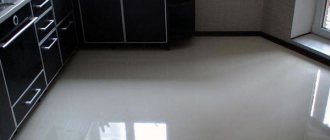
Finishing options for further use
When studying the question of how to make concrete floors in a bathhouse, every master thinks about further finishing. Concrete allows you to implement any option - leave the screed in its original form and arrange wooden pallets or cover the floor with any material.
Ceramic tiles (an ideal choice in terms of durability, environmental friendliness, and resistance to moisture), a wooden false floor, or simply wood flooring (a less durable option) are perfect for a bathhouse.
When planning to create concrete floors in a bathhouse with your own hands, you need to study the whole process very carefully. Subject to compliance with technology and established rules, as well as the selection of high-quality materials, it will be easy to create a durable and durable floor covering.
Useful advice from experts
To increase the strength of a concrete floor, you can pour an additional layer of cement-sand screed on top of it. This will level the surface of the base, best preparing it for laying the finishing coating.
You can begin finishing work only after the concrete has sufficiently dried. In the case of laying ceramic tiles, this period is 4-7 days.
If the final finishing of the concrete floor in the bathhouse will be done with ceramic tiles, be sure to first make a screed to level the base. It is most convenient to use ready-made solutions. It is important that the screed is as strong and uniform as possible. The presence of chips and cracks is unacceptable.
Pouring concrete is a relatively inexpensive and quick method of arranging a high-quality floor. Follow the instructions and everything will definitely work out. Good luck!