Home / Installation, repair, maintenance / Sealing holes and cracks / Ceiling repair - sealing the seams between the slabs
Any renovation in an apartment starts from the ceiling. In panel houses, a phenomenon such as cracks is often observed.
They most often appear at the joints of concrete ceilings. No matter how you whiten the ceiling, they will come back again, reminding you of the incorrectly performed repairs. The question arises of how to seal the seams between the slabs on the ceiling.
Sequence of work execution
Repairing a seam is quite a labor-intensive job that must be done meticulously, otherwise the bad work will be visible later, no matter how much you paint or whitewash it. Haste in this matter is a big hindrance.
The sequence is as follows:
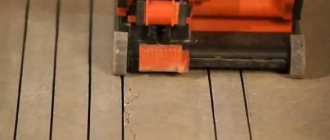
- We expand the seam between the concrete floor slabs using a hammer drill or a drill equipped with a spatula attachment. We clean off the old remains of the cement screed or filler with a knife or spatula. If this is not done, then the fresh solution will not adhere well to the concrete, and the stones from the old plaster cannot be sanded off.
- We clean the crack and the surface of the ceiling from dust. We coat the entire seam with a pre-prepared primer. This must be done liberally and thoroughly, after which the primer must dry well.
- According to the instructions, mix the gypsum plaster with a construction mixer. If you need a small amount of plaster, you can do without a mixer. The finished solution should be similar to thick sour cream.
- We begin to fill the crack with plaster. We fill deep furrows in several passes, each time thoroughly drying the previous layer. We fill especially deep seams with polyurethane foam, the remains of which, after drying, are cut off with a knife. Then we level the surface by rubbing gypsum plaster well into the pores of the foam.
- Now we need to let this whole song dry well and then proceed to strengthen the seam by gluing masking tape. The tape should be 2-3 cm wider than the seam. Then putty is applied on top of the tape.
- The seams should dry completely again. Then the surface of the ceiling slabs is primed and the surface is finished with putty. The putty should be applied in a thin layer. Instead, you can use painter's fiberglass, prime it and then paint it with the paint you like.
What to pay attention to before starting work
If your apartment is located on the top floor of a multi-storey building, and there is no technical floor above, then before proceeding with the sealing it is necessary to check the condition of the roof. It is quite possible that moisture will soon begin to flow through the cracks. Gypsum is a mineral base with a beneficial environment for the proliferation of microorganisms that only need humidity and above-zero temperatures. With the described leak, all conditions will be met and the ceiling will soon bloom.
Excess moisture leads to the appearance of fungus
The second important point is heat loss. A draft can literally “walk” through large gaps, making it uncomfortable to be in the room. But even in the absence of air movement, a good cold bridge is created, through which heat from the radiators will be transferred to the street.
Advice! This will not be a problem if there are also heated rooms above you.
A cold bridge means that there will be practically a dew point in the room, since the boundary of heat and cold moves inside the room. This is another reason for the appearance of a large amount of moisture and the problems that accompany it.
To eliminate all these troubles, you will need to insulate the seam, which will be discussed in detail below.
If the slab does not lead to the roof, its preparation and sealing is greatly simplified, but it is also important as other problems may arise.
- The sound insulation of the room is compromised;
- Dirt and dust will constantly fall out of the crack, which is unpleasant for suspended ceilings, which, when the door is opened sharply, can act as a membrane, lifting it all into the air.
- The integrity of the ceiling covering will also be compromised, because nothing will resist the movements of the house that occur as a result of shrinkage and seasonal soil fluctuations.
Now let's talk about everything in more detail.
Useful tips and unconventional ideas
- Instead of foam, you can use ceramic tile adhesive to seal deep cracks.
- A painting mesh can be successfully replaced by ordinary gauze or a bandage. A thin fabric that is pre-soaked in water and steamed with an iron is also suitable so that the fabric does not shrink afterwards.
- To avoid much hassle with leveling the ceiling, you can cover it with seamless polystyrene foam tiles.
- Small seams are sealed with seam putty or acrylic sealant. We do not recommend using silicone sealant because paint does not adhere to it.
- Another idea from folk craftsmen is simultaneous reinforcement and filling of cracks. This is done as follows: mix a thick cement mortar with the addition of a small amount of liquid glass, dip a piece of bandage into it, roll it into a rope and place it in the gap. You need to act quickly - the solution with glass dries very quickly. Use the same solution to level the ceiling and, after drying, sand it with sandpaper.
- Be careful in areas where there might be wiring, otherwise you may damage it with the drill and create more work for yourself.
Recommendations for building a house
If housing is being built independently, then it is necessary to take into account some features even at the stage of building the house. This will help avoid unpleasant phenomena in the form of cracks in corners and between floor slabs after construction is completed.
Controlling several factors will help you cope with this task:
- Reliability of the foundation. If the foundation is poured correctly and with high quality after the building shrinks, cracks in the corners and on the floors between the slabs will not appear. It is recommended to first conduct a soil study, determine the level of soil freezing, and make the correct markings and compaction of the surface.
- Prevent heat leakage through the floor. For this purpose, it is necessary to lay the foundation correctly.
- Use of composite concrete. This material not only has excellent technical characteristics, but is also completely safe for human health.
- Adding special ingredients to concrete during construction in winter. The standard composition of raw materials is unsuitable for work at sub-zero temperatures.
- Reinforcement of the building. If aerated concrete is used as the main material for housing construction, reinforcement should be done every 2-3 rows. The reinforcement is laid inside block recesses previously created with a wall chaser for aerated concrete.
If the work technology is followed, it is permissible to seal holes of any size. To eliminate seams between slabs, you can choose any available method. If you carry out the work efficiently, you will end up with a completely smooth coating without flaws.
The only exception is apartments in new buildings. A new house shrinks within four years. As a result, the slabs will shift and small cracks may appear on the walls and ceiling. To give an aesthetic appearance to the ceiling in a new home, it is recommended to use tension or suspended structures.
Preparation of tools and materials
If you are thinking about the question of how to seal the seam on the ceiling between the slabs, then you should prepare tools and materials, including:
- putty;
- putty knife;
- drill blade;
- masking tape;
- fine-grained sandpaper;
- sealant gun;
- primer;
- perforator;
- mixer;
- PVA glue;
- acrylic sealant.
As a putty, you can use a dry gypsum mixture, but when choosing a primer, you should prefer one that has deep penetration.
The spatula should have an elastic, flexible blade, while the hammer drill can be replaced with a drill. But it will require a shovel-shaped attachment. If you cannot find sandpaper, you can use a sanding mesh.
Working with a wide, shallow joint
If the depth of the joint between the slabs on the ceiling is small and the width is more than 3 centimeters, it should be filled with construction foam. It happens like this:
- before sealing the seam, fill it with construction foam;
- wait until the foam dries and cut off the excess fragments with a sharp paper knife - the depth of the groove should be no more than 5 millimeters;
- Apply latex elastic putty using two spatulas - put the required amount on the wide one, and smear it into the groove with the narrow one, flush with the main surface;
- Using a wide spatula, smooth and remove excess.
Recommendations for choosing materials
Sooner or later, you may also be faced with the question of how to seal the seam on the ceiling between the slabs. The technology for carrying out the work is described in the article, but to achieve a high-quality result it is necessary to select the right materials.
You should purchase NC cement in the store, which is used to fill deep joints.
This material has expansion properties when hardening, so it fills the entire space of joints and seams. You will also need dense thermal insulation materials, which are necessary for sealing wide seams. It is better to purchase those made of foamed polyethylene or polyurethane.
Experts also advise using elastic putty. When purchasing a serpyanka mesh, you must take into account that its width should extend beyond the limits on both sides by 50 mm. For the final work, you will need primary and finishing putty, which will be used to finish the entire ceiling area.
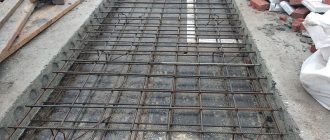
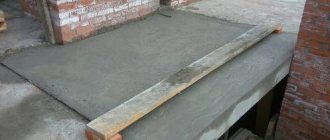
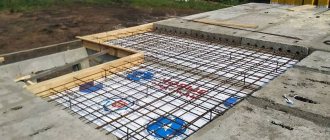
Monolithic sections with a width of more than 300 mm
If the gap between the slabs is from 100 to 300 mm, we construct a monolith with reinforcement. Options are also possible here.
Option 1
Used when formwork from below is not possible .
- We install load-bearing beams with a cross-section of 40x100 mm on the edge, in increments of 1 m, resting on adjacent slabs;
- We attach the formwork panels to the load-bearing beams with wire twists;
- We cover the formwork with roofing material or film;
- We install the reinforcement cage on the glasses so that the reinforcement is 30...50 mm above the formwork;
- We are concreting.
Option 2
If it is possible to secure the formwork from below, you can use reinforcement to construct the supporting structure.
- We construct the formwork;
- We make mounting parts from A1Ø8…12 reinforcement (depending on the width of the gap to be bridged), taking into account that there must be a distance of at least 30 mm between the bottom of the formwork and the reinforcement;
- We lay protective material on the bottom of the formwork;
- We install mounting parts;
- We lay reinforcement or reinforcement cage;
- We are concreting.
Important!
Do not settle for filling the gap between the wall and the slab with lightweight concrete cellular blocks (foam concrete, expanded clay concrete, etc.) - they do not have the required load-bearing capacity. Taking into account the arrangement of furniture along the walls, this section of the floor is subject to a large load, this will lead to the destruction of the blocks and the need for costly repairs of the floor.
Reference
The areas between the wall and the slab are sealed in the same way.
This story tells not only about sealing seams, but also about anchoring the slabs to each other:
How and with what to seal the seam
If you are faced with the question of how to seal the seam on the ceiling between the slabs, you must decide on the order of work. These manipulations can be considered quite labor-intensive; haste in this matter will become a hindrance. First, the seam is unstitched; for this you need to use a drill or a hammer drill; the tool should be supplemented with an attachment in the form of a spatula.
The remains of the cement screed are removed with a spatula or knife. If this step is neglected, the fresh solution will have poor adhesion to the surface. The resulting gap must be cleaned of dust and its surface coated with a generous layer of primer.
The layers should be allowed to dry. Gypsum plaster is mixed with a construction mixer. If you need very little composition, then you can do without a mixer.
The solution should have the consistency of thick sour cream. The crack is filled with plaster, and the furrows should be decorated in several passes. Each previous layer must be dried before laying the next one.
If you are thinking about how to seal the seam on the ceiling between the slabs, then you can use polyurethane foam. It is used when the seams are especially deep. After drying, the remaining material is cut off with a knife, the surface is leveled, and gypsum plaster should be rubbed into the pores of the foam.
How to mix putty?
Since we are moving directly to the question of how to seal the seams between the slabs on the ceiling, we need to learn how to make putty for this job. Typically, the solution is prepared from a certain proportion of water and a mixture that manufacturers indicate on the packaging. It must be stirred until it becomes thick sour cream (this is best done using a construction mixer or a drill with a whisk at a speed of 600 rpm). Afterwards, the putty is left for 5 minutes for final softening and mixed again. The mixture is ready!
It is important to remember that once the solution is mixed, it must be used in about 2 hours, because dried putty can only be thrown away. Any attempts to restore it with water or add it to a fresh batch will lead to the appearance of grooves on the ceiling that cannot be eliminated.
Also, to seal the seams, you will need serpyanka - reinforcing tape, which can either be glued from the very beginning (the base of the tape usually allows you to do this), or pressed into the first layer of already applied putty. The order here is not particularly important, the main thing is that the seam is in the middle of the tape. The solution is applied to the seams using a spatula, which must be rubbed through the tape into the joint. To make it more convenient to take the putty in small portions, it can be placed on the falcon.
Excess solution is removed, and the tape is covered with another thin layer of putty. It is important to level all layers with a spatula. When it dries, the final layer is applied and the joints are allowed to dry for about a day. The seams must be even and level with the plasterboard sheets. You can check and control the evenness of the surface using a building level.
Sealing drywall seams
Processing corners of plasterboard slabs
Knowing how to seal regular seams on the ceiling, you will be able to cope with the processing of corners, because the principle of operation is approximately the same. The difference is that metal corners are used here as a reinforcing element (you can also use serpyanka, but it won’t be as reliable). They are attached to the first applied layer of plaster, pressed into it, excess mortar is removed and covered with several more layers. For such work, it is recommended to use special corner spatulas.
Final works
After all the above steps have been completed, the layer should be allowed to dry. Only then can you begin to strengthen the masking tape. Its width should be 3 cm larger in relation to the seam.
Putty should be applied on top of the tape. These layers must be completely dry.
The surface of the slabs is primed and finishing putty is applied. It is applied in a thin layer. Instead, you can use painting fiberglass, which is primed and painted in the desired color.
Which mortar to choose: gypsum or cement?
To make the right choice between cement and gypsum plaster, you need to have a good understanding of what both of these mixtures are used for, what their main advantages and disadvantages are.
Gypsum gives the finish greater plasticity. Plaster based on it has a lower density than cement plaster. It has a more attractive texture and there is practically no shrinkage. Gypsum mixtures are porous, the finish is vapor-permeable, which prevents the development of mold on it. In addition, such gypsum hardens quickly.
Alternative Material Options
Quite often, novice craftsmen think about how to seal the seam on the ceiling between the slabs. Instead of foam, adhesive is sometimes used for laying ceramic tiles. The painting mesh can be replaced with a regular bandage or gauze.
A thin fabric that needs to be soaked in water and steamed with an iron is also suitable to avoid shrinkage.
In order to facilitate the work, the ceiling is peeled off with polystyrene foam tiles, which have no seams. Small cracks can be sealed with acrylic sealant. Silicone sealant should not be purchased, because it does not hold paint.
Another solution would be the simultaneous formation and subsequent filling of cracks.
First, a thick cement mortar is prepared, to which liquid glass is added. The bandage is dipped in this composition, rolled up into a rope and placed in the gap. You need to work quickly, because the glass solution will dry in a short time.
The same composition can be used to level the ceiling, and after drying it can be treated with sandpaper. When deciding how and with what to seal the seam on the ceiling between the slabs, you must be careful, because there may be wiring in the ceilings that must be protected from damage.
Types of paint for ceilings
Selecting an option for how to paint a concrete ceiling begins with assessing the requirements for paint, which are dictated by: the purpose of the room, the original state of the ceiling, wishes for the characteristics of the composition and the appearance of the lined base. Let's look at the most popular compositions for painting ceilings.
Acrylic
These paints:- most interesting in terms of price/quality ratio;
- dry quickly;
- due to the absence of solvents in the composition, they do not smell;
- resistant to moisture and temperatures;
- characterized by a wide selection of textures and shades.
Silicone
Silicone compounds are not very budget-friendly in price, but have good characteristics:
- first of all, they are elastic, which minimizes the risk of cracks forming;
- vapor permeable;
- have excellent water-repellent ability;
- capable of bridging small cracks;
- antiseptic;
- The coating is very attractive in appearance.
Silicone paint for ceilings
Epoxy
Epoxy enamels
Epoxy enamels form a durable, wear-resistant layer with good moisture resistance. The coating can be washed with industrial detergents, as well as using high-pressure washers. However, they are not so harmless to human health and the choice of colors is not too wide.
Alkyd
Paint based on alkyd resins is suitable for use in rooms with high humidity and dirt formation. However, it takes a long time to dry and has a pungent odor.
Enamel based on alkyd resins
Silicate
In rooms with high humidity and steam formation, such products will come in handy. In addition, due to improved antiseptic characteristics, they are not afraid of biological damage.
Silicate paint
To create a spectacular surface, you can use texture paints.
Decorative paint on the ceiling
The video in this article clearly illustrates the process of painting a ceiling.
Recommendations from specialists for carrying out work
Many people are interested in knowing how to seal the seam on the ceiling between the slabs; the instructions presented below will help you with this. Before cleaning, the surface should be treated with water from a spray bottle. It is better to wet only the part of the ceiling that you plan to work on at the moment.
The moistened area is left for 15 minutes, and then you can get rid of the old coating and move on to the next area. The entire procedure is repeated again in the new zone.
Until the entire ceiling plane is cleaned, the work must be repeated again and again. As soon as you can get rid of the old coating, you will be able to estimate the amount of work to be done. As a rule, there are several joints per room, the number of which sometimes reaches three.
When thinking about the question of how to seal the seam on the ceiling between the slabs, the options presented above are worth considering. At the preparation stage, the seam should be cleaned, deepening by 50 mm. Next, using a wide brush or iron brush, the seam is cleaned of small concrete residues.
To seal the seam, you can use special rollers made of foamed polyethylene. It is important to choose products of the desired thickness. A strip of sealant is applied to one side.
Afterwards, the roller can be inserted into the previously primed joint. You need to use a spatula for this. The craftsman should ensure that there is room left to fill the space with concrete.
When sealing joints with expanding concrete, it is necessary to install recesses for decorative plaster. Once the solution has dried and the groove has been prepared, elastic putty can be applied to the surface. The work should be carried out using two spatulas, one of them should be wide, the other medium or narrow.
Questions and answers
Is it necessary to wet the rust before sealing?
Yes, definitely, otherwise the plaster may peel off, since there is a high probability that there is dust and dirt inside the seam - they interfere with normal adhesion.
Is the sealing done only along the rustication?
The final movement must be along, otherwise there will be holes in the seam. Apply Rotbunt or an analogue as you wish, but remove it along the line - this is mandatory.
Can I only use cement plaster for the job?
Not necessary - the rusts are indoors, so the gypsum mixture is perfect. It is optimal to use Rotband - it grips perfectly, is elastic and does not simply fall out of the rust.
PS Site tips Let's build together. Good luck with the renovation.
Rusts are artificially created grooves or rollers in plaster. For example, rustications are made on facades when cutting under natural stone, when plastering the walls of staircases, when finishing ceilings mounted from prefabricated reinforced concrete flooring.
The tool used to cut through rustications is called rustication, or jointing. The simplest rustication is a wooden template with a groove or roller cut out on a guide plane - this depends on the required shape of the rustication.
Professional builders, as a rule, have not used wooden rustications for a long time; they have been replaced by duralumin ones.
In my practice, I have improved this tool twice. First, on the basis of a wooden rustication, he created a more convenient universal one, which can be used to pull both a groove and a roller (Fig. 52).
Here, a wooden platform measuring 240X100 mm serves as base 1. In the middle of it is a wooden vertical post measuring 170x25x100 mm, which is additionally fastened to the base with two wooden struts with a diameter of 15 mm in cross-section.
On one side of the rack, a metal plate with a protrusion 4 is bolted,
on the other, a plate with a semicircular groove 5. The first is used for opening the groove, the second is for pulling out the roller. The sides of the stand on which the cutting blades are attached are covered with metal strips. The dimensions of this rustication are 240x195x100 mm and it weighs no more than 250 g.
Rice. 52. Universal rustication for finishing grooves and rollers
: 1 - base; 2 - rule; 3 — handles; 4 — steel plate for pulling out the concave rustication (grooves); 5 — steel strip for pulling out convex rustication (rollers); 6 - screws
But this device is still cumbersome. And soon I abandoned it, making lighter rustications from duralumin - separately for each operation. The rustication at the ends of the metal strip has two protruding rollers for making a rustication groove (Fig. 53)
or two similar plates, but with a semicircular groove on the working part. The rustication can also be used to install a guide rail.
Rice. 53. Rustication for making a groove
It is much more difficult to process rustications on ceilings. In modern industrial buildings, reinforced concrete floors are quite smooth. If the ceiling is the size of a room, then the plasterer has nothing to do here. If the ceiling is assembled from several reinforced concrete floorings, then there are seams between them that cannot be left unfinished.
It would seem that nothing could be simpler: fill the joint with mortar, rub it in better - and the job is done. However, this should not be done under any circumstances.
It will not be possible to hide the seam; there will be a sloppy stripe on the ceiling. Therefore, builders, on the contrary, emphasize the joint and embroider it. Only in this case it is necessary to ensure that the rustication is a clear and even line along its entire length. It is very difficult to achieve this without special devices. It was possible to develop such devices that began to be used everywhere. The kit includes telescopic stands (Fig. 54),
rustications, duralumin graters with foam and foam coating.
Rice. 54. Telescopic stand
The stand is used for mounting guide rails on the ceiling. It is made from duralumin pipes. You need two pipes with a diameter of 30 mm and a third of a smaller diameter - such that it can go inside the first two and connect them to each other. The top and connecting pipes have four holes through which the fastening pin is passed when it is necessary to extend the rack to a certain height. At the bottom of the rack there is a support heel, and at the top there is a screw jack with a clamping bar.
The rustication is a duralumin sheet measuring 270×70 mm. The edges of the canvas are bent upward - they slide along the guide rail. A handle is riveted in the middle of the blade, and slots are formed along the edges, semicircular steel knives with a radius of 8 mm are riveted into them. If the knife is positioned with the sphere facing down, it will cut the rust groove. In most cases, this is exactly the type of rustication that plasterers use.
The roller - a convex rustication instead of a groove - is pulled only in cases where the slabs for some reason are laid with some difference in the horizontal plane. The groove is not suitable here, it only emphasizes the difference, and the roller will hide this defect.
Two workers are cutting the rust. They need two finisher's tables, a stepladder, three telescopic stands, a wooden slat, two boxes for mortar, two brushes, two trowels, two duralumin floats with foam and foam rubber coating, rustication, darning, two buckets.
Work begins by marking the center lines of the rustications on opposite walls.
Then they make a notch on the edges of the slabs, clean them, moisten them with water, and if necessary, caulk the seams.
Fill the joint with cement mortar (1:3), filtered through a sieve with 1 mm mesh. The surface is rubbed first with a foam float and then with a foam float.
The next operation is to install the guide rail along the risks and secure it with telescopic stands. Two or three racks are sufficient for the entire length of the ceiling. The worker guides the rustication along the guide rail, the rustication rests against it with one side. Two knives at the ends of the rustication ensure greater straightness of the groove.
You need to remember: if you use cement mortar (1:3), then cutting through the rustication can only begin 1…2 hours after filling the seam.
This waste of time can be avoided. For this purpose, I began to use quick-setting gypsum cement mortar to fill the joint. For a bucket of water (10 l) you need to take 1 part of gypsum, 4...5 parts of dry cement mixture and 1000 g of polyvinyl acetate emulsion (PVA). The dry mixture and gypsum are mixed and filtered. The solution is prepared in small portions, per rust.
Using a brush, moisten the joint with water, to which PVA emulsion is added. Fill the seam with mortar and rub it with a foam or foam float. Strengthen the guide rail and immediately embroider the rust. There is no need for subsequent putty with this method.
In conclusion, it must be said about the method of adding rustications on the ceilings of industrial buildings, where the height of the walls is significant - 3...10 m. You cannot install slats here.
As a rule, spherical slabs with protruding ribs are used for floors. These ribs can serve as guides for opening the seam between the joints of the slabs. In this case, a special rustication is needed - rackless (Fig. 55).
It is also made from duralumin measuring 300X120 mm. One of the 40 mm wide sides is bent. In the middle part there are cutouts into which knives are attached. And here, by placing the necessary knives, you can cut a groove or pull a roller.
Rice. 55. Duralumin slatted rustications
It may happen that the floor slabs are laid unevenly, with differences. In this case, you will have to make a rustication, the hangers of which have different heights. And not make a groove, but pull a roller.
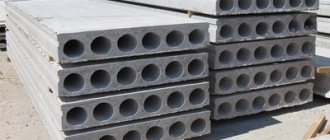
They are laid with 15 mm seams, that is, almost end-to-end. Regulatory literature prescribes the construction of monolithic sections with reinforcement with a distance between slabs of 300 mm.
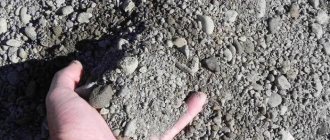
To seal the seams between floor slabs, it is necessary to use concrete with quick-hardening Portland cement or Portland cement grade M400 or higher with fine aggregate.
. The grain size of the aggregate should not be more than a third of the gap between the slabs and three-quarters of the clear size between the reinforcing bars. Plasticizers and setting accelerators must be added to the concrete mixture.
If you get a standard seam between slabs with a width of 10-15 mm, then usually a reinforcement bar is laid at the bottom of the seam, which is arranged in the form of a “cone”, and filled with mortar.
Work methodology
A wide tool is used to collect the compound from a container, and a narrow tool is needed to apply putty to the joint. The solution is compacted into a seam and leveled to the level of the ceiling surface. Excess putty should be disposed of.
After 2 days, which are necessary for the mixture to dry, you can begin to reinforce the seam. To do this, a thin layer of putty is applied to the surface, onto which the mesh is fixed. It should be pressed into the solution and the excess should be removed with a spatula.
The primer is applied after the joints have dried using a roller. It is better to apply it in two layers.
After the ceiling has dried, plastering can begin. First, a thin layer is applied, and after it dries, you can apply the finishing layer, which should be smooth. When applying it is necessary to use a spatula, leveling the surface to an ideal state.
Curved ceiling cracks
First of all, the defect needs to be tapped to determine the boundaries and possible scope of work. If the coating “bounces” over a large area around the crack, you may have to re-plaster and putty a large area, or finish the entire ceiling in some other way, and repairs of such an extent require preparation.
If “bulging” is heard at a short distance along the crack, then the defective finishing coating is carefully removed - cut out with a sharp chisel or carpenter’s hatchet.
The area of the base freed from finishing is inspected for integrity - cracks of complex configuration in most cases are limited in depth by the layer of plaster and do not extend to the base. The repair surface is cleaned down to the concrete slab and primed twice. After the primer has dried, the cavity is filled with a leveling mixture solution, not bringing it to the level of the edges by 2-3 mm:
- cement plaster is leveled with a mixture based on cement or gypsum;
- When finishing gypsum ceilings, gypsum-based compounds are used.
A thin layer of the same material is applied over the hardened repair coating, and a painting mesh cut to the shape of the area is embedded into it with a spatula. The dried reinforced composition is used for finishing leveling using putty.
The repaired area is hidden by completely painting the ceiling.
Filling a hole in a seam
Now you know how to seal the seam on the ceiling between the slabs. We hide the seams along with the holes in them.
In this case, you can act in one of two ways. The inside of the hole is sealed, which can be done with a narrow brush. The inner walls are cleaned of dirt and sprayed with primer.
As soon as the first layer has dried, you can begin applying the second. When thinking about the question of how to seal the seam on the ceiling between the slabs, you need to read the tips.
From them you can find out that the seams, like the holes, are filled with polyurethane foam. After it dries and expands, the excess should be cut off, and a cone should be cut in the inner space of the hole, the height of which will be 50 mm. These manipulations are necessary for laying cement mortar.
In a brick wall
A crack in a brick wall occurs due to shrinkage of the house and improper masonry.
The reasons for the formation in a brick wall are shrinkage of the house, violation of masonry technology, incorrect proportions of the mortar, lack of reinforcement in the wall.
First of all, the crack needs to be thoroughly cleaned; to do this, it needs to be deepened and expanded to the sides at an angle of 45 degrees, and primed.
There are several ways to seal a brick floor slab: using joint sealant or the same mortar on which the wall was laid.
Sealant is better suited for these purposes, since after drying it does not lose elasticity, which allows it to expand or contract without forming cracks in the ceiling. A regular solution will not allow this. Using a construction gun, the sealant must be placed in the seam of the floor slab, and the excess must be removed with a rubber or metal spatula.
But it is worth remembering that silicone-based sealant is not suitable for these purposes, since it is greasy and neither paint nor plaster will stick to it.
If you decide to cover a crack in the floor slab of a brick wall with cement mortar, then first you need to moisten the crack with water, and only then cover it with the mortar.
Necessary materials
In order to properly and reliably putty the seams between the floor slabs, it is necessary to carry out preparatory work on jointing and sealing the seams, as well as purchase the necessary materials that have specific properties and are suitable specifically for this purpose:
- For deep seams, NTs grade cement is required, the peculiarity of which is that it expands during hardening, allowing it to densely fill deep seams and joints;
- For a wide floor seam, it is necessary to use sealing materials made of foamed polyethylene or polystyrene, or polyurethane foam;
- Deep penetration primer;
- Putty with residual elasticity, for example, latex;
- Serpyanka with a width of at least 20 cm;
- Ceiling putty, preliminary and finishing;
Tools: narrow and wide spatulas, brush and spray bottle.
Regulatory requirements for the size and filling of installation joints
Typical dimensions of the slabs provide for their laying with 15 mm seams, that is, almost end-to-end. Regulatory literature prescribes the construction of monolithic sections with reinforcement with a distance between slabs of 300 mm.
To seal the seams between floor slabs, it is necessary to use concrete with quick-hardening Portland cement or Portland cement grade M400 or higher with fine aggregate . The grain size of the aggregate should not be more than a third of the gap between the slabs and three-quarters of the clear size between the reinforcing bars. Plasticizers and setting accelerators must be added to the concrete mixture.
If you get a standard seam between slabs with a width of 10-15 mm, then usually a reinforcement bar is laid at the bottom of the seam, which is arranged in the form of a “cone”, and filled with mortar.
Technology of work execution
- Floor seams are usually sealed simultaneously with ceiling repairs, so it is more convenient to carry out the preparatory work as a complex.
The old coating is removed from the ceiling: whitewash or water-based paint is moistened with water from a spray bottle, left for 10-15 minutes and removed with a wide spatula until the plaster is applied. If the ceiling is covered with a thick layer of putty, it is cleaned only in those places where it has poor adhesion. If there are traces of rust on the ceiling, they are removed with special compounds. The seams between the slabs are opened: the old putty and plaster that are poorly secured in the joints are removed. If necessary, you can use a hammer drill. After processing, the seam should have a U-shaped or slightly expanded inward shape so that the putty holds better. Remove dust from the resulting seam by sweeping it away with a brush and wiping it with a damp sponge. Removing old coating from the ceiling and preparing the seam - Inspect the resulting seam. If its width is more than 3 cm and its depth is small, it is sealed with polyurethane foam. To do this, lightly moisten the seam with clean water and apply foam from a balloon. Wait for it to expand and begin to harden, after which the excess is removed, cutting it off with a knife so that a triangular-shaped depression with a maximum depth of 0.5 cm is formed at the seam site. If the seam is deep and not wide, it must be sealed with polystyrene foam, polyethylene foam or any other elastic material. The seam is pre-treated with a deep penetration primer and dried well. The seal is secured using a moisture-resistant sealant; the surface of the concrete must be dry. The sealant is placed deep into the slab, and the seam on the outside is sealed with NTs grade cement mortar so that a small depression remains at the joint. The cement mortar is dried.
Removing old coating from the ceiling and preparing the seamSample of a putty seam with polyurethane foam inside
- Putty for rust with residual elasticity, for example, latex, is applied to the prepared recess with hardened mounting foam or cement mortar.
Level it flush with the surface of the slab. It is convenient to put putty into the seam using two spatulas: apply a sufficient amount of putty to the wide one, and put it into the seam with the narrow one, compacting and smoothing it inside the seam. After applying the putty to part of the seam, smooth it out with a wide spatula, removing excess. The process of applying latex putty - The solution is dried for 24 hours and the joints are puttyed.
Apply a layer of preliminary putty to the seam and adjacent surface of the floor slabs and glue sickle or paint mesh over it, pressing it into the layer of putty. Iron with a spatula along the direction of the seam. The width of the serpyanka or mesh must be at least 20 cm. Dry the putty and, after drying, level it with sandpaper. Apply another layer of preliminary putty with a finer grain to the entire ceiling, leveling it with a wide spatula. Dry and sandpaper. After this, a layer of smooth finishing putty is applied, dried, smoothed with fine sandpaper and painted. After applying the putty, dry it for a day - If the floor slabs have a height difference of more than 1 cm, the ceiling will have to be plastered after sealing the seams.
Plastering is done with a gypsum-based composition over a reinforcing painting mesh. The ceiling is treated with a special “concrete-contact” primer containing solid particles - it creates a rough layer on the surface of the slabs and facilitates the adhesion of the solution. The mesh is attached to a layer of plaster, carefully smoothing it out. After the plaster has completely dried for 2-3 days, you can begin to putty. Ceiling plastering technology
The ceiling made in this way looks absolutely smooth, there is no destruction of the seams, and the resulting microcracks, due to the plasticity of the putty, remain invisible. However, this method is unacceptable for apartments in new buildings - the house will settle within three to four years, and the slabs will inevitably move. Therefore, for new houses it is better to use other types of ceiling finishing, for example, suspended ceilings.
In order to properly putty the seams between the tiles on the ceiling, you need to carry out preparatory work. The seams that are located between the ceiling tiles are considered to be one of the most difficult defects. For many decades, people tried to fight this problem, but as a result, the cracks made themselves felt again. This happened for various reasons, such as settling of the house or ground movement.
The current building materials market can offer a wide range of products that can help in this situation. One solution to hide this defect is to install a stretch ceiling, but not everyone can afford this luxury. What to do in this situation?
Sealing the ceiling seam from the bottom side
Inter-tile seams - rustications are filled with concrete during installation, then the ceiling is primed, puttyed and painted, unless other finishing is provided.
Sequence of sealing rusts
Before concreting, the seams are thoroughly cleaned of dust and mortar residues with a wire brush ; for better adhesion of the mortar to the slab, the side surfaces can be primed.
- The prepared fresh concrete solution is unloaded into a container and delivered to the work site;
- If the width of the rustication is small, the filling is carried out at one time, if the width of the area is large - in several layers, but no more than after 2...3 hours;
- A concreting area of small width is bayoneted; for a large one, it is compacted with a vibrator;
- For the first week, the surface of the monolith is moistened with water daily;
- After 28 days, the formwork is removed.
Uneven shrinkage of the house
It's unpleasant when cracks appear on the ceiling. This often happens due to::
- Uneven settlement of the building;
- Incorrectly selected brand of concrete;
- Poor quality concrete.
Let us dwell on the causes of uneven precipitation. It may occur in the following cases:
- Structural defects - incorrectly designed foundation;
- Foundation construction without taking into account geology, soil freezing depth and groundwater depth;
- Poorly performed work on the construction of the foundation and masonry of walls;
- Poor quality building materials.
To understand the reason for the appearance of cracks, it is sometimes necessary to order a construction examination.
Decorative ceilings
A protective layer of concrete 30-50 mm thick should ensure that there are no rust stains on the ceiling from the reinforcement, but sometimes this layer is ineffective. The best remedy for seeing stains on the ceiling, traces of leaks and rust cracks is to install a suspended, suspended or suspended ceiling.
A decorative ceiling is the best solution when it is necessary to level the ceiling surface. It will cover all construction flaws and give completeness to the interior. If you want to reduce the height of the room, multi-level or suspended ceilings made of plasterboard, acoustic boards, or combinations of various materials are arranged.
In rooms of low height, false or suspended ceilings are used. The champion here is the suspended ceiling, which “eats” only 3-5 cm of the room’s height.
Every problem finds its solution. Sealing joints between slabs in an aerated concrete house, even with a large width, does not pose a major structural or technical problem. From the proposed options it is easy to choose the one that suits your specific case.
We tried to write the best article. If you liked it, please share it with your friends or leave a comment below. Thank you! Great article 11
Content:
How to remove expansion joints if they are very visible? If you decide to use a material such as wallpaper or fabric for the ceiling, then the best option for closing the seam would be to use polyurethane foam and putty. If the ceiling is painted, then it would be better to use a method that will be of higher quality.
When sealing seams on the ceiling, you need to use only high-quality working materials.
If you do not follow this simple rule, then after a certain period of time the seams will appear again and the ceiling will have to be leveled again.
Sealing seams on the ceiling using polyurethane foam is the easiest and fastest
Covering the seams on the ceiling can be divided into 5 stages:
- First of all, you need to widen the crack. To do this, you can use a hammer drill or a special spatula;
- After this, using a construction knife, you need to clean the seam and coat the crack with a special primer. This stage must be done with a brush;
- Next, the seam must be filled with foam using a construction gun. When the foam is thoroughly dry, using a construction knife, the excess is removed to a smooth surface;
- The next thing to do is mix the mortar primer. The mixture is carefully applied to the seam using a spatula. Movements must be smooth and confident in order for the putty to completely fill the empty space of the foam;
- After half an hour, it is necessary to apply an additional layer of putty using a wider spatula.
This method is suitable not only for sealing ceiling seams. It can also be used if there is empty space between the pipes that go into the ceiling.
After the mixture has dried, it must be primed, then the entire surface of the ceiling must be treated with putty.
The simplest formwork
The budget, most common formwork option is made from boards and timber of at least 2nd grade wood:
- The monolithic layer is poured onto a plank deck with a thickness of at least 25 mm; the width of the boards can be any.
- Beams and purlins are made of 50x100 timber.
- The minimum cross-section of load-bearing posts is 50x65 mm.
Compliance with these requirements will ensure that there is no sagging in the monolithic section of the floor.
Installation of racks
The side edges of the floor slabs serve as formwork fencing for the monolithic section being constructed. Its deck is placed under the floor slabs and mounted on support posts
Procedure for installing supports:
- Pillars are installed on both sides of the opening.
- Beams rest on them and are laid across the slabs.
- The purlins are mounted on top of the beams along the slabs and are made of 50x100 mm timber.
- Next, the remaining supports are mounted under the purlins in increments of 1 m to ensure the horizontality of the formwork.
- At the base of the supports, a lower frame is made - the posts are sewn together lengthwise and crosswise with a 25 mm board to ensure the stability of the structure when poured with concrete.
- The top trim is done in the same way at a height of approximately 1.5 m, resulting in a rigid spatial structure.
Racks can be made using the extension method. The essence of the method: the supports are made smaller than the required height, but then they are built up at the top in pieces of the required size. This makes it easier to dismantle the formwork after performing monolithic work:
- The lower beams are removed first;
- then the upper parts of the racks with beams are dismantled;
- then the flooring with the purlins attached to it is removed.
Flooring
The deck is mounted on top of the purlins, the edges of the boards run under the installed floor slabs. Any gaps in the flooring are sealed on top with polyurethane foam. The entire surface is covered with plastic film. Covering purposes:
- retaining water in the concrete mixture;
- preventing cracking of the monolithic layer;
- facilitating the dismantling of formwork;
- giving the surface increased smoothness.
Fastening the deck without the use of posts and beams
If the width of the monolithic section is small (up to 1 m), you can use a simplified method of attaching the deck, which does not require the installation of racks. The principle is quite simple, fast, and economical: attracting the deck to the lower plane of the slabs with wire clamps. The technology provides:
- boards, plywood, OSB can be used to construct the flooring;
- the deck should extend under the adjacent floor slabs by 20 - 25 cm on both sides;
- clamps are made of wire with a thickness of 6 mm or more;
- the fastening wire is launched into the flooring in increments of 0.5 m;
- above each place where the wire clamps pass onto the slabs, a transverse bar with a cross-section of at least 50x75 mm is installed;
- the deck is pulled through the top beam using the twisting method;
- The flooring, firmly attached to the lower plane of adjacent slabs, is reinforced and poured with concrete in the standard way.
Important! Sometimes developers punch holes for reinforcement in the edges of slabs, but this should not be done due to the weakening of the structure of hollow-core slabs.
When dismantling the deck, the clamps are simply cut off with a grinder, and part of the wire remains in the monolith.
The joint between the wall and the ceiling: choosing the material
Another problem that can very often be encountered is a crack between the walls and the ceiling.
What to do with such a seam? This problem will interfere with high-quality ceiling finishing. Of course, you can resort to the method described above and seal the joint with construction foam, but there are several other materials that can save the situation.
For example, to close a seam you can use:
- Gypsum mortar;
- Synthetic putties;
- Moisture-resistant putties.
The best option to seal the joint between the wall and the ceiling is construction foam, since after application it begins to expand during drying, thereby filling all empty spaces
If there are large joints, then you can use a reinforcing mesh, which must be placed in the crack that has formed. Most often, cotton or linen is used for this, which is soaked in glue. The final stage will involve applying plaster, which will help consolidate the result.
How to get rid of them
There are two main ways to solve the problem of rust on the ceiling. Each of them has its own advantages and disadvantages, but which one to use cannot be determined immediately.
Layed floor slabs are not always parallel to each other. Height differences can be quite large. The choice of finishing method will depend on how strong the difference in the plane level of the slabs will be.
In one case, a whole complex of works related to obtaining a smooth plane will be used. This option involves and is quite labor-intensive. Its undoubted advantage will be the most smooth and very even resulting plane of the new coating.
The disadvantages of this solution include a fairly large amount of leveling work and the high total cost of the work. In addition, not everyone can perform all operations with sufficient quality.
Sealing rust on the ceiling using the second method will be much easier. You just need to fill the existing recess with putty solution and bring the sealed area into the same plane as the rest of the ceiling. After this, it is necessary to sand the sealed area and give it its final look using finishing.
The costs will be much lower, and the amount of work will be significantly reduced. However, the qualifications of the employee will also be of great importance. An inexperienced master will not be able to perform all operations perfectly.
Preparatory stage: how to cover the seams on the ceiling between the slabs
In order to prevent the seam from being visible in the future, it is necessary to carry out some finishing measures, which include the use of special materials. However, first you need to prepare the ceiling for work. Since the primer is applied exclusively to a clean surface, first the old coating is removed and the old cement and lime are cleaned off.
It is important to remember that you cannot apply subsequent layers of material until the previous one has dried. This is a very important point that must be observed. If you do not pay attention to this and neglect the rule, the quality of the final work can be seriously affected.
Work associated with sealing seams
Repair and insulation of wall joints
Sealing the joints of wall panels is carried out along the facade of the building. With modern technology for sealing joints (“warm seam”), not only sealing materials are used, but also an insulating cord specially designed for this purpose. Repairs restore their tightness and protect apartments from freezing walls and the appearance of fungus, drafts and dampness.
Final leveling work
After the main work is completed, you can begin leveling the surfaces. This is done using abrasive mixtures.
Non-woven fabric can eliminate all minor irregularities on the ceiling
It is very important to remember that you can start painting the ceiling only when all repair work is completed.
Using non-woven fabric, you can get a wonderful ceiling. It needs to be glued before you start using putty.
This way you will get a flat ceiling. After the finishing putty has been applied, the ceiling is primed one last time. Finally, the ceiling can be given absolutely any look using paint or other material.
What is the characteristic of finishing the ceiling surface using paints and varnishes?
The quality of finishing of the ceiling surface in residential and public spaces is extremely important. When entering a room, one of the first things that catches your eye is the ceiling. Accordingly, its attractiveness largely determines the overall impression of the room’s decoration.
Ceiling paint for concrete is the simplest, most affordable material, but at the same time allows for a neat and attractive finish. And in industrial and utility buildings, painting concrete ceilings is used even more often than other finishing methods.
Painted concrete ceiling in garage
It is worth noting that this type of cladding of ceiling surfaces has become relevant in modern interiors: loft, industrial, techno, contemporary, minimalism.
The benefits of painting the ceiling
- You can apply the composition yourself without the help of professional teams.
- Using paint to decorate ceilings is one of the most budget-friendly options. Naturally, suspended and tensioned coverings will cost many times more.
- Thanks to the use of paints and primers, the concrete surface is additionally protected from the effects of adverse factors.
- This finishing method is excellent for rooms with low ceilings, since the facing layer has a minimum thickness.
- Applied in accordance with the rules, the composition will delight the eye with its attractive appearance for a long time.
Along with this, it should be understood that the process of painting, especially a surface located at a height, is quite labor-intensive.
Finishing
The final treatment of the ceiling seams involves applying putty, which will completely disguise it.
After drying, the solution is rubbed down, treated with a primer, and the finishing composition is applied on top. It has a more uniform structure and is based on gypsum and white cement. The putty can then be painted or wallpaper placed on top. If the shrinkage of the house is within normal limits, and the work itself was done correctly, cracks should not appear in the next 10 years.
Another option is installing ceiling tiles. It is attached to an installed frame or glued to the plaster with liquid nails. It is advisable to make a hanging or tension system to hide the wiring and install spotlights.
In any case, you first need to work out the joints between the slabs, since the sealed ceiling will guarantee the preservation of heat in the house and the protection of the room from moisture and destruction.
We recommend watching the video:
Preparing the work surface
They start by assessing the extent of the damage. Since most ceilings are covered with plaster, you need to get rid of it with water and a spatula. Use a spray bottle to evenly saturate the old plaster and allow it to soften, and then carefully remove the unnecessary layer with a tool.
Where there is a joint, it is necessary to clean the seam itself from concrete. Over time, the edges of the slabs begin to crumble, so they get rid of the weakened material - take a hammer drill and clean out everything unnecessary.
It is necessary to ensure good adhesion with the solution in order to properly seal the seam. The concrete is treated with a primer, carefully brushing the recessed areas with a brush. It is better to use formulations that will provide additional antiseptic treatment. This will protect the concrete from the formation of fungus, which cannot be avoided on the upper floors adjacent to the attic.
The appearance of defects in the ceiling
This is the most pressing problem for multi-storey buildings, since construction standards are not always followed. As a result, after a few years the surface begins to change for the worse, including the seam becoming noticeable. Newer homes use more advanced technologies to avoid significant structural movement, but due to shrinkage, cracks still appear.
Expanding the space between the plates also entails:
- leakage in the presence of flaws in the roof;
- penetration of dampness into the house;
- heat loss;
- violation of housing design;
- further displacement of the plates relative to each other.
Let's look at how to seal a seam to avoid such negative consequences. It is important to perform the work efficiently in order to permanently get rid of surface defects.
Roof inspection
Residents of the upper floors in houses without an attic should make sure that the roofing is reliable before starting work, so that the work done will not be in vain. If the waterproofing layer on the roof is damaged, heat can escape and water can leak through the seam in the ceiling, even after it has been sealed, so if damage is detected, it must be repaired. To do this, you can contact the management company responsible for the overhaul of the building, or take care of replacing sheets of roofing material yourself, which is most often used to cover the roof.
Preliminary preparation
Before sealing the seams between the ceiling tiles, you need to prepare the ceiling. To do this, carefully clean off the previous layer of finishing material (paint, lime whitewash, or putty). In this case, a spatula or scraper will help out. When working with tools, it is necessary to ensure that the base of the ceiling, that is, the panel slab, appears.
After cleaning, the cracks and cracks need to be widened inside for better placement of the base material. You can use a construction drill or hammer drill if the crevice is too large and needs to be cleaned thoroughly. After dust and other contaminants have been removed from the seam, the surface must be thoroughly primed. The primer will enhance the adhesive properties of the putty.
When the preliminary work is completed, you can move on to the main stage.