In order for the structure to be strong and of high quality, you need to know how to correctly lay floor slabs on the foundation. This will make it possible to achieve uniform distribution of the load created by the floor elements and increase the rigidity of the structure erected on moving soil. Attention should be paid not only to the algorithm of actions, but also to the materials used. Each type of slab has its own characteristics that you need to know in order to install it correctly.
The installation sequence is strictly regulated Source tildacdn.com
Types of panels
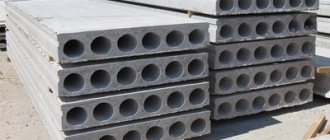
Before you figure out how to lay floor slabs on a foundation, it’s worth getting acquainted with the main varieties. They can be solid, hollow and ribbed. Each type has its own characteristics, which should be taken into account when choosing the appropriate option.
Solid
Monolithic reinforced concrete products demonstrate a large margin of safety. The required strength characteristics are ensured through the use of high grade cement and reinforcement.
To form them, wooden formwork is used, inside which a reinforcing mesh is placed, and then concrete is poured. Monolithic floor slabs require four weeks to harden and gain strength. The timing may increase with high humidity or low temperature.
The choice in favor of a monolithic structure is made when the shape of the structure is non-standard. Finished products differ in size and configuration. It is worth immediately understanding how to correctly lay floor slabs on the walls in order to ensure the required technical characteristics of the assembled structure.
Monolithic technology requires an individual approach Source vse.kz
Attention! The high rigidity and strength characteristics of solid slabs make them in demand in the construction of industrial facilities operating in conditions of high vibration.
Monolithic slabs have the following advantages:
- minimization of transport costs, since monolithic floor slabs are formed directly on the site intended for the construction of the facility;
- smooth surface, simplifying finishing work;
- high heat and sound insulation characteristics due to the absence of joints between the elements being laid;
- corrosion and biological resistance;
- long service life;
- fire safety;
- the possibility of forming a slab that will have a shape that allows it to be used as a floor and an external element at the same time.
When choosing monolithic slabs, the configuration of the structure does not matter Source cdnvideo.ru
The disadvantages of monolithic products include:
- Difficulty of manufacturing. You must have certain knowledge to form a surface with the required characteristics.
- Difficulty in installation. Laying floor slabs on the foundation yourself is problematic. It is worth engaging professionals who have special equipment and tools at their disposal to prepare the solution and then pour it into the formwork.
- Long installation. Due to the long period of concrete hardening, construction work has to be postponed.
- Impossibility of reuse.
Void
Finished products are designed for less load than monolithic ones. There are special cylindrical cavities inside the structure. They are located along the entire length of the product, reducing its weight and worsening its heat and sound insulation properties.
Inside the hollow core slabs there are cavities of a characteristic cylindrical shape Source sdelaipotolok.com
Attention ! The cavities inside the hollow elements are used for laying communications.
Products are manufactured in factory conditions. To form them, heavy concrete and steel reinforcement with a suitable cross-sectional size are used. Before laying the floor slabs on the foundation, verification calculations are performed. Their result will allow us to assess whether the mounted structure can withstand the operational load.
The advantages of hollow products include:
- availability;
- ease of installation;
- sufficient heat and sound insulation characteristics;
- light weight;
- long period of operation;
- reliability;
- good resistance to wear;
- possibility of reuse.
Among the disadvantages it is worth noting:
- costs of transportation and storage of slabs;
- standard parameters, due to which the dimensions of the building have to be coordinated with the existing ones;
- impossibility of using buildings with unique architecture in the construction.
End surfaces must be sealed Source stroyimdom.com
Ribbed
Such floor slabs are often called U-shaped due to their characteristic cross-section. They have 1 - 2 stiffening ribs, depending on the design. Thanks to this, they are able to withstand large bending loads. Light and heavy concretes are used for their production. When manufacturing a product, preheated reinforcement and mounting loops are placed in the mold, and after that the concrete mixture is poured. The latter is compacted by applying vibration.
Attention! Ribbed floor slabs are not used in the construction of residential buildings.
Ribbed structures are relevant for the construction of industrial facilities, retail facilities, garages, and warehouses. In such buildings, protruding stiffeners on the ceiling being formed can be used for mounting various elements.
Ribbed slabs have a characteristic cross-section Source activen.com.ua
The advantages of ribbed elements include:
- high strength characteristics;
- light weight due to the characteristic curved shape;
- accessibility due to factory production;
- corrosion, biostability;
- preservation of properties under conditions of prolonged exposure to moisture;
- the ability to adjust the size taking into account the location and availability of free space;
- admissibility of repeated use.
Disadvantages include an unattractive appearance, which limits the area of use of the products, and difficulties during installation work.
The formed surface is difficult to decorate Source tildacdn.com
See also: Catalog of companies that specialize in designing country houses and villages.
Useful tips
You cannot install slabs with broken hinges.
The installation of slabs is constantly monitored. The quality of covering products, certificates and passports for them are checked. The correctness of storage and transportation is taken into account. During the work, compliance with the project, the quality of sealing joints and welding of embedded parts are examined. If the joints are filled with concrete in winter, the area is heated until the mixture completely hardens.
On large-scale construction, joints are checked after reaching the design strength, and the installation is checked using levels and laser levels. If there were changes to the project, detailed drawings are made, welding logs are kept, connections are sealed, and hidden work reports are drawn up.
You cannot install slabs that have broken hinges or are not cleaned of dirt or adhering layers. During the break, the raised structures are not left hanging, but are laid down after welding is completed. You cannot level the panels with a crowbar after removing the slings, nor can you move them through the air in winds exceeding 15 m/s or in fog.
Calculation and layout drawings are carried out before the construction of foundations in order to accurately determine the position of walls and columns in space and ensure the correct support depth.
Laying rules
In order for the building to last as long as possible, you need to know how to lay floor slabs correctly. To achieve the best result, the following rules are observed:
- Laying is carried out on a prepared base. If there are deviations in height, a suitable alignment method is selected.
- The support area when laying on a reinforced concrete base must be at least 6 cm. When laying on brickwork, the size of the supporting surface increases to a minimum of 12.5 cm.
- Before installation work begins, the end parts of the slabs are sealed with insulation, which can be the remains of mineral wool slabs or polystyrene foam placed in polyethylene. Let's say laying penoplex (extruded polystyrene foam). The surface is covered with cement mortar. This helps to increase the strength characteristics of floor slabs.
- Installation is carried out in such a way that the extreme sides rest on the opposite ones. The side part is sealed using different methods.
The installation procedure is strictly regulated Source zonaremonta-ufa.ru
- A metal scrap is used to adjust the position of the plate. To achieve the best result, the work should be performed by several people at once.
- The foundation is coated with a 2 cm thick concrete solution. To prevent it from being squeezed out, reinforcement rods are laid along the tape.
- The location of the upper and lower surfaces is precisely determined in order to understand how to lay the floor slabs. Under the influence of operational load, the lower surface is actively stretched. To avoid its premature destruction, during the production process the lower layer is subjected to more active reinforcement. The top layer compresses during operation, and therefore manufacturers may refuse reinforcement.
- The slabs are adjusted to size along the bottom side.
- The solution that will be used during installation work is prepared in advance by mixing the components in a given ratio and achieving a uniform consistency.
The ratio of components of the concrete solution must be maintained Source gbs-78.ru
- The concrete solution poured into the space between the slabs includes a certain amount of limestone, expanded clay, and crushed stone. The presence of voids is unacceptable, since a large percentage of the solution used to form the concrete screed can escape through them, which will significantly increase the cost of installation work.
Attention ! You can distinguish the top layer from the bottom by appearance. When in contact with air, the upper surface becomes rougher. The lower one, due to contact with the formwork, turns out smooth.
Thermal insulation of joints
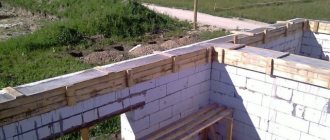
After laying the slab, the perimeter of the foundation is leveled with brickwork. This material is a cold bridge by default, so it is necessary to lay bars of extruded polystyrene foam or mineral wool between it and the floor slab. Only in this case will heat loss through the floor be minimal.
Scheme of insulation of the ends of floor slabs.
It is allowed to use solid strips along the entire length of the wall, assembled from pieces of insulation. If there are cracks, it is necessary to fill them with polyurethane foam, the characteristics of which are almost similar to the specified heat insulator.
Installation procedure
To correctly lay floor slabs on the first floor, adhere to the following sequence:
- a set of preparatory measures, including a large list of works aimed at preparing slabs and foundations;
- installation itself using special machinery and equipment;
- sealing and reinforcement of the structure.
There are certain requirements for each stage, which can create certain difficulties when performing installation on your own. Specialists know how to lay floor slabs on the foundation, and therefore will be able to take into account all the necessary nuances.
Installation of floor slabs Source pm16.ru
Preparatory stage.
Installation work begins with preparing the foundation. To achieve a positive result, you need to properly prepare the foundation. Particular attention is paid to the horizontality of the foundation being formed. A laser or optical level is used for checking. The algorithm of actions is as follows:
- The magnitude of the differences in height is measured.
- The maximum value is determined, based on which the surface leveling method is selected;
- The base is leveled. If the difference between the heights is less than 50 mm, the base is leveled using concrete mortar with reinforcement of the formed layer. If the difference is greater than 50 mm, first a layer of bricks is laid or a concrete reinforcing belt of sufficient height is formed.
The base must be perfectly level Source gazobetoneco.ru
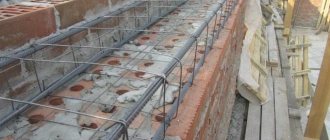
The foundation, for the manufacture of which prefabricated blocks were used, is reinforced with the help of an armored belt. The structure is formed around the perimeter. Its presence is mandatory, as it will allow:
- evenly distribute the load created by individual floor elements and transmitted to the base;
- will allow the strip foundation to better resist bending load;
- make the upper supporting surface of the foundation more even;
- increase the rigidity of the structure.
The thickness of the formed armored belt must be at least 20 cm. B20 concrete is used for its construction. The reinforcing belt is poured using monolithic technology. Reinforcing rods are laid longitudinally in two rows. Thanks to their presence, the poured structure will better resist bending stresses.
Filling of the armored belt is performed:
- once around the entire perimeter;
- layer by layer.
It is better to fill the armored belt in one go Source stroyfora.ru
Learning to lay slabs correctly - performing reinforcement
Reinforcement of the overlapping structure, formed from individual slabs, is carried out to increase rigidity, provide stability and prevent cracking.
Strengthening is carried out in various ways:
- by pouring a concrete belt around the perimeter of the structure, reinforced with reinforcing mesh;
- by performing screeding over the entire floor area with preliminary installation of reinforcing mesh.
Reinforcement work is carried out on the basis of previously performed strength calculations and is carried out in accordance with the reinforcement scheme. A ceiling reinforced with reinforcement is characterized by increased reliability and a long service life.
Video description
This video shows the algorithm of actions of specialists when installing floor slabs:
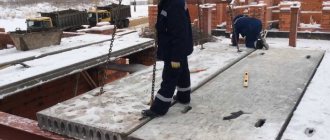
In the most general case, installation is done as follows:
- The foundation is covered with a layer of cement mortar 20–25 mm thick. A continuous layer of equal thickness is formed.
- The floor panel is strapped together and moved towards the base using special equipment. When lowering the element to the installation site, the slings are held in a tense position. This allows you to adjust the position of the element being laid by moving the lever to the desired position.
- After checking the size of the contact area, the slab is lowered onto the foundation.
- If necessary, its position is adjusted.
- The slabs are connected to each other using sling eyes and secured to the foundation with anchors.
To lift and move floor slabs, special equipment is used, which must be in place before work begins.
Sizing can be done in different ways Source stroyimdom.com
Advantages of a slab foundation
With your own hands - How to do it yourself How to make a two-flight staircase to the second floor with your own hands photo drawings Do-it-yourself two-flight staircase to the second floor
The large area and the presence of spatial reinforcement can significantly reduce the pressure of the foundation on the ground (up to 0.1 kg/cm2) and transfer alternating loads that arise due to various ground movements. Since the slab foundation is located under the entire area of the building, its use is more justified in the construction of relatively small objects.
The main strengths of slab foundations are:
- simplicity and relatively low cost of manufacturing and installation of a monolithic slab (due to the possibility of unloading concrete directly from concrete mixer trucks and, as a result, no need to use an expensive concrete pump). Provided that the work is carried out under proper control of the customer, the pouring of such a foundation can be carried out even by builders with low qualifications, who only need to explain where to get it, where to pour it and how to level it;
- high load-bearing capacity, which is due to the large area of contact with the ground. As an example, we can mention that the monolithic foundation slab on which the 63-meter elevator column of the Ostankino Tower is located is only 1 meter thick;
- Thanks to the common platform, which is not subject to local deformation, the guaranteed integrity of the walls of the building is maintained. In winter, there are no dips or bends in the structure, since it lowers and rises evenly. This property is due to the fact that the monolithic slab is a rigid, rigid platform on which columns and walls are located;
- the possibility of using the foundation as a subfloor for the basement floor. In this case, the use of any additional floor slabs on the ground floor is not required, which significantly saves money;
- the possibility of using a monolithic slab foundation on so-called difficult soils, due to the fact that its construction practically does not require excavation work. This opportunity allows you to minimize labor-intensive and expensive work in conditions of frozen soil, high groundwater levels, and so on.
The procedure for covering large openings
If the opening is wide enough, floor slabs can only be laid on the foundation using additional elements. In order not to destroy the entire product, two methods are used. In the first case:
- determine the amount of free space that should be filled during installation, divide it by two;
- install the first slab, prudently departing from the edge a distance numerically equal to the obtained value;
- install all slabs in accordance with the requirements of the regulations;
- measure the remaining space, which should be numerically equal to the distance left earlier when installing the first slab;
- fill the gap on both sides of the structure, laying cinder blocks with their ends facing the main surface;
- control the position of the block holes, which should be directed to the side.
Blocks will help block free space Source stroyimdom.com
In terms of labor intensity, the second method is significantly superior to the first. In this case, having previously determined the amount of free space, distribute it evenly between the laid slabs. After installation is completed, the resulting gaps are sealed as follows:
- a board is attached from below between the slabs, which can act as formwork;
- reinforcement is placed in the space;
- concrete solution is prepared;
- the free space is filled with concrete mortar.
Depth of the establishment on the walls
The minimum support of floor slabs is regulated by regulatory documents. It depends on:
- Type of building - industrial, administrative or residential.
- Thickness of a brick load-bearing wall.
- Types of load - dynamic or static.
- Load sizes - point and distributed.
- Lengths of reinforced concrete products.
- Dimensions of the overlapped span.
Accurate data on the size of the overlap is obtained using calculations by design engineers; they must fit within the standard of 9-12 cm.
Elements of interfloor ceilings are produced in 2 sizes:
- constructive, which is equal to the distance between the ends of the ceiling slab (net length);
- modular - planned span width.
So, when laying 6-meter hollow core slabs, the actual size of the product is 5.98 m. If you leave 2 cm for the plaster on each side, then to make a room 5.7 m wide, you should install the product with an overlap depth of 12 cm .
In the case when the amount of support is greater than that established by the rules, the reinforced concrete products are pinched. That is, part of the load falls on the end of the floor element. The brickwork of load-bearing walls will slowly crack due to improper operation of the entire structure.
In addition to this, the increased overlap leads to excessive heat loss, since the end is located outward.
If the minimum depth of the depth is less than required, the load transfers to the edge of the masonry and causes its collapse.
Excerpt from SNiP
The required depth of support for the floor slab is indicated in SNiP. In the section regarding large-panel structural systems, it is noted that on 2 sides hollow-core slabs must overlap the load-bearing panels:
- by 100 mm - with a height of more than 220 mm;
- by 80 mm - with a height of less than 220 mm.
In any case, the support distance should not exceed 15 cm. Concrete products with many voids are not laid on the 3rd and 4th sides.
Products made monolithically are laid on walls made of reinforced concrete or concrete with a support depth of:- 7 cm - with a span of more than 4.2 m and installation on 2 sides;
- 5 cm - if the value is less than 4.2 m and 2 sides or more than 4.2 m and 3 sides;
- 4 cm - on 4 sides (along the contour).
Video description
We suggest watching the following video, which will help you understand in detail the procedure for forming a hatch leading to the basement of a private house:
When cutting reinforcing elements with a grinder, you should act with extreme caution. The geometric parameters and characteristics of the tool used can cause the grinder to become jammed between the protruding parts of the reinforcement. This phenomenon may cause injury to the installer. In the absence of an autogen, a small cut is made on the sledgehammer, and then the cut site is hit with a sledgehammer.
Calculation of the thickness of a slab foundation
The essence of the calculations comes down to determining the characteristics of the soil, selecting and checking the parameters of the foundation, taking into account the expected loads. The results are used to calculate the amount of required building materials, draw up a diagram of the reinforced frame and to confirm the economic feasibility of the choice. The minimum thickness is calculated in the following sequence:
- Analysis of the condition of the soil and selection of the optimal specific pressure on it (tabular value).
- Determination of the total weight of the structure, including walls, floors, roofing and snow loads.
- Calculation of the foundation area and obtaining the specific load per 1 m2 by dividing it by the previous value. After comparing this value with the optimal one, the difference is used to find the mass of the slab itself.
- Calculation of the volume of the structure by dividing by the density of reinforced concrete (default 2500 kg/m2), determining its required thickness.
- Rounding to a multiple of 5, recalculation. With the correct thickness, the difference does not exceed ±25%.
- Selecting a concrete grade based on the specific load per 1 m2.
To eliminate errors, you can use a calculator to calculate the optimal thickness; the results are assessed from an economic point of view: if the slab height is over 35 cm, you should choose a different type of foundation; if it is less than 15 or a negative value is obtained, the weight of the building should be reduced.
For reliable operation of a two-story house made of wood or foam concrete, a height of 20-25 cm is sufficient, and for a brick house - 30-35. The reinforcement scheme is selected based on the resulting thickness: for bases within 15 cm, one mesh is required (including ribbed ones), for 20 cm - two. They adhere to the standard minimum distance from the edge of the concrete - 50 mm, the spacing of adjacent rods varies from 20 to 30 cm, in areas with high stress it is recommended to strengthen them. The diameter of the reinforcement is from 12 to 16 mm; on average, 100 kg of metal is required per 1 m3 of slab foundation.
Briefly about the main thing
Laying slabs may be required during the construction of buildings for various purposes. When performing work, the characteristics and type of mounted elements are taken into account. They can be monolithic, ribbed or hollow. The choice depends on the purpose of the structure being built, the characteristics of the foundation and a number of other factors.
Before installation work begins, a set of preparatory measures is carried out, including leveling the foundation and forming access roads for lifting equipment.
Then the installation itself is carried out, with the position of the plates adjusted and fixed relative to each other and to the base. With large opening widths, the space is filled in various ways, the choice of which depends on the characteristics of the structure being built.
Sealing seams between slabs and internal cavities
The gaps between the panels are sealed to reduce heat losses. The sealing method depends on the size of the seam:
- small gaps between the side planes of the slabs should be filled with concrete mortar or cement mixture;
- the enlarged space is filled with concrete blocks or bricks, followed by cementation.
For concreting large voids, the technology provides for the possibility of installing formwork. Sealing is carried out immediately after installation of the slabs. To improve the thermal insulation characteristics, the end cavities should also be sealed with mineral wool, rubble brick or concrete.
Operating conditions determine the approach
If we talk about the operating conditions of bricks, they are extremely harsh:
- firstly, the brick must be very strong - it will have to support the entire building;
- secondly, the brick must have good frost resistance, because it directly forms the outer wall of the building;
- thirdly, the brick should not allow moisture to pass through and not be subject to changes under the influence of moisture.
Clinker brick
All these conditions are fully satisfied by clinker bricks, which have:
- strength - from M75 to M500 (silicate is much inferior here, but acid-resistant is ahead - more than M500);
- frost resistance - from F50 to F100 (in this indicator, fireclay and acid-resistant are much inferior);
- average density (kg per cubic meter) – 1900 – 2100;
- porosity (%) – 5;
- thermal conductivity coefficient (W per meter) – 1.16.
Helpful advice! We advise you to pay attention to the special types of bricks that can be found on the market and which have a strength of up to M 500, while having a porosity of 43-45%.
The next choice is to find the type of clinker brick.
There are five of them mass produced:
- A – facing;
- B – construction;
- C – single;
- D – one and a half;
- E – double.
Thus, the most optimal choice is considered to be one-and-a-half clinker bricks with a strength of M400 and frost resistance no worse than F50.
Requirements
In addition, additional requirements are imposed on bricks, taking into account operating conditions:
- it should not have chips or signs of deformation;
- its dimensions must exactly correspond to the standards;
- the brick should not have any claims from an environmental point of view;
- Cement mortar will be used as a binding material, so it must have good adhesion to the mortar.
Brick plinth manufacturing technology
Having decided what a brick base is needed for, you can begin construction. Laying the base of a building does not require high qualifications or special equipment.
Material selection
It is not recommended to use sand-lime brick due to its maximum hygroscopicity. In addition to destruction from the moisture they absorb from the air and earth, they transfer it to the walls or foundation. In addition, decorative plaster, which is most often used to finish masonry, does not adhere well to their surface. the optimal choice is:
- clinker is the most durable of existing analogues, has a long service life, does not require finishing, is absolutely waterproof, but is too expensive, so it is rarely used;
- ceramic clay brick - average price, excellent decorative properties, solid modifications are used (grades not lower than M200, frost resistance F100);
- dry, semi-dry pressing - looks like ceramics, but does not fire, has lower frost resistance, is inexpensive, the masonry does not need lining;
Solid clay brick M200 is the most suitable material for the plinth.
When choosing a brick other than the walls, the plinth by default becomes an independent element of the facade design.
What tools will you need?
To build a brick plinth, you will need a standard trowel, a level, a mooring, a plumb line, a cord, and a pick. When using facing bricks, cutting is best done with an angle grinder (grinder) with a diamond blade. For the solution you will need a bucket with a shovel or a bucket with a drill and a mixer. Professionals can make do with a piece of roofing felt or a sheet of iron; it is better for a home craftsman not to risk the quality of the batches.
For facing masonry, special devices are produced that make it easier to level the pastels in each row. The only drawback of the Bricky device is its adaptation to foreign bricks, the dimensions of which are somewhat different from their domestic counterparts.
Selecting the width of the plinth
The brick plinth has a width depending on the type chosen (flush, protruding, recessed) and the thickness of the walls. For example, for a masonry of 51 cm, this value is in the range of 45-57 cm. There are options when the base is wider than the foundation - in this case, the release of brick on any side is limited to ¼ of its length (6 cm). If for the thickness of the walls a similar overlap of masonry of the first row along the base is not enough, the foundation will have to be topped up from a convenient side, increasing its width.
How high should the plinth be made?
Due to the lack of regulatory documentation, the brick plinth can be of any height. Experts do not recommend building it higher than half of the first floor - this will disrupt the architecture of the building and the exterior of the facades.
Without a project, only garden houses can be built; in all other cases, the necessary marks for all structures are included in the documentation. Self-builders solve the problem of foot height as follows:
- if the foundation is poured at ground level, choose a masonry height of 0.7-1 m;
- if a plinth is needed for a technical underground, they are guided by the dimensions of the engineering systems (usually pumping equipment, valves) that must fit in it;
- if a footstool is needed to complete the basement, choose a comfortable ceiling height in the lower level.
In the last two options, insulation is often placed into the base structure (if the brick is facing) or external insulation is performed, taking into account its thickness.
Foundation waterproofing
Unlike the external soil, the ground under the house does not freeze in any frost. It contains moisture absorbed by the concrete and transferred to the upper structures. Therefore, the foundation is necessarily cut off from them with a waterproofing layer.
In order to waterproof the foundation efficiently, it is enough to lay two layers of rolled material (roofing felt, glass insulation) along its perimeter. The side surfaces of the concrete strip also need to be treated to protect against flood, groundwater, and melt water.
The top waterproofing is laid overlapping at the joints, protrudes 2-3 cm beyond the perimeter, and is cut off upon completion of the masonry.
Marking
Before laying the waterproofing layer, it would not hurt to check the diagonals and the compliance of the foundation dimensions with the design dimensions. To do this, you can use a long rope (without stretching). The corners of the plinth are set in accordance with the project.
Ventilation ducts
The strip base will not be effective if ventilation holes are not left in it. When using bricks, they do not have to be made round; you can make small rectangular or square windows using sheet steel and reinforcement as lintels.
They must be on all walls, including internal partitions. You cannot cover them with insulation or plugs for the winter - humidity is present in this space all year round. Therefore, it is wiser to install decorative grilles in the masonry or to provide for their dimensions during construction.
Proportions for solution
When laying bricks on a strip foundation, a plastic solution is required. In the standard version, for the manufacture of different grades, different proportions of sand and cement are used, respectively:
- M75 – 3/1
- M50 – 4/1
- M25 – 5/1
The base will be stronger if you use the first two options. In this case, it is necessary to check the quality of sand using available methods:
- Squeeze a handful of wet material in your hand with some force;
- Loosen your grip to check the result;
- If the sand spilled onto the ground completely, partially, there is a minimal amount of clay impurities in it, in the case of a formed lump (more than 2/3), there is too much clay in the sand for a normal solution.
Types of used anchor products
Depending on the type of buildings, load-bearing elements, installation location and purpose, the following types of anchor products differ:
- Wedge type, consisting of bolts with spacer-type bushings and cone-shaped caps. Installation is carried out in materials with a dense structure (solid brick, concrete or natural stone, reinforced concrete). Fixation occurs as a result of the bushing jamming in the load-bearing walls and friction against the walls of the hole. The frequency of use is due to the ease and speed of installation. The main disadvantage is only one-time use.
- Bushing, the principle of operation is similar to wedge ones. The main disadvantage is the need to drill large holes to connect the structures.
- Driven, in which the bushings are notched at one end. When the element is struck, a wedge-shaped expansion of the bushing occurs. The strength of the connection is ensured by friction against the hole and the internal stop. The advantage lies in the ease of installation and resistance to mechanical influences. High precision clearances are required for a reliable connection.
- Chemical action. Bonding of structures is carried out by pumping adhesive compositions into the fastening channels. The plus is ease of installation, and the minus is high cost.
- A separate type is a special-purpose anchor. The following subspecies are distinguished:
- frame - for securing windows and doors;
- ceiling - suspension of various designs
- foundation, for fixing foundation elements;
- Moli anchors - used inside hollow structures or weak-bearing structures (hollow brick, plasterboard, chipboard).
Anchoring reinforcement
Anchoring in reinforcement frames is carried out to allow the rods to absorb the forces acting on them by installing anchors of various designs at their ends or by inserting the reinforcement beyond the design sections to a length that ensures the inclusion of the rods in joint work. In the fixation zones, the reliability of fastening stretched reinforcing bars in concrete or the transfer of forces from elements working in compression to the concrete is ensured. The necessary calculations are carried out at the stage of design development of structures.
Anchoring of reinforcement in concrete is carried out using the following main methods or a combination of them:
- using straight ends of rods (not acceptable for smooth reinforcing steel);
- the device of bends in the form of hooks or loops at the end of the rods, as well as bends (the legs are bent only when using a periodic profile). This method is not recommended in compressed areas. The minimum diameters of bends or bends must ensure the impossibility of splitting or destruction of concrete at the bends and within them. The radius of the arc must be ≥ 10 times the diameter of the rods, with clamps attached to the bent sections to protect the elements from unbending;
- welding of transverse shorts;
- fastening various anchor devices (set heads, plates, nuts, washers, angles and other elements) to the ends of the rods.
The anchorage length of the reinforcement is ≥ 15 rod diameters and at least 20 cm, with a sufficient thickness of the protective concrete layer to protect them from corrosion.
Joining of non-prestressing reinforcement ≤ 36 mm in tensile zones is allowed by overlapping by knitting or welding of rods. The joints should be spaced apart in places where minimum torque and bending moments are applied. The length of the overlap, mainly performed by rods A-III, depends on their diameters. The building codes contain special tables, so for 10 mm rods the overlap should be 30 cm, and for 25 – 76 cm.
Calculation of the required anchorage length should take into account:
- method of execution;
- profile, diameter and class of reinforcement;
- presence of transverse elements;
- arrangement of rods in cross section;
- stress state of concrete in the anchorage zone and its strength characteristics.
When welding anchors, the method and conditions of welding work and the weldability characteristics of reinforcing steel must be taken into account.
Prestressed reinforcement with a periodic profile and steel ropes, when tension is applied to the stops and the concrete has sufficient strength characteristics, can be placed in the structure without the use of anchors, and bundles of smooth high-strength wire are necessarily secured in the concrete with special anchoring.
When tensioning concrete, it is important to ensure good transfer of stresses from the reinforcement to it. Steel plates are installed under the anchor devices to ensure that the concrete absorbs forces from the reinforcement equally
The ends of the structures are strengthened by installing additional welded mesh, clamps and spirals.
Reinforcing bundles are stretched to specified stresses by placing jacks at the ends of the elements, after which the wire bundles are wedged with conical tubes in steel blocks using a special piston pulled out from the jacks.
More powerful reinforcement beams are secured with glass-type anchors. Grabbing the body of the anchor, the jack pulls it away, focusing on the concrete and creating a gap from the end of the structure, into which washers with longitudinal slots are installed. In this way, the reinforcement beams are fixed in a state of a given voltage.
We build our own brick plinth on a strip foundation
The base occupies an intermediate position between the foundation and the walls. It must protect them from moisture and withstand the load of the entire structure, furniture and equipment installed in the building. Last year, my friend and I did the necessary excavation work and laid the foundation for the future house. Now, in his free time, he lays a brick plinth on the foundation.
Bricks for masonry of the second row
Vadik, the owner of the future cottage, is an economist. He is interested in all the ways to reduce costs. When purchasing a plot and designing it, he decided to test his professional knowledge in practice. Having heard that it was cheaper to do it yourself, I decided to master the profession of a laborer and replace training in the gym with useful physical labor.