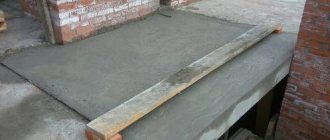
The need for a monolithic section is quite common even in professional design schemes for laying out floor slabs. Most often, this decision is made for buildings of non-standard, complex configuration. Concreting a small section of the floor is much simpler than casting a solid monolithic slab: there is no need for side formwork, the levels of the monolithic insert are set by adjacent slabs - all that is required is the manufacture and strengthening of the lower formwork panel.
We seal non-design joints up to 300 mm
If the width of the seams between adjacent slabs does not exceed 300 mm, sealing such a seam is relatively simple; there are several methods for filling the seams to choose from.
Method 1
- At the bottom of the adjacent slabs, using spacers, we install a board or sheet of plywood that bridges the gap - this is formwork;
- You can lay a piece of roofing material or film on top of the formwork, then there will be no traces of concrete left on the formwork, and it can continue to be used;
- Fill the gap between the plates with mortar;
- We wait for the concrete to gain strength within 3-4 weeks and remove the formwork.
Method 2
If it is not possible to install the formwork from below, you can make permanent formwork from galvanized roofing steel 0.8-1 mm thick according to the size of the gap between the slabs, resting on the upper edge of the slab (trough). The profile of the side surface of the slabs will provide additional expansion and rigidity to the monolithic section.
Method 3
Another way to seal seams with permanent formwork is to make mounting parts from steel strips 4 mm thick and 5 cm wide, along the profile of the gap, as in the previous case, resting on the front surface of the slabs; lay these mounting parts every 0.5 m along the length of the slab. On the bottom (in the plane of the lower edge of the slabs) we place a strip of galvanized roofing steel, plywood or plastic, and concrete it. This method ensures reliable adhesion of the monolithic section to the slabs.
Method 4
If you come across a pair of defective slabs with incorrectly positioned side locks, when the recess is at the bottom, they can be installed next to a gap of 2-3 cm. Place the formwork from below using method 1 and pour concrete through the provided gap.
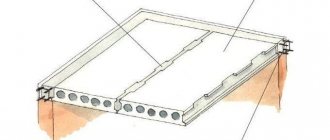
Monolithic section between two slabs 980 mm wide (download drawing in dwg format)
Sometimes you have to make wide monolithic sections between the floor slabs. They must be calculated according to the current loads. The drawing shows a monolithic section with a width of 980 mm, supported by two hollow core slabs. The conditions for such a monolithic section (loads, principles of reinforcement, etc.) are described in detail in the article Monolithic section between two prefabricated slabs.
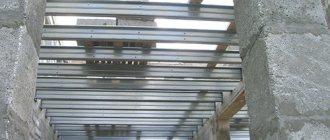
Features of technology when installing floor slabs
How to lay a chipboard floor. Laying chipboard on a wooden floor, on a concrete floor with your own hands, instructions, photos.
Installation of all floor slabs occurs by lifting the slabs using special hinges using a truck crane.
Reinforced concrete floor slabs are installed exclusively on the main walls of the house; all internal partitions and walls are erected only after the installation of the slabs is completed.
It should be taken into account during the installation process that the elements must rest on the wall of the house by at least 120 mm. Adjacent slabs must be fastened together using mounting loops.
It is necessary to take into account that the technology for installing floor slabs requires that in no case should a double span be covered instead of two short elements, for example, with one long slab - in this case, the material will not withstand the load and will burst, which can lead to catastrophic consequences. The same can happen if the workpiece for the balcony is pushed a little forward, leaving part of it on the street, only here the first frosts can also have an effect: the cold will go straight through the material, and also, crushed by the wall, it can burst.
All walls of the house must be at the same level, otherwise between the floor slabs you will get some kind of “steps” that are completely unnecessary and which will be difficult to get rid of later.
Be sure to take into account that the elements must rest on the wall of the house by at least 120 mm
When starting to install floor slabs, you should know that there are special requirements for the mortar on which they will be laid: this mortar must be made sufficiently liquid and it should be applied minimally to the walls, and when making the mortar, the sand must be carefully sifted, otherwise even a small pebble will negate all efforts to install a flat ceiling.
It happens that there is a need to make a hole in a reinforced concrete floor slab, for example, to access the attic. In this case, you first need to draw a rectangle of the required size on the element with chalk, then use a grinder to lightly trim the element along the drawn lines. After this, you can pierce the element with a sledgehammer until the reinforcement appears. The reinforcement needs to be cut with a metal disc using an angle grinder, however, you need to be careful here, since the reinforcement inside the reinforced concrete blank is highly stressed, this can lead to pinching of the angle grinder disk. Therefore, it is best not to cut it a little with a grinder, and then break it with a sledgehammer. If you have an autogen on hand, then cut the reinforcement with an autogen.
Reinforcement of a monolithic section
To strengthen monolithic sections of floors, periodic profile reinforcement, class A-III and higher, hot-rolled, with a diameter of 10-14 mm is used. The reinforcement frame is made directly in the formwork or a ready-made structure is installed from two horizontal rows of mesh connected to each other by vertical rods.
To pre-fabricate the frame, the parameters of the longitudinal and transverse rods and the overall dimensions of the frame structure are measured. It must be taken into account that the reinforcement bars must be protected on the outside with a layer of concrete of at least 3 cm.
The frame is tied on a flat surface, after which it is installed in the formwork on special plastic stands or on concrete bars, stones, bricks.
The upper mesh is fixed at a given height using clamps, brackets or other devices. The mesh cells are connected with 1-2mm wire, the knots are made with a special hook or using other devices and mechanisms.
Reinforcement features:
- If the standard rod length of 6 m is not enough, sections of reinforcement of the required length are spliced together. The joining is carried out with an overlap of at least 40 diameters of the rod used.
- If adjacent rods are built up, the longitudinal seam is displaced by at least 60 diameters.
- The monolithic section can extend onto a wall that has a recess for connecting the frame. In this case, the mesh reinforcement is bent to run inside the stiffener, and the masonry rod is inserted into the monolithic slab.
Often monolithic sections are intended to support internal flights of stairs. In this option, additional operations are performed:
- The formwork for the stairs or hatch is installed.
- Planks are screwed to the formwork from the inside to create steps to support the flight of stairs.
- The reinforcement of the lower mesh is released out through special cuts in the lintel panel, the resulting cracks are foamed.
Calculation and installation
Insulation of walls with mineral wool from the inside. Mounting on hangers. Laying into a finished frame
Calculations are made by designers based on temporary and permanent loads in accordance with GOST 8829-94. It includes several main stages, the essence of which is the selection of geometric parameters of the cross section, concrete class and reinforcement. This must be done accurately and correctly so that in the future the slab does not collapse under the influence of the maximum possible loads.
Produced according to a pre-designed layout. In this case, the surface of the blocks on which the slabs will be installed must be absolutely flat. The sequence of actions is as follows:
- installation towers are installed;
- the installation site is prepared and marked for the crane operator;
- the slab is lowered, during which it unfolds and is kept from swinging;
- it is installed, unslinging is carried out;
- the seams between adjacent panels are filled with fine-grained concrete.
It is recommended to fill the edges of the hollow holes in the slabs before finishing. For this you can use crushed stone, expanded clay, concrete.
During installation, you need to ensure that the support on the wall is at least 100 mm. Also, the thickness of the cement layer on which the slab is laid is 20 mm.
Warming and insulation
When walking on the floor, vibrations occur that are transmitted to surrounding objects and rooms. In this regard, sound insulation of concrete floors is carried out with mineral wool or expanded polystyrene. It is recommended to do this before pouring the screed.
Insulation of interfloor concrete floors is required only in cases where the microclimate in the separated rooms varies greatly. For example, under a heated room there is an unheated basement. Thermal insulation is laid over the entire surface of the panel, on top of which the film is placed. Insulation can be done with mineral wool or expanded polystyrene. The thickness of this layer should be several times greater than the sound insulation. Sometimes developers lay insulation in several layers, creating a so-called “pie”.
In the case of using mineral insulation, vapor barrier of the floor slabs is also carried out. This is done with a special Izospan film.
Repair
Repair, strengthening or reconstruction of floors is carried out in several cases. For example, if the old ones are in disrepair. This is also necessary if the load on existing beams or slabs exceeds the load-bearing capacity.
Repair options developed:
- Replacement of floors by full or partial prosthetics of existing wooden beams.
- Strengthening metal structures by welding additional profiles to beams.
- Installation of a new monolithic floor in old buildings.
Manufacturers, cost
Among the manufacturers of floor slabs, we can highlight concrete products in Ryazan, Ivanovo, Yaroslavl, as well as the Moscow region (Odintsovo and Tuchkovo). Their price depends on the presence of a quarry at the enterprise, distance from Moscow, and the size of the product.
| Plate name | Designation | Size | Price, rubles |
| Round hollow (PC) | PK17-10.8 | 1680x990x220 | 3 400 |
| Panels with single-row reinforcement (NR) | НВ63-10-9к | 6280x990x220 | 9 500 |
| Round hollow (PC) | PK78-12.8 | 7780x1190x200 | 19 500 |
| Prestressed (PPS) | PPS80-12-8 | 8000x1200x220 | 11 300 |
https://youtube.com/watch?v=F6cn3B0ehos
Required materials and tools
Considering that the work on constructing a concrete floor section consists of different stages, it is necessary to prepare a number of materials for each of them. The list of such materials may vary due to various factors, including the distance between the slabs that needs to be poured. The standard list looks like this:
A horizontal formwork support is placed on wooden beams.
- plywood or boards to create a direct surface for pouring mortar and side formwork, construction film;
- wooden beams or metal channels to create a horizontal support on which plywood or a plank pallet will be laid;
- timber (120-150 mm), wooden beams or channels to create load-bearing supports under the formwork platform;
- reinforcing bars (15-25 mm), wire for tying, metal chairs for installing reinforcing bars at the required height (reinforced mesh can also be used);
- M400 cement, sand, crushed stone, water for mixing concrete;
- concrete mixer;
- circular saw for cutting beams, boards, plywood, as well as metal reinforcing rods;
- a shovel, a bayonet tool, a trowel or a rule for leveling the surface of the floor area between the slabs, a protective film for covering this area.
The amount of all materials depends directly on the distance between the concrete slabs that needs to be covered and the overall area occupied by the monolithic section of the floor. Typically, in private houses such a section of flooring is not very large, so its formation is not too difficult a task. However, at the same time, you should still adhere to clear phasing and rules for working with building materials and structures.
Monolithic floor slabs for garage
Laying underlay under laminate on concrete floors
Even building structures such as floor slabs can be made with your own hands. Let's look at the garage floor design. We will be covering a span of 4300 mm long, so the slabs will be made 4500 mm long. On each side the slab will rest on a 100 mm brick wall.
Materials for making the plate
How to make floor slabs with your own hands? To make a slab we will need:
- corrugated sheet H75/750 x 4500 mm, it will be used as removable formwork;
- wooden boards 150 mm high and 25 - 30 mm thick;
- fittings with a diameter of 16 mm;
- mesh with a cell 100x100 with a diameter of 5 mm;
- screed with a diameter of 8 mm, 2 pieces per slab;
- concrete class B20.
The process of making a slab with your own hands
A sheet of corrugated sheets is laid on a rigid base. You need to place cross members (wooden boards, 4 pcs) under the sheet. We arrange formwork from boards around the perimeter of the sheet.
We place reinforcement in each sheet tray (5 pieces). The protective layer of concrete should be 25-30 mm. We attach loops (4 pieces) to the same reinforcement bars for transporting the slab (in our case, raising it to the height of the garage floor level). We lay a mesh at the top of the slab, which should also be protected by a 30 mm layer of concrete.
In order for the corrugated sheet to adhere well to the concrete, it must be lubricated with oil (working off) or covered with plastic film. Concrete consumption per slab will be 0.4 m3. Concrete is prepared in a gravity concrete mixer, poured and compacted with a vibrator. The slab can be removed only after 7 days, when the concrete has gained 70% strength.
It is also possible to install ceilings directly on the walls. Sheets of corrugated sheets are laid, reinforcement is performed and formwork is installed. The concrete is lifted by crane into a bucket and poured in a continuous layer. It is necessary to install supports under the ceiling while the concrete gains strength. This method will be more expensive, since the corrugated sheets remain in the ceiling.
How much does it cost to make a floor slab?
Now let’s calculate the costs of manufacturing slabs with a total area of 29 m2 and a height of 150 mm. The cost of concrete is $335, the price of H75 corrugated sheeting is $400, fittings are $235, crane services are $135. As a result, we get the amount of $970. This cost will be if you make the slab directly in the garage, that is, the corrugated sheet remains under the concrete floor.
If you make floor slabs with your own hands on the ground, then the cost of the floor will be slightly cheaper; we remove the cost of corrugated sheets. The total will be 705 $.
Monolithic floor thickness
In accordance with the calculations performed, we can recommend, for the installation of monolithic floors, in private houses, a floor thickness of 150 mm, for spans up to 4.5 m and 200 mm up to 6 m. It is not advisable to exceed the span of 6m. The diameter of the reinforcement depends not only on the load and span, but also on the thickness of the slab. The often installed fittings with a diameter of 12 mm and a pitch of 200 mm will form a significant reserve. Usually you can get by with 8mm at 150mm pitches or 10mm at 200mm pitches. Even this reinforcement is unlikely to work to the limit. The payload is assumed to be 300 kg/m2 - in a home it can only be formed by a large closet completely filled with books. The actual load in residential buildings is, as a rule, significantly less.
The total required amount of reinforcement can be easily determined based on the average reinforcement weight coefficient of 80 kg/m3. That is, to install a floor with an area of 50 m2 with a thickness of 20 cm (0.2 m), you will need 50 * 0.2 * 80 = 800 kg of reinforcement (approximately).
In the presence of concentrated or more significant loads and spans, the diameter and pitch of the reinforcement specified in this article cannot be used for constructing a monolithic floor. Calculations for the corresponding values will be required.
Video: Basic rules for constructing monolithic floors
b The second method is more labor-intensive.
You can also disperse the plates, that is, make small equal distances between them.
For example, to cover a floor you need 10 slabs and there remains a hole of 500 mm (half a meter). We install the first slab from the edge of the inner wall (so that there is no gap). We install the second slab with a slight indentation of 55 mm from the first.
Ten slabs are nine joints between them. Dividing 500 mm into 9 joints we get 55 mm distance between the plates.
Next, we tie the formwork (board) from below under this hole between the slabs. We place reinforcement in the gap between the slabs and fill it with concrete.
.
.
5) Why can a circular hollow-core slab burst?
.
Very often, when installing floor slabs, you come across a broken slab. This most often occurs from improper storage of floor slabs or transportation.
In the photo below you see how circular hollow-core floor slabs should never be stored.
All these slabs burst, and the lower ones in several places. I took a closer photo
Many times I saw how the slabs seemed to be folded correctly, but winter passed, the base under the slabs became limp, the middle of the slab touched the ground and the slab burst.
To prevent the slab from bursting, you must be careful when storing slabs in stacks. To do this, you need to make a good base under the edges of the first slab (bottom).
It is advisable that the slabs lie horizontally
It is important that the first linings under the slabs are high, in case it begins to sink into the ground
Under no circumstances should the middle of the slab touch the ground, since it is almost 100% likely that it will burst, not just one, but also those on top of it!
The following spacers between slabs are usually made from wooden slats
Here you need to pay attention to three factors:. a) So that the slats are thick enough so that the plates do not touch each other
a) So that the slats are thick enough so that the slabs do not touch each other.
b) So that the wooden slats (spacers) are located one above the other VERTICALLY.
c) Spacers are laid 200 - 400 mm from the edge of the slab.
The height of a stack of slabs on a good, solid base can reach a maximum of 2.5 meters (8 - 10 rows).
.
.
Load calculation
The minimum thickness of the monolithic floor, the number and cross-section of reinforcement, as well as other parameters are determined based on the calculation of the loads acting on the structural element.
- Permanent - those that create the weight of the building box, all partitions in the structure, roof
- Variables - can change: this is the mass of finishing elements, the weight of utility networks, furniture, people
The ability of a floor slab to withstand certain loads directly depends on the thickness of the reinforced concrete monolith, as well as the cross-section and amount of reinforcement, and the grade of concrete. In order for a monolithic reinforced concrete floor to withstand a load of 500 kilograms per square meter, the thickness must be 20 centimeters.
- Concrete grade
- The size of the design forces that act on a unit area of the slab
- Concrete slab thickness
- Slab width and length
In accordance with the calculated loads, the cross-section of the reinforcement is determined that can withstand tensile forces and bending moments. It is very difficult to independently calculate a monolithic reinforced concrete floor, but you can try using special formulas or find an online calculator on the Internet.
If you plan to take more than 18 centimeters, the decision must be justified by accurate calculations, because the load on it increases in proportion to the increase in the thickness of the slab. Thus, before you start designing and installing a monolithic floor, drawings must be drawn up.
6) What to do if the slab is cracked.
If the cracks on the round-hollow slabs are not very large, then in principle there is nothing to worry about. Almost every house we have built had cracked slabs installed.
Below we will consider the best options for installing cracked slabs so that the minimum load is put on them:
a) If the crack in the slab is large, then we usually place such a slab on the main (or external) wall by 100 - 150 millimeters.
In other words, we install the cracked slab so that it rests on three walls, namely, the ends of the slab rest on the main walls and the long side of the slab also extends and rests on the main wall.
The cracked slab is pressed against the walls above and a completely solid ceiling is obtained.
b) You can also mount a cracked slab where there will be a brick partition underneath it. In other words, the cracked slab will be supported from below by a partition.
c) We install the cracked slab between good, intact slabs
Please pay attention that the rusts between the cracked slab and the good one are well sealed. When the solution in the locks hardens, the ceiling will be solid
d) If you don’t really like the quality of the round-hollow floor slabs (cracks), you can strengthen the screed on these slabs. The screed can be made of concrete, with reinforcement. The result is a reinforced concrete screed that will completely relieve and strengthen the floor slabs.
e) You can mount cracked slabs in places where there will be minimal pressure on them. For example, mount a cracked slab on the very top - the attic floor, where there will be no pressure or support from the roof (rack, etc.) on it.
f) If the slab is severely cracked, forming a gap of 4-10 mm, then it is best to cut such a slab and make it short.
.
.
7) How to hammer in rusts correctly.
.
Rusts are the joints of slabs. Two slabs are mounted side by side, with the long side facing each other. Between them is rust:
You should always fill in rusty areas with mortar. Why hammer in rustications? The fact is that round-hollow slabs have locks on the sides, round recessed dimples (photo below):
When these recesses are filled with mortar, the slabs adhere to each other and the overlap becomes one. Thanks to the locks, the plates firmly adhere to each other.
.
How to cover a room if the width of the slab is a little short
When covering a room, it may turn out that its dimensions are not a multiple of the dimensions of the slabs, which leads to the formation of gaps between the slabs or between the slab and the wall. You can cut out the missing piece from existing slabs, but this is time-consuming and troublesome. There are easier ways to fix this problem.
Let's take for example the case when, when installing slabs, a gap of half a meter remains between the last slab and the wall. What to do in this case? There are several options. Let's look at the simplest of them first. The gap size is 500 mm and is divided into two parts – 250 mm each. The first slab is laid at a distance of 250 mm from the wall, then all slabs are mounted end-to-end. As a result, there will be a gap of 250 mm between the last slab and the wall. A cinder block is installed into the resulting voids, from which the walls are erected. In this case, the cinder block is securely fixed, resting against the slab. The cinder block should be placed so that its holes are directed to the sides, and not up or down. The erected external wall will additionally clamp the cinder block, strengthening its fixation.
This design, although it looks unreliable, is actually quite durable. If anyone doubts the load-bearing capacity of cinder blocks, when pouring the floor screed on the second floor, the gaps can be further strengthened by installing reinforcement or masonry mesh on top of them. Rods with a diameter of 6 mm are used as reinforcement.
Another way to bridge the gap is to distribute its size between the plates. For example, there is an extra half meter and ten floor slabs, between which there are nine gaps of 55 mm each. Why 55 mm? The total value of 500 mm is divided by the number of joints - 9. The result is 55 mm.
The first slab is laid flush against the wall. The second is indented from the first by 55 mm, etc. The last slab should be pressed flush against the wall.
A board is tied under each gap, acting as formwork. Reinforcement is laid into the resulting formwork and concrete solution is poured.
Solid slab
The thickness of the ceiling is most often taken to be 200 mm. The reinforcing frame in this case includes two meshes located one above the other. Such meshes must be knitted from rods with a diameter of 10 mm. In the middle of the span, additional reinforcement bars are installed in the lower part. The length of such an element is 400 mm or more. The pitch of the additional rods is taken to be the same as the pitch of the main ones.
Additional reinforcement must also be provided at the support points. But they place it at the top. Also, at the ends of the slab, U-shaped clamps are needed, the same as in the foundation slab.
Example of floor slab reinforcement
Calculation of floor slab reinforcement by weight for each diameter should be performed before purchasing the material. This will avoid overspending. A reserve for unaccounted expenses is added to the resulting figure, approximately 5%.
How not to support prefabricated floor slabs
1) Supporting the slab on two long sides.
As we remember, working reinforcement in the slab is only in the longitudinal direction. In the transverse direction there is only a small mesh that can absorb the load from the slab’s own weight during installation (when the loop is lifted by a crane using four loops). And if we support the slab on two long sides, under load it will begin to bend as in the figure, and there simply will not be enough reinforcement area in this direction - the slab will begin to crack. At the initial stage, the existing mesh will be able to absorb the load, but (I repeat), the reinforcement area of this mesh is designed only for the slab’s own weight.
2) Installation of additional support in the span of the slab.
We need to remember once and for all: prefabricated slabs work exclusively as single-span slabs. If a wall or column appears somewhere in the span, what happens is shown in the figure above. The slab between the supports bends downwards, and above the support there is a bend in the opposite direction - with a stretched zone at the top. But in the upper zone of the slab we do not have working reinforcement, and we have nothing to absorb tensile bending stresses. As a result, cracks appear in the upper zone of the slab, as shown in the figure. It may be just one crack, but it will be enough to lead to an emergency over time or immediately.
3) Supporting the prefabricated slab on two walls with the removal of part of the slab in the form of a balcony (console).
This situation is approximately the same as in the previous case. There is no upper reinforcement, there is nothing to absorb the tension. The greater the length of the console and the greater the load on it (especially at the edge), the faster the destruction will occur.
Overhanging the slab in a different direction will be just as dangerous as that shown in the figure.
4) Supporting the prefabricated slab on columns (point supports).
If you want to support the slab not on walls or beams, but directly on columns, remember: this cannot be done. The principle of operation of reinforcement in reinforced concrete is as follows: tensile reinforcement in a slab works only when its ends are placed on a support. If there is no support under the edge of the slab (and under the end of the reinforcing bar), such reinforcement becomes useless ballast.
In the picture we see the option of supporting the slab on 4 columns. Firstly, the slab bends not only in the longitudinal, but also in the transverse direction - and as we found out from point 1, in this case cracks can form. But this is not the worst thing - these cracks simply will not have time to form due to an emergency in the other direction. So, secondly, we only have two outer reinforcements on the support, the rest are “hovering in the air” and are not included in the work. This means that the area of working reinforcement in the slab has decreased many times compared to the required one. Naturally, such a slab will tend to collapse.
The best way out of this situation would be to install beams in the desired place to support the slab - between closely spaced columns.
5) Pinching of the prefabricated floor slab.
What is pinching? In the case of supporting floor slabs, this means placing the slab on the wall by more than the height of the slab section and loading it on top with the wall. The fact is that clamped slabs work completely differently than hinged slabs. All prefabricated slabs are designed for hinged support (when the slab, sagging, seems to rotate on the support). The regulatory documents for prefabricated slabs clearly stipulate the depth of support, and it should not only not be less than specified - it should not be made too large.
Let's look at the figure to see what the pinching of the slab on the support leads to.
With hinged support, the slab simply turns a little on the support and stretches in the lower zone - that’s where the lower working reinforcement is activated.
When pinched, the slab is inserted too deeply to rotate; as a result, it bends in a tricky way when the lower zone of the slab is stretched in the center, and the upper zone is stretched at the supports. And in this upper zone we do not have enough reinforcement to absorb tensile forces. As a result, cracks form, which are especially dangerous because they are not visible (they are hidden under the floor), but over time they expand and lead to an emergency condition.
I hope this article has clearly demonstrated how prefabricated (hollow, ribbed and solid) slabs can be supported, and how not.
Types of monolithic floors
Monolithic floors are divided into non-beam, beam and coffered (ribbed) floors.
1 type Beamless ceiling. This is a solid slab that rests on the columns of the building. Which in turn can be with or without capitals. To ensure the necessary rigidity in the places where the slab rests on the column, the floor spans are reduced and the loads are distributed evenly.
Type 2 Beam ceiling. This is a slab that rests on beams that rest on columns. Beams in this case are the load-bearing element of the building frame. Beams can be located either only along or across the building, or in two directions at once. The dimensions of the width and height of the beam are determined by calculation and are directly dependent on the distance between the columns of the building; the greater the distance, the larger the cross-section of the beam.
Type 3 Caisson (ribbed) ceiling . This is a lightweight floor, which consists of floor ribs (beams) located in two directions with a small pitch (no more than 1.5 meters). Beams of such a floor are divided into main and secondary. The main ones rest on and transfer the load to the columns. And the secondary ones serve as a support for the slab and rest on the main beams.
Installation of formwork
Formwork installation diagram.
To complete this stage of work, a team of 3-4 people will be required.
To make assembly easier, we place one shield as a base. We install a spacer under each bolt so that nothing bends under load.
We attach the ribs to the base of the formwork. We fasten the ribs taking into account how wide we need the beam. Beams of three sizes are allowed: 35, 40, 45 cm. With the required width of 35 cm, both side ribs are placed flush. With a required width of 40 cm, only one edge of two prefabricated panels is placed flush. If you need a beam 45 cm wide, the ribs are attached without using this technique. Everything is fastened with self-tapping screws.
As a result, we ended up with a box of three prefabricated panels in the place where the future beam will be located.
Figure 4. Types of attachment of ribs to the base. A - 35 cm, B - 40 cm, C - 45 cm.
Now we prepare spacers from the reinforcement. They will be needed in order to maintain the required size of the beam and prevent bevels. We simply cut the reinforcement into pieces of the required length (35, 40 or 45 cm).
After this, we proceed to upholstering the resulting box with film from the inside, using a carpenter's stapler with staples. This is necessary in order to prevent unnecessary water loss from the concrete and to avoid the appearance of sinkholes. If this is not done, the concrete will lose a lot of moisture along with sand and cement. After drying, gravel will appear heavily on the outer edges of the beam. The surface of the beam will be completely covered with strong roughness and irregularities, bumps and depressions, the so-called shells. Such a beam will be of poor quality and will have to be redone.
Surface preparation
1. The steps of the base must not have deviations from the horizontal. If the steps are narrow, you should not increase their width with tile adhesive - this will make the structure heavier. In this case, you should install wooden formwork and fill the steps with a mixture of small-caliber expanded clay, sand and crushed stone. The surface of a brick staircase is leveled in the same way.
2. Cladding wooden stairs with porcelain stoneware is not allowed. Some experts recommend using elastic glue or adding a plasticizer to it. This won't save the situation. The structure of a wooden staircase may not withstand the load that comes from facing the stairs with porcelain stoneware. Wooden steps do not have sufficient rigidity; this will lead to the fact that over time the porcelain stoneware coating will move away from the surface.
3. Prime the base with a deep penetration primer. The primer serves to reduce the absorption of the surface. Concrete absorbs moisture well; if it is not primed, the moisture necessary for good adhesion of the tile adhesive will be absorbed into the concrete and the adhesive base will become fragile.
4. You can start covering a new concrete staircase with porcelain stoneware only after two months from the date of its manufacture.
Features of installation on your own
Before you start work, you need to familiarize yourself with the standard flow chart for laying floor slabs. It describes in detail the stages of work, equipment and safety precautions, and includes drawings.
To lay concrete products, lifting equipment is required; a crane operator and two certified slingers will be needed. Do-it-yourself installation of slabs without qualified assistants is contrary to safety regulations.
During unloading or work, it is not recommended to drag blocks or let them fall freely. Ideally, you need to build supports (from wooden beams) specifically for storing the slabs. You can plan to lay the panels at once, lifting them directly from the truck: this will allow you to save a lot, since the crane operator has to pay for each lift, and the materials will be more intact.
The panels must be laid on cement mortar from M100 so that they rest on the load-bearing walls by at least 100 mm. In this case, you need to ensure that the position of the mounted floor slab is level and that each of them fits perfectly. It is recommended to check the level of the panels with each laying. If necessary, they are lifted by crane and repositioned. After finishing the masonry, the slabs are cleaned and the joints are filled with cement mortar.
Installation of slabs on gas silicate blocks requires a larger area of pressure on the supports (up to 250 mm), since they are less durable than baked bricks. In this case, it is advisable to strengthen the walls with a reinforced belt.
Quality control of installation of floor panels
During work, it is necessary to monitor the symmetry of laying the slabs on the spans. The laying depth of adjacent blocks must be the same. To do this, check that the solution is of the same thickness and no more than 20 mm
It is not allowed to use building mixtures that have begun the setting process, especially not to dilute them with water. It is important to ensure that deviations in the position of the plates in the plane are no more than 5 mm.
Installation of prefabricated monolithic ceiling
The advantages of this type of construction are low cost, relative safety of work, no need to rent lifting equipment and hire highly qualified workers. Small lightweight slabs of various types can be used: cellular, ribbed, beam. But there is also a minus: it takes time for the concrete to set.
Laying beam-type slabs consists of the following steps:
- drawing up a work plan, calculating materials, fittings and other things;
- formwork assembly;
- installation of wooden or iron supports;
- installation of waterproofing on formwork made of roofing felt or polyethylene;
- reinforcement;
- laying slabs;
- repeated reinforcement (if necessary, depending on the type of beam);
- pouring with liquid mortar using cement grade from M300;
- after 28 days, remove the formwork.
Installation of cellular concrete slabs is carried out according to the same principle.
It is important to arrange a canopy or cover the structure with film so that weather conditions do not affect the quality of work
Price
When buying slabs, pay attention that they are smooth, with a good surface, without radioactive background from the reinforcement. One product costs the buyer from 3,800 rubles
The price of laying slabs includes equipment rental, hiring a crew, and the cost of materials and electricity. A prefabricated monolithic ceiling with your own hands costs only 1,000 rubles/m2, since it does not require additional expenses.
Stages of work on forming a monolithic section between floor slabs
The monolithic section of the floor between the slabs is formed in approximately the same way as any monolithic floor. Given the small area of such a site, the work, of course, is simplified, but it is necessary to adhere to all building codes and regulations. Therefore, no matter what distance between concrete slabs is poured, all stages of work must be carried out carefully, on which the reliability of the monolithic structure created independently will depend.
Installation of supports and formwork
First, we form the formwork for the monolithic section, which must have such mechanical and strength characteristics as to hold a large mass of concrete solution for a long period of time, which will dry for quite a long time.
Installation of formwork is carried out as follows:
Preparations are underway for pouring the ceiling. Please note that the assembly and filling of the upper rows is carried out from the “goats”.
- We form the bottom of the formwork. To do this, you can first take a sheet of plywood or boards and stuff them onto the beams used as load-bearing elements for the bottom. The distance between floor slabs required for pouring in a private house is usually not very large. In this regard, forming the bottom of the formwork is very simple. Before forming the reinforcement grid, it is advisable to cover the bottom with construction film or even simple roofing felt.
- On both sides, the lateral boundaries of the monolithic section will be floor slabs. The third is usually a wall. Therefore, the side of the formwork will require the use of one simple board. Even if you need to install a side formwork board on both sides, this will also not be difficult.
- We place vertical supports under the beams or boards used as the main retaining elements of the bottom and secure them in such a way as to completely eliminate the possibility of the formwork bottom slipping off the load-bearing vertical supports. Often they even use a unifork for this. However, in private construction conditions, without special supporting equipment, individual parts of the formwork structure can be fixed to each other using nails, staples, etc.
- It is extremely important that the bases of the load-bearing supports of the formwork rest firmly on the plane of the floor. To do this, you may need to compact the soil, lay down some tile or board material, etc. It all depends on what kind of floor is on the construction site at the time of creating the monolithic floor section.
Having created a reliable formwork and made sure of its strength, you can proceed to the next stage of work.
Formation of reinforcement grid
The reinforcement grid is formed very simply and quickly.
No matter how small the monolithic area created between the floor slabs is, it must be reinforced. If the distance between the floor slabs is more than 1.5 meters, then it is advisable to use reinforced mesh in addition to reinforcing bars. If the gap is small, it will be enough to install two layers of lattice made of rods.
The reinforcement grid is formed quite simply:
- We saw off the rods of the required length based on the formation of the reinforcing lattice in increments of 15-20 cm. We tie the rods together using wire. We form two layers of such a reinforcing lattice.
- When using reinforcing mesh, we place the first layer of the grid on special metal “cups” that lift the grid 5 cm from the bottom of the formwork. Then we lay the mesh and put another layer of reinforcing mesh on top of it.
- A small area between the floor slabs can be reinforced using a conventional frame made of rods - without mesh. The frame needs to be formed in two layers, so that each of them is 5 cm away from the edge of the floor slab. All work can be carried out without a welding machine. simply tying the rods together using ordinary metal wire.
Sometimes you can find a recommendation that reinforcing bars must be inserted into holes pre-drilled in the floor slabs. This should not be done. The created monolithic section will rest on the mounting recesses, which necessarily exist along the side planes of any floor slab model. Such mounting recesses can be longitudinal or round (glass-shaped). They are quite enough to provide reliable support for the monolithic concrete section between the slabs.
Concrete mixture and its pouring
When starting to mix the concrete solution, you need to make sure that there is a sufficient amount of the materials necessary for it. Having calculated how much volume needs to be poured, it is necessary to calculate how much cement, sand, crushed stone and water will be required to prepare the solution. This is done using a simple formula. For a medium-sized monolithic site, grade 200 concrete is suitable. For private construction, it will be enough to use M400 cement to mix this grade of concrete. The calculation for 1 m³ of such a solution is made from the following mass indicators of all materials:
How to shorten a hollow core slab
Round hollow-core slabs are available to order in any size, but there are times when it becomes necessary to reduce their length or width, cut out the desired shape, for example for a bay window, or make a hole in the slabs to access the attic. In such cases, the slab needs to be chopped using a grinder, a crowbar and a cam. Despite the fairly high strength characteristics of the slab, it is cut quite easily - 40 minutes is enough to cut off the extra centimeters of a 1.2 m wide slab.
How to do it? Let's consider options for cutting the slab crosswise and lengthwise. To cut a slab crosswise, you need to position it horizontally, placing linings under it and drawing lines on it along which it will be shortened. The pads should be located exactly under the marking line, and not along the edges. For example, you need to cut off half a meter of slab. To do this, at a distance of 500 mm from the edge, a chalk line is drawn on the surface of the slab, and a lining is installed exactly under it. If the lining is not under the markings, but next to it, when cutting, the concrete surface will be what is called “licked”.
Along the marked line, the slab is cut with a grinder and a concrete disc. After this, you need to tap on the voids near the cut line with your fist. The cam strikes should be aimed precisely at the voids, and not at the ribs. Usually the plate is broken through with 3-4 blows of the cam. These actions are repeated across the entire width of the slab. To cut the ribs, they are struck with the same fist, only from the side, and not from above. An unnecessary piece of slab, deprived of support from below, will sag under the weight of its own, which will speed up and facilitate the cutting process. Next, using a crowbar, the bottom wall of the pipe is broken through, under which the fittings are located. The surface of the reinforcement is thoroughly cleaned of concrete, after which it is cut with a grinder using a metal disc.
The resulting shortened slab will have a not entirely smooth cut edge, which must subsequently be sealed with backfill bricks and mortar, which will not only hide the unevenness, but also strengthen the slab.
The slab can also be cut lengthwise. The technology is almost the same, but requires less effort and more time, because the length is greater than the width. In this case, you only need to use your fist to break the wall of the void running along the slab, having first made a longitudinal cut with a grinder along the intended line. Next, the lower wall of the pipe is broken through with a crowbar. During the cutting process, smooth bars of reinforcing mesh with a diameter of 3-8 mm will be encountered in the concrete layer. They can be cut with a grinder.
When cutting reinforcement, you need to take into account that it is tense and can jam the cutting disc of the grinder. To prevent this from happening, the reinforcement bars are slightly not cut to the end, and then the resulting cut is finally separated by the blow of a crowbar or a cam. Another reliable way to cut reinforcement is using an autogen.
The relative ease with which a round-hollow slab is cut suggests that it is not that strong. But that's not true. In fact, this slab can withstand a load of up to 800 kg/m2, which is mainly carried by reinforcement and ribs.
Making a reinforcement grid
Regardless of the size of the area, it must be reinforced between the floor slabs.
When the distance between the slabs is from 1.5 m, in addition to reinforcing bars, it is best to use reinforced mesh. If the distance is small, you can limit yourself to two layers of lattice made of rods.
The process of forming a reinforcement grid:
The reinforcement grid is laid 5 cm above the bottom of the formwork, the reinforcement is tied together with wire.
- The rods must be sawed off to a certain length, taking into account the step, which should be about 15-20 cm. Next, the prepared rods are tied together with wire. The result should be two layers of lattice.
- When installing the first layer, the reinforcing lattice must be laid 5 cm above the bottom of the formwork, for which the “glasses” are intended. After this, laying a mesh on top, lay the second layer of lattice.
- If the area between the floor slabs is not so large, reinforcement can be done with rods without mesh. In this case, the frame is formed in two layers, and each of them must be 5 cm away from the edge of the slab. It is worth noting that it is not necessary to use a welding machine in this process, since all connections can be made using metal wire.
Some people advise inserting reinforcing bars into pre-drilled holes in the slabs, but this should not be done. The monolith section will rest on the notches that are present on any floor slab model. They can be either longitudinal or round, resembling a glass.