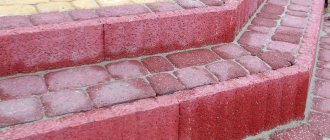
The porch group is often called the calling card of the house. The first thing guests notice when entering a home is how comfortable and safe it is to climb the porch stairs. Most often, steps for a porch are built from paving slabs, porcelain stoneware or clinker, it all depends on financial capabilities and the desired result.
Is it worth covering the steps with paving slabs?
The selection of material for cladding steps is always selected based on the overall design of the facade and the desire of the owners to add more decorative chic to the overall appearance of the porch. For expensive building facades finished with natural stone, granite and porcelain stoneware are best suited. For stairs with high loads and a large number of passers-by, clinker steps are the optimal solution.
For an ordinary porch of an apartment or private building, steps from paving slabs are built based on the most practical considerations:
- Cheapness and availability of facing material. Often, facing steps with paving slabs is used as a temporary option during the construction, repair or reconstruction of the facade of a building;
- Relatively simple technology for laying the covering; in most cases, it is quite possible to make steps from paving slabs with your own hands, which is especially valuable when the repair budget is limited.
The cost of paving slabs is an order of magnitude less than expensive clinker or porcelain stoneware. If the cladding is damaged or chipped, for repairs you will need to purchase at least one package of granite or clinker, cut out the old covering of the steps and apply a patch. Such a procedure costs a tidy sum.
With paving slabs everything is much simpler. To cover the stairs and steps of the porch, you can use the remnants of material left over from paving the area or sidewalk in front of the house.
Advice! Prudent owners often keep a ready-made metal mold and a coloring toner in stock, with which they can “print” an unlimited number of tiles, both for restoring steps and paving in the yard.
Skillful selection of paints and fillers allows you to achieve an improved appearance of the cladding. Photos of steps made of paving slabs can be made colored, with mosaic inserts made of multi-colored glass or even a surface that fluoresces in the dark.
Cement-sand tiles slip less and, unlike porcelain stoneware, do not require special mats or reagents to combat ice. The only significant drawback is higher wear on the surface of steps than clinker and chipping due to severe waterlogging and frost. But such shortcomings of paving slabs are easily eliminated by using special protective impregnations.
Peculiarities
Tile is a universal building material that is widely used for the design of street structures. At the same time, tiles are especially popular in the decoration of porches and staircase steps. Depending on the components, tiles come in different types, as they are produced in a wide range from various raw materials. As a rule, clay, natural additives, quartz and spar are used for its production. The product is manufactured using modern technologies, so it is durable, resistant to temperature changes and mechanical damage.
The main positive characteristics that guarantee a long service life of the tiles.
- Frost resistance. The product can withstand low temperatures well. For external cladding, it is recommended to purchase material that is designated with a special marking - an asterisk.
- Abrasion protection. To finish the porch, tiles marked V are used. According to the international classification, this is the maximum class that is used for coatings with intense traffic of people.
- High slip resistance. Since the product is used for outdoor decoration, it must be safe to use. Typically, tiles with a slip coefficient of R11-R13 are chosen for the porch.
- Resistance to moisture and aggressive substances. To decorate the porch, it is necessary to purchase products with a water absorption of no more than 6%.
In addition, the tiles are also not afraid of exposure to fungal microorganisms and ultraviolet radiation. To make a high-quality porch finish, tiles, regardless of their type, should be laid only on a well-prepared base. To do this, the surface of the platform or steps is carefully leveled using special adhesive mixtures, applying an even layer of no more than 10 mm. If you need to cover the porch, then use tiles measuring 30x30 cm, but the terrace is best decorated with large elements of 30x60 cm - this way you can avoid cutting the material.
As for the disadvantages of tiled finishing, some types of material are too slippery and can lead to falls in winter. To avoid this, you will have to additionally cover the lining with rubber mats. In addition, most products made from natural raw materials are expensive. Regardless of the tile model, its installation can only be carried out on a well-prepared base, which will not only prolong the work, but will also require additional costs for leveling.
How to Install Pavers on Porch Stairs
With the right approach, steps made of paving slabs are practically not inferior in appearance, decorativeness, and durability to cladding made from more expensive materials. It is enough to choose the most suitable installation method and the original pattern on the coating.
To make steps based on paving slabs, three main methods of laying the material are used:
- The traditional method of covering the concrete frame of the porch with tile material, as is done for clinker and porcelain tiles;
- Laying the tread of steps using the sidewalk method on a soft cushion of sand and gravel screenings;
- Laying and fastening paving material on a metal staircase frame.
The most suitable method for making steps is selected based on the size and layout of the porch. For tall and narrow flights of stairs, a steel frame is best.
Wide porch stairs, two or three steps high, are easiest to build by casting a base concrete frame and then covering it with paving slabs. In all other cases, the tile material can be laid on a sand and gravel bed.
For your information! A staircase based on a steel frame with steps made of paving slabs will cost approximately 2.5 times cheaper than other options.
In fact, this is the most suitable option for cases when it is necessary to add a separate additional entrance to the ground floor of an apartment building. In this case, no additional approvals from the architectural inspection or management company will be required, since the design of the staircase does not put pressure on the blind area or the foundation of the building.
No. 6. Lawn covering
In a plot outside the city, where you want to take a break from the bustle of the city, asphalt and concrete, it is better to use natural materials, for example, lawn grass. Such a courtyard will look cozy, and the surface of the area will be in harmony with the plantings and the environment, however, it is better to take the most trampling-resistant lawn, but even it is better not to use it in the parking area - this is an option for recreation areas and places with the least load.
Among the minuses
lawn coverage requires constant care: fertilizing, pruning, weed control, reseeding in the most trampled places. But walking on the grass will be very pleasant, you can even move barefoot, and children will have a reduced risk of injury if they fall during games.
Manufacturing steps according to the classical scheme
At first glance, laying paving slabs on a pre-cast concrete base is the simplest and most reliable way of arranging porch steps. It is really much easier to stick paving slabs onto the concrete surface of steps than to lay out the tile material on a sand bed.
But don’t let the apparent simplicity of the method fool you, before laying the tiles you will need:
- Make a foundation for a massive concrete base of the steps;
- Cast the step profile using formwork.
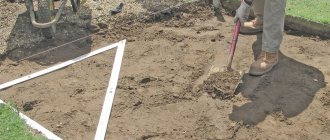
It is best to plan the foundation for the stairs of the future porch at the stage of arranging the load-bearing foundation strip of the entire building. At this stage, an excavation in the form of a slab adjacent to the porch area of the house is torn off, and steel reinforcement is laid, which must be connected to the steel frame of the porch base. The stiffer the support of the future staircase, the less will be the deflection of the flight of stairs, and accordingly, the risk of chipping of the glued paving slabs will be reduced.
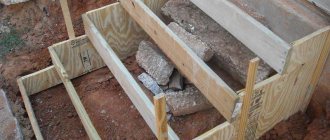
Next, formwork is installed from wooden boards, a wire frame is laid, and M100 grade concrete is poured. In the summer months, the boards can be removed on the third day; in other cases, the concrete is kept for at least a week to ten days.
Before gluing, the concrete is thoroughly blown away from cement dust and primed with deep penetration acrylic impregnation. The tile material begins to be glued onto the treads, starting from the topmost step. Each tile is cut to the required size so that the end protrudes above the vertical plane of the riser by an amount equal to the thickness of the facing material plus the adhesive layer. The optimal thickness of the adhesive layer is 7-10 mm.
If the tread of the step is wider than the dimensions, then it is better to cut and lay two identical parts of a smaller size. You cannot lay material smaller than 1/3 the size of the tile on the treads of steps. The risers are laid out in a similar way. The upper edge of the tread should overlap the end of the riser with a drip edge overhang of 10-15 mm.
After laying the paving slabs, the seams are rubbed to ½ depth with a mixture of sand and acrylic primer. The rest of the seams are covered with fine sand.
Primary requirements
The pie mounted under paving slabs can be different. The support must be of high quality, otherwise the masonry may float over time. To prevent the slabs from collapsing on top of each other, it is necessary to comply with a number of requirements for the foundations. The surface for installation must be flat, stable, strong, durable, and buried in the ground. In addition, it must be waterproofed.
To begin with, it is worth considering the design of the drainage cushion. It will remove accumulated moisture, preventing the destruction of paving elements. This is a layer of drainage material that is placed on a prepared and compacted bottom.
It is necessary to provide for the drainage of water entering the coating during heavy rainfall. The drainage device is usually performed by creating a drainage ditch at a slope. To make an even covering with identical seams, you will have to level each layer of the pillow.
The base for paving slabs must prevent displacement of the cladding elements, regardless of the level of load. To arrange sidewalk paths according to all the rules, you should use GOST 17608-91, SNiP Sh-8-76, SNiP Sh-10-75, instructions BCH-50-79, TU 400-1-190-79.
The structure of the installation of prefabricated sidewalks under paving stones consists of several elements:
- underlying layer;
- base;
- tiled covering.
As for laying on an old base, this issue is resolved in different ways. If it is a tile, then its condition is assessed. Ideally, you should place the paving stones on top of the newly installed pie.
Laying steps from paving material on a sand and gravel base
The main problem that one has to face when making a coating based on paving slabs is the low strength of the adhesive layer. Water and ice freezing in the seams often chip away the cladding from the concrete base. To avoid problems with frozen water, it is better to lay the tile material without an adhesive base, directly on a sand bed.
For laying paving slabs, each tread is made in the form of an improvised container filled with a mixture of sand and fine gravel screenings. For low stairs of three or four steps, you can use long curb stones laid out in several cascades on two stringers or parapets made of brick.
Before making steps from paving slabs, you will need to pour a foundation under the parapet walls and the base of the stairs. To strengthen wide and long steps, it is often necessary to cast an intermediate concrete frame that holds curb stones.
If the porch steps have a rounded shape, photo, you can use brick or paving stones instead of curb stones. The stone is laid on mortar with careful sealing of joints and seams with insulating material.
Often the concrete base is supplemented with a frame made of steel angle, and a geotextile fabric will need to be laid under the future pillow. The end angle is welded to steel reinforcement posts driven into the concrete base. The entire system of corners is tied with several horizontal reinforcing mesh made of rods with a diameter of 6-8 mm.
In any case, the paving slabs are laid flush with the upper edge of the corner or the end of the curb stone, this will ensure reliable retention of the tread on the sand cushion. Add ¼ of dry cement to the mixture of sand and screenings and mix thoroughly, lay out and thoroughly compact with a hand tamper to fill all the cavities. Before laying, the surface of the pillow is slightly moistened, leveled with a screed, after which the tile material can be laid out.
The technology for laying porch steps is no different from paving ordinary paving slabs, the only difference being that the joints and seams have to be sanded more carefully.
Step-by-step instruction
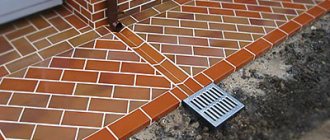
To lay floor tiles on the porch according to all the rules, you must follow the step-by-step cladding technology.
- At the initial stage of work, a trial installation of tiles is carried out. All elements are laid out on the work surface, leaving an approximate distance for the seams. The width of the seams may vary. When working with ceramics, it is 0.6 cm. The clinker must be laid taking into account the seams of 1.4 cm. The distance between the seams when laying porcelain stoneware is 0.8 cm. After a trial installation and checking it for symmetry, they begin to fix the elements.
- Regardless of the shape of the porch, the tiles are laid from the corner. After laying out and adjusting, mix the solution. Each composition has its own mixing proportions, which are indicated on the product packaging. The selected product is mixed using a construction mixer.
- After this, take a notched trowel and apply glue to the base and each tile. Excess glue is removed, the die is slightly pressed into the base and shifted, thereby eliminating voids.
- The identity of the seams is maintained using special crosses. Later they are removed and filled with grout.
The curved staircase elements are pressed tightly. During work, the surface is checked for slope and solidity. All elements are pressed into the glue so that none of them protrudes higher than the others. The indentation should be uniform over the entire area of the die.
The grout mixture may differ in composition and color. It is kneaded to a paste-like consistency, after which all seams are filled with the mixture. Grout is used only after the working solution has completely set. As a rule, this takes at least a day.
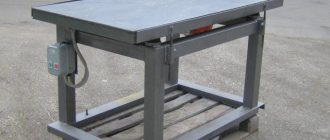
Steel frame steps
The simplest option for building steps from paving slabs with your own hands is shown in the photo. Unlike previous options, the manufacture of a flight of stairs and steps will take no more than one working day, subject to preliminary concreting of the supporting platform and preparation of material for the steps and side posts.
First you need to make load-bearing sidewalls that perform the functions of stringers. The steps and the upper platform of the porch will rest on the posts. To arrange the lower platform, it is necessary to concrete the support platform with embedded anchors. The racks can be welded from a steel angle with a shelf height of 70 mm or several reinforcing rods with a diameter of 16 mm.
Each step is made in the form of a rectangular steel frame. The width of the step frame is selected according to the size of the paving slabs. To hold the tile material, the horizontal shelf of the corner should be located at the bottom of the tread frame. The operating conditions of paving slabs require that the load on the material be distributed as evenly as possible over the surface, so often the step frame is additionally hemmed with sections of reinforcing bars or the bottom is welded with a sheet of metal with a thickness of at least 4 mm.
After treating the metal of the porch with protective coatings, the tiles are laid out on the steps and secured along the edge with an additional steel corner. This solution simultaneously allows you to protect the edge of the paving material from chipping.
No. 7. Bulk coating
Bulk covering in yards is not often installed, as its main drawback is
– difficulty in care, inability to sweep it up, as well as a tendency to spread beyond the designated boundaries. On the other hand, with the help of bulk material you can organize a platform of any shape. Bulk paths are made from:
- gravel, crushed stone and pebbles
. These materials can be used as a stand-alone coating or combined with stone and concrete slabs. The coating will support the weight of a parked car, and if there is a swimming pool on the territory, the pebbles will create the impression of being on the shore; - wood chips
Suitable for arranging only certain areas of the yard, as it is afraid of fire, cannot withstand high loads and is blown away by the wind, but walking through such an area will be pleasant.
Getting started: fitting and cutting
Since the steps are semicircular, the first thing you need to do is try out the layout of the tiles so that after laying their pattern will look beautiful. We decided to lay out the tiles so that solid squares alternated with pieces. In this situation, the edge of the step does not look like a perfect semicircle, but with small edges, but you will have to cut much less.
- Whole tiles were laid out on all 4 steps so that they were located strictly one below the other (creating straight lines from top to bottom).
- Tiles were placed between them, which will then be cut. Moreover, the whole ones should lie on top, and future pieces should be under them.
- Using a construction pencil, we marked the cut location on each tile that will have to be cut.
Important! First, we draw the cut location along the edge of the whole tile that lies on top, and then move the marking 2-3 mm to the center so that there is room for the seam.
- On the back side of all the tiles, place numbers one by one with a marker so that after cutting you do not confuse where each part should lie.
- For cutting, use a small grinder with a diamond blade.
- Before cutting, glue adhesive tape or tape along the lines marked on the tile; during cutting, the pencil is almost invisible on a gray or dark surface.
You need to cut away from yourself so as not to be injured by fragments.
Place the prepared ceramics on the steps to see if you have cut the individual tiles correctly.
Composites
As an alternative to concrete tiles, polymer sand tiles have often been used in recent years.
It consists of the following components:
- Sand;
- A binding polymer that replaces cement (usually polyethylene chips);
- Coloring pigments;
- Various additives and plasticizers.
After mixing, the raw materials are melted at a temperature of 250 degrees in an extruder and then pressed into the desired shape.
Polymer tiles
Advantages:
- The scope of application is not limited to climatic conditions. Frost resistance reaches 300 or more cycles, and strength is maintained at temperature changes from -70 to +70 degrees.
- Light weight for easy transportation and installation.
- Ease of processing: the product can be given the desired dimensions using a regular hand hacksaw or jigsaw.
- Resistant to fading, as the products are dyed in the mass.
- Moisture resistance – they do not absorb moisture at all (water absorption up to 0.15%), due to which they do not crack in the cold and do not become a breeding ground for mold and moss.
- Environmentally friendly - do not wear off to form dust and do not emit volatile compounds.
Note. The disadvantages include the ability of the material to expand greatly at high air temperatures. Therefore, the seams between the elements when laying must be at least 5 mm.
When deciding which tiles to choose for your porch, you should also think about how to lay them. It is advisable to place polymer sand products on a cement-sand base, using a metal corner as a boundary border. And fill the seams with a dry cement-sand mixture.
Metal staircase with composite steps
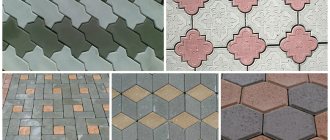
The standard sizes of the tiles allow them to be used to cover steps of different lengths and widths.
The most common sizes:
- 330x165 mm;
- 330x330 mm;
- 300x300 mm;
- 500x250 mm.
The thickness can also vary from 17 to 33 mm. Not long ago, ready-made polymer-sand steps with dimensions of 300x345x12 mm (ordinary) and 345x345x12 mm (corner) appeared on sale.
Ordinary stage
According to the manufacturer's instructions, they can be mounted on a base using a special adhesive composition or by means of hidden fastening to perforated mounting angles made of galvanized steel.
Recommendations
When choosing paving slabs as an element of finishing the space near the house, you should pay attention to what type of base will be the best solution in a particular case. Paving stones are highly decorative, have a long service life, and are suitable for paving paths, parking areas and driveways
With its help, landscaping of areas in courtyards is carried out.
Installing tile flooring is a process that requires careful planning. You have to plan for everything, break the work into stages, and choose the right materials.
To understand on what basis it is better to lay paving slabs, it is worth taking a closer look at the advantages and disadvantages of different options.
- Sandy base. Small screenings with a total thickness of about 200 mm can also be used in this capacity. Laying is done directly on the compacted base. The sand cushion is suitable for installing large-format tiles; its own load-bearing capacity is already quite high.
- Cement-sand dry mixture. There may be a cushion of crushed stone at the bottom. This type of base is suitable for laying medium-sized pavers intended for the movement of people or vehicles. This is a good option for arranging paths, pathways, driveways, and landscape design.
- Concrete. The laid blocks or slabs are fastened with mortar and paving stones. A solid foundation is necessary if installation is carried out on heaving, weak or swampy soil. In addition, a rigid concrete base is required when laying thin tiles that cannot independently withstand significant loads.
Taking into account all these recommendations, you can sort out the search for a suitable base for paving slabs and get a finished paving stone covering that will last for many years. It is quite difficult to compare different options directly. It is necessary to take into account the dimensions of the tiles, as well as the conditions of their subsequent operation and the intensity of the loads. This will allow you to choose a base that will not sag after a few months.
Surface preparation
Tiles for the porch and its steps on the street require a non-slip working base, which must be perfectly level. It can be leveled by pouring concrete with formwork. After pouring the steps, you need to wait at least 28 days; it is best to wait about 90 days from the moment the surface is leveled.
Pouring the porch
Leveling is controlled using a construction bubble or laser level. Do not allow the formation of bubbles, bumps, pits, cracks, debris or other substances that can interfere with high-quality adhesion.
To prevent water from remaining on the canvas, it is recommended to slope the porch in the direction from the entrance to the street at a rate of 2 degrees.
Leveling the work surface
Next, the working base is carefully primed with a water-repellent substance in one or two layers. After complete drying, you need to apply waterproofing. Cement-based coating type insulation is best suited.
The choice of tiles is carried out in accordance with the width of the porch step, sometimes purchased in advance, and the depth of each tier is adapted to the tile surface. The optimal size of the product is 30 by 30 centimeters, while the width of the step will be no more than 28 cm, so that there is a reserve for the riser (vertical tile).
Tile location
If you need products of a non-standard size, you can measure and cut the tiles yourself using a tile cutter, and the cut must be sanded so that the canvas does not collapse or get cut.
Preparatory work
To carry out quality work, it is necessary to prepare all tools and consumables in advance. You will need cement, tile adhesive, masking tape, tiles, crosses for even gaps, waterproof grout, reinforcing tape. To mix and apply the solution, you will need a mixing container, water, a special mixer or a strong, clean, large stick that you don’t mind. A building level, rope, and chalk will help you make markings for the masonry.
Marking
The adhesive composition is applied using a notched trowel, and after laying vertically located products, they should be secured with reinforcing tape while drying. The grout is applied using a small rubber spatula.
Consumables, tools