The durability and reliability of the building are ensured by compliance with construction standards and regulations. SNiP completely regulate the process of building construction. Interfloor ceilings differ for different types of structures.
The depth of support of the floor slab on a brick wall is an important parameter that ensures the overall stability, strength and safety of the structure.
Types by method of support
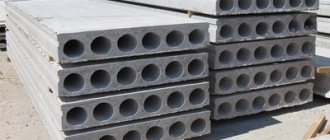
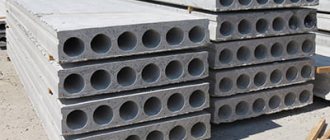
The slab used for interfloor separation is a reinforced reinforced concrete structure with voids. The holes in the slabs come in various shapes and sizes to lighten the weight of the structural element.
The choice of interfloor slab and the depth of its support depends on the design features of the building. The following parameters are taken into account :
- purpose of the building (residential, industrial, public);
- the material from which the structure is constructed;
- wall thickness;
- types of loads acting on both the slabs and the building;
- seismic characteristics of the development area.
Based on the type of support, interfloor slabs are divided into three categories . Their selection is carried out at the project planning stage, taking into account calculations of the loads acting on the load-bearing elements of the building.
On both sides
The support for such slabs is two opposite load-bearing walls. They are laid on capital elements, with narrow (transverse) sides. Most often, for this type, interfloor slabs with round voids are used, marked PK, 1PK, 2PK. They can withstand loads of up to 800 kg/m².
On three sides
They have reinforced end reinforcement and are laid on three load-bearing walls. They are mounted in the corners of the building, which have a U-shaped structure of load-bearing walls. They are marked PKT and can withstand loads of up to 1600 kg/m².
On four sides
Such slabs are reinforced with reinforcement at all ends, they are more rigid and have increased load-bearing capacity. They are used only in complex structures where maximum distribution of high loads is required, or in cases where the construction of additional superstructures is planned. They are marked PKK, indicating increased strength. They are practically not used in low-rise construction.
Advice
For low-rise and private construction, it is recommended to use round and oval-hollow floor slabs, supported on two sides.
Basic anchoring standards
Building codes recommend:
Slab anchorage units
Floor slab anchorage drawing
When placing ties at a distance of more than 3 m, an accurate calculation of the anchor elements is required. In practice, tie rods are made from 10 mm reinforcement with an anchoring length of 50 cm or more.
Depth of the establishment on the walls
All floors, regardless of installation method, can be laid on a foundation or load-bearing walls made of brick, reinforced concrete panels, aerated concrete or foam blocks.
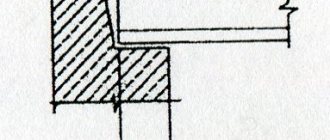
The support depth is the distance at which the slab rests on the load-bearing element.
It is important to know how much you can support a hollow reinforced concrete product. This depth depends on the material from which the supporting structures are constructed :
- brick - from 9 to 12 cm;
- panel - from 5 to 9 cm;
- aerated concrete or foam block - from 12 to 25 cm.
Failure to comply with the recommended laying depth can lead to the destruction of walls due to improperly distributed loads. Insufficient depth leads to coloring of the inner layer of masonry and plaster, or to cracking of the panels. Excessive distance taken for support will lead to the destruction of the outer part of the wall.
Diagram of correct and incorrect support on a brick wall:
Important!
Excessive depth of support on the load-bearing wall creates cold bridges and improper distribution of loads, which, accordingly, leads to large heat losses and leads to the gradual destruction of the building.
Excerpt from SNIP
JV “Large-panel structural systems. Design Rules"
4.3.17 The depth of support of prefabricated solid-section slabs on concrete and reinforced concrete walls, depending on the nature of their support, is taken to be no less than :
- 40 mm - when supported along the contour, as well as two long and one short sides;
- 50 mm - on two sides and a span of 4.2 m or less, as well as on two short and one long sides;
- 70 mm - on both sides and a span of more than 4.2 m.
The support of formless hollow-core slabs on wall panels is carried out on two sides, that is, according to a beam pattern with a support depth of at least 80 mm for slabs with a height of 220 mm or less, and at least 100 mm for slabs with a height of more than 220 mm.
In all cases, the maximum support depth for hollow-core slabs without formwork is taken to be no more than 150 mm.
Supporting hollow-core slabs without formwork on three or more sides (inserting the longitudinal side of the slabs into the walls) is not allowed .
How to properly anchor floor slabs
An important stage in the formation of a horizontal load-bearing surface of a floor made of reinforced concrete products is the anchoring of floor slabs. Its purpose: fixing individual slabs to each other, as well as connecting them to load-bearing walls to eliminate the possibility of structural destruction under certain types of impact. The joints are subsequently sealed with cement-sand mortar to avoid corrosion of the metal bonds. SNiP II-22-81 in paragraphs 6.35-6.39 determines the need to tighten the slabs to prevent their displacement.
Armopoyas
Before installing the floors on the main structures, a monolithic reinforced belt is installed. It is carried out along the perimeter of the area of the main walls, along their entire width. Formwork is installed along the edge, then a reinforced frame of longitudinal, transverse and vertical reinforcing bars is mounted and filled with concrete.
When constructing an armored belt, the following requirements must be met :
- The height of the armored belt is from 20 to 40 cm (not less than the height of a standard aerated concrete block).
- The width must correspond to the width of the supporting element.
- The thickness of the reinforcement is at least 8 mm. The frame is tightly knitted with wire or fastened by welding.
- The concrete must match the brand of mortar used for masonry. The recommended grade of concrete used is at least class B15.
The armored belt serves to evenly distribute all loads. It also contains reinforcement fasteners, which are designed for reliable installation of interfloor ceilings. Since the armored belt is a cold concrete layer, it is provided with a thermal insulating coating.
Attention!
Floor slabs are installed only after the monolithic reinforcing belt has completely dried.
Design of anchor connections
The goal of such design solutions is to implement an optimal fastening scheme in a building structure, form a rigid spatial frame of the structure, and eliminate the possibility of shifting the floors. Anchoring schemes are carried out on the basis of load calculations, taking into account the deformation of the foundations, possible subsidence, displacement and other factors. The choice of anchor connection configuration is based on the structural parameters, in particular, on the nature of the support of the floor slabs.
As a rule, for the construction of a small private house using floor slabs, anchorage calculations are not carried out. The slabs are fastened to each other and to the walls according to the generally accepted scheme, in compliance with standard solutions.
Important! Calculations are necessary only if the thickness of the supporting walls is asymmetrically changed.
Support nodes
Support nodes are the places where the slab is attached to the supporting structure, or the joints of the vertical and horizontal elements of the building structure.
They are designed for reliable and correct fixation of floor slabs on permanent elements. Laying the slab and fixing it to the wall is done using mortar and rigid reinforcing compounds.
Nodal connections must meet the following requirements:
- the end sides of the slabs should not be closely adjacent to the masonry;
- thermal insulation is performed between the masonry and the ceiling;
- It is recommended to close the hollow holes with special liners to prevent heat loss;
- The connection between the ceiling and the reinforced belt is made by rigidly connecting the reinforcement belt reinforcement with the reinforcing rods of the slab by welding.
The nodes depend on the number and type of capital elements. For support on two sides, they are made on transverse load-bearing walls, and for support on three or four sides - on both transverse and longitudinal walls. The nodes are also performed when the load-bearing elements are columns, trusses and floor beams.
Advice
In areas with increased seismic activity, it is recommended to construct support units using movable hinged joints.
When laying floor slabs, it is necessary to take into account all the parameters necessary for correctly supporting them on the load-bearing elements. The selection of slabs, calculation of nodes, reinforced belt and support depth are made at the building design stage.
After installation, do not forget to seal the seams.
What does the concept mean?
Floors always operate in a building within one floor, taking permanent and temporary loads from their own weight, the mass of floors, equipment, furniture and people using the room.
When external forces are applied, internal forces arise in the element , which determine the geometric section and make it possible to calculate the span structure according to 2 groups of limit states.
At the same time, in the floor slab, along with the loads applied to it, support reactions arise, which are concentrated in places where the elements rest on walls or point vertical structures. These reactions are distributed over the support area and the larger its area, the smaller the load on each cm 2 of the vertical element.
Thus, the depth of embedding of the floor in the wall is an important parameter that affects both the value of the supporting transverse force Q in the slab and the axial force N arising in the wall or column. Also, the size of the embedment affects the possibility of local crushing or chipping of the reinforced concrete product during load transfer .
Nuances of drawing up a work plan
The floor anchoring scheme is drawn up at the design stage of the building. In practice, this looks like the interaction of the fastener with the surface and with the installed reinforcement. The most commonly used reinforcement bars are class A-III . The ends of rods with a diameter of 10 (mm) are bent, tensioned and welded to mounting loops located on the floor slabs.
If a 4-6 (mm) binding wire is used to create a binding around the perimeter of the surface, then it is twisted in several layers. Such double or triple twisting of rods will reliably fasten the upper and lower surfaces, with the participation of existing beams, to each other. So the ceiling will be completely ready for pouring concrete. In rare cases, the ends are welded.
The scheme for working with rods when anchoring is as follows:
- the fastener element used is bent into the shape of a loop, to which the panel eye is attached;
- the anchors nearby should be pulled together, then they are welded to each other and to the mounting loops;
- the seams between them are sealed with cement.
Anchors under the ceiling must be installed perpendicular to the axis of the load-bearing wall, be level and at the same distance from each other. To do this, the surface of their location is marked in advance. The connection establishment scheme provides for the study of future interacting surfaces, their operational condition and geometric component are checked.
The sling often forms a solid concrete belt around the entire perimeter of the house . And before it is created and filled with cement mortar, the anchors can be additionally reinforced with large metal pins. Bonding of all fastened surfaces is the basis of anchoring.
Before starting work, each fastener is carefully inspected to exclude any defects.
Installation Rules
As indicated in the previous section, the technical features of the installation of various beams are specified in the standards of GOSTs, SNiPs and references from them to other documents. Important rules for attaching beams to an attic, staircase or interfloor structure, according to the standards, are as follows:
Mounting devices of this type are made of high-quality metal, wood, and reinforced concrete.
It is important to correctly carry out the work process according to plan, in accordance with calculations and the established load distribution indicator. When installing beams, special attention is paid primarily to the rafter system, which can lead to roof collapse. Also, if there are construction errors, constant leaks will form.
Attention! It is best to entrust work with calculations and load distribution of fastenings to professional engineers. In the drafted project, specialists will fully take into account all the technical requirements that relate to beam floors.
Types of anchors
The main types of fasteners are represented by the following groups:
- Wedges . These include spacer bolts. Their design is represented by a sleeve and a cone-shaped cap. The fastener installs quickly, is suitable for any hard surface, but is not suitable for reuse.
- Hammers . Upon external inspection, it is clearly visible that the bolt sleeve is notched at one end. When hitting the anchor, the sleeve bursts apart with the wedge of the part. Suitable for slinging dense parts. The downside is that it requires precise connection gaps.
- Bushings . The functions resemble wedge ones. Suitable for conventional and through-hole installation in solid slabs. But their disadvantage is that they require large holes for connection.
- Chemical . They are formed on an adhesive base, which is pumped into the fastening channel. Installation of such fasteners is simple. The downside is the high cost of the adhesive.
- Special . They have different subtypes, but for ceilings they use suspended or foundation ones. This variety is represented by studs and Molly bolts, on the surface of which markings from the manufacturers are applied. They are suitable for all hard and soft surfaces.
In addition to the listed types of fasteners, they also use screws with a semicircular head (collets), foundation bolts, embedded metal plates of various sizes from 10 x 5 (cm). Galvanized and stainless steel anchors are considered the best metal fasteners.
The installed anchor connections are filled with cement mortar of strong grades, preferably M500. But you can also use M300 and M400 for finishing.
Features and rules for fastening floor beams to walls and other structures
Attaching beams to the main structure (floors, roofing) is necessary for its long-term stability and additional support.
Therefore, the features of fastening floor beams are considered an important stage of construction, because the reliability of the entire building depends on it.
The ceiling is reinforced with various beams - wooden, metal, reinforced concrete. What nuances you need to know when arranging floors with beams, how they are fastened and with what, whether there is a possibility of making mistakes, and how to avoid them, read more in the presented article.
Difficulties and errors
The appearance of various errors and difficulties can arise from the wrong choice of beam, non-compliance with equipment and regulatory installation rules, or the use of low-quality products. If you do not adhere to these rules, this may result in rapid wear and a reduction in the service life of the beams, collapse of the roof and structure.
The most common mistakes, in addition to those listed, also include:
A wooden product must be treated with several layers of antiseptics, and then with polymer substances.
You can also cover the surface with paint or varnish (if finances allow). It is advisable to treat metal beams with a primer against rust, and, if possible, protect the surface with paint. Reinforced concrete beams are treated with a primer and polymer substances with a reinforcing base.
In buildings where chimneys are arranged next to beams, the room is often divided by special metal boxes. Beams (especially wooden ones) should not come into contact with chimneys to prevent a fire.
Some builders divide the space between them with thermal insulation materials that are not prone to spontaneous combustion. For this, mineral wool or polystyrene foam is used.
Also, do not forget to wrap beam products with materials for vapor and waterproofing , as this extends their service life and protects them from condensation and atmospheric changes, especially in the attic. You can wrap both the ends of the beams along the joists and the entire surface of the beam.
Construction companies can handle the purchase and installation of beam floors very well. They cooperate directly with manufacturers and have the opportunity to purchase materials at wholesale prices. And the installation work will be carried out professionally, with high quality, with a price list for the services performed and a guarantee for them.