Beton-House.com
Website about concrete: construction, characteristics, design. We combine the experience of professionals and private craftsmen in one place
Concrete balusters, beautiful and practical
Railings not only ensure the safety of stairs and platforms at height, but also often decorate the house. The decorative effect of this design is largely provided by racks, which are called balusters.
They are made from different materials - metal, wood, ceramics and even polymers. But the most common is concrete, which provides greater durability and strength to this part. The manufacturing cost is also less than when using metal or wood. We'll tell you how to make concrete balusters with your own hands. We will pay special attention to the work on preparing forms. We will also offer additional help: “Making balusters from concrete” - video:
- Plaster casting
- Preparation of the solution
- Without embedded parts
Preparatory stage
To organize a successful enterprise, an entrepreneur should familiarize himself with all the nuances of the process, draw up a plan for opening and calculate possible costs and investments.
Before making concrete balusters with your own hands, you need to consider the following aspects in detail:
As for the thickness of the column, it does not matter, and the cross section in the center can vary from 3 to 8 cm. After specifying the type and size of the balusters, you can begin preparing tools and material.
DIY concrete staircase: the creation process
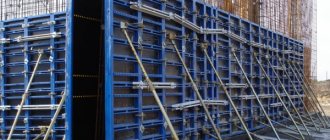
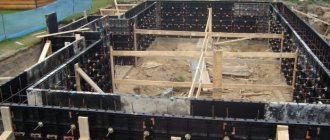
When the drawing of your structure is ready, you can begin creating the formwork.
It is necessary to keep the concrete at the required height and in the required volume, preventing the material from flowing out.
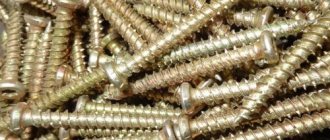
To create it, use boards or plywood, but it must be moisture-resistant. The formwork structure must be very rigid, so its elements are fixed using self-tapping screws. It should also be borne in mind that the weight of concrete stairs is impressive. In addition to the weight of concrete, the weight of the formwork will put pressure on the foundation of the house, so rigid supports must be placed under the structure. A film should be placed at the bottom of the formwork, which will provide additional moisture insulation.
The next stage is the installation of reinforcement. The reinforcement elements are connected to each other by welding.
Of course, this will affect the cost of the structure, but the concrete version of the staircase can hardly be called economical.
To install reinforcement, plastic supports are distributed from the bottom point of the formwork to the steel elements, which help to join the reinforcing elements. Along the entire length of the flight, the reinforcement must be fixed in the wall. The third stage is pouring the concrete staircase.
To create a high-quality solution, you should take 10 parts of cement, 30 parts of crushed stone, 20 parts of sand and 7 parts of water.
It is best to use a concrete mixer for mixing, which will increase the strength of the concrete. While the material is being prepared, it is necessary to install the railings. When the solution is ready, the concrete should be poured on top and compacted with a trowel. The structure is ready. After the concrete staircase is poured, it is covered with plastic film.
Please note that concrete takes about a month to dry. That is why it will take a lot of time to produce concrete stairs. However, it is possible to speed up the process. To do this, place a rag soaked in an ammonia solution under the film.
The fourth stage is lining the concrete staircase with wood or other material of your choice.
This cannot be avoided if the structure is located inside the house. Although for external options, the stairs do not need to be sheathed. First you need to break the formwork, then sand the steps using a special machine. Typically, concrete stairs are lined with wood. This is the simplest, most affordable and at the same time aesthetically attractive option. However, if desired, the options for wooden steps can be replaced with tile, stone or porcelain stoneware steps.
A few recommendations for beginners
Only high-quality materials should be used in the production process. It is necessary to follow the algorithm for performing actions. The posts can be installed only after they have completely hardened.
It is better to make concrete railings and balusters to order according to a sketch developed together with the client. Several columns can be made for display.
Before you start making items for sale, you should try making a few pieces for personal use.
The price of concrete balusters depends on the complexity of execution and the size of the products. Medium-sized columns cost from 300-800 rubles on the market. with their cost about 150-300 rubles.
Railing options
Railings play an important role in the construction of a concrete structure.
Firstly, no matter how reliable and safe the staircase is, the railing is an additional safety element.
It is necessary to organize them if the number of stages of the structure is more than three. Since most concrete structures are adjacent to the wall, railings can only be installed on one side. Secondly, railings are the most important element from an aesthetic point of view. Therefore, most often they are ordered rather than made with their own hands. First, let's figure out what types of railings a concrete staircase can have.
Advantages and disadvantages of concrete balusters
Installing concrete products is a good idea, since such a material has many advantages that manifest themselves in operation:
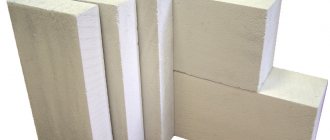
Kawabanga! Expanded clay concrete wall panels: dimensions, classification and installation
Concrete really has many advantages, which is why it is quite popular in the construction industry. However, there are also disadvantages that you should also know about before using concrete products:
We can say that the disadvantages are not too significant, so the material remains one of the best options for creating decorative balusters and other products.
Metal fencing
In this case, stainless steel railings are perfect. They can be used both inside the house and especially outside, while wooden ones are only suitable for use inside the building.
Stainless steel railings practically do not wear out, have excellent strength and can withstand heavy loads.
Other advantages of stainless steel fences include their low weight, which allows you to easily install and even make them yourself, as well as the ability to create completely different designs by polishing or painting.
There is only one drawback to stainless steel railings: high cost compared to other materials. In addition, some may find stainless steel fencing too cold and uncomfortable. But for a staircase in a house whose interior is made in high-tech style and is replete with metal elements, such balusters and handrails are just right.
Metal railings can be forged, cast, prefabricated or welded.
Cast railings are very expensive and difficult to install yourself.
The price for forged fences will also be high, but since they are usually made to order according to individual sketches, the cost is justified. However, it will be difficult to repair such fences for the same reason.
Welded stainless steel options are among the most affordable. In addition, they are quite easy to make with your own hands.
Prefabricated railings are also easy to assemble yourself due to their modular design.
Why should you pay special attention to stainless steel fencing? Although it is quite expensive, its qualities are worth it. This is a durable, wear-resistant and aesthetically attractive material that is not afraid of moisture and does not corrode.
How are concrete balusters made?
The first method is beating balusters; in this case, a semi-dry cement solution is used to obtain the products, which is brought to the desired state with water.
The second method is casting. In this case, the concrete solution is poured into the mold through a special hole, and then left to harden, periodically turning it in a horizontal position. This way you can receive products faster.
Concrete balusters are an excellent decoration for a site; if installed correctly, they will delight home owners and their guests. Thanks to the advantages of the material, the fence or staircase will retain its original appearance for many years.
Types of concrete stairs
If you decide to create a staircase from this material, you will have a wide choice of different options for its construction.
In general, a distinction is made between cantilever, monolithic and bowstring staircase structures. Cantilever staircases can be fixed in the wall using a crown or attached directly to the supporting structure. It can be installed on one or two stringers.
Monolithic concrete stairs can be marching or spiral. Marching options may have a turning platform or winder steps.
Concrete structures on strings are stairs that are installed on special beams. In this case, high beams, the reinforcement of which involves the use of steel rods, can play the role of a kind of railing.
Design of balusters, their sizes and shapes
The baluster consists of three main elements:
- Base (bottom of the column).
- Central part (decorative). Is the largest element.
- The supporting part (on which the railing rests).
The dimensions of manufactured products depend on where they will be used. If handrails are installed on them, the height of the products should vary from 800 to 1000 mm.
The shape and thickness of the central element of the column are determined in accordance with the project. Most often, the cross-section of the product is round, and its length can have any shaped shape. The photo shows various configurations:
Basic properties
Everything in this world has both positive and negative sides. Therefore, our instructions will first tell you about the pros and cons of the elements described.
Advantages
First, we should talk about the positive properties, of which there are actually many:
- Very impressive resistance to mechanical stress.
- Low price.
- Ecological cleanliness.
- Waste-free production.
- Does not require additional processing.
Advice: it is worth saying that if you wish, you can still carry out additional processing. For example, if you paint it with special compounds, you can significantly increase its lifespan.
- Has an excellent glossy surface, almost like natural stone.
By applying silver alkyd paint (for example, as in this photo), you can give it a more aristocratic look
- Frost resistance.
- Possibility to produce a product of almost any shape.
- Waterproof.
Flaws
You also cannot ignore the negative aspects:
- They are not as impact resistant as natural stones (eg granite).
- Due to their heavy weight, they are difficult to install with your own hands.
- Not as attractive a surface as its natural counterparts.
Set of plastic molds for making concrete balustrades
A concrete balustrade is a set of architectural elements for staircase fencing made by vibration casting into plastic molds. What is included in the main elements of the balustrade:
- balusters,
- glasses for installing balusters,
- pillars (or columns) with a base and a cover (top),
- railings (handrails) balustrades (straight or radius),
- bowstring (base) for balustrade balusters (straight or radius).
Kawabanga! Reinforced concrete power line supports - types and applications
A concrete balustrade is a set of architectural elements for staircase fencing made by vibration casting into plastic molds. What is included in the main elements of the balustrade:
- balusters,
- glasses for installing balusters,
- pillars (or columns) with a base and a cover (top),
- railings (handrails) balustrades (straight or radius),
- bowstring (base) for balustrade balusters (straight or radius).
A balustrade whose balusters are arranged in a circle rather than in a straight line is called a radius balustrade . For such a balustrade you need a radius shape of the railing and bowstring.
In the Legobeton online store you can purchase a complete set of plastic molds for the manufacture of all of the above balustrade elements or individual molds for the manufacture of balusters, pillars, railings and other elements in the section - Plastic molds for balustrades.
Wooden balusters
Of all types of balusters, wooden ones are the most common. On such columns you can depict original patterns, in some cases entire scenes.
Kawabanga! GOST 12504-80 Internal concrete and reinforced concrete wall panels for residential and public buildings
Structurally, wooden supports consist of the following elements:
The base and top of the column are made with a small margin, which is necessary to adjust the height when attaching the balusters.
Methods for attaching balusters:
- through the baluster and the bar under the handrail with screws screwed in vertically;
- to the baluster with a screw from the side;
- directly into the step and handrail through an anchor, etc.
The method of fastening the baluster is determined during its design, so the consumer must decide this issue in advance.
Do-it-yourself baluster making machines
To make balusters of more complex shapes, homemade milling machines, manual or with a copier, are used. The simplest manual router can be made with your own hands.
A milling machine with a copier, assembled on the basis of a lathe, will allow you to obtain balusters of a more perfect shape.
The principle of operation of this device is that the depth of the cutouts is adjusted not manually, but with the help of a thrust guide roller moving according to a template.
A manual milling machine is installed on a movable carriage capable of moving perpendicular to the axis of rotation of the workpiece. In this case, the distance to the center of the workpiece is determined by a thrust guide roller, which moves along the template.
Manufacturing of flat balusters
Finally, hand-made balusters from boards are connected into sections and a handrail is mounted. Then the entire structure is varnished.
Forms
Factory-made baluster mold
The simplest option is to purchase ready-made forms for pouring concrete balusters. But as mentioned above, the choice may not suit us, so we will make them ourselves.
The most commonly used methods for making molds are:
- Casting from plaster.
- Foam casting.
- Polyurethane casting.
- Molded from fiberglass.
Some craftsmen still sometimes use a punch made from a steel sheet, but this requires good experience as a tinsmith. And besides, it is difficult to make a shape with large changes in cross-sectional area using this method. Therefore, we will not consider it.
Making molds on a printer is the near future
Well, about one more method - 3 D printing. Printers for it are becoming increasingly widespread. True, the cost of models that can print a finished plastic form is still prohibitive to purchase a device for home use.
But now there are companies that offer 3D printing services on their equipment. So perhaps soon this will become the best option.
You simply develop a three-dimensional model of the form (there are many programs for this), and a finished form for concrete balusters is printed from it, without any intermediate operations or additional materials.
Plaster casting
The plaster mold can repeat the most complex pattern of the model
One of the simplest and cheapest options. In recommendations on how to make a form yourself, this option is often suggested.
But it has many disadvantages, we list them:
- Gypsum is a very brittle material. The form can easily be destroyed when laying and especially compacting the mixture; it must be handled very carefully. Sometimes, after making just a few balusters, you have to make a new mold.
- Plaster is not waterproof. The mold must be coated with several layers of waterproof varnish or paint, then the coating must be renewed periodically. Also, before molding, abundant lubrication of the surfaces is necessary.
- In addition to the fact that the form is fragile, it is also heavy - which, coupled with the obligatory careful handling of it, significantly reduces the speed of molding.
Now about making the mold step by step:
Making a wooden model
- First of all, we need a model - a part that will look exactly like the future baluster. In most cases, it is made from wood on a lathe. If a more complex relief is needed, then additionally they resort to tools for decorative wood carving. But you can make a model from any material - sculpt it from clay, wax or even plasticine. If you want to copy (for example, for repairs), then an exemplary concrete baluster is quite suitable as a model.
- Then we prepare the formwork in which we will cast the mold. Any rectangular box will do, the height and width dimensions of which are 10-15 centimeters larger than the layout (they should be equal in length). We don't need a lid.
- We install our model in a box. We need it to be at an equal distance from its walls on all sides (the thickness of the mold wall). To do this, you can install any stops at its ends, up to a pair of screws that will secure the model through the wall. In order for the mold to have a hole for pouring and installing reinforcement, the ends of the model must be firmly adjacent to the walls.
- We mark on the walls of the box the level at which we will pour the first portion of plaster. It must coincide exactly with the axis of the model.
- We lubricate the walls of the box and the layout with any lubricant, perhaps a soap solution.
- Prepare the gypsum solution and fill it to the mark.
- Immediately along the edges of the model, we also recess greased cylinders from any material with a diameter of 2 centimeters and a few centimeters. They will form recesses to secure the form from moving when assembled.
- After the plaster has hardened, remove the cylinders.
- Lubricate the hardened surface of the plaster, including the recesses from the cylinders, with lubricant. We do not remove the model, but clean it of particles of the poured mixture and re-lubricate it.
- Fill the box with plaster to the top.
- After the second portion of gypsum has hardened, you can remove the almost finished form. Immediately remove the upper part, then release and remove the model, and take out the lower part.
- We cover the surfaces of the mold with several layers of moisture-resistant paint or varnish.
Our form is ready, you can make concrete balusters with your own hands.
Foam molds
Foam molds
Polystyrene foam is slightly better than gypsum, since the molds are easier, and vibrating the product in it can be done without fear of splitting the mold. But it also has its shortcomings.
- The shape of the layout is not always accurately conveyed.
- The surface of the mold also has to be coated with paint or varnish to protect it from moisture and smooth out minor irregularities.
- More complex mold manufacturing technology.
- Although polystyrene foam is not fragile, forms made from it have little strength, and they are also easy to damage when molding or demoulding the product.
We begin to make a foam mold:
Please note, this requires some experience, not everything will work out the first time.
- We are preparing the model. Unlike the first case, molding will take place at elevated temperatures, so wax or plasticine will not work.
- Then we need to purchase a semi-finished product - PVA polystyrene granules. It’s difficult to do this in a regular hardware store; it’s better to try ordering online, since the price for this material is low.
- Then we proceed to the initial foaming of the granules. For this we need a steam bath (about the same as for steaming food, but only slightly larger). You can adapt two containers of different sizes; we will boil water in the second one with a mesh bottom and carry out operations to make the mold.
- Pour a small amount of granules into the second container and set it to steam. The main thing is to guess the quantity - the granules will foam and increase in volume by 20-40 times.
- After that, we dry them and let them sit for about a day.
- While our granules are aging, we prepare (excuse the tautology) a mold for making the mold. This is the same box as in the previous case, but it is metal and with a lid that can withstand slight pressure.
- Just as in the previous case, we fix our model in the form. We lubricate both it and the walls of the box with any lubricant that does not lose its properties when heated.
- We fill the form with our aged granules and fix the lid.
- Place the mold again in a steam bath for several hours.
- Remove and leave to cool. Then we remove the workpiece.
- Carefully cut the foam mold into two halves along the axis. The model will interfere with us, so we need to be especially careful when performing this operation. It is best to use a heated blade for cutting.
- Then we need to arrange the clamps to align both halves exactly. The easiest way is to drill holes and install pins made of any material on one of the halves.
- As in the case of plaster, we cover all surfaces of the form (including the external one) with paint or varnish.
By the way, many people try to simply pump in polyurethane foam instead of all this fuss with granules and a steam bath, but the result is not very good; the molds cannot even withstand the production of two or three balusters.
Polyurethane mold
Production of balusters in polyurethane mold
This form is stronger than the foam version, although the manufacturing technology is not much more complicated. Most of the industrially manufactured molds offered are made from this material.
- We are also preparing a baluster model that can withstand elevated temperatures.
- Next we prepare the box in which we will make the mold. You won’t have to heat it from the outside, so you can get by with a wooden structure. We just seal the joints with silicone so that the mixture does not spill out. Choose smaller sizes. 1-2 centimeters larger than the dimensions of the model is enough. The polyurethane mold does not need a large wall thickness.
- We purchase the components of the mixture - these are: polymer SKU-PFL-100 and hardener in granules "Kuralon". Component consumption: 1 part hardener to 5 parts polymer.
- Place both components in metal containers and carefully heat to about 110-120 degrees. You should not use open fire, as the granules near the walls may overheat until they melt and lose their properties. It is better to use a hair dryer.
- When heating, carefully mix both components to remove air bubbles.
- While the components are heating up, place the model in the box and lubricate all surfaces.
- Next, the polymer should be allowed to cool to a temperature of 60 degrees, leaving the hardener heated. We heated it to a higher temperature only to remove air inclusions.
- Pour the polymer and hardener into one container and mix thoroughly.
- Carefully pour the finished mixture into the mold.
- After the polyurethane has cooled, remove the mold, and as in the previous case, cut it along the axis and install the clamps.
Attention. The mixture is toxic, so work must be carried out outdoors or under a hood. To protect your health, use gloves, goggles and a respirator.
Fiberglass mold
Fiberglass mold, one of the best
The best option is as seen in the video in this article. Easy to manufacture and has excellent strength. For work we need epoxy resin with a hardener and fiberglass.
The technology itself is somewhat similar to papier-mâché made from paper and paste. I think that many people mastered it in school labor lessons.
- As in all previous cases, we prepare the model.
- Then mix, according to the instructions on the package, epoxy resin and hardener. Don't cook too much, the ingredients react quickly.
- We cut the fiberglass tape into strips.
- We lubricate the model with any lubricant and begin to cover it with strips of tape. Moreover, we alternate a row along and a row across, carefully pressing it in the places of the recesses.
Advice. If the model does not have a complex relief (it is a pure figure of rotation), then you can simply wind the tape crosswise at an angle of 90 degrees, soaking each layer. Also in this case, instead of fiberglass, you can use thread.
- When we have formed a layer about three centimeters thick, we can consider that our form is ready. But it remains to be taken care of how to reliably fix its parts relative to each other during assembly. Therefore, in several places we thicken the layer to almost a centimeter by simple winding.
- When the resin hardens, cut the mold. Moreover, this cannot be done with a knife. We use a grinder with a cutting wheel.
- All that remains is to install the clamps. We drill holes in the places of thickening for metal pins of small diameter and glue them in.
Having made the forms, you can proceed directly to the manufacture of balusters.
Special mixtures for concrete balusters
Solutions for casting concrete have very different compositions and directly depend on the purpose of future products. The classic solution for pouring balusters for household use consists of the following components:
- cement;
- silicates;
- water;
- fillers - crushed stone, gravel, sand.
The price of additives largely depends on the planned load, so if you make balusters with your own hands for your home or site, you can buy affordable options for household needs.
Prefabricated reinforced concrete balusters with fastening pin: drop shape
Custom-made balusters from Rikam
In our company you can order balusters and railings from the direct manufacturer at the most optimal prices in Moscow and the Moscow region.
Rikam guarantees all its clients:
- highest quality products;
- using only environmentally friendly materials;
- providing a full range (from computer development of a 3D sketch to installation of finished products in the location specified by you);
- flexible pricing policy and a wide range of discounts;
- individual approach for each client.
You can order balusters with any unique characteristics and in any architectural style directly on our website or by phone.