Hello, dear blog reader, in the article we will look at the expansion joint and its significance in structures, and we will consider in detail the construction of joints in concrete floors.
Expansion joint - necessary to reduce loads on structures in buildings in places of possible deformation. What causes deformations that appear in the form of cracks throughout the building:
- Fluctuations in air temperature, heating of a building from the sun do not occur evenly and concrete or metal expands in one part, while in another the temperature does not change and deformation occurs.
- Seismic phenomena, a small earthquake can break or crack a building.
- Uneven ground settlement, a building may have different number of storeys and some parts of it sag more, some more slowly, because of this, cracks appear along the entire height of the walls.
To avoid cracks, an expansion joint is made in buildings, which divides all structures into separate blocks and runs along the walls, floors, roofs and, in some cases, foundations. Expansion joints are divided into temperature, sedimentary, anti-seismic and shrinkage.
If your house is no more than 10 meters in length, then you do not need to worry about these seams, and in this article I wanted to talk about the construction of seams in concrete floors or screeds.
Expansion joints in floors
Why are seams cut in a freshly laid concrete floor? All for the same reason to avoid cracks. I think I won’t be wrong if I say that everyone saw cracks in the floors. Now companies engaged in the production of concrete floors provide a minimum five-year warranty on floors.
And the manufacturer doesn’t want to have to come back to a once-made facility to repair cracks. For this purpose, shrinkage joints are cut in concrete floors, generally 6 by 6 meters. The shrinkage joint weakens the concrete slab at the point where it is cut and gives direction to the crack in the concrete, which appears when it deforms.
Previously, they cut seams on all objects, but recently I learned a trick that they don’t cut concrete floors. The manufacturer agrees with the customer that when the floors are cracked, he will come and repair them.
The argument is that cracks will still appear in other places. It is more economical for the manufacturer to repair the cracks than to spend money on diamond discs for concrete, the cost of wages for workers and then come again to repair it. Many customers agree.
What do SNiPs write about expansion joints in floors?
10.13. In rooms where sudden temperature changes (positive and negative air temperatures) are possible, expansion joints must be provided in the screed, which must coincide with the axes of the columns, with the seams of the floor slabs, and expansion joints in the underlying layer. Expansion seams must be embroidered with a polymer elastic composition.
3.14 It is recommended to install expansion joints by cutting through the concrete of the underlying layer with a milling cutter to a depth of at least 1/3 of the concrete thickness after 2 days of hardening. When constructing expansion joints in the concrete underlying layer, it is permissible to place slats coated with an anti-adhesive compound or wrapped in rolled roofing material at the locations of gaps before laying concrete, which are removed after the concrete mixture has hardened. The resulting seams are filled with sealing materials
on floor design (in development of SNiP 2.03.13-88 “Floors”) MDS 31-1.98
10.5. In the concrete underlying layers of the floors of premises, during the operation of which sudden changes in temperature are possible, it is necessary to install expansion joints located among themselves in mutually perpendicular directions at a distance of 8-12 m.
Expansion joints in floors must coincide with the expansion joints of buildings, and in floors with slopes for liquid drainage - with the watershed of the floors.
Snips write that they need to be cut. And please note that the concrete floor is cut after two days of hardening. I can tell you from my own experience that often after two days concrete floors were not cut into shrinkage joints. After a week, or even at the end of the project, all poured floor maps were cut, regardless of when the concrete was laid in them.
After such cutting, one could see a crack next to the cut seam; it would have been better not to have cut it then.
In addition to shrinkage joints in concrete floors there is the same expansion joint, structural or cold and insulating.
Expansion joints are made according to the design; factory inserts are used or from two metal corners in industrial buildings. In an expansion joint, the concrete between the fill maps does not touch; these are separate structures.
Structural or cold joints separate fill maps. When producing concrete floors in warehouses, you need to think about how to arrange pour maps so that cold joints fall into the area of least load.
The cold seam expands over time; all shrink and insulating seams are filled with sealants after a month. Since over the course of a month, concrete slabs deform and the seams increase. But cold joints expand over the course of a year, I can’t explain this exactly, most likely due to the fact that concrete gains strength over the course of a year and deforms probably the same amount.
Insulating seams are cut in places of loads and possible deformations from the building columns and foundation subsidence. The columns are cut into a diamond shape at a distance of approximately 1.5 meters. Before pouring the concrete floor, structures, columns, and walls that may sag are wrapped in polypropylene 1 centimeter thick.
Expansion joints will be sealed with sealants in several stages, the first is cut two days after laying the concrete, the second a month later is cleaned of dust, dirt and Velotherm with a diameter of 5-8 millimeters is laid, and the last stage is sealed with sealants.
Threaded seams
They are used in relatively small spaces, allowing to reduce the cost of a concrete floor and speed up its construction. The seams are cut with special mechanisms according to the building plan; if there is none, then in the most dangerous places in increments of approximately 3–5 meters. Seams can be sealed using two methods: using a flexible insert with sealant or using plastic sealants only. Let's consider both methods of work production.
Threaded seams
Sealing joints with high-quality hybrid sealant
Step 1. Thoroughly clean the seams from any remaining concrete dust. To do this, it is recommended to use a thin spatula or other metal device. Insert it into the seam to its full depth, move it forward/backward and slightly lift the side plane of the spatula to the top. In order to arrange the process and improve the quality of cleaning the seam, use a vacuum cleaner. Always keep the suction pipe next to the spatula - the air stream will pull all the dust out of the groove, you just need to pry it a little. The fact is that while cutting seams, the diamond disk of the mechanism is constantly cooled by water, the dust gets wet and sticks firmly together. The spatula crushes the lumps, which allows the vacuum cleaner to clean them efficiently. We will tell you how to work with the unit for cutting seams in this article a little lower.
Seam cleaning
Step 2: Use a vacuum cleaner to remove dust from the upper surfaces of the concrete floor near the grooves. Do not rush, dust residues greatly reduce the adhesion coefficient of materials, and the sealant may peel off over time. As a result, dirt from the floor will get into the gap, and unsightly stains will form at the expansion joints. Removing dirt from cracks is very difficult and time-consuming; to prevent the reappearance of dirt, you will have to completely remove the old sealant and repeat the work of sealing the seam.
Use a vacuum cleaner to remove dust near the groove
Step 3. Prime the adjoining surfaces of the seam planes with sealant, use special compounds for this. You can prime it with a small brush.
Applying primer
Important! The primer must be applied not only to horizontal surfaces next to the cut strip, but also inside the seam. To do this, take the maximum amount of primer onto the brush and let the excess flow into the slot. Remember that concrete absorbs a large amount of liquid, apply the primer several times at once.
Application process
Step 4. To reduce the cost of finishing expansion joints and prevent three-way adhesion, lay a special seam cord to the required depth. Push it through with a wide spatula, the embedding depth is approximately 0.5–1.0 cm. Make sure that the surface of the cord does not protrude above the surface of the concrete floor. The diameter of the cord is selected depending on the width of the cut groove. If the cutting was performed with an ordinary diamond disk, then the groove width is standard - 3 mm. An increase in width may occur due to a malfunction of the cutting unit or disc curvature.
Seam cord laying
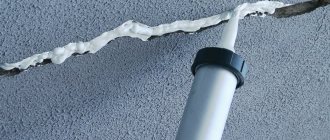
Step 5: Insert the can of hybrid sealant into the universal caulking gun. Using a sharp knife, cut off the end of the sealed package and screw on the tip of the gun.
Attaching the sealant bottle to the gun
The edge of the package is cut
Step 6: Carefully cut the end of the ferrule so that the exit from the tube is slightly larger than the width of the seam. Make the cut at an angle of 45°, due to this you will be able to firmly press the cut-off surface of the tip to the concrete and fill the seam to the required depth.
The end of the tip is cut off
Step 7: Place the tip on the floor and seal the seam. In this case, you need to simultaneously move the tool along the seam and squeeze out the mass, the work requires a certain skill, do not be discouraged if you don’t succeed right away. After a short time, practical skills will appear and the work will go much faster.
Seam sealing
Sealing process
Step 8. Wait a few minutes and use a clean putty knife to carefully remove any protruding sealant from the floor.
Removing excess sealant
The same steps should be repeated on all seams. The method is considered the simplest from a technological point of view, and is almost as effective as the others.
Sealed expansion joint
Puttying expansion joints with two-component sealant
The method is somewhat more complicated, but the surface is perfectly smooth. Another advantage of this method is that the seam is not only plastic, but also durable, which significantly minimizes the risk of damage to the coating during operation of the premises. In what order should the work be performed? Cleaning the seam from concrete dust is carried out using the same method as described above. Cover the external and internal surfaces of the seam with a primer.
Step 1. Prepare the sealant for use, follow the manufacturer's instructions. Pour the main component of the sealant into the container and add the hardener to it. Mix the mixture thoroughly with an electric mixer, allowing a little time for air bubbles to escape.
Preparation of sealant
Cooking process
Important! Keep in mind that the time for using two-component putty is limited; how long you can use the material is indicated on the packaging. As soon as the polymerization reactions begin, adding any of the components is prohibited.
Mixing the composition
Step 2. Prepare a simple device for pouring liquid sealant into a narrow seam; it’s easy to do.
- Find a clean plastic bottle with a volume of 1-2 liters, drill a hole with a diameter of about 0.5 cm in the lid. If the hole has a smaller diameter, the sealant will flow out too slowly, and the work time will increase significantly. If the diameter of the hole is large, then the composition will not have time to penetrate the entire depth of the seam and will begin to spread over the horizontal surface, which causes excessive consumption of expensive material.
- Cut a hole about 5 cm in diameter near the bottom of the bottle. The sealant will be poured through it.
Device for pouring sealant
A hole is drilled in the lid
Step 3: Fill the bottle with sealant to about half its capacity. Place the lid with the hole against the slot and slowly move the container to fill the seam with sealant. The speed of movement is selected experimentally. You need to choose a mode so that the maximum amount of sealant fills the seam, and only a little remains on the surface. If you find that there is too little sealant and depressions have appeared on the surface of the concrete floor, then you need to go back and pour out some more material. Check the quality of the fill several times, correct problem areas if necessary. Fill all the seams in the room in this way.
Sealant is poured into a bottle
Filling the seam with sealant
Another photo of the process
Step 4. Allow time for hardening, it can be 12 hours or more. The manufacturer indicates approximate times; specific values depend on the humidity of the concrete floor and the microclimate parameters in the room.
Next you need to wait for the sealant to harden.
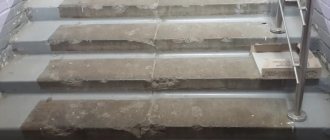
Step 5: Once the material has completely cured, begin sanding the joint surface. Use a special cylindrical grinder.
Grinding the seam surface
Expansion joint after grinding
The effectiveness of an expansion joint depends on two factors: the correct choice of location, optimal depth and width. As for the sealing, it is more decorative than functional. If the choice of seams should be made by architects, then the workers are responsible for the quality of cutting. In order to cut a seam correctly, you need to know the technology of the work and the design of the cutting machine. With technology, everything is simple: the car should move only along marked lines, the movement should be uniform, without stopping. How to use the slicing machine?
Seam cutter BFS 735
What is an expansion joint
A seam is a cut (an artificial gap) in a monolithic concrete slab, which divides it into sections that can move independently of each other within small limits.
Why do you need a cut in a floor screed? Essentially, it is a monolithic concrete slab that is subject to such serious loads as pressure from the entire structure, shrinkage, thermal expansion, and swelling. The heterogeneous structure of a large monolith causes uneven expansion (compression) of different areas, which causes internal stresses leading to cracking.
Cutting a large slab into several elements reduces internal stresses. Each block can move relative to the neighboring section, regardless of it. As a result, the likelihood of cracking is reduced.
Necessity of the device
The structural elements of buildings are connected and constantly interact with each other against the background of the fact that buildings change geometric dimensions under the influence of changes in temperature and humidity conditions of operation, shrinkage of the frame, and settlement of hardening concrete monoliths. All this causes stress in the nodes of a single structure of the structure, although often such changes in the geometry of elements are visually invisible. The creation of cuts promotes the uniform distribution of additional loads (forces, stresses) by compensating for changes in the geometric dimensions (expansion, compression, twisting, shearing, bending, etc.) of the material that arise due to factors acting on the concrete (or in the concrete).
Loads always affect structures, but without formed expansion joints they entail deterioration in the characteristics of foundations, the occurrence of cracks, manifestations of structural deformations, an increase in internal stresses, a reduction in service life, etc. For example, heating/cooling of walls leads to a slight change in their dimensions, which in turn creates stress in the material. Larger wall dimensions mean greater stress.
They cause cracking (in concrete screeds, interior decoration), and are transmitted through a rigidly connected frame to floors, beams, stairs, foundations, etc. A minimal shift in the position of the wall in the source of stress will immediately create a threat to the integrity of the rigid structure of the building. The duration of the impacts and their magnitude can even cause destruction of the structure’s frame. Movements and seasonal heaving of soils also manifest themselves as a factor in the destruction of blind areas if temperature cuts are not provided for in them.
Return to contents
The largest distances between seams in a floor screed
According to their purpose, deformation gaps are divided into 3 main categories:
- Insulating type. Such a gap is formed around the perimeter of the room, near the walls, as well as around columns and other architectural elements. It is designed to compensate for expansion of both the walls and the screed itself.
- Shrinkage. They must prevent the destruction of concrete as a result of uneven shrinkage during hardening. These gaps divide the concrete slab into separate squares with a length to width ratio of about 1.2-1.5. They are made in the form of straight gaps, without branches. The greatest distance between expansion joints in a floor screed is 3 m. If the width of the slab is 3.5-4 m, then the joint is made in the middle. The gap depth is usually at least 1/3 of the coating thickness.
- Structural. It is arranged during a break in pouring concrete in the place where work is suspended. The construction seam may coincide with the shrinkage gap.
The parameters of deformation gaps depend on the coefficient of thermal expansion of the material, shrinkage characteristics, load, and operational factors. The distance between them is usually calculated from the expression (25-37)h, where h is the thickness of the screed. If the concrete solution shrinks significantly, the parameter is taken at the lower limit. The seam width is selected within 4-6 cm.
How to make an expansion seam
The wall expansion joint (expansion joint) must separate the screed from the structural elements of the building, so it should be performed along all walls, as well as around stairs and columns. Such a seam is made across the entire thickness of the screed by attaching a compensation tape, for example made of polyurethane foam, to the structural elements from which the screed is to be separated. Thanks to the wall expansion joint, the screed will not be subject to stress as a result of deformation of the structural elements of the building.
In addition, impact noise from the floor will not be transmitted to these elements. Intermediate expansion joints divide the screed into smaller fields, preventing the occurrence of cracks as a result of shrinkage of the drying screed. The thickness of the notches depends on the thickness of the screed and the presence of underfloor heating. As a rule, cuts are made to 1/3-1/2 the thickness of the screed. In reinforced screeds, expansion joints must be made between sheets of reinforcing mesh. In cement and concrete screeds, intermediate expansion joints should divide the screed into fields with an area not exceeding 30 m2, with a side of no more than 6 m. In long corridors, the implementation of intermediate expansion joints depends on the width of the room: the smaller it is, the more joints there should be. Expansion joints should be made at a distance equal to 2-2.5 times the width of the corridor.
Attention! Cuts should also be made at the junction of two different floor coverings and if the thickness of the screed changes.
The location of the seams should also be tied to the tile format so that the inter-tile seams coincide with the expansion joints. Sometimes it becomes necessary to move the expansion seam a few centimeters.
Expansion joints under parquet and laminate are left unfilled. In the case of tile and stone flooring, the expansion joints repeated in the tile joints may remain empty at the base, with the exception of terraces: where they should be filled with a waterproof material, such as silicone. In addition, the tightness of the seams can be ensured by appropriate adhesive masses and fugues that are resistant to water penetration. It must be remembered that the materials used are from the same manufacturer.
Wall expansion joints in the floor covering layer remain unfilled. If the covering is parquet or laminate, the skirting boards will close the gap. If a tile or stone covering was laid, the plinth should be higher than the floor level by the thickness of the fugue, and the resulting gap should be filled with an elastic material, for example, a silicone fugue.
Alekseevskaya Roshcha rent an apartment without intermediaries
Compensation tape must be laid along walls, around stairs and supports
Features of cutting seams
The question of how expansion joints are made is decided depending on the type of screed (semi-dry, self-leveling, etc.), the size of the room and specific conditions.
The likelihood of concrete cracking increases as the moisture content of the solution increases and the rate of hardening increases, if the proportions of the ingredients are violated. The risk is reduced due to proper care after pouring, which involves gradual hardening of the concrete. An important role is played by controlling the humidity and temperature conditions in the room. Expansion joints of various types are performed at various stages of floor construction. Their arrangement is developed in advance, calculating the distance between them and the cutting depth. When forming a channel, it should be remembered that cracking is typical for sharp corners, and therefore they must be avoided.
All seams can be divided into 2 types:
- Technological elements. They are needed only at the stage of manufacturing the concrete screed and its complete hardening. Subsequently, there is no need for them, and therefore they must be sealed. This category includes construction and shrinkage seams.
- Permanent type. The main representative is the insulating seam. Deforming loads persist throughout the entire life of the building, which requires the constant presence of a compensation gap.
Based on the purpose of the seams, the corresponding work is planned. Gaps of a technological nature will interfere and must be eliminated. To do this, a sealing and sealing stage is provided at a certain stage of construction. Permanent seams should be kept in working order, but disguised to give the proper appearance.
In a semi-dry screed
The most typical semi-dry screed for private construction is made from a thick solution with a minimum water content. This reduces shrinkage problems somewhat, but does not eliminate them. Such screeds require cutting all of the specified types of expansion gaps:
- The insulating seam is formed at the screed manufacturing stage. To do this, before pouring concrete, a strip (batten) that does not have adhesion to the mortar is laid around the entire perimeter of the room, close to the wall. Its thickness is selected within 10-20 mm. After the concrete solution has set, it is removed, opening the cavity between the screed and the wall. Next, the seam is masked with a plinth.
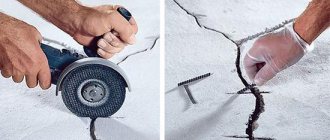
- Shrinkage cuts are made after pouring, but before the mass has completely hardened. They are not needed during the period of active evaporation of moisture, when shrinkage has not yet occurred, but are necessary at the stage of structural transformations. It is necessary to form seams within 2-6 days after pouring. To cut them, it is best to use a special concrete joint cutter. You can use a grinder. Sometimes the following technology is used. A few hours after pouring, when the mass still retains a certain plasticity, a bar is pressed into it. The depth of the shrinkage seam is selected within 1/3-1/4 of the thickness of the screed.
- Construction joints are special elements. They are necessary only when there is a forced break in pouring concrete. In this case, after completion of the work, transverse slats or metal cones are installed at the pouring boundary. As a result, the seam is formed according to the “groove-tenon” system. In fact, this is the only type of deformation gap with uneven channel walls. When planning work, you should think about the location of structural cuts in advance.
How to determine the screed level
It is best to do this on the entire floor at once, taking into account the thickness of the floor coverings laid in different rooms (for example, the thickness of parquet will be different from the thickness of carpet or floor tiles).
In order for the floors to be at the same level, it is necessary to lay screeds of different thicknesses in separate rooms.
Determining the level of screed on a floor should always start from the room in which the screed will be thickest, for example, from the one in which there will be underfloor heating. Such a screed will have a thickness of at least 4 cm. When determining the height of the screed in adjacent rooms, you need to take into account the thickness of the floor coverings.
The exception is in rooms where water can be spilled, such as a bathroom or kitchen - here it should be 1 cm below the level of the hall and living areas.
There is no need to worry about accurately determining the thickness of the screed only in a situation where thresholds are supposed to be installed. If a traditional solution with a thick-plastic or semi-dry consistency is used to install the screed, then the level of the screed is fixed by beacons attached to the base. Later, excess solution is removed using the rule.
The need for reinforcement of the screed depends on its thickness and the magnitude of the load to which it will be subjected during operation.
Traditional cement screeds are floated using steel, wood or felt-wrapped floats.
Sealing expansion joints
Sealing is necessary to eliminate the water channel and give the gaps an aesthetic appearance. The following methods are used:
- Sealing tape. This is the easiest way. It is implemented by placing a sealant in the form of a bundle into the cut cavity. Most often, a rope made of foamed polyethylene is used, which has sufficient elasticity and a low price.
Sealants. You can use special sealing mastics, sold in finished form. After hardening, the mass turns into a monolith, providing waterproofing properties. Filling the seams is done using rubber spatulas.- Waterstops. They are made in the form of a plastic or rubber tape. The special profile allows their dense and durable placement in the canal cavity.
- Profile elements. Essentially, this is a special system of rubber inserts and profiles. The main advantage is protection from significant mechanical loads.
Which method to seal the seam should be decided taking into account specific conditions. It is necessary to take into account the size of the gaps and real loads. We should not forget about appearance.
Deformation gaps are necessary when making concrete floor screed. The compensation, insulating gap must be maintained throughout the entire life of the house. Other types of seams are only necessary during the construction phase. They will have to be carefully and elegantly sealed.
A common option for floors of buildings, structures and coatings in industrial premises with intense mechanical stress is a concrete floor. The material from which these structural elements are made is subject to shrinkage and has low resistance to deformation, as a result of which cracks occur. To avoid repeated repairs, artificial cuts are created in monolithic structures. For example, expansion joints in concrete floors, building walls, roofs, bridges.
Use of sealants
Their use is considered a convenient and simple option for sealing joints on a concrete surface. Sealants are sold in the form of mastics. They fill the cuts and therefore, in this case, it is quite possible to seal the temperature-shrinkage joints in the floors with your own hands.
After complete hardening, the mastic becomes a rubberized material with elasticity. To perform the work, use a rubber spatula.
Thus, sealants provide reliable protection against possible mechanical damage. As a result, the junctions of adjacent cards will be protected from vibration.
What are they needed for?
The concrete floor appears to be a strong and durable base. However, under the influence of temperature fluctuations, shrinkage processes, air humidity, operational loads, and soil settlement, its integrity is lost - it begins to crack.
To impart some degree of elasticity to this building structure, expansion joints are created in the concrete floors. SNiP2.03.13-88 and its Manual contain information on the requirements for the design and installation of floors, indicating the need to create a gap in the screed, underlying layer or coating, which ensures the relative displacement of isolated sections.
- Minimizing sudden deformations by dividing a monolithic slab into a certain number of cards.
- The ability to avoid expensive repairs with the replacement of rough and base coatings.
- Increased resistance to dynamic loads.
- Ensuring the durability of the structural basis.
Types of seams, joints and junctions
Concrete is an important building material, it is durable, strong and can be formed into a variety of architectural shapes. Design considerations are necessary to ensure proper operation of the structure. Generally, any structure that is expected to be deeper than 6 meters underground will experience movement and dynamics.
Concrete must be designed and constructed to accommodate dynamics and movement: Types of dynamic load and movement:
- Shrinkage is initially rapid, less pronounced as the concrete ages.
- Creep is a phenomenon that causes a redistribution of stress away from points of intensity.
- Thermal movement is the expansion and contraction of a structure as temperature changes.
- In order to adapt the structure to movement, the structures are designed with “joints”. These joints are placed into the concrete slabs at regular intervals to prevent further development of cracks. The design of the joint is important to the functioning of the overall structure - Sealing these joints is a necessity.
Based on the above, various seams are formed in concrete and other structures.
There are different types of seams and joints:
- Expansion joints are separations between adjacent parts of a structure to allow movement during the dynamics of the structure.
- Control joints – designed to prevent accidental cracks in concrete to facilitate filling after curing.
- Construction, cold, process or concreting joints are stopping points in the construction process where new concrete is poured against existing concrete.
- Installation joints are installation gaps or junctions that must be filled with insulating materials.
Main types: insulating seam
Expansion joints in concrete floors, depending on their purpose, are divided into three types: insulating, structural and shrinkage.
Insulation cuts are made at the junctions of structural elements of the room. That is, they are an intermediate seam between walls, foundations for equipment, columns and floors. This makes it possible to avoid cracks during shrinkage of concrete in the contact areas of the horizontal and vertical elements of the room. If you neglect their arrangement, then when the screed dries and decreases in volume with a rigid adhesion to the wall, for example, it will most likely crack.
An insulation joint is created along walls, columns and in places where the concrete floor borders other types of foundations. Moreover, near the columns the seam is cut not parallel to the edges of the column-shaped element, but in such a way that a straight cut falls on the corner of the column.
The considered type of seam is filled with insulating materials that can allow horizontal and vertical movement of the screed relative to the foundation, columns and walls. The thickness of the seam depends on the linear expansion of the screed and is about 13 mm.
Types of screeds
Structurally, screeds are divided into those connected to the base and those built on a separating layer. The separating layer can only be a waterproofing film or heat or sound insulation.
The technique for laying screeds is similar regardless of their type. In this case, the base is prepared differently and the thickness of the screed is not the same.
The screed connected to the base is connected directly to the structural part of the house - a concrete floor slab on the ground or ceiling. It must function together with the structural part of the building on which it was laid, therefore, before installing the screed, the base must always be primed (it is necessary to apply a layer to ensure adhesion).
Screed on the separating layer is carried out if the substrate is damp, greasy, too weak or has excessive absorption. In this case, the screed should be laid on top of the separating layer - on a waterproofing film with a thickness of at least 0.2 mm. It should be laid with a 10-centimeter overlap and wrapped on the walls. After installing the screed, the protruding fragments of the film must be cut off.
A floating screed is used if the base is too weak or the level of impact noise in the room needs to be reduced.
The soundproofing layer (substrate) is made of special materials intended for laying floor coverings. These can be mats made of elastic polymer materials, natural cork, sheets of corrugated cardboard, slabs of mineral wool 30-40 mm thick. Waterproofing film is laid on them, and only then a screed is placed on top.
If the screed is installed, for example, in a room located above an unheated garage, it may be necessary to lay insulating material. The insulation boards are laid with bandaging so that the seams between them are shifted relative to each other.
Rice. How to connect the screed to the base
Main types: shrink seam
If insulation joints prevent deformation of a monolithic concrete floor at the points of contact with the walls, then shrinkage cuts are necessary to prevent chaotic cracking of concrete over the entire surface. That is, preventing damage caused by shrinkage of the material. As the concrete dries from top to bottom, tension appears inside it, created by the hardening of the top layer.
The construction of expansion joints in concrete floors of this type occurs along the axes of the columns, where the cuts meet the corners of the perimeter joints. Cards, that is, parts of a monolithic floor bounded on all sides by shrinkage joints, should be square; L-shaped and elongated rectangular shapes should be avoided. The work is carried out both during laying of concrete using forming slats, and by cutting the seams after the screed has dried.
Screed care
If we want a traditional cement or concrete screed to have adequate strength, we must ensure that it is damp for 7 days after completion of the work. The rooms in which the screeds are made must remain closed so that drafts do not cause the screed to dry out too quickly.
The surface of the screed can be covered with plastic film, so that the screed will be regularly moistened with water condensing on the underside of the film. You can also spread a layer of wet sawdust on the screed. It is best to simply spray the surfaces of screeds laid in summer with water. After seven days of such care for the screed, you should remove the film or sawdust from it and begin ventilating the room. After four to six weeks of slow drying of the screed, its moisture level should be less than 3%. Floors that are less sensitive to moisture, such as tiles, can be installed in just three to four weeks.
Main types: construction seam
Such protection of monolithic floors is created in the event of technological interruptions in work. The exceptions are rooms with a small pouring area and continuous supply of concrete. Expansion joints in structural concrete floors are cut at the junction of screeds made at different times. The shape of the end of such a connection is created according to the “tongue and groove” type. Features of structural protection:
- The seam is placed at a distance of 1.5 m parallel to other types of deformation boundaries.
- It is created only if concrete is laid at different times of the day.
- The shape of the ends should be of the tongue-and-groove type.
- For a screed thickness of up to 20 cm, a 30-degree cone is made on the wooden side protrusions. Metal cones may be used.
- Tapered seams protect the monolithic floor from minor horizontal movements.
Stages of performing a cement screed
Traditional cement screed can be laid if the temperature of the base and air in the room is from +5 to +25°C. Before starting work, you need to thoroughly sweep the base to remove any dirt that could weaken the adhesion of the screed.
1. Prime the base to increase its adhesion. If it is cracked or has grease stains, then instead of a primer it is necessary to apply a separating layer of film
2. Along the walls and vertical structural elements of the house (for example, stairs, columns) we make a wall expansion (dilation) joint . We attach accordingly trimmed polyurethane foam strips or 1 cm thick polystyrene foam strips to the wall with an adhesive solution
3. On cakes of mortar (preferably quick-setting), we fix guide rails-beacons - wooden slats or steel tubes. There should be a distance between them of about 1.5 m, and a distance from the walls - 20 cm. Before fixing the beacons to the base, they should be lubricated with an anti-adhesive compound, so that they can be easily removed
4. Using a level , we check whether the beacons are located in the same plane . Thanks to the fact that the level of the beacons is identified accordingly, it is possible to obtain not only one floor level, but also its intended slopes
5. Mix the solution using a shovel or mechanically in a concrete mixer and distribute it evenly between the guide beacons . The excess should protrude slightly above the level of the beacon slats
6. After compacting the solution with a float (made of polystyrene foam, wood or steel), level the surface of the screed with a wooden lath , performing zigzag movements with it. Moving the lath towards you, remove excess solution. If there are sinks left unfilled with mortar behind the rule lath, they should be removed immediately and the screed should be leveled again
7. After the initial setting of the solution, we remove the guide beacons . This should be done very carefully so as not to damage the freshly laid screed. If the laid mortar has a semi-dry consistency, then this can be done within two to three hours
8. We fill the places where the beacons were located with fresh solution . Then, using a wooden or polystyrene grater, we rub the surface of the screed, performing circular movements. The surface of the screed will be smooth and rough, which will ensure good adhesion of the glue or mortar used to glue the floor covering.
9. In certain places we cut intermediate temperature compensation (dilatation) seams . If we do this immediately after rubbing the surface of the screed, then we use a spatula; if later, we use a diamond disc
Expansion joints in concrete floors of industrial buildings
Increased wear resistance requirements are imposed on floors laid in factories, warehouses and other industrial facilities. This is due to the appearance of the influence of different intensities of mechanical impact (movement of vehicles, pedestrians, impacts from falling solid objects) and the possible ingress of liquid onto the floor.
As a rule, the design feature of the floor consists of a screed and a covering. But under the screed there is an underlying layer, which in a rigid version is laid from concrete. In it, a seam is cut in mutually perpendicular directions every 6-12 m, with a depth of 40 mm, with at least 1/3 of the thickness of the underlying layer (SNiP 2.03.13-88). A prerequisite is that the expansion joint of the floor coincides with similar protective gaps in the building.
A distinctive feature of the floor structure in industrial buildings is the creation of a top layer of concrete. Depending on the intensity of the mechanical impact, coatings of different thicknesses are designed. With a thickness of 50 mm or more, an expansion joint in concrete floors (SNiP “Floors” clause 8.2.7) is created in the transverse and longitudinal direction, repeating the elements every 3-6 m. The cut is sawed 3-5 mm wide, its depth is not less than 40 mm or a third of the coating thickness.
Step-by-step instructions for installing a waterproof expansion joint with a metal profile
Step 1. Surface preparation. Place marks on the floor along which the seam will be installed. Using a long rule or bluing rope, draw longitudinal lines. Use a special machine to cut lines inside the marks you made. The distance between the cuts is approximately 2–3 cm; the smaller it is, the easier it will be to cut out the grooves later.
Marking
Grooved cutting
Seam cutting process
Step 2. Use a hammer drill to cut grooves, making sure that the edges are smooth.
Punching with a hammer drill
Step 3: Use a cylindrical grinder to smooth out the bottom of the groove. Use a laser level to check the depth. The check should be done in several places; the more often, the more accurate the results will be.
Finishing the mounting surface
Important! The minimum depth of the groove must correspond to the height of the metal profile. If there are protrusions at the bottom, they should be cut down again with a hammer drill and leveled with a cylindrical grinder.
Level control using a laser level
Step 4. Fill the bottom of the groove with a small layer of reinforced polymer concrete. Wait until it sets completely and level the surface again.
Finishing surface treatment after complete setting of reinforced polymer concrete
Step 5. Install the profiles in the design position. Before this, you need to insert special bolts into the profiles, put on the connecting elements and secure them with nuts. Thus, two profiles are connected into a single structure, the distance between them can vary depending on the technical specifications for the expansion joint. Make sure that the bottom plane of the profiles lies flat without distortions in one direction or another. The profile should fit into the groove without effort.
Installation of profiles in the design position (M6 bolts are inserted and secured with nuts)
Important! At the joints of the profiles there is a guide rod and a hole; such devices ensure the strength of the connection of several profiles in one line. Before joining, it is recommended to coat the elements with high-quality glue for metals.
Step 6. Secure the aluminum profile with dowels. On wide horizontal planes, drill holes of the appropriate diameter to match the dimensions of the plastic elements of the dowels.
Practical advice. The depth of the drilled hole should be 2–3 cm greater than the length of the dowel. This is done to facilitate driving in the dowel. The fact is that it is impossible to remove all the concrete dust from the hole with a drill, and a margin of several centimeters in length will allow the plastic part of the dowel to push it into the free space and enter completely.
Drilling holes for dowels
Using an electric drill, tighten the metal elements of the dowels until they stop. Check the secure fit. The distance between the dowels is 40–50 centimeters.
Fastening aluminum expansion joint profiles with dowels
Step 7: Remove the installation kit. To do this, you need to unscrew the nuts and remove the metal tie. It is fixed using bushings with internal threads. After unscrewing, the bolts are located below the upper plane of the deformation profiles; there is no need to cut them off. A decorative insert is subsequently attached to these bolts. Unscrew the nuts temporarily fixing the bolts on the profiles.
Removing the installation kit
Dismantling the nuts for temporary fixation of M6 bolts
Step 8. Proceed with installation of the elastic replacement insert. Roll out the roll along the profile, start laying from the end. Place the insert on the profiles and carefully press it into the mounting tabs until it stops. Make sure that the insert fits correctly, do not allow distortions or omissions. If the element is laid correctly, the surface will be perfectly flat. Cut off the excess piece of the insert using a mounting knife.
Laying the elastic replacement insert
Step 9. Install decorative trims. They can be aluminum or alloy stainless steel. The second option is used for particularly loaded floors and is characterized by increased wear resistance and physical strength. The linings have special technological holes; the ends of the mounting bolts fit into them. Screw the elements with nuts. The insert holes allow for precise position adjustment, thereby eliminating gaps between two adjacent elements. The upper front surface of the inserts is protected from mechanical damage by self-adhesive polyethylene film; remove it.
Installation of decorative stainless steel trims
The protective film is removed
Joint of profile with guide rod
Step 10. Install the protective cover on the profile. It protects the structure from contamination by concrete while pouring the floor. After the coating has hardened, the protective casing is removed.
Installation of a protective casing before pouring the finishing layer of concrete
The seam is completely ready, you can start pouring the floor with concrete.
Requirements for creating deformation protection for floors
Concrete cutting must be done with a milling cutter after two days of hardening. The cutting depth according to the standards is 1/3 of the concrete thickness. In the underlying layer, in places where there are supposed gaps, before pouring concrete, it is allowed to use slats treated with anti-adhesion compounds, which are removed after hardening of the material and as a result, protective seams are obtained.
The lower parts of columns and walls to the height of the future coating thickness should be covered with rolled waterproofing materials or foamed polyethylene sheets. In those places where the design provides for expansion joints in concrete floors. The cutting technology begins with marking the places of artificial breaks with chalk and a ruler.
A test seam serves as an indicator of timely cutting: if the aggregate grains do not fall out of the concrete, but are cut by the cutter’s blade, then the correct time for creating expansion joints has been chosen.
Screed according to the rules
Cement and concrete screeds are the most commonly used flooring bases. Due to the fact that after drying they become insensitive to high humidity, they can be installed in rooms exposed to moisture (bathrooms, kitchens, toilets), as well as outside the house - on terraces.
Cement screed can be easily laid because it is plastic and has good adhesion to the base
When installing the screed, you can use a rented mixocret (pneumatic pump). One worker doses the components of the mixture, and the second applies a solution prepared in a machine and pumped into the room through a long elastic pipe
Traditional cement screeds must have a thick consistency.
They are made from cement mortar of a certain grade (not lower than M75); in this case, the ratio of cement and sand is 1:3. To prepare the solution, first of all, mix the dry ingredients and only then add water. Traditional cement-based screeds are characterized by a compressive strength of about 25 MPa. In residential premises the strength should be at least 12 MPa, in the garage - 20 MPa.
Concrete screeds are made from concrete of classes B10, B15, B20. The filler here can be sand, crushed stone, gravel. The size of the aggregate should not exceed 1/3 of the thickness of the screed. Concrete screeds can have a thick-plastic or semi-dry consistency. They can be supplied using a device called a mixocret (pneumatic pump).
Semi-dry screed (the so-called prancing), due to a significantly smaller amount of water, has much greater compressive strength (about 35 MPa) compared to traditional mortars. In addition, they are characterized by less shrinkage, and therefore are less susceptible to cracks. Components that accelerate setting, increase density or increase plasticity can be added to cement and concrete screeds, including those prepared at a construction site.
The modern market offers ready-made mixtures , to which you only need to add water at the construction site (the amount is always indicated by the manufacturer). As a rule, such mixtures contain glass and polypropylene fibers that act as reinforcement, which prevents shrinkage and cracking of the screed. Ready-made mixtures after mixing with water can have a thick-plastic, semi-dry or semi-liquid consistency (in this case they are ideally distributed over the base, forming a self-leveling screed). The quality of the mixtures is improved due to polymer additives, which speeds up the setting of the screed. Fast-setting mortars can be coated with floor tiles or gres (porcelain tiles) after 24 hours, and on some even after four hours. Some ready-mixes are suitable for preparation and delivery using a concrete pump. Their compressive strength can reach 55 MPa.
roof rack ford focus 2 original
When making a screed for heated floors, it is best to choose a ready-made mixture - the packaging should contain information about the possibility of such use.
Attention! In the case of underfloor heating, the screed must cover the coolant tubes to a thickness of at least 2 cm or equal to their diameter - 2.5; 3 cm.
Seam processing
Normal functioning of the seam is achieved by sealing it. Sealing expansion joints in concrete floors is carried out using the following materials:
- A waterstop is a profiled tape made of rubber, polyethylene or PVC, laid when pouring a concrete screed;
- A sealing cord made of foamed polyester is placed in the slot and retains its elasticity during temperature changes, ensuring safe movement of the concrete covering;
- Acrylic, polyurethane, latex mastic;
- Deformation profile consisting of rubber and metal guides. It can be built-in or overhead.
Before sealing, the working surface of the gaps must be cleaned and blown with compressed air (compressor). Also, to increase the service life of concrete floors, it is advisable to strengthen the top layer with topping or polyurethane material.
Sealing with waterstops
The use of waterstops can be called the most effective option for sealing seams. They are profiled tapes made from rubber or using certain types of polymer materials.
The advantages of waterstops are as follows:
- high strength and elasticity;
- simple installation method;
- they provide long-term protection for the concrete screed from many external influences.
Work on sealing and waterproofing joints
Each type of seam has its own set of works and its own technology, with the help of which it is protected from future leaks. Seams are the most vulnerable places in the structure of your home; therefore, if the work on sealing the seams is performed poorly, in the future they will allow water or moisture to pass through and will require expensive repairs. Based on the above, in order to carry out these works efficiently, it is necessary to invite a professional waterproofing company with the appropriate experience and qualifications.
What materials are used for waterproofing seams and joints
- Waterstop - This is a special waterproofing tape made from plasticized PVC or polymer materials. Waterstop is used mainly in monolithic construction and is laid in cold and expansion joints in order to serve as waterproofing.
- Bentonite swelling cord is a flexible rubber or rubber waterproofing profile that swells when exposed to water or moisture. When the bentonite cord swells, it serves as a waterproofing barrier, preventing water from passing through. Bentonite or swelling cord is designed for waterproofing cold concreting joints.
- Waterproofing tape - waterproofing TPO tapes withstand the dynamics and movement of seam walls in various directions, while maintaining a high degree of sealing.
- Sealants – when it comes to sealing joints, non-shrinking and expanding sealants are mainly used. When moisture enters, expanding sealants have the ability to expand, preventing moisture from passing through.
- Injection waterproofing - Injected into the seam under pressure using equipment, through packers or pre-prepared tubes inside the seam. It is used to fill all voids, microcracks and pores of concrete.
You can read more about injection waterproofing in the article - Injection waterproofing.
SNiP requirements
Preparing and carrying out work on a concrete floor, determining the required number of seams and their length - all this is stipulated in the regulatory documentation for construction work. A preliminary work flow chart is issued, which takes into account all of the above points:
Ideally, when calculating and designing a structure, engineers try to place all the seams along the axes of the building so that they coincide with the expansion joints on the screed or the joints of reinforced concrete slabs.
The seams should:
Materials required for work
Metal profiles equipped with rubber inserts are installed simultaneously during the concrete pouring process, due to this, other intermediate operations are eliminated - there is no need to cut expansion joints in the finished concrete, and the labor productivity of concrete workers increases. The only drawback of this method is the high cost.
If the work is carried out in a room with a small area, then a round rubber band is used as a seal. It is much cheaper, but requires a more precise cut.
There is another way - using profiled tapes made of polymers or special rubber.
In addition to these methods, one-component and two-component silicone sealants are used. This option is acceptable in rooms with light loads on the floors.
Expansion joints significantly reduce the risk of cracks, swelling and other damage to the finished floor screed.
Prices for concrete mixers
The technology for constructing cold joints during concreting, see here.
Video: How to make an expansion joint in a concrete blind area, walkway, etc.:
Source