by admin
Previously, there were no floor panels and everyone simply poured concrete into the ceiling.
Then they began to use floor panels. This is not a very complicated or difficult option. But in European countries this technology is still popular. In this article we will tell you how the ceiling is poured with concrete, but if you are interested in Lviv formwork, we recommend going to the website. This work can be done with your own hands. It is possible to look at a lot of videos and photos on this topic on the Internet. Here you will find instructions for performing this work.
Everything about installing and repairing ceilings with your own hands
Pouring concrete on the ceiling is one of the most effective ways to create a reliable and high-quality ceiling in the house. At the same time, the ceiling structure has a long service life.
And what a creative canvas a concrete ceiling is! It can be turned into a real work of art. Interested? Let's take a closer look.
Stucco features, advantages and disadvantages
Stucco molding
The classic way to decorate the ceiling is stucco
Just a few decades ago, stucco molding belonged exclusively to large administrative buildings, ancient houses and museums, but nowadays stucco molding is a common element of a classic interior.
A variety of materials are used to make stucco:
- gypsum;
- stone (soft);
- alabaster;
- polyurethane;
- polystyrene;
- fiberglass.
Advantages of stucco
Stucco on the ceiling
The last three options represent alternative solutions that make the production of decorative elements less expensive. The advantages of stucco molding made from classic materials are impressive, reliable, and durable, but modern versions can also boast some significant advantages: lightness, moisture resistance, good workability and low cost.
Disadvantages of cheap stucco
- The outlines of the structure give the impression of being fuzzy and blurred due to the characteristics of the material.
- Products are fragile and prone to deformation. Any mechanical impact from the outside will damage the structure.
Tools for installing stucco molding
Finishing the ceiling with stucco
- Nails.
- Air gun.
- Assembly adhesive.
- Miter box.
- Hacksaw.
- Special glue.
- Sandpaper.
- Wet sponge.
What you need to know about concrete ceilings
Pouring the ceiling with concrete is meant as monolithing a roof or ceiling. This can also be understood as pouring already assembled floors from ready-made reinforced concrete products.
The latter is most often used when installing a roof for additional heat and sound insulation. The monolithic pouring method is more applicable in the initial stages of construction.
Let's consider the main comparative characteristics of such concrete ceilings:
However, such monolithic works can also be dangerous. If the formwork is placed incorrectly, you will end up with a low-quality concrete ceiling, which can lead to destruction in the future.
Therefore, do not take on board this problem yourself. Be sure to consult with specialists, study all the necessary technical documentation, and it is advisable to attract an “experienced” master to your team who will lead the entire “parade”.
With all this, there is nothing “outlandish” about the monolithic filling of the ceiling. All operations are available and can be performed independently.
Varieties
Different types of this material are used in the construction of residential multi-storey buildings, their decoration, strengthening and other things. The material is strong, durable, hygienic and does not harm health. Thanks to such advantages, many people resort to installing a concrete ceiling in their home. Types of concrete installation:
- monolithic slab (solid);
- connecting concrete slabs;
- pouring architectural material.
Please note that monolithic structures do not have joints, due to which their surface is smooth. It is much easier to work with such a surface, finish it, and fill it with additional materials. Surfaces that have unevenness, roughness, and unfilled joints will complicate the work, increase the level of labor intensity, and spend additional time and effort on installation.
Monolithic concrete ceiling
For those who dare to pour the ceiling with their own hands, our small and useful instructions will direct their working impulses in the right direction and tell you how to properly perform concreting.
Preparation
The preparatory stage is the time when you not only need to clear the construction site of debris, but also purchase everything you need. You also need to decide exactly in advance whether you will pour purchased concrete or make it yourself.
If you choose the second, then think through to the smallest detail how you will feed the finished mixture into the formwork: lift the equipment, use a pump, or drag it in buckets the old fashioned way.
For the pouring itself, you will need concrete of a grade no lower than M250, preferably M350. But the grade of concrete is taken according to the project or not lower than specified. But this is only in case of other changes during the construction process.
In addition to this, to set up the formwork you need the following:
In terms of equipment and tools, be sure to keep the following on hand:
Keep in mind that the ceiling is poured with concrete over the entire area simultaneously. Therefore, once again think through the algorithm of your actions and the list of everything you need.
Installation of formwork
The formwork for pouring the ceiling is slightly different from that which is made for driving foundations or armored belts. The ceiling should be as level as possible, accurately installed and durable.
Before installing it, be sure to make sure that it can withstand the weight of concrete and reinforcement. Practicing master builders or architects will be of great help in this matter.
Attention! Always be guided by the project at any stage of construction, especially when pouring the ceiling with monolithic concrete.
Tip: After completing the assembly of the formwork, check its levelness again with a level. Found the slightest discrepancy? It is better to disassemble the structure and reassemble it. This way you will avoid defects and subsequent dismantling of the ceiling.
Reinforcement
Ceilings are poured with a minimum thickness of 15 cm. In this case, the reinforcement is done in one layer. If the height of the future ceiling exceeds this value, then the structure must be reinforced with an additional top layer of reinforcement.
When doing such work, you need to adhere to important principles:
Performing such work requires certain skills and skill levels. If there are none, then it is best to hire qualified workers.
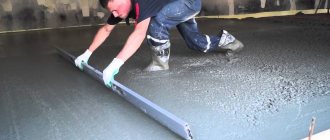
Fill
The actual pouring of concrete is the simplest part of the entire work process.
It can be divided into three main stages:
It is best to fill the entire ceiling area at once. If it is too large, then it is better to split the whole process into several parts.
Excerpt
And now about the most unpleasant thing - about building a concrete ceiling. To prevent this structure from cracking or folding in half, you need to wait a long time before removing the formwork and continuing construction.
This may take up to several months. Only an experienced craftsman who knows all the features of your project can say more specifically.
In the summer, especially when it is hot, the concrete will need to be watered so that it does not dry out and cracks appear. In any case, it is best to cover the finished concrete ceiling with plastic film, under which, during hardening, its own greenhouse microclimate will form. When the moisture dries up, add a little water to maintain “tropical” conditions continuously.
Option on load-bearing beams
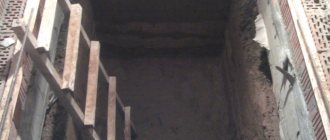
To make a high-quality ceiling for your cellar, you can use load-bearing beams. Metal beams are best for this. If possible, you can even use ordinary rails, which can often be purchased at construction warehouses or scrap metal collection sites. Often the beams from which the ceiling of the structure is supposed to be made are ordered individually at factories.
Even ordinary rails are suitable as load-bearing beams.
When choosing this method of creating a cellar ceiling, at the stage of its construction it is necessary to provide for the presence of special holes in the walls that are required for attaching load-bearing beams. The ceiling of your cellar will experience significant stress. That is why the walls must also be as strong as possible, capable of supporting the weight of the beams and soil poured on top. By and large, the walls will be the “foundation” for the ceiling.
Special holes are provided in the walls for laying beams.
The order of work is as follows:
- Load-bearing beams are laid in pre-prepared holes in the wall. By and large, this work can be done independently, but with several assistants, because even the rails have significant weight.
- In the space that will be formed after laying the load-bearing beams, it is necessary to mount reinforcing bars and then secure them with special wire. Next, the reliability of the connection and the durability of the beams are checked. If all is well, then wooden formwork is made and a waterproofing layer is applied to it.
- After installing the formwork, it is necessary to install supports that will be designed to take the load of the cement mortar.
- You can mix the cement mortar yourself or order it ready-made from any construction company. The solution must be poured as evenly as possible and without long breaks into the metal frame. All compartments of the frame must be filled with concrete; nothing should be left out. Upon completion of pouring, distribute the solution throughout the entire thickness of the structure.
- The ceiling that is obtained after using this method requires high-quality thermal insulation. In principle, any thermal insulation material is suitable for this.
Concrete ceiling finishing
Often, during the finishing work, many questions arise, the most popular of which is: how to level a concrete ceiling quickly, easily and inexpensively. This can be done in several ways - namely, sheathing it with plasterboard or puttingty. The first option is simpler and faster to implement.
And as always, there will be a “but” that will ruin everything. In our case, the cost and quality of gypsum boards. Really good drywall is expensive, which is unjustified if you are going to make suspended or suspended ceilings in the future.
Do-it-yourself putty is cheaper, but also requires more labor. If you have never done such work, then it is best to watch a video that will tell you in detail how to putty a concrete ceiling. You may not become a professional finisher, but you will be able to supervise the workers.
After leveling the ceiling, you can leave everything as is or move on. Today, the most popular finishing method is suspended ceilings. Due to the fact that demand is high and the level of competition is incredibly high, prices for them have dropped significantly. In this case, the concrete ceiling does not need to be specially prepared.
Creative ideas
For those who want something “like not everyone else”, we offer a traditional and more creative option - coloring. No, you don’t need to paint a solid canvas with regular water-based paint. Today there are many different shades of pigments. And creative individuals can combine them in some unusual ensemble of drawings. We offer a small selection of options for painting concrete ceilings.
The easiest way is stencil painting. All that remains is to choose the colors and the required stencil. And the rest is a matter of technology.
As you can see, pouring concrete on the ceiling is not only reliable and durable, but also beautiful. You can create anything you want on such a canvas, the main thing is desire and imagination.
Source
What types of liquid wallpaper are there?
There are two main types: professional mixtures and amateur ones. The first ones are without dye, but they are much more affordable. But the master needs to know exactly how much paint to add to the mixture.
The second option is completely ready for use, has a specified color. That is, just add water.
In addition to this division, liquid wallpaper differs in the types of main filler:
- Cotton
- Silk
- Cellulose
- Blend of silk and cellulose
That is, the more natural the material, the more expensive these coatings are. Silk ones are the most expensive, but they are worth spending money on. This is a fairly durable coating and the cotton version is much inferior to it.
Cellulose mixed with silk is an alternative option, it is more affordable, has all the advantages of natural fillers, but is not a completely natural substance. However, this option is no worse and can also be considered an environmentally friendly solution.
Making formwork
By the way, this is a fundamental point in the work. According to its execution, the installation of the entire building is dependent and error-free.
Important: Before installing the formwork, you should make sure that it will support the full weight, including the reinforcement. To do this, it is better to consult a professional in this field.
Gain
This is the use of iron grating to fill the ceiling. This significantly increases the strength of the floor. It must be performed:
Frame installation
Important: When laying reinforcement, it must be inserted into the brickwork no less than 15 cm. If you are making a home ceiling where there is already a roof, and not in a new building, then to install the reinforcement you need to make holes in the wall using a punch.
Type of reinforced grating
Important: When installing logs, it is necessary to take into account the load on them. Place components perpendicular and firmly to the ground. When loaded, the rack can be pulled to the side and then the whole system collapses
Method for increasing frame rigidity
Pouring concrete
After the frame has been installed, you can order concrete or create it yourself. To do this, you need to prepare a place for unloading or install a kneading tub.
Pouring concrete using a pump
Important: Whatever pouring option you choose, it does not have to be stopped until the formwork is completely filled. You need to work instantly and together.
Frame installation
The frame should be placed on the brickwork by 15 cm or more. When manufacturing in a finished house that is being renovated, holes are made in the wall using a hammer drill to insert the reinforcement into the wall. Joints with transverse laying of reinforcement must also be welded, or, in extreme cases, rewound with steel wire, which must be burned before use for greater elasticity. To do this, the material is heated over a fire and cools naturally. Water cannot be used for cooling, as this will harden the wire even more.
As already mentioned, plywood is used to cover the lower part of the formwork. And it must be moisture resistant. Next, the finished formwork is supported from below by telescopic posts or logs. When installing logs, you need to take into account the possible load on them, place them firmly and strictly perpendicular - using a level is mandatory so that the stand cannot be pulled to the side.
After the frame is installed, you should check it for horizontalness and, if necessary, correct it.
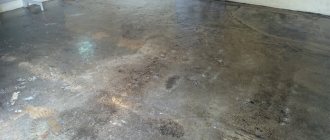
Leveling a concrete ceiling
After removing the formwork, the surface will not be ideal and this disadvantage should be removed. There are two options for this, and how to level the concrete ceiling depends only on you. Before making a decision, you need to know the quality of the surface production. To do this, it is better to use a hydraulic level, which will better display the picture. And then you can make a decision.
Leveling with putty
This option is great for surface finishing work if you don’t have very large imperfections. Pros:
Leveling the ceiling with plaster
This option is suitable for surfaces where there are large differences (see Leveling the ceiling with plaster - how to do it yourself).
Pros:
After eliminating the unevenness of the plane, you can think about how to putty concrete ceilings. In the first and second versions, it is made in the same way and you can read about it in detail on the pages of our website. Find different cladding options. If you have carefully completed the concrete ceiling, this will not be very difficult and the system will serve you for a long time.
Source
Alignment
Leveling the ceiling with putty will be optimal if there are no noticeable defects on the ceiling.
No matter how smooth the formwork is, the ceiling still needs to be further leveled after it is removed. There are two ways to level the ceiling, but before doing this, you need to check the quality of the manufactured plane with a hydraulic level.
Leveling with putty is suitable if there are no large defects in the manufactured ceiling and does not require large financial investments. This will not change the height of the ceiling. Putty is a good material for leveling the ceiling; it allows the ceiling to “breathe”. But puttying ceilings is a dusty and labor-intensive job that requires time to dry each layer of material. Large defects or level differences cannot be eliminated with putty. This material reacts to the shrinkage of the building by the appearance of cracks.
The leveling option using drywall is suitable for planes with large differences and other defects. This is an environmentally friendly material with which the ceiling will breathe in the same way as with putty. Drywall can hide all communications, and with it you can implement any design solutions.
High-quality pouring of concrete ceilings is only possible if you use the necessary materials and tools, carefully fulfill all requirements and follow the advice of specialists.
How to make a concrete ceiling
This article is about how to build a concrete ceiling. Pouring a concrete ceiling is a common technique in Europe. However, although it is more expensive and time consuming compared to a wood ceiling, it has several advantages that may make you think twice about building your home. Therefore, by constructing a concrete ceiling, the rigidity of your home will be much better and it can support more weight compared to lightweight structures. On the other hand, a concrete ceiling has good sound insulation and is more durable.
But this technology also has a few disadvantages, such as the high cost of the project or the fact that pouring a concrete ceiling can take up to several months before you can actually build the walls and roof. Additionally, you must build formwork to be able to construct a concrete ceiling.
Pouring a concrete ceiling is difficult without the help of a qualified engineer. In addition, you must comply with the rules in order to obtain a building permit. The thickness of concrete ceilings varies depending on the weight it must support, but it is generally in the 5-6″ range for residential buildings. It is necessary to take into account the weight of the reinforcement, as well as the weight of the concrete; this is very important for reliable construction.
In order to build a concrete ceiling, you need the following:
Materials
1 × 4 wooden planks for formwork construction / plywood 4 × 4 wooden beams for ceiling support / metal reinforcement, nails / screws for formwork fastening
Tools
protective gloves, glasses, tape measure, carpenter's pencils, square, circular saw, jigsaw for creating formwork, hammer.
Adviсe
use protective clothing, clean your tools thoroughly after completing the project, wear safety glasses and gloves to avoid possible injury, ensure that the ceiling formwork is at the perfect level
Time
Several hours are possible per day, depending on the surface of your foundation and the number of workers
Microcement
Most often, this material is used to create the desired effect. Moreover, it is the most affordable among those offered. This is because there are no critical requirements for warmth and other qualities that apply to finishing materials used for walls and ceilings.
Microcement will help to recreate the intended surface decor
Fact! With the help of microcement it will be possible to achieve an interesting effect, in particular to imitate different tones with subtle differences. This will create the desired result.
A spectacular combination of concrete with wood and numerous lamps
How to make formwork for a concrete ceiling
In order to build a concrete ceiling, you need to make the right formwork. Building formwork is a complex process, but if you have experience working with wood, you will succeed.
Complete information about formwork, as well as reinforcement, must be provided in the plans of your house. Remember that constructing a concrete ceiling is essential to the longevity of your home, so you should consult a qualified professional before starting such a project. In addition, you must follow all the rules and obtain all necessary construction permits so as not to expose yourself to unnecessary threats.
Smart Tip : When constructing formwork, you should use pressure treated wood, make sure it can support the weight of the reinforcement as well as the concrete.
As you can see in the image, you must build the first row of formwork using 4×4 boards. On this structure you need to install 2 × 4 wooden planks or plywood. The first option is better for a project with a limited budget, but we recommend that you use sheets of plywood, then everything will be completely straight at the bottom of the ceiling and you will not have to put in extra effort to make it level.
If you are using wooden boards, you must ensure that they are straight and in good condition. Also, make sure that you do not leave any gaps between the boards, as this may cause the concrete to leak.
Smart tip: When building formwork, you should use a level to make sure it's level, otherwise you'll waste money and time correcting these imperfections.
You can look at the ceiling from inside the house to get a better idea of the procedure. This may look unusual to you, but this is the correct way to pour a concrete ceiling. You will notice that there are many 4×4 timbers installed every 15″ to support the weight of the structure and concrete.
Smart Tip: Use adjustable metal reinforcement when building a concrete ceiling. It can support more weight and can be easily adjusted to the height of your room.
We have prepared this sketch to show you in detail what the ceiling formwork structure should look like. As we said, these details will be provided by the architect, but we want you to get used to these construction techniques.
Smart Tip: Use a 4' spirit level to ensure the shape and level of the supports are plumb correctly. Construction of a concrete ceiling requires, in most cases, to build a strong reinforcement, otherwise it will not be stable and the walls will not support their weight.
If you are using 4×4 joists, you must carefully attach them to the base of your ceiling. Hence, you should use 2×4 lumber and some nails to fix it firmly. Use a level to check that the supports are plumb correctly.
Sticking foam
Often, consumers choose foam boards for finishing the ceiling surface, which have a number of advantages. They are easy to install, lightweight, which allows you to install them yourself, cheap and have a very attractive appearance.
To attach polystyrene foam directly to a concrete surface, special attention should be paid to the adhesive composition on which the slabs will be attached. The fact is that the concrete surface does not have good adhesion to other materials, unlike, for example, primer. That is why you need to pay special attention to the choice of glue.
There are several options for attaching foam boards to a concrete ceiling:
It is important not to try to save money on the adhesive composition for polystyrene foam. Otherwise, the result obtained after pasting may disappoint you. It is also imperative to ensure that there are no gaps between the slab and the concrete surface. If a gap does form, it must be eliminated using sealant.
If the foam plastic is securely attached to the concrete surface, then the room will look presentable, and in addition, the foam plastic slabs perform a thermal insulation function, protecting the surface from drafts.
Strengthening the building structure for a concrete ceiling
After you have built the formwork for pouring concrete, you must create and fix the reinforcement in the desired position. The concrete ceiling is almost floating, it is supported only by a few walls and pillars, so you must use a lot of reinforcement (the architect will calculate the required amount)
Smart tip: If your formwork is made of wood planks, it would be a good idea to stretch plastic sheeting over the entire surface to prevent concrete leakage.
In this photo you can see a close-up of the reinforcement used to strengthen the concrete ceiling. You may have noticed the thick iron pins, are you wondering what they are for? The reinforcement pins are located at the top of the wall and are connected to the rest of the reinforced concrete ceiling. This way, the concrete ceiling will support the walls and will be more rigid and durable.
Smart Tip: You should always follow the construction plan, otherwise you may endanger your safety.
In this photo you can see the reinforcement of the structure around the stairs. You may have noticed that we used a lot of rebar around the stairs and along the walls.
Smart tip: These kinds of projects need to be carried out by qualified and experienced professionals, so you should learn the basic principles for yourself. We recommend that you hire an experienced architect and a team of qualified workers.
Basic concept
Methods for laying a concrete ceiling
There are several options for how to make a concrete ceiling:
- the slab can be laid in a single copy;
- several plates are involved, between which visible joints are formed;
- The ceiling is filled with architectural concrete.
Of course, it is easiest to work with one monolithic slab, because for future finishing of the ceiling, the seams between several slabs still need to be filled and processed accordingly in order to ultimately achieve a flat and smooth surface.
Processing with architectural concrete is an innovation proposed by the designers; it adds a touch of asceticism to the interior. However, not everyone will like such a bold decision.
Concrete plates
Advantages and disadvantages
The technology of pouring concrete pavement is especially in demand among European residents. Despite the fact that the pleasure is not cheap, the procedure has a number of significant advantages that outweigh the high cost of the operation. Under the influence of concrete, the building structure becomes rigid and can withstand a large load on the structure. A sufficient thickness of the concrete layer provides the house with the necessary sound insulation.
Unfortunately, pouring a ceiling surface cannot be done quickly, so decide whether you can afford a delay in construction. Such a procedure cannot be completed without erecting formwork, for which permission must be obtained in writing from the construction authorities.
Preparatory work
The necessary tools and materials should be purchased before the ready-made concrete solution is delivered. You will have to work quickly so that the concrete does not harden before the paving is ready.
So, in order to pour a concrete ceiling, you will need:
Tools for working with concrete.
- Shalevka or board. In case of a large area of filling, it is better to take boards with a thickness of at least 5 cm, for a small area - about 2.5 cm.
- Plywood. Needed to cover the surface for filling.
- Bars or logs. They will support the structure from below, giving it stability until the solution dries.
- Fittings.
- Welding machine for connecting individual parts of reinforcement.
- Mop with a long handle.
If you make concrete yourself, you will have to purchase:
- concrete mixer;
- shovel;
- buckets;
- cement, crushed stone, sand, water.