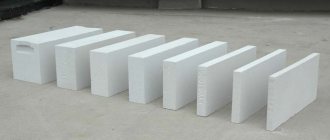
Aerated concrete is a modern building material, which is an artificial stone. The base contains natural raw materials. Insulation of aerated concrete is almost always carried out. Walls using these blocks have the qualities of vapor permeability and thermal conductivity. Before the process of insulating a house, it is important not only to select the material, but also to determine its thickness. Only then will it be possible to achieve a positive result, because if the thermal insulation is too thick, you risk overpaying, otherwise the barrier layer will not be enough to provide a sufficient level of thermal insulation inside the house.
One should not assume that it is better to abandon aerated concrete as a material for the construction of walls for the reason that it requires additional work to keep the house warm. Some believe that this causes additional expenses, because brick houses are often not thermally insulated at all. At first glance, this belief may seem true, but it is only partially true. After all, gas blocks have impressive dimensions, which means that the construction process can be carried out at a much higher speed, which allows you to save on the services of specialists and the cost of heavy equipment.
Is it necessary to insulate houses made of aerated concrete?
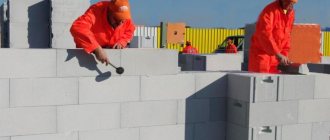
Insulation of external walls made of aerated concrete is not a mandatory procedure, but there are conditions under which such work is carried out. For example, if the construction was carried out without complying with the standards, and the seams turned out to be wide enough, the walls will have to be insulated. This procedure must be performed if high-density material was used during the construction of the building, and the wall thickness does not exceed 30 cm.
In order to subsequently save on insulation by laying it in a thinner layer, it is recommended to build a house using special glue. It is, of course, much more expensive than cement mortar, for the production of which you can use free river sand, but the glue itself is consumed in less volume. The seams are very thin, which means you won’t have to spend a lot on a thick layer of insulation, and it will require less mechanical fasteners.
It is also important to take into account the climatic conditions in the area where you live. Insulation of aerated concrete can be carried out externally or internally. Sometimes such procedures are carried out in a complex manner. In the first case, it is possible to move the dew point beyond the walls and eliminate the negative impact on the material when the temperature drops and rises.
There is also such a thing as cold bridges. They are formed in minimal quantities during external thermal insulation.
Is it worth disassembling the facade decoration?
Dismantling the existing facade finishing, its substructure, inspection and unpredictable repairs of thermal insulation in the frame are expensive and time-consuming processes. The removed facade materials are not suitable for reuse, which means significant losses.
But the choice of additional insulation method must be justified technically. If the house design with load calculations has been preserved, you should study it and understand how much weight the added layer will make the structure.
If there is no data, it is necessary to re-calculate the load capacity of the structure. Only based on these calculations can you choose insulation options.
What thickness of insulation to choose
If you decide to insulate your home using aerated concrete from the outside, you need not only to choose the right materials, but also to decide how thick it will be. When determining the last feature, it is important to take into account the region of construction, the final value of thermal resistance and the thickness of the walls, as well as the density of the material at their base. Last but not least, attention should be paid to economic feasibility. The material should be selected taking into account your budget and the ability to carry out work without the involvement of specialists.
But if your budget allows, and you still don’t plan to work on your own, then you can choose the insulation method in the form of spraying polyurethane foam. It allows you to create a very warm layer, which, however, will then have to be additionally protected with a layer of decorative finishing. But aerated concrete walls will already require additional protection and improvement.
Houses are built from aerated concrete, which can have a certain density. As this value increases, the thermal resistance increases. They correspond to certain regions.
For example, for Moscow this value is 3.28 m2 °C/W, while for Voronezh it is 3.12 m2 °C/W. In Magadan, the thermal resistance of the wall should be 4.33 m2 °C/W, but in Kazan - 3.45 m2 °C/W.
In order to determine the thickness of the material when insulating, you need to multiply the thermal resistance of the insulation by the thermal conductivity. If the final value was 134 mm, then you should choose a material with a more impressive thickness. For example, mineral wool is sold in 150 mm sheets. But if you plan to install a wet facade system, then the thickness of the insulation should be 100 mm, because when installing thermal insulation you will also have to apply plaster, install mesh and fasteners. At the same time, you won’t be able to save much between insulation with a thickness of 50 and 100 mm, but the work will be much more expensive.
Fire prevention technology
To reduce the possibility of fire of foam plastic and some other types of board insulation, it is recommended to use them together with mineral glass and basalt wool.
In the insulated surface, around window and door openings, instead of foam plastic, strips of non-combustible mineral wool are installed, eliminating the issue of spreading a separate outbreak to the surface.
The same narrow but effective delimiters of foam plastic boards are mounted at their joints - an excellent solution that makes it possible to use all the positive properties of combustible insulation.
Insulation of aerated concrete house outside and inside
Insulation of the walls of a house made of aerated concrete can be carried out from the side of the premises or the facade. It is a mistake to carry out such work immediately after completion of construction. When the house was built during the cold season, moisture could freeze inside the material, which would remain there immediately after insulation, and eventually destroy the walls. Therefore, it is important to leave them for a period until the moisture has completely evaporated. This exposure can last at least 2 months. Once the walls are dry, you can begin to form the insulating layer. Insulation of aerated concrete is usually carried out:
- mineral wool;
- polyurethane foam;
- penoplex.
In order not to wait such a long time after completion of construction and begin insulation work immediately, you need to ensure that the blocks remain in a protective film at the construction site. It is better to store them in a closed, dry place.
External insulation
You cannot leave an aerated concrete house completely without insulation, which is especially true when you live in a cold climate. When you have already decided that such work will be carried out without fail, you should think about whether to place the layer inside or outside. In the latter case, you do not take away free space from the internal area.
After carrying out such work, it will be possible to line the walls with any desired material. This can be plaster, siding and even facade paint. Insulating aerated concrete on the external walls also allows you to increase the energy efficiency of the house, reducing the cost of heating. After such protection, aerated concrete will last much longer, because the walls will be protected from negative influences. The house turns out to be more soundproof, and the facade is more attractive.
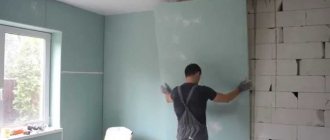
Insulation from the inside
Aerated concrete is often also thermally insulated indoors. The advantage here is that the work is much easier to carry out. You don't need specialists working at heights or equipment for this. But it is better not to carry out such work separately from external insulation, since the material will not be protected from the outside, it will become saturated with moisture, which will subsequently cause it to freeze and expand.
Traditional approach
In cases where it is undesirable to overload the facade due to the small safety margin of the house, it is necessary to dismantle the outer part to add insulation.
Disassembly
Careful actions during disassembly will help avoid additional costs:
- First, the exterior trim is removed;
- The base is dismantled;
- The counter-lattice is disassembled;
- The wind protection is removed.
- After adding the insulating layer, the restoration of the facade occurs in the reverse order.
Adding insulation
When access to the frame racks is free, a visual inspection of the frame filled with insulation is carried out. If construction defects or negative changes have been detected over the past period of operation, measures must be taken to restore the integrity of the insulation.
Perhaps these will be separate, not very significant, cracks in the junctions of the insulation and studs, or an increased gap between the insulation boards due to shrinkage - they must be carefully treated with polyurethane foam.
After this, beams equal in thickness to the insulation are sewn to the frame racks. As a rule, this is a 50 X 50 beam, for using basalt slabs of the same thickness. The technology is similar to the initial structure of the frame, the main thing in which is the absence of cracks and gaps. The façade is then restored to its pre-disassembly state.
If the facade was dismantled carefully and accurately, then some of the materials can be installed back. But practice shows that it is better to use new materials to restore the facade, and use the removed ones in less critical structures.
Mineral wool
External insulation of aerated concrete can be done with mineral wool. It is sold in slabs and, in addition to thermal insulation properties, also has sound insulation qualities. The material is ready to last for quite a long time, is fire resistant and environmentally friendly. The layer is resistant to rotting, microorganisms do not form in it. But the cotton wool itself will need to be additionally protected from moisture, since it allows water to pass through, which causes condensation to occur. If the layer gets wet, it will not only settle, which means it will open spaces for cold penetration, but will also create favorable conditions for the emergence of life in the walls, which often happens in private homes. Rodents will settle in the walls, and the cotton wool itself will no longer fulfill its role.
Acrylic plaster should be abandoned as a finishing layer, as it will also contribute to the formation of condensation.
Mineral wool insulation technology
Thermal insulation of aerated concrete with mineral wool is carried out in a certain sequence. The surface must be freed from dirt and mechanical elements, seams and irregularities must be filled, and potholes must be covered with cement mortar. If you want to make your walls even more thermally insulating, it is recommended to use masonry adhesive with appropriate characteristics during the construction phase. With its help, you can form the thinnest seams that will not become cold bridges. The mixture is selected so that it is able to withstand difficult operating conditions, periods of freezing and thawing.
Before proceeding with insulation, aerated concrete must be covered with vapor-permeable plaster in the area of defects. Its application is carried out on a previously primed surface. And to fasten the mineral wool sheets, a frame structure should be formed in the area of the base.
Beacons are placed at the corners of the building. The insulation layer is fixed with glue, which must be applied to the slab at the central point and along the perimeter. In order to distribute the composition over the entire area as evenly as possible, you should use a steel notched trowel.
When insulating, mineral wool must be laid in such a way that the rows of slabs do not move relative to each other. This result can be achieved by forming cross-shaped joints. For additional fastening, a mechanical method should be used, which involves the use of dowel umbrellas. They should be located in the center and in the corners of each canvas.
The aerated concrete is covered from the outside with mineral wool as tightly as possible. In those places where the canvases are connected to each other, there should be no gaps, since they can also become cold bridges, reducing the thermal insulation characteristics of the insulation layer. It may seem to you that mineral wool has an insufficient level of rigidity. This is true, but if you plan not to form a ventilated façade, but to cover the surface with plaster, you should purchase material with a sufficient level of rigidity, for example, marked PZh-175. In this case, the products will have a rigidity even higher than that of foam sheets, while serving as a good basis for the liquid mixture.
When insulating walls made of aerated concrete from the outside, you need to apply an adhesive solution to the thermal insulation using a spatula, sinking the mesh into the composition. Next, another layer of glue is applied on top of it. Openings and corners should be secured using perforated corners. After drying, the surface is covered with plaster, but a primer must first be applied. It is sometimes replaced with putty. The finishing layer can also be paint.
Prices for mineral wool
If you plan to use mineral wool for insulation, you should inquire about its cost. So, PAROC WAS 35 can be bought for 1100 rubles. per package. The thickness of the material varies from 30 to 250 mm. Density is 71 kg/m3. The operating temperature may be less than or equal to 200 ˚С. Another offer is PAROC Linio 15, for which you will have to pay 1300 rubles. per package. The density in this case is 90 kg/m3. The thickness is 150 mm and the length is 1200 mm.
Reasons for heat loss
The main problem of low thermal efficiency of houses is most often not the poor quality of wall insulation materials, but design and construction flaws:
- Insufficient thickness of the insulating layer; for the middle zone it should be at least 15 cm;
- The frame racks, which became a source of cold entering the house when they freeze, are not insulated;
- The insulation boards are loosely laid among themselves or in the frame cells, which allowed the formation of cold bridges;
- There is no moisture-protective layer or vapor barrier, which led to a decrease in the quality of the insulation;
- There are no ventilation ducts.
Expanded polystyrene
Insulation of external walls made of aerated concrete is often carried out with expanded polystyrene. Surface preparation in this case only involves removing irregularities that most often arise around the seams. If potholes appear during the construction of a house, they should be filled with cement mortar. If you still haven’t decided whether to use this particular material, then you should consider its positive characteristics, namely:
- affordable price;
- long service life;
- insignificant thermal conductivity.
After completing the work of insulating the walls with polystyrene foam, finishing materials, for example, plaster, can be applied to its surface.
Foam insulation technology
As soon as the walls have been freed from minor errors, they are coated with an antiseptic composition to prevent the occurrence of fungus and mold. This layer should dry well, a primer is applied on top of it to increase the adhesion of the materials. When externally insulating a gas block with polystyrene foam boards, an adhesive composition is applied to their back side. Ready-made powder mixtures are also suitable. Perhaps it is most convenient to work with liquid compounds or assembly adhesives, the latter of which are sold in aerosol packaging.
The outside air temperature must be suitable for the work. Typically this limit is in the range from - 10 to + 40 ˚С. There should be no wind, as the canvases have high windage and can break. You need to start working from the bottom, forming the first row. Then they begin gluing the remaining rows, moving along the perimeter. The plates should be pressed to the surface, placing them in a checkerboard pattern. Their position is checked using a level.
Adhesive for polystyrene foam
If you decide to insulate aerated concrete with polystyrene foam, you need to choose the right adhesive. When working with aerated concrete outside, it is important to take into account that the composition must be frost and moisture resistant. It should be able to withstand temperature changes well. For external work, adhesive foam, cement-polymer composition and bitumen mixture are suitable. The latter option contains a light solvent that is not capable of adversely affecting polystyrene foam. Such mixtures are very common; they are sold ready-made, which makes them easier to use.
Before use, the surface of the walls is dried and sanded. Then you need to apply a primer to the surface. The base must be freed from dirt and dust, as well as rust. It is convenient to use a comb spatula for application. With its help, an even layer of material is distributed over the back surface of the aerated concrete, and then the slab is attached to the wall of the house.
The cement-polymer composition can be used not only outside, but also inside. It is suitable for brick, cinder block and concrete walls. The glue attaches the insulation well, but requires deep priming. Such mixtures are sold in powder form, to which you will need to add water, which complicates the process somewhat.
Simple, inexpensive, reliable
Since money has already been invested in the facade and its insulation, the desire to make an additional layer inexpensively and with maximum return is fully justified. The most affordable insulation material is glass mineral wool. If you deviate slightly from the standard installation of glass wool between the laths, then the economical step-by-step technology looks like this:
- A vapor barrier is stapled to the existing façade. We proceed from the fact that since the room is cold, heat loss could occur due to a violation of the vapor barrier - therefore we perform the full insulation cycle almost all over again;
- Instead of wooden frame bars for installing glass wool, you will need: a metal framing profile; mounting angles for profiles, hangers, disc dowels;
- A profile selected according to the thickness of the insulation, usually 50 mm, is attached to metal corners along the perimeter of the surface to be coated;
- Suspensions, usually 4 pcs. on the insulation board, attached to the facade;
- A slab of glass wool is inserted into the groove of the profile and then cut through with hangers and fixed to them;
- A disc-shaped dowel is driven into the center of each slab for final fixation of the wool;
- Next, close to the surface, subsequent insulation boards are secured in a similar manner;
- Then the insulated facade is covered with a windproof film, which is attached with four disc-shaped dowels through the film on each slab to the surface of the facade;
- After completing the installation of the windbreak, profile posts are attached to the surface for installing siding cladding.
Additional insulation of a frame house with glass mineral wool can be done from the outside using OSB, moisture-resistant plywood, lining and other materials.
The surface of the facade must first be cleaned and leveled
Penoplex
Insulation of aerated concrete can be carried out with Penoplex. It is sold in the “Wall” variety and does not absorb water at all. The material has a high level of thermal insulation and is completely environmentally friendly. It is ready to last 50 years or more with proper installation and operation.
Many people are interested in whether it is necessary to insulate the facade of a house made of aerated concrete if the walls are of sufficient thickness. The manufacturer of Penoplex claims that this procedure cannot be avoided, because even 400 mm walls are not able to provide a normal level of thermal resistance.
Useful Reminders
Regardless of the type of insulation, the final finishing layer is necessary to seal the previous layers and decorate the facade of the house.
The higher the vapor permeability of the heat-insulating layer, the less likely it is to be destroyed by condensation.
The main technical and everyday requirement for insulation is fire safety. But often the choice is made based on the cost of the material - for example, polystyrene foam is 3-5 times cheaper than mineral wool. In such cases, additional fire-fighting measures can be carried out in the form of using fire retardants or combining flammable and non-flammable insulation.
The building insulation cake must be well ventilated using a ventilated facade so that the humidity inside the insulating layers is minimal.
Additional insulation must be done immediately after realizing that not all is well with the insulation system of a frame house, and installing an additional layer on the outside is much more convenient and expedient.
Prices for popular types of penoplex insulation
Penoplex slabs not only have excellent thermal insulation qualities, but also have an L-shaped edge, which allows the products to be effectively joined, eliminating the penetration of cold. Among the most common varieties, “Penoplex Comfort” should be highlighted, the thickness of which can range from 20 to 100 mm. For 20 insulation boards with the smallest thickness you will have to pay 1,520 rubles.
30 mm canvases are sold in a package of 13 slabs. The cost of this material will be 1326 rubles. If you have 100 mm products in front of you, then the package will contain four slabs, for which you will have to pay 1,356 rubles. If you want to insulate aerated concrete from the outside with penoplex, you can purchase the “Wall” variety. It is offered with a thickness of 50 mm, and 7 slabs will cost 1225 rubles.
Working with Penoplex
Insulation of aerated concrete with Penoplex is carried out using one of several technologies. Dowels can be used as mechanical fasteners. In other cases, these are wet methods, for example, using cement mortar, bitumen-polymer mastic, liquid nails or polyurethane foam.
The work involves five stages.
- First, the surface should be prepared by cleaning and sealing cracks.
- At the second stage, the sheathing is installed.
- The third stage is the starting bar and its installation.
- The fourth step is installation of penoplex.
- At the last stage you will need to seal the seams.
Prices for deep penetration primer
One of the important requirements that should be taken into account before carrying out insulation, regardless of whether mineral plaster is applied, polystyrene foam boards or mineral wool are installed, is the application of a primer. You can purchase NewStaR for 340 rubles. The composition is sold in a 10 liter container. After drying, a transparent film will be formed on the wall, which eliminates the ability of the material to absorb moisture. This will not only extend the life of the building, but also reduce the consumption of glue when installing thermal insulation.
If you plan to carry out work also inside, it is best to purchase “Optimist G106” primer in a concentrated version. For 10 liters you will have to pay 1900 rubles. The walls acquire the quality of moisture insulation, and such a layer can be used in conditions with high humidity. A universal composition is also the primer “VDAK-0181M” with deep penetrating ability. For 3 kg you will pay 162 rubles. This acrylic mixture is also excellent for interior work.
Complete solution
One of the effective methods of insulation is the use of ready-made thermal panels. The heat-insulating layer of the panels is formed by polystyrene foam or polyurethane foam, and panels of smaller thickness are made from polyurethane foam, the insulating layer does not exceed 40 mm.
There are many product options, but to complement the finished house design you need to select:
- The smallest thickness;
- The most inexpensive option for the substrate, the back side of the panel;
- The easiest and most acceptable option for outdoor decoration of products;
- Favorable price.
Insulated surfaces
It is a mistake to consider insulating the walls of a frame house as the only task facing a specialist.
In order for the finished house to maximally please you with warmth and comfort, the frame system must be insulated in all planes. Namely:
- floor;
- walls;
- ceiling.
It is this design and laying of the insulator in all planes that gives the maximum result in protecting the house from the cold.
I will say right away that I will not advise you to use polystyrene foam or use polystyrene foam. It's the same thing though. But I won’t talk about what density you should choose for cotton wool either. All this is in our previous materials.
But I will try to describe step by step how to properly insulate a frame house.
Sealing cracks and preparing sheathing
Preparatory work before installing insulation involves applying a protective primer layer , leveling the surface and softening the conductivity of adhesive transitions between blocks.
After this, several horizontal rows of wooden blocks are installed , the cross-section of which is equal to the thickness of the insulation.
After installing the mineral wool, they will serve as support for the counter-lattice strips necessary to provide a ventilation gap and for installing the outer cladding. The bars are pre-coated with a layer of antiseptic (twice) to prevent rotting of the material.
Installation of sheathing
As an option, instead of bars, you can use a metal profile for drywall . The guides are installed in the same order, attached to the wall with dowels and screws (necessarily galvanized).
The counter-lattice can also consist of drywall guides. The connection of vertical strips with horizontal ones is made using standard screws for a drill.
A variety of methods for using ecowool
The second most popular material for thermal insulation of frame buildings is ecowool. But here it is better not to experiment and entrust the work to professionals. Mechanized backfilling will ensure the required density and uniformity of laying. There are three methods of using ecowool:
- dry "spray";
- wet application;
- glue method.
The dry method is applicable for horizontal surfaces, inclined closed cavities, filling interfloor ceilings and non-demountable structures. The packing density of ecowool using this method is 45-65 kg/cubic meter. m depending on the slope.
Wet technology is suitable for vertical open walls. Ecowool flakes are moistened and applied to the surface under pressure. The density of the thermal insulation layer is about 65 kg/cu.m. m.
The adhesive method is similar to the previous one, but instead of water, an adhesive component is added. Advantages of the technique: high adhesion of the insulation to the wall, elasticity of the material and low deformation after drying. The adhesive method is indispensable for thermal insulation of flows from below; this option is also suitable for treating walls.
The issue of insulating a house needs to be thought through at the construction stage. This is more profitable from a financial point of view and technically correct. Structural elements are insulated as the building is erected, and there is no need to carry out major repairs to the building after commissioning.
Stage three. Waterproofing layer
Let’s immediately make a reservation that the installation technology for all materials is approximately the same. First, measure all the walls of the frame, then, in accordance with the calculations, cut strips of the material that was chosen for waterproofing. Attach the material to the posts using a stapler so that the frame is completely covered.
Self-adhesive penofol
We advise you to learn more about the technology of insulation using penofol, more details about which can be found here
Wall "pie"
Wall insulation with penoplex is carried out in different ways. One of the most common is the “wet facade”. This method includes mixtures and formulations that are prepared using water. They also use reinforcing mesh and primer. The result is a multi-layer insulated wall that does not allow cold air to pass through, without shifting the dew point.
Each layer applied in a certain sequence is important:
- The adhesive composition is prepared on the basis of water and a dry mixture. Penoplex is mounted on it.
- Penoplex slabs insulate and soundproof the building from the outside.
- Fiberglass reinforcing mesh is a strong connecting element. It promotes better bonding with the surface and also prevents cracks.
- Primer. Neutralizes, protects, promotes better adhesion.
- The facing material is a decorative element. It also protects the insulation from external factors.
The insulation boards are mounted tightly to each other. The glue must be completely dry before applying the next layer of cake.
Options for thermal insulation of rooms outside
To insulate walls made of gas silicate, you need to use one of two available options. They are:
- Wet facade technology;
- Dry facade technology (ventilated).
Let's consider each of the options.
Wet facade technique
It is not for nothing that the wet method is called, since it is associated with dirty and wet work. The insulation pie in this version looks like this:
- Wall made of gas silicate blocks;
- Insulation layer;
- A layer of glue into which the reinforcing fiberglass mesh is embedded;
- Final adhesive layer;
- Facade finishing (fur coat, bark beetle or other types of structural plaster).
Important! The layer of reinforcing mesh prevents the adhesive mass from cracking and peeling off from the surface.
Most often, beginners in the construction business resort to this option. It’s easy to do it yourself, especially if you have the skills to work with plaster. The main thing is to follow the technology and adhere to the recommendations. The entire process is performed exclusively in warm weather.
Ventilated façade technology
This method is somewhat more complicated and more expensive, but it is considered more reliable. In addition, the finishing layer is not limited to the use of plaster, but there are many options for finishing a house made from a gas silicate block. As for the insulation scheme, it is as follows:
- External wall made of gas silicate;
- A fastening system or frame made of metal or wood;
- Thermal insulation layer;
- Moisture-proof membrane or film;
- Ventilation gap, at least 4 cm thick;
- Decorative layer (wall panels, siding, metal cassettes, lining, imitation timber, etc.).
The most difficult thing in the work is to build a frame with precise alignment of the façade surface. If you do something wrong, unevenness will appear. The advantage of this method is the variety of options for cladding gas silicate walls, as well as the ability to insulate gas silicate walls at subzero temperatures (down to -7 degrees).