Monolithic curb is a new construction technology for creating low boundary structures that are poured directly at the installation site using special vibration-compressing machines or manually.
Initially, this technology began to be used in road construction, and then in the housing sector for the improvement of local areas, parks or gardening areas.
The monolithic method of pouring borders of any length, size and shape helps to quickly carry out landscaping of any territory, the main thing is to strictly adhere to the technological process.
What does the concept mean?
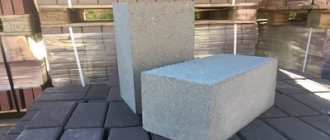
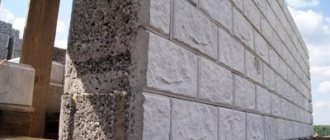
Monolithic concrete curb (MCB) is a fence for sidewalks and roads that delimit zones by appearance and functionality, which are made using seamless technology.
This method, due to the absence of seams increases the strength characteristics of the structure , since it prevents the flow of water between the elements, which can subsequently destroy their base. Such MBBs can be of any shape: rectangular and complex curvilinear.
Monolithic concrete curbs are considered to be extremely durable and at the same time inexpensive. And with the addition of plasticizers, gravel and sand, the mechanical strength of the product will only increase.
In addition, this design has increased frost resistance characteristics, it is not afraid of icing and snowdrifts, it is also easy to maintain and clean from road dirt.
This technology has become preferable for landscaping urban and garden areas.
What are borders for?
Borders carry not only an aesthetic meaning. Their functionality is much wider:
- borders limit the growth of plants beyond the borders of flower beds and flower beds;
- emphasize the style and combine flower beds and flower beds into a single ensemble;
- give the site a well-groomed appearance and neatness;
- serve as a barrier to accidental trampling;
- prevent soil from being washed away from the flower bed during watering and precipitation;
- help to divide the area into zones.
For the construction of borders framing flower beds and paths, various materials are used:
- plastic: inexpensive, resistant to temperature changes, flexible (which allows you to give the flower garden any shape), easy to install, a variety of shapes and colors;
- metal borders can be made of stainless steel, aluminum or copper;
- borders made of wood: boards, bars, pegs or cuts;
- clinker or facing bricks are well suited for paths lined with stone, paving stones, and paving slabs;
- curbs made of natural stone are durable, strong, the stones have their own unique color, but the material is heavy and has a high price;
- Concrete curbing is probably the most popular because it is durable, relatively inexpensive and can be made with your own hands.
You can learn more about plastic borders for flower beds...
In addition, thanks to all kinds of additives, you can paint concrete in different colors. And this is no longer boring dullness, but bright individuality.
Until recently, curbs were made by pouring them into molds or pre-installed formwork. But today it is possible to pour monolithic curbs directly at the installation site using special equipment. Moreover, you can frame flower beds of any shape, making the necessary bends.
Purposes of using edge stone
Features of the use of monolithic stones determine their strength characteristics, production technology and external shape.
They are produced single-sided , when with one finishing side, which is installed to the fencing area, and the back - to the ground, and double-sided, in this case they separate single-level areas, lawns and sidewalks.
The most commonly used cross-sectional shapes for products are parallelepipeds with straight, beveled or rounded edges. A simple rectangular shape is used in road construction, while curly ones are installed in parks or vegetable garden areas.
According to production technology, curbs on an industrial scale are most often produced by vibration casting or vibration pressing.
For projects of improvement of the territories of cities and towns, vibration-pressed products are more preferable in terms of characteristics, which are easy to install, have high strength parameters and frost resistance, which increases the service life of improvement objects.
Depending on the degree of load on the structure and area of application, monolithic curbs are produced in the following modifications :
- Road - the most popular modification, used for city and highway roads, as well as intra-block and intra-house driveways, they are not limited in length, this size depends on the volume of the curb-laying machine, and in height/width they have restrictions, respectively, not lower than 30/15 cm.
- Sidewalk , very similar in shape to a road one, but has smaller dimensions in height/width - 20/8 cm. Areas of application: in residential areas, in parking lots, parking lots, in private housing construction. Such an MBB simultaneously performs both a functional and decorative role.
- Garden , similar in size to sidewalk, can also have a different size of 15/10 cm, used for designing beds, garden paths and sidewalks in the local area. One of the varieties of these modifications is a special curb for a lawn mower, which has a lowered edge below the level of the lawn, which allows you to mow along the edge of the lawn without damaging the blades.
- Landscape 15/10 cm is used for the design of a site; it can be of any shape: waves or arcs and colors.
It is prohibited to install monolithic curbs on the roadway or other places where they will obstruct the passage of vehicles and the passage of pedestrians.
Side stone installation diagram
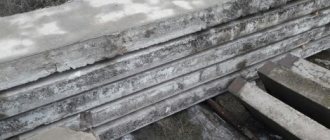
Side stones are installed on a freshly laid concrete base. Before installation, the ends of the curbs must be cleaned of dirt.
.
Beacon side stones are set
according to the marks made or using a level/tacheometer . Then, along a lighthouse cord stretched between metal pins hammered into the lighthouse side stones at a height corresponding to the mark of the upper edge of the stones, the remaining borders are set.
Photo: Installing a garden border
The borders are installed with the front side close along the stretched cord. Each stone is placed tightly in the concrete mixture
, paying attention to the tightness of the stones and the evenness of the outer and upper sides of the side line. If necessary, side stones are upset by blowing a hand tamper onto a board laid on top of the stone. In the case where the side stone cannot be leveled on top, concrete is selected from under the base of the stone. Subsequent side stones are laid over the original stone.
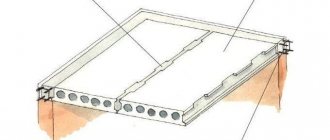
Fig: Installation diagram of side stone:
Check the horizontality of the top of the installed side stone using a level and the straightness of the side plane using the sights. The width of the seams between the side stones should not exceed 5mm
.
At the end of the inspection, the seams between the side stones are unstitched
.
Seams and joints between curbs must be carefully sealed to prevent washout of the underlying layer.
The seams are unstitched in two stages
: first coated on all sides with a cement mortar of a creamy consistency (1:2 solution) with a hole on top, which is then filled with a more liquid cement mortar (1:4 solution).
On rounded areas, curbs are installed in the same way as on straight ones, having first broken down the outline of the curve using a template made from a thin board or along a cord. On curves, use a special patterned (curved) side stone or shortened curb BR 50.20.8
(only for sidewalks and garden paths).
Photo: Using the curb BR 50.20.8 to create a radius path:
The correct installation of the side stones is checked using a batten and a cord. Side stones must lie firmly on the concrete base
, the line of installed stones should be straight in straight sections and have a smooth outline in curved sections.
Note!
Installation of curb stones must occur no later than 3 days before the start of paving work (installation of sidewalk coverings) in order for the concrete frame and mortar in the seams between the curbs to gain sufficient strength. Photo: Work on installing a border for a garden path:
Regulatory acts
Manufacturers of monolithic concrete curbs are required to produce the product in strict accordance with SNiP and other basic construction and architectural requirements.
The main act that establishes the requirements for the production, installation and operation of curb stones is GOST No. 6665, published in 1991.
The monolithic concrete structure must be poured from concrete grades B30/22.5 . In certain projects, it is allowed to deviate from the standard dimensions of the stone, provided that these changes are agreed upon with the road services and the company that is responsible for landscaping the area.
Parameters and characteristics
In order for monolithic concrete side stones to meet regulatory requirements, the organization that installs such structures must have quality certificates.
To obtain them, manufactured products must periodically undergo inspection and testing for such characteristics as strength, frost resistance, crack resistance, moisture absorption and compliance of sections with GOST requirements.
Based on the test results, monolithic concrete curbs must have the following indicators :
- High strength and wear resistance. These product qualities are obtained through the use of modern technologies and grades of concrete not lower than M450.
- Frost resistance and resistance to sub-zero temperatures in cycles from F 200 to F300.
- Hygroscopicity is important for concrete products so that they maintain the integrity of the structure during the natural crystallization of water, this is achieved by adding certain additives, its class is designated W, for monolithic curbs it should correspond to 4 to 6 kg/cm 2, which allows it to withstand water pressure without absorption - 6 kg per 1 cm2 of area, the use of plasticizers allows you to increase moisture resistance by 1 step.
- The nominal period of use is over 20 years.
Casting curb blocks
Like any other, this process has two main stages: preparatory and main. First you need to stock up on everything you need: reinforcement, concrete, molds for making blocks. Experts do not recommend purchasing ready-made dies, since they are often one-piece and removing the frozen workpiece from them is very problematic. In addition, they will not allow you to get non-standard figured elements. In general, the most reasonable thing is to make the casting frame yourself.
Ready-made shapes will limit your ability to give the border the desired dimensions
Making forms for borders
- We stock up on a sheet of metal with a thickness of 5 mm - it will become the bottom and give the top of the concrete blocks ideal smoothness. You can, of course, use chipboard or wood, but they need to be wrapped in thick film, otherwise the surface of the border will be rough.
- The sides are best made from perfectly planed and sanded lumber. If the size of the bottom sheet allows, you can place several formworks in a row with adjacent partitions - this will save materials.
- We take a couple of dozen self-tapping screws, metal corners and overhead plates for fastening the wooden parts together.
- We mark the locations of the sides on the sheet, drill a pair of holes in the metal for each sidewall and tightly tighten the wooden elements to the sheet with self-tapping screws. We fasten them together with corners on the outside and overhead plates on top.
- If we want to get a beveled or shaped upper part of the side stone, we need to screw a triangular block or a plastic shaped plinth at the bottom on one side.
- Keep in mind: the ratio of the width and height of the form should be in the range of 1:2 – 1:4. A very long and very narrow curb may break.
Rules for laying reinforcement
For narrow, low curbs, one reinforcement bar with a diameter of 10–12 mm is sufficient. For larger structures, it is necessary to weld a frame in the form of a mesh or volumetric embedded part from reinforcement or thick wire. There should be a distance of 2-3 cm between the reinforcement and the walls. Before reinforcing, lubricate the inner surface of the form with used machine oil, liquid wax or silicone - it will be easier to separate the hardened concrete from the wood.
The thickness and amount of reinforcement depend on the size of the curb stone
Taking on concrete
It is preferable to buy ready-made concrete with the required characteristics. The strength, durability and appearance of the curb stone will depend on its quality, and if you make it yourself, you can make a mistake in proportion or technology. As a result, your curb may begin to crumble within a year or two and will require replacement. Do you need this trouble?
However, if you want to make the solution yourself, go ahead!
- Mix well 1 part cement (M400) and 3 parts sand or 1 part cement (M500) and 4 parts sand.
- Add crushed stone to the dry mixture at the rate of 1 to 2 or 1 to 3.
- Add water to the consistency of very thick sour cream and mix thoroughly so that there are no lumps left. For this purpose, it is best to use a concrete mixer. If it is not there, you will have to do a lot of manual work.
If you don't have a concrete mixer, you'll have to work with a shovel
Subtleties and tricks of casting blocks
In general, working with concrete requires adherence to a certain technology. Making borders also requires this.
Fill part of the solution to the level of the reinforcement. Place the embedded structure in the mold and fill it completely with concrete. Level the surface. Now it would be good to place the future block on a vibration table to expel air bubbles. If such equipment is not available, just carefully tap the mold on all sides.
Place the workpieces in the shade or cover with a thick cloth and moisten it periodically. Drying of concrete should be gradual; if this happens too quickly, the finished product will crack. After 3–4 days, the molds can be unrolled, the frozen blocks can be placed in the shade and left to dry completely for another 5–7 days.
Over time you will learn how to create the perfect border
Tools and accessories for installation
There are two options for installing monolithic concrete stones: manually and using an extruder press machine. The set of tools that the performer will need for the job will depend on this choice. They differ from each other in that when using a press machine, a concrete mixer is not needed.
Extruders have the same type of equipment: Kohler 6.5HP Engine gasoline engine, gearbox and pusher. The machine is capable of laying 4.5 m of monolithic concrete stone 15x10 cm. For which you will need: cement-25 kg; sand -10 kg; gasoline -0.8 l per 140 m, plasticizer and dye.
Necessary materials and tools for manual production of MBB:
cement M450/500;- crushed stone up to 30 mm;
- plastic and steel reinforcement reinforcement D=6 mm;
- binding wire for steel reinforcement;
- washed coarse sand;
- plasticizer or liquid detergent;
- tap water;
- pigment dye;
- board, plywood or slate for formwork;
- fasteners and metal pins;
- concrete mixer;
- submersible construction vibrator;
- shovel;
- containers for transferring the solution;
- measuring set: plumb line, cord, tape measure and level;
- trowel and spatula;
- hammer and hacksaw.
Installation technology and rules
The main difference between the installation of monolithic concrete curbs and finished products is that their production requires a trench with characteristics exceeding the size of the stone in width from 5 to 10 cm, and the height must correspond to 1/3 of the height of the curb.
You can dig a trench manually or hire a trencher for this purpose - a universal machine for laying a product with a depth of up to 23 cm. After which the bottom is laid as evenly as possible with sand or crushed stone. If the shape of the curb must be curved, it is better to use an iron sheet for formwork, which has the greatest flexibility.
Technology for the production of monolithic concrete curbs in the local area:
To create the formwork, pins of large diameter steel reinforcement are driven into the trench along its sides.
This will ensure the required rigidity of the formwork structure. The formwork must be rigid and strong to prevent concrete from leaking out.- Install a formwork board or other acceptable material, such as slate or plywood.
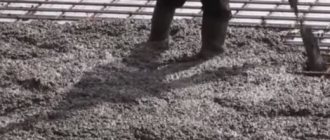
- The pouring solution is mixed in a concrete mixer. The working mass from M450 is made in the ratio: cement/sand/gravel - 1/2.5/3, and for M500 - 1/3/4. First, 1/2 of the required portion of sand and crushed stone is poured into a concrete mixer and mixed thoroughly for 3-4 minutes.
Then cement and the rest of the sand and crushed stone are added to the resulting mass and mixed dry again for 5 minutes.
After this, the plasticizer is diluted in the required volume of water in the proportion specified by the manufacturer or a regular liquid detergent and the resulting solution is gradually added to the concrete mixer until the concrete reaches the desired thickness. To create colored borders, add a pigment of the desired color to the water.
- If necessary, lay the reinforcing layer in the formwork.
- Pour the solution into the formwork on the side of the path. In this case, the filling height will be slightly higher, which should correspond to the planned height of the product.
- Next, they begin to compact the mixture; it is best to do this with a submersible construction vibrator, which squeezes water and air onto the surface as efficiently as possible, thereby compacting the poured mass. If there is no vibrator, the mass is pierced with a metal pin, quickly moving from side to side, but the pin must be pierced and lifted from the mass slowly.
- After pouring, the surface of the product must be smoothed well.
- The monolithic border is covered from exposure to the sun, then periodically moistened with water for at least 7 days.
When making a monolithic border, its upper part can be decorated with pieces of tiles or similar decorative elements.
Difficulties, errors and their consequences
Difficulties and errors when making a monolithic concrete curb occur when the contractor incorrectly prepares the work site for installation, since such an object is always installed in a trench in the ground with a thickness of at least 1/3 of the thickness of the stone.
This size is calculated from the level of the laid underlying pillow of at least 10 cm.
The main mistakes that performers make when making a monolithic border:
- The installation was carried out separately from the laying of paving slabs, the integrity of the structure was compromised, such a path would crumble very quickly.
- The trench bottom was not compacted.
- The pins were not installed during the manufacture of the formwork, which is why the strength of the structure is very weak.
- The reinforcement was not performed or was performed in violation; steel U-pillars were not installed in the underlying layer perpendicular to the reinforcement.
- Poor vibration of the concrete mass in the formwork, many air voids.
- The concrete surface is not leveled with a spatula.
- Improper storage of the product in the first 3 days: in the open sun and without sprinkling with water.
Construction of the underlying layer and concrete base
To indicate the longitudinal line of installation of the curb, a cord is pulled. A rectangular cross-section trench with a bottom width of 0.4-0.5 m is torn along this cord. The depth of the trench depends on the design position of the top of the side stone (at the same level as the paving or higher), but must be at least 0.3 m.
A leveling layer of fractionated crushed stone or sand is placed along the bottom of the trench, which is leveled and compacted.
Photo: Preparing the trench
“Light” sidewalk or garden borders are installed on a sandy base.
(brand
BR.100.20.8, BR.50.20.8
), when they should be at the same level as the sidewalk surface.
In all other cases, side stones (road, highway) must be installed on a crushed stone base
.
For the construction of the underlying layer are used
:
- medium and fine sands of class II (according to GOST 8736)
- sands from crushing screenings of class I according to GOST 31324
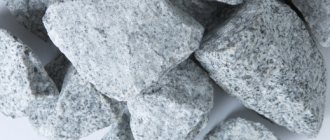
- crushed stone fraction from 20 mm to 40 mm, crushability grade not lower than M600, thickness h = 0.10 m
It is not recommended to use a dry sand-cement mixture for the installation of the underlying layer.
.
Since the underlying layer is not load-bearing, the use of binder (cement) in its construction does not provide any advantages. In addition, the use of cement can be an additional source of efflorescence
- the appearance of white spots - on the surface of paving slabs.
The underlying layer material is distributed over the surface of the base manually or mechanically. When pouring the underlying layer, you should have a reserve thickness for vibration planting of stones
.
The amount of this reserve depends on the shape and size of the stones and the material of the underlying layer. It is installed locally. For a sandy base, the margin is ≈ 1.0-1.5 cm
.
It should be taken into account that after installation of stones/tiles, the surface of the paving should rise above the top of the side stone by approximately 0.5 cm as a reserve for settlement of the pavement during operation.
Fig: Paving should be 3-10 mm higher than the level of side stones:
A concrete base is installed on the prepared underlying layer (when pouring monolithic concrete, prefabricated formwork from boards is used).
The construction of the concrete base is carried out manually, by laying and leveling fine-grained or heavy concrete
class B15 (M200) to the bottom of the side stone.
Pros and cons of using
Monolithic curb stones do not differ from factory ones; if they are made in strict accordance with the Technological Map, then they will be able to show all their positive qualities in operation.
Advantages of monolithic concrete curbs:
extremely durable, their manufacture requires building materials that are available in sufficient quantities on the market;- temperature resistance to sudden temperature changes and other weather influences;
- traditionally strict appearance;
- budget cost;
- easy care and manufacturing technology;
- accessibility for self-installation.
The disadvantages of MBB include the need for trenching and formwork work.
Average creation costs
To determine the average cost of producing a monolithic concrete curb, it is necessary to take into account all the costs of materials and work.
The cost of the work is influenced by the qualifications of the craftsmen, the availability of high-performance machines and tools, the complexity of the form, as well as the functionality of the borders: garden from 95 rubles/running meter; road - from 180 rubles/l.m.; sidewalk - 150 rub./running meter
Initial conditions:
- Concrete for laying MBB - strength class B30 concrete M-400.
- Concrete consumption per 1 m of border measuring 20x8 cm is 0.016 m3 0.043 cubic meters. m.
Consumption of building materials per 1 m3 of M400 concrete:
- Cement M 500 – 400 kg
- Crushed stone 10 mm – 1300 kg
- Washed sand – 650 kg.
- Board for formwork 20 mm 1 m.p. — 0.01 m3
- The cost of cement M 500 – 6700 rub./t
- The cost of gravel 10 mm is 3815 rubles/t
- The cost of river sand is 650 rubles/t.
- Board for formwork - 10960 rub./m3
Cost of materials for the production of 1 m of monolithic stone:
- Cement – 0.016 m3 x 0.400 x 6700 = 42.88 rub.
- Crushed stone - 0.016 x 1.33 t x 3815 = 81.18 rub.
- Sand - 0.016 t x 0.65X650 = 6.76 rubles.
- Total: 130.82 rub./m.p.
- The cost of work for a sidewalk curb is 150 rubles/m.p.
- Total total cost: 130.82+150= 282.82 rub./m.p.